
“I am MasterBoner, the Bone-ist of Bonedor”
INTRODUCTION
Hey guys,
As some of you already know, my approach to GD is wildly different than most. I spend a lot of time testing top builds to try and see every corner of this game’s possibilities, and I make very few endgame builds myself. Most of my time is spent doing HC runs that function like roguelikes, in that they are fast-paced, reckless, and just wildly different than most people play this game. I try to use underused leveling skills and that led me to trying a DW Oppressor with two Bonescythes, RF for consistent DPS and sustain, and BH nukes every few seconds. It was a super fun build, and when I heard that 1.1.9 had buffed the damage of BH (increased % Weapon damage scaling with rank to 270% by rank 16, 330% by max ultimate rank), I knew I had to make an endgame version.
Thanks a lot to @mad_lee for providing a lot of useful advice on optimization and making the build shine, and to @grey-maybe for providing additional useful insight regarding WPS and the like (as he is making a similar build rn that you should all check out soon!)
Special thanks to @Nery for his Bone Appetit! Vitality CDR Bone Harvest Oppressor, that made me fall in love with BH in the first place.
THE BUILD
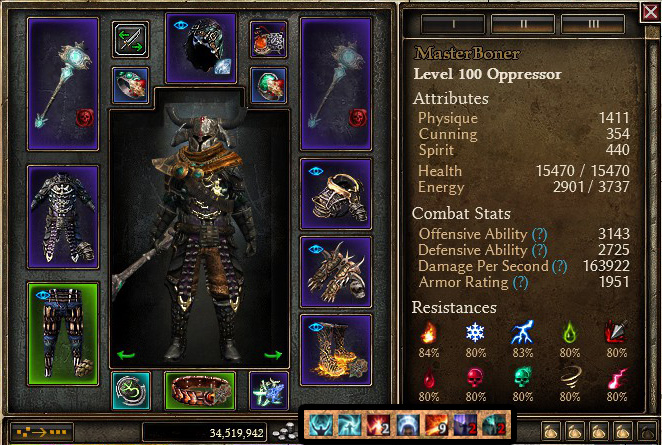
GAMEPLAY
This build has a very pretty look to the skill rotation, which is something I can appreciate, and functions rather simply. When engaging a new mob, cast Aether Corruption, and then auto-attack with RF, using BH nukes when they’re off of cooldown, and try to keep Ascension up when you can. You then have Siphon for some additional -RR and sustain, and Mark of Torment for harder mobs/bosses/nemeses. Just note that the ADCtH is extremely high, both statically, and from all of the additional proc sources, so it’s imperitive to just keep attacking.
GEAR
Scion of the Screaming Veil is the star of the show here; providing us with our conversion to aether on RF and some nice attack speed
The Bonemonger Set is key to this build’s functionality, and should not be tampered with
Magelord Rings are a nice boost to aether and provide one of the triggered effects that both make this build look cool, but also functions as an additional WPS source, which this build thrives off of
Ghol’s Reach provides some additional sustain, empowering our nukes and making them healing bombs
Serenity Relic is perfect on melee builds and provides us with some excellent defensive options
Other slots are not as crucial, and I’ve tried several medals, pants, etc with varying results. Greens are not required with these specific affixes, so there is no need to panic over farming the perfect drops
DEVOTIONS
Devotion map is a collaboration between myself and @Fretheo and provides a ton of sustain with Bat+Scales and some great -RR from Widow+Revenant
For the inevitable person asking the path: Green > Bat > respec Green > Jackal > Blue > Sailor’s Guide > respec Blue > White > Lotus > Kraken > Widow > Lion > Panther > Scales of Ulcama > respec White > Eel > Red > Revenant > respec Red > Spear of the Heavens
LEVELING
Although it is definitely possible (and fun) to level this build in a similar way to how it plays in the endgame; I have not written an extensive guide for it, so I would suggest looking at the legendary builder, @Nery’s Beginner’s vitality Ravenous Earth Oppressor with leveling guide as it is extremely thorough and well written. The build will have to level as vitality, regardless of if you used my version or his, so it’s entirely relevant.
PERFORMANCE
This build seems to do well with most of the game’s content, and although I didn’t push particularly hard, a skilled pilot could definitely push deeper SRs
Slev1n’s 5:37 CR Run (5:29 buff timer)
Crucible run in 6:06 (5:59 buff timer)
THANKS
Thanks to @mad_lee, @fretheo, and the Grim Dawn community. Special thanks to @Slev1n for his godtier piloting skills!
 GD stash is obvious but kinda easy to figure out a more reasonable spec as you mentioned. There are two very similar builds posted on the forum before, Duchy and RektbyProtoss have almost similar specs (but I think one of them went without RF)
 I leveled with it.