some builds/setups requires more attention from the player side than others, being aware of fight mechanics and boss attacks/effects. There are many/several types of situations or attacks where the player must respond correctly, or it can result in death. This can then vary more up/down depending on the build/how sturdy a build is or how many layered defences it has.
*i notice OP didn’t take Mirror here which i personally don’t understand as it would be a great helping defence situationally.
Direct examples i can mention, aside from obviously Sunder debuff (red spikes around screen edge), not only should the Sunder debuff itself in many cases be avoided/evade before the sunder attack land or prevent the sunder attack, but specific attacks too just based on their dmg.
- Ben’Jahr the Colossal has a “stab” attack with all arms, this applies sunder but can also potentially hurt itself. He also places obsidian clusters that explodes, which also apply sunder; but the dmg hurts itself too, so should be avoided.
- Aleks has a slow falling Meteor rock that should be avoided.
- Grava’Thuul has a homing orb/projectile attack that will remove your buffs for 3 seconds, but also does big dmg; this orb should be avoid or lured into objects to be destroyed.
- Iron Maiden does a blitz attack she triggers outside close range; it must be avoided because it hits hard (and applies sunder) or prevented from triggering by being in close range.
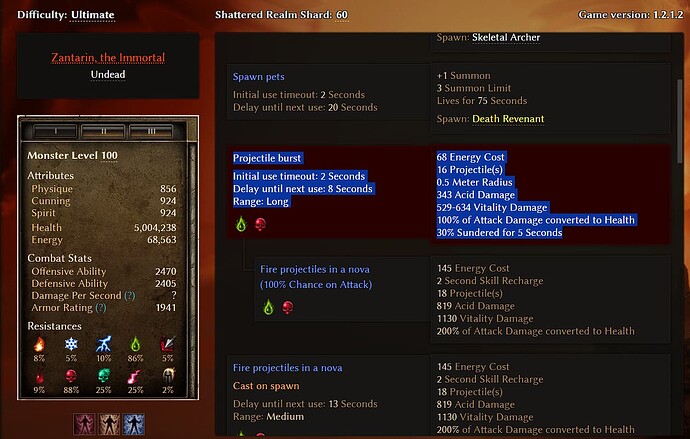
- Zantarin has a 16projectile shotgun attack, again triggered by distance, must be avoided or prevented from triggering
- etc etc etc etc for many many bosses,
they have specific or special attacks that must be learned and avoided/prevented depending on the strengths or weaknesses of a build.
It’s also important to know when/where to pull so you’re not fighting multiple Bosses in boss room, or fighting too many trash mobs in chunks.
Some chunks will also feature static traps (like the crystals), but a trap can also be hidden until triggered like the Volcano traps, which can be hard to see if you’re fighting a surround fight with traps and the screen is “covered” in effects. These Volcanoes can hurt a lot.
Generally don’t stand in pools, puke or ground effects.
Until you become more experienced and familiar with the game/enemies/attacks/debuffs, i’d simply recommend taking it very very slow to pay attention to what when and where things are happening or your deaths start to occur. If then it’s possible to look up the enemy to see their attacks or ask for direct help and tips to the more specific troublesome scenarios
*on this particular build i’d atleast also personally recommend reallocating 1pt into Mirror of Ereoctes, as it can be used to survive.
