Build Intro:

Couldn’t resist experimenting a bit more with the Mythical Decree of the Circle of Five which was (and still is) my favorite item in Grim Dawn. Given that it has very good physical damage scaling, it felt almost natural to incorporate it with the The Spellscourge set for a unique playstyle.
Image Source: https://www.artstation.com/artwork/OyWOAg
Pros & Cons
PROS
- Good trash / mob clearing
- Works best at melee / range
- Respectable damage output from mid range
- Reasonably tanky (Overguard can technically be permanently active)
- Does quite well vs champions / bosses
- Relatively High Offensive Ability (Up to 3,700+)
- Great Mobility
CONS
- Not the tankiest build there is (I opted for more offense)
- Losses effectiveness when engaging from long range
- Devastation skill can be blocked by uneven terrain / environmental barriers
Leveling
For leveling, I referred to this guide [1.1.9.0] Pure Soldier [HC] Beginner Forcewave 1-75 Leveling Guide + Endgame Options and Class Combos
There are other ways to get to level 94, but an Obsidian War Cleaver with decent affixes and suffixes is extremely easy to farm. Most notably, it grants a significant damage bonus to Forcewave which turns it into a devastating skill.
Before moving on, here is how I recommend distributing our skill points following each Level Up:
- 2 points into Soldier / 1 point into Arcanist (Level 2 - 50)
- 1 point into Soldier / 1 point into Arcanist (Level 51 - 90)
- If you are done with the soldier tree, then focus completely on the Arcanist Tree
Soldier tree Skill allocation is as stated in the guide, though you might want to consider these options from the Arcanist Tree as well. The bolded skills should be prioritized:
- Iskandra’s Elemental Exchange (one point)
- Overload (12 / 12, you want this for the Aether resistance + Offensive Ability)
- Mirror of Ereoctes (one point)
- Maiven’s Sphere of Protection (3/12 at first, then gradually max it out when you are done with leveling the soldier tree)
- Inner Focus (Really good source of Offensive Ability
The linked guide gives a lot of good advice for gearing. And as for devotion pathing, you may follow the above guide or continue below for my choices which pertains to this particular build (Recommended, since it allows you to level up your celestial powers sooner)
Once you have hit level 94, please continue reading and prepare to respec your skill points.
Build

Battlemage, Level 100 (GD 1.1.9.6) - Grim Dawn Build Calculator : Final Build
Attribute points- Physique / 47 Cunning / 60 Spirit / 00
The playstyle for this particular build can take some getting used to, but is relatively simple once your muscle memory has had the time to get into the swing of things.
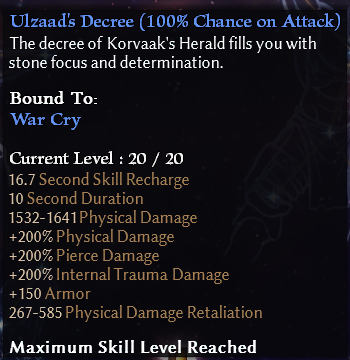
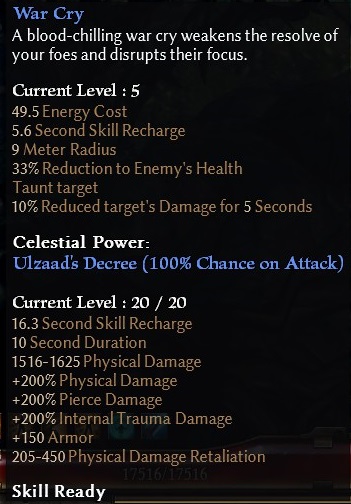
Your main combo should be to close in to short / melee range and attack with bone lance, while activating Doomforce + Devastation as much as possible. I choose to bind ‘Ulzaad’s Decree’ to War Cry ; turning it into both a buff and debuff. Given that Ulzaad’s Decree has a lengthy 16 seconds (give or take) cooldown, I only recommend using it when you need that extra burst of damage. So for trash / common mobs, you should stick to the ‘Bone Lance + Doomforce’ combo, with the occasional Devastation thrown in when you can nail most of the group at once; Save War Cry for when you really need it.
As mentioned earlier, Overguard can be permanently active- This build gives it a 13 second duration, with a cooldown of 8.5 seconds (As shown in my game, and as of patch 1.1.9.6). Meaning that you can refresh it before the complete duration runs out. It is tedious, but if you can handle all the button pressing then feel free to run around with overguard always on.
As far as tanking goes, feel free to keep taking hits if your health bar doesn’t budge. But if it goes down even slightly, then you might want to move back / kite around a bit while engaging with bone lance and devastation until your HP has been replenished through life steal, before going back into melee range.
For the sake of comparison, you may look at Battlemage, Level 100 (GD 1.1.6.1) - Grim Dawn Build Calculator (From RektbyProtoss) and [1.1.9.3] Devastating Spellscourge Battlemage, Max Block Cooldown Tank (Video) - Both of these alternative builds are vastly tankier, while mine is geared more towards offense. Feel free to tinker around with your own build until you find the desired balance of offense and defense.
Devotion Pathing
- Yellow Crossroads
- Assassin’s Blade (Bind to Bone Lance)
- Empty Throne
- Blue Crossroads
- Sailor’s Guide
- Ulzaad, Herald of Korvaak (Bind to War Cry)
- Lion
- Tortoise (Bind to Presence of Might)
- Scales of Ulcama, 4 nodes towards the right (Bind to Maiven’s Sphere of Protection)
- Toad
- Azraaka, The Eternal Sands (Bind to Doomforce)
- Complete Scales of Ulcama, 2 nodes towards the left
- Dryad (One node only for Acid Resistance)
- Dire Bear (Bind to Devastation)
- Refund Blue Crossroads
- Refund Yellow Crossroads
- Owl
- Green Crossroads (For Offensive ability, but you can put this anywhere you want)
Final Words:
To be completely honest, I have an existing Battlemage that was downright tanky, but it also didn’t feel fun at all to me since it had the killing speed of a turtle. So I guess you could say that this was an effort to remedy that. Sure, it might not be able to ‘spank and tank’ on a consistent basis, but the increased killing speed really makes up for it. I mean - Dead enemies can’t hurt you - Killing things faster essentially means that I’ll need to tank a lot less damage in the long term, which kind of justifies the cost. But yeah, different strokes for different folks ; The myriad amount of choices I managed to include in this guide alone means that there’s tons of room for customization.