Disclaimers before we get into things:
- Tested in Crucible? No.
- Tested in SR? Yes; see below.
- GDStashed? No.
- Beginner friendly? The concept is I guess. The gear isn’t though.
- Is this the best this build can be? No. It’s suboptimal, as advertised.
- Why? Optimality is boring and there’s already build posts for it.
People don’t change; times do.
Grim Dawn has changed a lot over the years, but my preferences haven’t really. I still prefer to play Cadence, just like I did in 2016. I still prefer to do it dual-wield, too. And my favorite weapon in the game is still as it was back then - Earthsplitter. I hadn’t made an Earthsplitter Cadence build in a while, though, mostly because Earthsplitter is…well…bad.  But it’s funny what some toying around in grimtools can do for inspiration - I finally decided to put together something as closely resembling my old Earthsplitter Battlemage from GD’s younger years without putting together a pile of poo. The result was…satisfactory on paper and fun to play in practice.
(Some cosmetics from the upcoming Loyalist Pack!)
Grimtools (<-- Click)
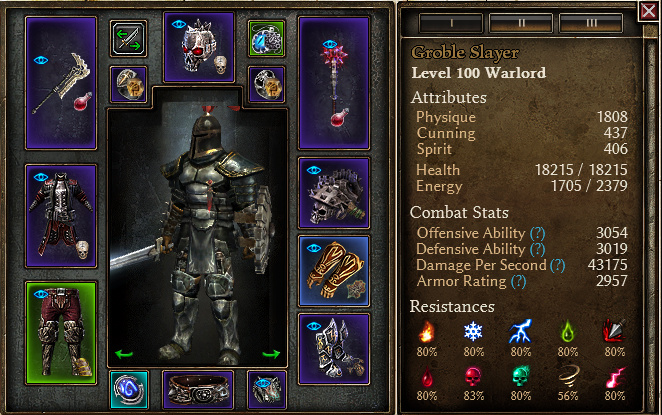
Nothing fancy here, just Cadence and a metric butt-ton of raw stats behind it. We’ll go over the individual skills more after a leveling discussion…
Leveling
It’s not how you start, it’s how you finish.
As usual, I won’t be putting a whole leveling guide here because I’m not of the belief that this is the place for it. I will, however, offer some general tips, like don’t level with Oathkeeper, for instance…
Instead, level with untransmuted Forcewave, using a 2-handed weapon. This would qualify you for Tremor, but don’t use Tremor. Shoot for this by Level 30: https://www.grimtools.com/calc/0V0WoER2 (This is reachable by 28/29, enjoy the flex points)
You can power through the game relying solely on the DoT Damage from the Internal Trauma modifier for Forcewave. Tremor would reduce the damage this DoT does without enabling it to stack with itself, and would make you need to invest in some energy regen in Devotions/gear to sustain the spam. With untransmuted Forcewave, you can go full-offense while leveling and focus on kiting enemy attacks as your means of survival. Between the DA/Armor from Field Command, the Health from Military Conditioning, and the panic heal from Menhir’s Will, your kiting will be more than sufficient regardless of your luck with gear.
Max Internal Trauma before maxing Forcewave, but get at least enough points in Forcewave until you reach IT that you can reliably 1-2 shot mobpacks in Act 1. Rending Force is for the extra range, nothing else, and Blitz for mobility. That essentially rounds out the entirety of the theory of leveling with Soldier. Do not level with Cadence.
Dipping into Oathkeeper at some point and maxing Presence of Virtue can get you reliably critting when combined with Field Command’s OA as well, and you’ll get more DoT damage too. Do this after attaining the skilltree in the first paragraph of this section. Going War Cry/Break Morale next and then pumping Oathkeeper to Celestial Presence/Divine Mandate can carry you until level 70ish, with plenty more flex points as well. Spec into Cadence whenever you’re comfortable tanking melee hits/have the gear for it.
Devotion-wise, level with Hawk + Bat/Twin Fangs. Good offense and good sustain, even if you’re not scaling the damage types in the long run. % Damage is insignificant anyways while leveling, so you can take anything you want, but Twin Fangs is a heal. Tsunami is likely going to be the most practical AoE DPS while leveling, but doesn’t heal you.
Endgame
I am inevitable. -some dude with a glove
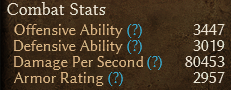
A lot carries over from the leveling setup, except of course we swap from Forcewave to Cadence. The big thing (that isn’t that) is that we take Ascension at one point and max Clarity of Purpose. CoP is your bosskiller, your CC-immunizer, your…everything. You don’t have 100% uptime on it, which means you need to learn how, when, and why to use it. Many of my builds max Ascension and one point CoP so as to focus on getting the most Damage Absorption out of Ascension in a defensive mindset. But this build gets its defensiveness elsewhere, which we’ll go into later. This build uses Ascension to kill something that really, absolutely, simply has to die soon…or to up our cleartimes.  Lets look at some examples. Many of these are shown in the above gameplay video.
Benn’Jahr - 50%. You’ll kill him well before your Ascension ends from 50%.
Valdaran - 50%, like Benn’Jahr.
Fabius - After the first Blade Barrier. He won’t see a second.
Iron Maiden - Just before or just after her heal pops.
Zantarin - Whenever, do it at the start of the fight and just flatten him.
Moosilauke - Whenever on Phase 2.
Aleksander - Whenever. Not a very dangerous fight. In SR, all that matters is killing his crystals when he spawns them and dodging the meteor.
Grava - After a nulli projectile. It can conceivably be worth tanking the projectile early, as your buffs don’t improve your defenses too much. So tank nulli -> kite to toggle buffs -> Ascend and smash him.
Reaper - 50%.
Kaisan - Use Ascension when he spawns a Crystal so as to kill that Crystal immediately. He shouldn’t survive long enough to summon more than one.
Kymon - Use when he reaches about a third of his health. Kymon’s Enrage occurs at 25%, but ideally you want to take it from 26%+ to 0% in as short a span of time as possible. Don’t take risks in trying to be super-efficient with him; CoP will give you more than enough damage to kill him before his enrage can be dangerous.
Korvaak - Get a damaging rotation (War Cry, 2 autos + 2 Oleron’s Might’s, Cadence) off as soon as he enters Phase 3, then use Ascension when War Cry is about to come off cooldown. Ideally, you’ll kill Korvaak before he temporarily goes invulnerable during his third phase for one of his multiprojectile attacks - I was not so lucky in the above video.
Alkamos - Use when the second rimefire pool appears. This can take some practice to get used to the visual cues if you let them overlap. You want the Freeze res offered by CoP to sustain your DPS throughout Alkamos’s enrage, which should come up around the time he gets two rimefire’s up.
Shar’zul - Fairly similar to Alkamos: Use when the third Fire Tornado appears. This is Shar’zul’s most dangerous, spikey “phase”, and similarly also about when his enrage triggers. Ascend to annihilate him as quickly as possible.
Overlord Van Aldritch, etc. - Use when a bubble fades away to instakill a target. Ideally, they’ll all fade away at about the same time and you’ll be able to take them out altogether.
Gargabol - After the first round of Volcanoes in Phase 2. You’ll want to make the most of your Ascension without being interrupted by their spawn, so do it while they’re on cooldown.
Now, let’s talk tank and why this build is so braindead. We have lifesteal - a lot of it. 4% is usually enough to satiate most autoattackers, and we walk around with three times that. Moreover, we’re a Warlord, which means we have Haven and Resilience - two things that can give us % Increased Healing Effects, which for some reason includes lifesteal in what they buff. And, of course, like a good autoattack we have Ghoul for when shit hits the fan, which will trigger alongside Resilience. This means that, in practice, we can attain dumb-tier levels of Lifesteal approaching about 140% ADCTH in practice in dire situations. That’s enough ADCTH to heal us to full against Mogdrogen from a regular autoattack without any procs or Cadence strikes whatsoever. Hence why it’s a good thing we’re all but CC-immune while Ascension is up…
But it doesn’t stop there! We’ve also got traditional Warlord-levels of Armor (3k) (more with procs), Warlord-levels of DA (3k) (more with procs), and Warlord-levels of Damage Reduction (100% Uptime with War Cry as well as yet more Reduction with 2x Oleron’s Mights should we be jumped by any new foes while War Cry is on its very-short cooldown), and Warder-levels of Health (18k). Combine all of this with the Slow Resistance offered by Decorated Soldier and Divine Mandate, and we essentially can’t be stopped by almost any single entity in the game. Except Ravager/Callagadra. They still hurt.
List of things this build has facetanked:
- Mad Queen
- Mogdrogen
- Kymon
- Kaisan (ish, needing to kill a Crystal)
- Every roguelike endboss/campaign endboss
- Every single Clone of John Bourbon at once, including the Actually Final Form, without killing them ‘strategically’.
- Lokarr
- Almost everything else one can think of.
List of things this build can’t handle without excessive kiting:
- Overfed Maggots
- Crate
- Ravager
- Callagadra
And that is quite literally it.
Now let’s talk SR.
It is a widely-held belief that dualwield builds cannot last in the Shattered Realms. This is fucking wrong. This build has successfully completed several SR75-80 runs. I won’t say they’re done without issue, because they aren’t. Yes, Dualwield does struggle with SR boss shards, but it is not impossible. It just requires immensely more piloting experience, even starting as early as SR40. I do not recommend taking this into SR if you’re a new player. You must have an understanding of what enemies are dangerous in what situations, and what their tells look like or sound like for certain attacks.
That being said, you can absolutely push this build and your own skills to their respective limits in the Shattered Realms, and the feeling for doing so is exhilarating.
Everything mentioned in the Ascension/Clarity of Purpose section needs to be considered at all times as you’re fighting multiple Nemeses at once. Aleks’s crystals become far more important to kill, and Kaisan’s will remain your utmost priority even still. Many of these bosses spawn adds of a sort, be they immobile plants/crystals or what have you. When they do so, that indicates a change of pace for the encounter: When an add is alive…
- You must not be attacking a boss.
- You must not use Ascension.
An add introduces additional ambient damage to an encounter that will chip away at your survivability but poses as an entity of low-life-leech resistance, meaning you can very reliably heal to full off of them without expending any real resources. (This does not apply to the aforementioned crystals of Kaisan/Aleks, nor to those from Moose/Benn, as they have 500% LL Resist. Crate pls nerf.) Save your Ascension for any of the myriad of kill-opportunities mentioned above, using it only when you know you can absolutely eliminate a battlefield threat. If you cannot do that even with Ascension, do not use it, instead kite between attacks and sustain yourself off the plants Gargabol spawns or the Skeletons Moose spawns, etc.
/walloftext
Questions? Comments? Concerns? Ask away.

 )
)
