Introduction
(this section will repeat between my build overviews; you can skip to Build Concept if you’ve read one of my overviews before and are familiar with my rating system and test criteria)
Patch 9.8 brought, among other things, major changes to the Shattered Realm. Given that SR is where I do my endgame build testing, with the release of the patch I decided to redo all the testing for all my builds. And since I’d be putting in the time and noting down all my results anyway, I thought I might as well post the builds and their scores publicly for others. Who knows, maybe you’ve been thinking of trying something similar and are curious if it even works. Or maybe you’re just morbidly curious and like that tickly feeling in your brainhole when you see someone play something utterly stupid.
Now, what exactly does this testing entail? Each character has to do 10 SR75-80 runs (I used to do 5 runs but I’m expanding it to 10 for this second wave). Every run completed within timer counts as a success. It takes 6 successes (over 50 % success rate) for me to consider a build complete. If a build keeps failing to meet that quota, I keep improving it till it works. Ergo, no build I post here will have a lower score than 6/10, because if it doesn’t have over 50 % success rate, I’m not done improving it and it doesn’t get posted.
Three rules were followed to make the results more representative:
- no consumables other than healing and energy elixirs can be used;
- no shrines can be taken; if a build has bad resists, it’ll have to make do with bad resists, Rattosh isn’t gonna be saving its ass;
- no mutator hunting; if I get shitty mutators, I’ll have to succeed with shitty mutators.
Other than that, it doesn’t matter in what manner the runs are completed. If a build takes twice as long to finish a run than others do, that’s perfectly fine as long as it successfully finishes. Doesn’t matter whether the build has to dodge Nemeses in shards like the plague or whether it hunts them for sport, doesn’t matter if it has to kite like crazy or stands its ground with ease, doesn’t matter if it completes the runs deathless or not. Only thing that affects the score is completion within timer. Generally, a weaker build that is slow, fragile, hard to play etc. will end up with a lower score regardless because its shortcomings will affect its reliability across the 10 runs.
Now, two final things before we get to the build itself:
-
As mentioned in the title, this is a build overview, not a build guide. What’s the difference? Well, a build guide says “this is the way you should build this type of character”. What I’m saying is rather “this is what I did, here’s why I did it this way, here’s how it turned out”. It’s more of a documentary, a post-mortem, rather than an example to be followed. “Wait, that’s just a fancy way of saying you make shit builds,” you might say. No, not exactly. I try to make a strong character without deviating from the concept of the build. But the concept of the build might not necessarily be something one should even be doing in the first place
 While my build concept and the in-game support will often align to create a reasonably predictable, almost cookie cutter build, just as often I’ll just be doing something abundantly demented for my own reasons. I’ll always endeavour to explain in the Build Concept section why I chose to do a thing a certain way, but I don’t want you to get the impression that what I’m presenting is a thing you should necessarily be doing.
 -
I’m also by no means hyperfocused on optimising the crap out of a build once it’s in a workable state. There will almost always be things to optimise on my characters, but frankly, I prefer spending an hour theorycrafting a new character rather than shuffling an existing character’s devo tree, gear, component and augment setup just to squeeze 5 % more damage out of it. I don’t care that much.
With that out of the way, let’s get to the build itself.
Build Concept
When Diablo 2 was releasing its first previews, a PC gaming magazine I read at the time showcased this image:

So when AoM was released for GD and I saw that there were melee WPS skills for the Necromancer, I got so excited my head nearly popped off my neck like a cap from a toothpaste tube. After nearly two decades of waiting to turn that concept into reality, I was gonna have my damn melee Necro and nobody could stop me!

Setup
Now, the question was, how exactly to go about it. The Necro mastery had the two WPS in Reaping Strike and Necrotic Edge. One dealt Vitality+Aether damage, the other Vitality+Cold. Another key skill on the Necro tree, and the one that ended up dictating my direction for the character, was Bone Harvest. While not a melee skill per se, its final node boosted Vitality and Cold damage dramatically for use in weapon attacks. So I decided to ignore the Aether side of the mastery and focus on Vitality and Cold alone, as at least one of them was present on either of the WPS and both were on Bone Harvest. However, while Necro was providing a good deal of Vitality support, it did hardly anything for Cold outside of the aforementioned skills. There was no RR, no passive damage bonuses, no extra flat. And so, to do for the Cold side of the character’s damage what Necro was doing for the Vitality side, I decided to add in Nighblade, with its Cold RR aura and %Cold damage bonuses (and some Vit as extra on Anatomy of Murder). I would then gather whatever Cold + Vit scaling gear I could find (which, pre-FG was fairly little) to boost both sides of the build. The one final issue left to solve was that there was no default attack replacer on either tree to capitalise on the WPS. Not to worry, Shard of Beronath was there to save the day.
This was the original approach to the build. But if you’ve already scrolled down and clicked the GT link, you’ll have noticed that a lot has changed. At the time of the character’s creation, the WPS approach seemed like the only option. But that was long before patch 1.1.9.1. With 9.1 the Uroboruuk’s Reaping relic had the cooldown on its granted skill removed. And while, at the time, the relic was dealing split Aether and Vitality damage rather than Cold, it still seemed like a far better option than using Beronath’s Fury with flat Physical and Elemental damage on it and relying on poor WPS coverage to solve any AoE issues. Therefore, I specced out of the Necro WPS that inspired this build in the first place, and slotted in Reaping Arc as the main attack. Some time after that, Reaping Arc had its Aether damage removed completely and the build was safely nestled in its Vit/Cold approach.
Due to the way I rotate through my characters, it wasn’t until quite some time after the release of Forgotten Gods that I finally got around to finishing the build for endgame and replacing any placeholder gear I was using. And it was a good thing I had waited that long. Because with FG and its subsequent challenge dungeon came the perfect set of gear to support this build: the Morgoneth set. Full Vitality+Cold support on all pieces, tailored to Reaper. It provided Vit rr to the Nightblade side that was missing it and Cold rr to the Necro side that was missing that. Perfection. But why stop at the set. We need Vit+Cold support on our other slots too, after all. So along came the Morgoneth pants and boots to complete the outfit. With that, the vast majority of the gear was solved. All that was left to decide was the belt, the jewelry and the weapon. For the weapon, I wanted something that would support both damage types, even if it wasn’t necessarily dealing both. After FG came out I was using a Reaping Halberd as a placeholder for its Bone Harvest support. But it was hard to argue against the allure of Soulrend. Support for both damage types, juicy +2 to both masteries, and an unreasonable slab of lifesteal.
Now for the jewelry. The medal was fairly simple. Since it’s not exactly possible to boost Reaping Arc through direct item modifiers, I had to look for modifiers and bonuses for what was left, Ill Omen, Bone Harvest, Spectral Binding, Veil of Shadow or Pneumatic Burst. The only two options on medal were Dreadchill Mark and Undying Oath. While Undying Oath does boost both damage types and Dreadchill does not, there really was no contest there. Dreadchill had attack speed, which was missing from both the gloves and the weapon, had better resistances (what use is having just Cold resist on Oath without any other elements?) and it had points for both Night’s Chill and Soul Harvest, providing a good chunk of flat damage, % damage and RR that Oath simply cannot rival.
Now, the matter of the amulet is a bit sad. Originally, I was using Reaver’s Hunger. However, in patch 9.6, Deathbound Amethyst has been buffed in the amount of damage it provided to Bone Harvest. With that, it now surpassed Reaver’s Hunger in both flat damage and range on Bone Harvest. Moreover, it gave +2 to Bone Harvest, which allowed me to hardcap the skill, while the extra point to Bone Harvest has just been removed from Reaver’s Hunger in 9.8, i.e. this patch at the time of writing. Why is that sad? Well, the idea of the build was to go 50/50 on Cold and Vitality damage. And yet, the weapon of choice is dealing solely Cold damage. Reaping Arc has been (deservedly) nerfed in its flat damage as time went on so that the Vitality it’s dealing isn’t anywhere close to what the %WD is doing. Both the medal and now also the amulet add flat Cold damage, not Vitality. All the damage mods for Ill Omen work with flat Cold damage and give only a pittance of Vit Decay in comparison. And the amulet is converting damage on Bone Harvest, the one place where we could have had that 50/50 split, away from Vitality into Cold. Granted, Reaver’s Hunger would doing to opposite globally as of the changes in 9.8, but that would at least be bringing things more into balance. As it is, the build ends up leaning towards Cold way more than I would have liked.
The ring slot makes that even more apparent. The first thought would naturally be “let’s get RR rings”. But with two damage types to cover and zero overlap on RR between them, RR isn’t nearly as efficient as it is on single-typed builds. In addition, with the above gear (and the devo route) already in place, putting on the ideal RR rings of Band of the Eternal Haunt and Signet of the Fallen does a real number on the build’s resistances. There is, however, one very thematic combo that covers the resistances very well. The legendary Alkamos ring set. Flat damage, the right resists, a slab of OA, total speed, which the build can definitely use with its lack of AS on weapon and gloves, a nifty damage proc to pile onto all our other damage procs from set, pants, boots and weapon, just, everything a growing girl needs. And it even sports Pierce to Cold conversion to give us 100 % convo on the weapon proc. And yeah, it only boosts Cold damage and provides only flat Cold damage. le sigh But hey, at least we’re very thematic. All the slots that can be filled with Alkamos or Morgoneth gear are filled with Alkamos or Morgoneth gear ![]()
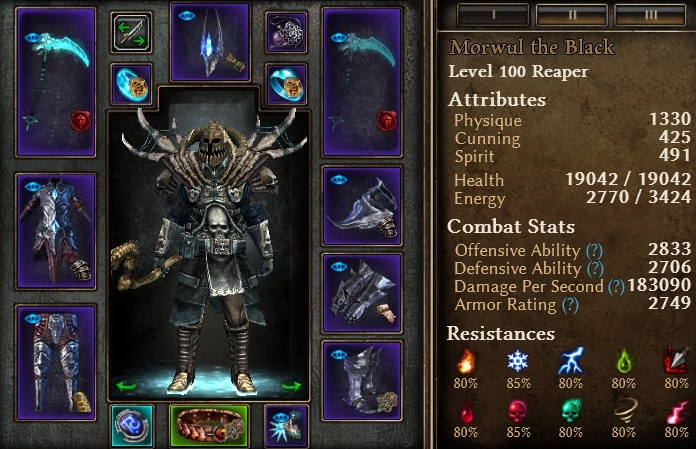
I then finished off the setup with a Necro belt (since that’s the mastery where we get the most of our damage). I fished for a green Necro belt that would support at least one of the build’s damage types, as none of the purple ones were doing quite enough on the resist front for my needs. And yes, it ended up boosting Cold damage only, of course. This is the setup I ended on for this testing:
1.2 UPDATE: no major changes to skills and item modifiers, but the build has gained about 20 OA and an incredible 180 DA! Phys res has gone up by 1 % somewhere, probably some change to a devo caused that. Build does 80-81 without issue, could probably do 85+.
Performance
(DPS is for Reaping Arc with all perma buffs, Pneumatic Burst and Soul Harvest active)
10/10
Hmmm…yummy yummy success. Now, there are 10/10s and there are 10/10s. This is the latter. It’s not like my Fire Retal Commando or Tri-Elemental Beastcaller Conjurer that just breeze through SR80 like it’s Wightmire on Normal. The build’s not invulnerable or unstoppable. It’s not even super safe like the only other 10/10 I’ve posted so far, the Black Scorch Witch Hunter. It’s just very strong, quite fast and very slippery. It can most definitely die though, and it has died on me a few times across these 10 runs. But as long as you don’t get a time-waster Chunk in the same Shard, like the Splendors of the Shattered Realm room, levers, Seeker of the Damned or Gazer Prime, you’re very likely to recover like I have.
The build is very mobile through access to two mobility skills (this time I learned my lesson from my Blademaster and did take Shadow Strike as my approach strategy; originally I wasn’t using it here either) and it has two Oh Shit buttons in Mark of Torment and Blade Barrier, allowing it to squeeze through some very nasty encounters indeed. You’ll see a showcase of that in the SR80 boss room below. It was by FAR the sweatiest SR80 boss room I had across these 10 runs. It doesn’t normally go like this, I promise ![]() Those adds are just gonna add sometimes. As for defenses it has a good chunk of health and armor, and while its phys res could be higher, it does have 30 % DR. There’s no permanent absorb on the build but there is a good bit of evasion (even if that doesn’t work on everything) plus melee fumble from Circle of Slaughter. The lack of absorb and reliance on dodging does, however, mean the build can take quite a lot of surprise damage at times and timely use of mobility and both Oh Shit buttons is required to keep it alive at times, particularly if Ill Omen happened to spread like the plague across the map and pulled all the rowdy natives at the same time.
Those adds are just gonna add sometimes. As for defenses it has a good chunk of health and armor, and while its phys res could be higher, it does have 30 % DR. There’s no permanent absorb on the build but there is a good bit of evasion (even if that doesn’t work on everything) plus melee fumble from Circle of Slaughter. The lack of absorb and reliance on dodging does, however, mean the build can take quite a lot of surprise damage at times and timely use of mobility and both Oh Shit buttons is required to keep it alive at times, particularly if Ill Omen happened to spread like the plague across the map and pulled all the rowdy natives at the same time.
The build’s damage is very solid. Even though sheet on Reaping Arc shows mere 180k DPS, there’s a chonky Bone Harvest coming out every 2 seconds or so, Ill Omen actually does respectable damage thanks to all the flat gained from the Morgoneth set and does a good job of not only crowd controlling mobs through the confuse but also wiping out the trash. Reaping Arc, in the meantime, satisfyingly chunks through groups of heroes or tankier champions and is no slouch on single target either. In terms of difficult foes, there really aren’t any. The build has a good amount of anti-human damage so even though Fabius does a decent job of resisting our mostly Cold-leaning damage output, he doesn’t feel sturdy at all and our two defensive buttons make easy work of any bursts of damage or leech downtimes he can create. Of the Nemeses, the only two notable ones are Kubacabra and Moosilauke, as they both sport high Cold and Vitality resistance. With Kuba, there is not much that needs to be done other than relocate once the healing pools start piling up a bit too much. There’s no danger at any point, it just takes a wee bit of time to kill the bastard, is all. It’s still not particularly slow as both our RRs reach to around 100 (Cold actually gets to exactly 100, Vitality just slightly under). As for Moosi, that’s actually where our split damage gets to shine. Normally Cold builds want to tear their hair (say that 15 times fast) out because of the stupid crystals they can’t hurt (still kinda hoping this relic of the old D2 “monster immunity” philosophy gets patched out one day). But since we’ve got Vitality damage flopping around on pretty much all our skills and on a number of our various procs, we can actually just stand our ground against Moose and let the crystals die to our various auxiliary Vitality effects while we’re just focusing down Moose. Other than that there is no SR boss worth mentioning. Everything dies, and pretty fast too, and nothing really threatens us with our assortment of defensive tools, if used appropriately. The one main weakness of the build overall, I would say, is the complete lack of slow resist. Doesn’t really matter against Reaper cause he’s dead so damn fast, but it can pose some issues in various hero clusters, like Timewarped with arcanes in the mix, where the reduced mobility can cause some issues with repositioning.
As usual, I’ll leave you with the SR75-76 and SR80 parts of one of my runs. While normally I’ll try to post a run that is the most representative of the build’s usual performance, this time the first run I recorded ended up being the most memorable of them all and by far the sweatiest and scariest one I had because of that SR80 boss room mishap. Seemed like a pretty nice way to showcase the shit this build can get itself into at times, and how its suite of tools can provide the perfect paddle for that shit’s creek. It is worth noting that if I bit the dust there, I still had around 9 minutes on the clock and could easily salvage the situation in the second round.

