
Introduction
I am a simple man.
I like fire.
I like hitting monsters with stick.
This build hits monsters with fire sticks.
→ Dual-Wielding Fire Strike Shieldbreaker (GrimTools) ←
Strengths and Weaknesses
- Easy to gear
- good single target DPS, with potential to become amazing single target DPS
- solid AoE for a melee build.
- solid mix of life leech and HP regeneration
- good movement skill to zip around
- not a lot of buttons to press
However
- Glass cannon. I made it as tanky as I could, removing some of the “glass”, but also some of the “cannon”. You can deal way more dmg if you are okay playing something that dies every so often.
That’s really it, the build is just a really soild starter with no huge downsides, apart from not being super tanky.
Build Mechanics
The build's main skill is Fire Strike. We use it to attack in melee, while dual-wielding some strong weapons boosting it's potential and converting all damage to fire damage.Fire Strike works with attacks that trigger from “default weapon attacks”, so called “weapon pool skills” (WPS).
These WPS have a chance to trigger on each strike and enhance the basic Fire Strike.
Unfortunately Oathkeeper only provides us with Smite as a usable WPS, which means we need to get more from our gear.
In the end the budget version has about 60% chance to trigger a WPS, with better gear the chance can be improved to about 100%.
Shieldbreaker provides some strong reduction to enemy fire resistances with Thermite Mines and Guardians of Empyrion. The Guardians are minions that have a passive aura, the mines have to be placed around the monsters.
For defense we rely on a number of passive procs, life leech and some passive HP regeneration.
Ascension is a buff, which provides a little extra defense and offense, when we need it.
Lastly, we can pull in and debuff (some) enemies with Judgement.
TL;DR: Put down Mines and start hitting monsters with your fire sticks.
![]()
![]()
General advice for new players
- Do all the quests, at least on your first play-through. They give you reputation with factions and keep you on track to level 100. Some also provide extra skill and stat points.
- Explore the map, especially if it’s your first time playing. Finding stuff like shrines is quite important.
- Prioritize resistances first, damage second
- Use crafted components from the smith to fix missing resistances
- Use 2x Scaled Hide (crafted) in pants, chest or shoulders to fix your armor absorption
- The inventor can recover components from your outdated gear, whenever you swap to a better piece
- Additionally to components, you can apply augments, which you buy from the faction vendors. They also sell great gear and blueprints, for leveling and even late-game setups.
Faction choices
-
I recommend being friendly with Kymon’s Chosen first on this character. They have some useful leveling gear that can help around level 40.
- You can switch sides later, after reaching Revered and buying their augments, blueprints and mandates
- this works best if you already have a Mandate from another character.
-
I prefer Cult of Bysmiel on normal, for the Emblem of the Leaping Mantis. If you desire a different movement skill, the choice is all yours. You will level up all cults eventually.
-
Friendly or hostile with Barrowholm, both work. (Friendly if you want to test your mettle vs Ravager)
-
Outcasts do not matter much, do as you please.
Progression through the game
You start as Demolitionist.
While you can start to level immediately with Fire Strike, I do not recommend it.
Instead, advise reaching at least level 25, before using Fire Strike.
This level will unlock some of the key items to make Fire Strike strong. ![]()
I recommend leveling with Blackwater Cocktail through the first act and a portion of the 2nd act.
Stat points are mostly invested into physique to wear armor at the start, cunning and spirit only when you stats to equip jewelry or weapons.
In the end, almost all points will be in physique, to make the build a bit more tanky.
Devotion progression is included in the GT links, open the devotion tree with (S) (D) and then scroll through the bar on the bottom.
Items used will usually drop along the way while questing, or are purchased from faction vendors.
Farm an upgrade for your green items, if the level falls too far behind (~15+ levels).
When you reach level 90+ you can put in some extra effort to farm a version of these items with good affixes.
Fill all the other item slots as you see fit.
Especially during the first act, any items with resistances and maybe some elemental damage will suffice.
Normal difficulty progression:
(links lead to the map with the drop location)
Act 1:
Items to pick up:
- any 1-handed scepter or dagger with fire or elemental damage bonuses. Check the vendors, if you need an upgrade, any cheap yellow item will do.
- for the other hand, any yellow or green off-hand effigy with fire or elemental damage bonuses, for example Kyzogg’s Skull from the first quest
- Shambler’s Heart in the Flooded Passage. You need the level 18 version or higher, to have the skill bonus for Flame Touched on it. (If the dropped amulet is too low level, come back in a new session at a higher level)
- Buy the blueprint for the Bladesworn Talisman from Devil’s Crossing (at the faction vendor) and craft it with the brain from the act boss.
Act 2:
- Martin’s Crest from Moneybags Martin
- Incendiary Casque from any of the goons around Cronley’s Hideout and Martin himself
- Incendiary Shoulderplates from the same sources
- Kilrian’s Skullbreaker in the Arkovian Undercity - you will need 2 copies of this mace (start a new session to farm Kilrian again)
Don’t forget your components, most of them crafted at the smith.
– Level 25 Snapshot before respec –
– Level 25 Snapshot after respec to Firestrike –
Leveling for 1-25 -- Act 1 & 2
Leveling up in order:
-
5 points into Demolitionist
- 5 points into Blackwater Cocktail
-
Demolitionist to 10
- High Potency node in BlackwaterCocktail
- 5 or more points into Vindictive Flame
- Blackwater Cocktail to 10
- 1 point into Flame Touched
-
Demolitionist to 20
- 1 point into Vindictive Flame
- 1 point into Temper
- Max out Blackwater Cocktail and softcap Demon Fire (12/12)
-
Demolitionist to 32
- Vindictive Flame to 11
- remaining points into Thermite Mine
After handing in the last quests for Devil’s Crossing (Cronley’s Gang), you should have enough reputation to buy their blueprints. If you are a little short, you can farm the mine (and Martin) a bit for extra rep.
When you have farmed 2 Kilrian’s Skullbreaker and crafted Bladesworn Talisman:
RESPEC (at the NPC in the top right corner of Devil’s Crossing)
- remove all points from the Blackwater Cocktail skill
- max out Fire Strike (22/12), softcap Explosive Strike (12/12)
- put three points into the “Searing Strike” node in Fire Strike
Act 3-4:
Shopping list:
- Gollus’ Ring from the Deepdweller (one is enough and not mandatory)
- Solael-Sect Legguards (You have to start the quest “The Hidden Path” by blowing up this barrier with Dynamite and slaying the boss there)
- Harvest Footpads, Harvest Grips (buy those from Homestead faction vendor as soon as you have the rep)
- try to get a good roll for offensive ability on the gloves (3%)
- Devil’s Chestguard (sold by Devil’s Crossing)
- Chosen Pauldrons (sold by Kymon’s Chosen) or Devil’s Spaulders (sold by Devil’s Crossing)
- Chosen Cord (blueprint sold by Kymon’s Chosen, crafted at the smith)
- get an updated Kilrian’s Skullbreaker or two
- Bloodlord’s Vengeance can drop right in front of the final boss. It has 50% drop chance, if you don’t get one first try, you can try to farm it later. It’s not needed for the boss fight.
-
(optional) Kymon’s badge, if you need chaos resistances (sold by this hidden vendor)
-
buy the blueprint for Oleron’s Blood (sold by the Black Legion) and craft at least 1, put it one one of the two weapons
-
If you are having energy issues, crafting an Arcane Spark (blueprint sold by Black Legion)
With some extra components we are ready to take on the boss:
– Level 40 Snapshot –
Leveling for 26-40 -- Act 3 & 4
-
Blastshield to 5 or more
-
1 point into Static Strike
-
max out Thermite Mine
-
Oathkeeper to 5
- 1 point into Presence of Virtue
- max out Smite
-
Oathkeeper to 10
- 1 point into Resilience
- 1 point into Vire’s Might
Now, with Bloodlord’s Vengeance, almost 100% of physical dmg is converted to fire, and Fire Strike is boosted by Kilrian’s Skullbreaker and the helmet.
Oleron’s Blood, the relic plus Smite enhance Fire Strike with weapon pool skills.
DLCs and prep for Elite/Ultimate:
Items to get:
- One or two Living Rings, either from any plant monster or bought from Vinelton
-
Legion Greaves, Chestguard and Pauldrons (sold by the Black Legion)
-
updated Martin’s Crest, Incendiary Casque, if you haven’t already picked some up
– Level 50 Snapshot –
Leveling for 41-50+ -- DLCs & Elite prep
-
Oathkeeper to 15
- 8 or more points into Haven
- 1 point into Ascension
-
Oathkeeper to 25
- a few points into Rebuke
Elite & Ultimate
- On your trip through Elite, update all gear to versions of the current level
- at level 70, if you have the faction rep, buy Elite Legion Greaves from the Black Legion
- Otherwise, you should have the Homestead rep to buy Elite Harvest Foodpads or Greaves.
- Gloves should probably be Elite Harvest Grips from Homestead, unless you find great gloves with a lot of offensive ability or attack speed.
- If you have the Rover rep, you can also buy Elite Rhowari Grips for attack speed
- At level 65, you can wear Malmouth Aetherblaze Vestment (sold by Malmouth Resistance) and either Coven Arcane Spaulders or Coven Arcane Mantle (sold by Coven of Ugdenbog)
- to upgrade your relic, you can buy the blueprint for Bladedancer’s Talisman from Hyram in the Steelcap District.
- he doesn’t always sell the blueprint, but you can reset his inventory by portaling away and returning after a few seconds
- the upgrade takes three Manticore Eyes, those are best farmed in the first portion of the Ancient Grove, I find (up to the boss at the locked gate)
– Level 75 Snapshot –
Leveling for 50-75 -- Elite, Prep for Ultimate
-
Oathkeeper to 50
- 1 point into Clarity of Purpose
- 1 point into Guardians of Empyrion
- max out Celestial Presence
- 1 point into Divine Mandate
-
in Demolitionist:
- softcap Flame Touched
- remaining points into Vindictive Flame
Level 90+
After hitting level 90, it can be worthwhile to start farming for some upgrades.
Ultimate equipment setup:
- Weapon 1: Kilrian’s Skullbreaker, with a fire or elemental prefix (Tyrant’s is another great prefix) and a suffix with attack speed (“of Alacrity”, for example)
- Weapon 2: Bloodlord’s Vengeance until you get to the 2nd half of Ashes of Malmouth
- Weapon upgrade: In Ashes of Malmouth, we get a guaranteed quest reward that is part of the final weapon setup: Blazeheart
- prerequisite is to bring Dahlia her diary in Homestead
- after you have completed that and unlocked the way to Malmouth, Dahlia will wait in Mourndale
- complete her quests to gain this phenomenal dagger
- Helmet: Incendiary Casque, preferably with the Overseer’s prefix so stun resistance is not an issue
- Chest: Elite Malmouth Aetherblaze Vestment (from Malmouth Resistance) or Elite Bysmiel Flameshroud Cuirass (from Cult of Bysmiel) or Galakros Singed Plating (farmed from Galakros)
- Shoulders: Elite Coven Arcane Mantle
- Gloves: Crafted Plagueguard Grips with attack speed and useful stats (blueprint drops often from totems around level 85+)
- alterntively Mythical Obsdian Grasp
or Mythical Turin’s Grips (if they drop)
- alterntively Mythical Obsdian Grasp
- Pants: Solael-Sect Legguards
- Boots: Crafted Stoneplate Greaves (blueprint from totems)
- some blue boots can also be fine, for example Mythical Final March (drops all the time)
- a lot of purple boots with fitting stats might drop as well.
- preferably you get some slow and/or freeze resistance on your boots.
- Rings: Gollus’ Rings will be good, but farming a good pair might take a while.
- Malmouth Arcane Seal can be bought from Malmouth Resistance at “Honored” standing
- Once you have a blueprint for the Elemental Harmony set, you can craft two of those rings and transmute one into the second part of the set (see chapter: Transmutation)
- Amulet: Vilgazor’s Heart from the fire crab in the locked part of the Ancient Grove. Mogdrogen at the entrance will give you a free key and you can craft more, to farm the crab.
- Medal: Martin’s Crest
- Belt: Malmouth Arcane Girdle (blueprint from Malmouth Resistance) or the Chains from Watcher Ordas
- Relic: Bladedancer’s Talisman until you find the blueprint for Blademaster’s Talisman
- as soon as you find the blueprint for Seal of the Void, you can use it to replace the Enchanted Flint for a big dmg boost
Leveling to 100
-
In Demolitionist
- max out Flame Touched
- softcap Temper
-
Demolitionist to 50
- max out Brimstone
- Blast Shield to 10/12
- softcape Vindictive Flame
-
in Oathkeeper
- softcap Rebuke
- Divine Mandate to 8/12
- 1 point into Tectonic Shift
- 1 point into Judgement and Crushing Verdict.
-
Remaining points into Static Strike, Vindictive Flame or Divine Mandate.
I usually drink a Tonic of Reshaping to reset my attributes as well.
Every point that isn’t needed in cunning or spirit, to wear gear, goes into physique here.
(For me, that meant full physique dump.)
End of Ultimate: – Level 100 snapshot –
Augments for the final setup
Our desired augments are sold by all factions at ‘Revered’ standing. If you play through all three difficulties, you’ll reach that rep either late in Elite or after you have done their quests on Ultimate.
If you buy and read a “Writ” after you reach Honored with a faction, you will get bonus reputation for your future actions. Strongly recommended.
Various armor augments are used to fix our resistances, until they are all ~30% over the maximum cap, ideally.
After we have reached our desired overcaps, we can use Solael Bloodbinding (Cult of Solael) or Wendigo Lifescent Powder (Barrowholm), to improve our pool of HP and Defensive Ability.
Rings and amulets are enhanced with damage augments, our main augments are:
- Forgefire (Malmouth Resistance) for defensive ability
- Arcane Heart Powder (Malmouth Mesistance) for offensive ability
- Osyr’s Wisdom (Cult of Dreeg), for offensive ability and resistances (if you can’t overcap them any other way)
- Witch’s Black flame (Coven of Ugdenbog) for HP and stun resistance
Weapon augments are:
- Potent Malmouth’s Heart (Malmouth Resistance) for HP and flat damage
- Potent Solael’s Vision (Cult of Solael) for HP and vitality resistance
- Potent Dreeg’s Foresight (Cult of Dreeg) for HP and chaos resistance
Farming and Crafting Guide
Selecting affixes and balancing stats
This build benefits from almost all types of stats, so it’s about finding the right balance:
- flat damage increases (+XX fire damage, phys dmg, lightning dmg, even chaos dmg)
- percentage-based damage increases (+X% fire/elemental damage)
- offensive/defensive ability
- attack speed
- HP and HP regen
- Life leech (“attack damage converted to health”)
Try to find a good balance that gives you the desired stats.
Insane offense is pointless if you get one-tapped.
High defense is not enough without sustain.
That said, this build benefits a lot from critical hit chance, so having 3k+ offensive ability at the end of Ultimate is strongly recommended.
Try to get over 16k, preferably over 18k life, with the help of your gear.
Make sure to cap your freeze and slow resistances and get stun res over 60% (80% if possible) in Ultimate.
Farming for affixes
- The best affix on the Skullbreaker mace would be “Tyrant’s”, ideally with a high roll for “reduced target’s damage” - this allows you to swap Oleron’s Blood for Seal of the Void
- Weapon suffixes can add a massive amount of attack speed
- “of Alacrity”, “of Fury”, “of Ferocity”, “of Scorched Runes” and “of the Elements” are the most relevant.
-
When farming Gollus rings, any belts or Vilgazor’s amulet, look for offensive ability or defensive ability, as those values will be higher on jewellery and belts.
- “of Attack”, “of Readiness” and “Aggressive” are great, when combined with Elemental affixes
- You can also get attack speed on amulets and rings, which is your only source of additional attack speed, outside of the weapon, your gloves and some components.
- “of Destruction” is a good suffix that gives +2 Fire Strike (on rings, belts, amulets) or +2 Explosive Strike (on armor). You can use those bonus points to invest into other skills.
-
Crafting Plagueguard Grips or Stoneplate Greaves mostly costs iron bits and scrap. Get the scrap by blowing up extra purple items, get the money by selling all green drops.
- You will need to craft quite a few gloves and boots to get really good results. If you save your money through Ultimate you should have ~3-4 million iron set aside for crafting
- Gloves should be crafted with attack speed. Lots of prefixes are good, it doesn’t have to be something with fire or elemental damage (but it also doesn’t hurt)
- Boots should ideally have stun res, slow res and/or freeze res. There are several affixes that can add those, “of Survival” is a rare affix that has two of them, for example.
- craft them at the smith in the Steelcap District, he has a chance to add additional freeze res or stun res, or at the Smith hidden in the Sunbane Oasis, he can add slow res.
-
try to get at least two pieces of armor with “of vitality”, for example on your pants, helmet or boots. That way you have enough HP to live and leech back through hefty hits.
Farming bosses and vendors
-
Kilrian is a long walk, if you want to farm him repeatedly. On the bright side, you’ll get plenty of his Shattered Soul, which some recipes need.
- Start from Broken Hills and ignore most of the skeletons on the way down, to save time
- You 100% need a roll with decent attack speed, if want to cap it
-
Galakros is pretty close to a portal. Drop chance for the right type of armor is 50%.
- You can skip this farm and use one of the faction armors, if you can cap your resistances through other gear
-
Incendiary Casque and Martin’s Crest can be farmed from the same source: Moneybags Martin.
- Look for Overseer’s on the helm, as that solves any stun res issues.
- For blueprints, random legendaries and epics, hitting totems that are on your farming route is the way to go, until you can roll through the Shattered Realm.
Once you start farming for your endgame setup, I recommend starting by farming the totems South of the Korvan City in the Forgotten Gods DLC.
They can be found in and around the tombs there.
Then afterwards, head to Okaloth, to see if he drops the helmet.
This will quickly get you to “Nemesis” reputation with the Eldritch horrors, and now you can spawn Kaisan by farming Eldritch monsters.
Doing the same route of shrines+Okaloth will be almost enough to spawn him most times, going a little deeper into the city or farming monsters near Korvaak’s lair will then summon him.
Kaisan is a tough nut for a fresh lvl 100 character, but the amulet can be worth it.
Once you have 2-3 pieces of Justicar, you can transmute them to try and improve their rolls, until you are happy with the 3 pieces.
Farming the Eldritch totems will give you all the Eldritch essence you need for that.
Crafting
Crafted items
Crafting items at the Blacksmith adds a “crafting bonus” stat, depending on the blacksmith.
My recommended smiths are:
- Kaylon, Steelcap District - for Freeze or Stun resistance
- Egellon, Sunbane Oasis (hidden) - for Slow or Reflect resistance
- Angrim, Devil’s Crossing - for Armor, Physique
If you don’t get your desired bonus, it’s not the end of the world, usually.
But getting a few rolls with slow or freeze resistance can really help to cap those stats.
The bonus doesn’t apply to relics, they get a different bonus, unrelated to the blacksmith.
Iron (money), Scrap & crafting mats
- Collect green items and sell them all to have plenty of iron (money) for crafting
- Collect dynamite while you are leveling, to blow up legendaries. Anything below level 84 can be blown to bits, without regrets. A lot of higher level stuff as well.
- This will provide the scrap needed for crafting and also the rare material that you don’t want to painstakingly farm
- Dynamite can be crafted from Aether Shards, shards can be crafted from crystals. Farming Aether Crystals (in the Warden’s lab for example) is going to yield more dynamite, than picking up individual sticks
Transmutation into desired set pieces:
How to transmute
The build uses the Elemental Harmony set.
Instead of praying for drop luck and sacrificing bunnies to RNGeesus, we can utilize the mechanic of transmutation to (almost) guarantee those items.
Prerequisites
- Complete the quest for Kargon in the Conclave of the Three (return his book).
- Have some level 82 or 94 set pieces, iron bits (roughly 1-2 million will be good) and Aether Crystals.
- OR find one of the two blueprint for the Elemental Harmony Set (they drop quite frequently)
Once the quest is completed, any inventor will offer transmutation services.
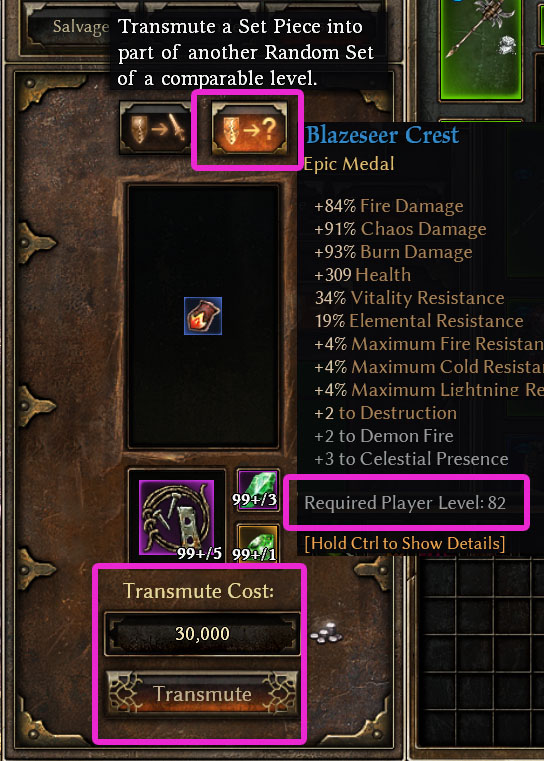
- Select Transmutation
- Select the right button (green square) to transmute into a different set of the same level.
- Take any random, blue level 82 or 94 set piece and place it in the empty slot
- Press transmute to change the item to a different set piece of the same level and rarity.
If you get any Harmony set rings, keep them and repeat the process with items from different sets.
Eventually, you will have two random Elemental Harmony rings.
Then swap to the left transmute option and use it to turn duplicate rings into the missing set piece.
If you have the blueprint for either ring, you can simply craft 2 of them and transmute one.
If you have spare resources, you can also reroll the values of your set items this way, but it gets very expensive quickly.
Legendary gear and endgame farming
Instant item upgrades
-
Relic: Blademaster’s Talisman
-
Components: Seal of the Void for one weapon, or both (if you find a Skullbreaker with the “Tyrant’s” prefix)
-
Medal: Mythical Korvaak’s Brand
-
Helmet: Okaloth’s Visage, dropped from the Messenger in Forgotten Gods (5.5% drop chance)
-
alternatively a well-rolled Chains of Ordas
-
Set 1: Justicar set offers some great bonuses, even on three set pieces
-
Set 2: The Infernal Champion could also be an upgrade, if you find 3 pieces
-
Kaisan’s amulets, once you reach “Nemesis” standing with the Eldritch Horrors. Farm for OA, speed and resistances
-
alternatively Mythical Alazra’s Ruby
Some gameplay vids:
(This only serves to showcase the playstyle and relative power level. I don’t necessarily recommend diving straight into the Shattered Realm, it’s just a way to show pure gameplay without major spoilers.)
Fire Strike Shieldbreaker on a stroll through SR


- Endgame setup, Ravager, higher SR -
Combining some Kaisan, Okaloth and totem farming got me a new amulet, a hat and some of the other legendary gear.
Then farming new Solael pants and Shattered Realm for the remaining pieces brought me (nearly) to this build:
I was still missing the Korvaak’s Brand, but ran out of patience and took one from my shared chest.
Overall, it came down to about 25 hours of post-campaign farming, to arrive at the build.
It still has some rough edges and could use some tuning, but I’ll leave it here for now.
vs Ravager of Minds, the totem spamming nuisance

Cleared Ravager on 3 out of 4 attempts, with the one death being caused by massive frame drops while recording.
The fight requires some piloting and can’t be face-tanked, because the totems nullify all buffs.
As usual, let me know if you spot any errors or have any questions.
I’m tired, so there’s probably some errors and missing parts ![]()

