
Introduction
Do you want to shred your foes with a barrage of deadly knives?
Then this is the build for you.
The Reaperman provides!
→ Phantasmal Blades Reaper (GrimTools) ←
Alternative version if you should go allied with Barrowholm
→ PB Reaper friends with Barrowholm ←
Strengths and Weaknesses
- Pure rogue power-fantasy
- Great Damage
- Good AoE
- Very high sustain from life-leech
- Smooth transition into endgame build
- Just a really strong build all around
However
- Some items are a little annoying to farm.
- Phantasmal Blades uses a lot of energy (mana), so you need to invest in energy regeneration early.
- To deal maximum damage, you need to kiss the monsters
- No movement skills besides the medal’s augment.
- Requires active playstyle with some timed skills to perform well, it’s not an afk-tank with a single button
This build is an update to the venerated, but tragically outdated, Phantasmal Blades Reaper by Stupid_Dragon.
Build Mechanics
This build uses Phantasmal Blades from the Nightblade skill-tree as the main attack. Phantasmal Blades is a spell that scales with casting speed.Phantasmal Blades throws a fan of knives that can pierce through enemies.
In total we eventually throw out 9 knives, which means if all knives hit the same target, the DPS is 9x of what you would expect.
For this to work, you have to get really close to the monsters.
The various damage types on Phantasmal Blades are converted by using a Spectral Arbalest and additionally having global conversion for Elemental damage.
That way, most of the damage from the knives is cnverted to Vitality damage.
To buff up, the build uses Pneumatic Burst, which can also act as a heal,
as well as Bone Harvest, which has a node that adds a ton of Vitality damage to our attacks.
To debuff monsters, we employ a number of spells and passive effects:
- Spectral Wrath and Night’s Chill reduce Vitality resistance.
- After equipping our desired helmet, we can use Siphon Souls to decrease Vitality resistance even more.
- as an extra, Siphon Souls and Veil of Shadow reduce monster’s ability to hit and crit
- Ill Omen reduces monster damage by a good amount
The Reaper also gets Mark of Torment, which can be used to reduce incoming damage and transfer some of it back to the attacker, which also transfers a percentage of debuffs thrown at your character.
TL;DR: Debuff enemies with a assortment of spells, then skewer them with a fan of knives.
General advice for new players
- Do all the quests, at least on your first play-through. They give you reputation with factions and keep you on track to level 100. Some also provide extra skill and stat points.
- Explore the map, especially if it’s your first time playing. Finding stuff like shrines is quite important.
- Prioritize resistances first, damage second
- Use crafted components from the smith to fix missing resistances
- Use 2x Scaled Hide (crafted) in pants, chest or shoulders to fix your armor absorption, unless you need the component slots for resistances
- The inventor can recover components from your outdated gear, whenever you swap to a better piece
- Additionally to components, you can apply augments, which you buy from the faction vendors. They also sell great gear and blueprints, for leveling and even late-game setups.
Faction choices
- I recommend being friendly with Kymon’s Chosen first on this character, so you can pick up a nice hat while leveling.
- This doesn’t work if you are already a Necromancer by the time you get to Homestead.
- If you already picked Necromancer, it’s not the end of the world, you just join Death’s Vigil and can instead buy their faction hat.
- You can then swap factions in Ultimate to join Death’s Vigil, after buying a stack of Kymon’s augments and their blueprints. This works best if you already have a Mandate for Kymon’s Chosen from another character.
- This doesn’t work if you are already a Necromancer by the time you get to Homestead.
- I prefer Cult of Bysmiel on normal, for the Emblem of the Leaping Mantis. If you desire a different movement skill, the choice is all yours. You will level up all cults eventually.
- Since this build uses an item sold by the Cult of Dreeg at Revered standing, it is probably a good idea to choose Dreeg on at least 2 difficulties.
- Hostile with Barrowholm. (Swap to friendly later, if you want to test your mettle vs Ravager and you have another character who can farm your Medal)
- You can also choose friendly relations early on, in that case use the items in the alternative setup.
- Hostile with Outcasts (Anasteria). Being hostile boosts Legion reputation and gives you access to nice pants.
Progression through the game
You start as Nightblade.
You can level with Amarasta’s Blade Burst and Belgothian Shears until you get the Spectral Arbalest, but using the main skill from the start is fun.
So lets go right into Phantasmal Blades!
Stat points are mostly invested into physique to wear armor at the start, with a few into cunning (for the ranged weapon) and spirit (for energy sustain).
In the end, the build needs about 1000 physique, 580 cunning and all the spirit it can get.
All points not needed for gear were dumped into spirit,
Devotion progression is included in the GT links, open the devotion tree with (S) (D) and then scroll through the bar on the bottom.
Items used will usually drop along the way while questing, or are purchased from faction vendors.
Farm an upgrade for your green items, if the level falls too far behind (~15+ levels).
When you reach level 90+ you can put in some extra effort to farm a version of these items with good affixes.
(For this build, I will have a section for good affixes at the bottom of the build guide.)
Fill all the other item slots as you see fit, this build will use pretty much whatever you can find in a lot of slots, until it can access the gear it wants in Ashes of Malmouth.
Normal difficulty progression:
(links lead to the map with the drop location)
Act 1:
- any 1-handed weapon with pierce or vitality damage bonuses will do, best would be a scepter or dagger.
- any caster off-hand with vitality damage and decent energy regeneration for the other hand.
- Check the regular vendors near the prison gate. Yellow items are much cheaper and will be enough for now.
- Buy two Serrated Spike components from the vendors and slap them on those weapons
This is important because otherwise you will have energy issues and not deal enough damage before your energy is drained.
– Level 12 with functional energy management –
- Craft the Equilibrium Relic after you defeat the Act 1 boss and plunder his chest
- alternatively you can craft the Gluttony relic, when you get an Ancient Heart (blueprint sold by Devil’s Crossing)
- or use the Bone Talisman (if you don’t hand in the Rover talisman from the Elder) - this can help if you have energy issues.
Act 2:
- Spectral Arbalest from the Spined Cove (if you get super lucky) or from Rhowena Kur
- Ectoplasms from the Spined Cove. You can also craft it at the blacksmith, once you have the blueprint.
Use 2-3 Ectoplasms to fix your energy regeneration.
You may need to take points out of Phantasmal Blades, if it gets too expensive, once you get the Spectral Arbalest.
– Level 25 Snapshot –
Leveling for 1-25 -- Act 1 & 2
Leveling up in order:
-
Nightblade to 5
- 4 points into Phantasmal Blades
-
Nightblade to 10
- 1 point into Frenetic Throw
- 1 point into Phantasmal Armor
- Pneumatic Burst to 3
- Phantasmal Armor to 3
-
Nightblade to 15
- Heart Seeker to 8
- Phantasmal Armor to 5 or 6
- Pneumatic Burst to 5 or 6
-
3 points into Anatomy of Murder
- 1 point into Veil of Shadow
- 1 point into Night’s Chill
- then distribute points between those 2, until Veil of Shadow is 7/10, Night’s Chill maxed out.
Act 3-4
Items to pick up:
- Solael-Sect Legguards from the Guardian of Solael - You have to start the questline for ‘The Hidden Path’ by blowing up the barrier here and defeating the first guardian.
- (alternatively) Anasteria’s pants, after going hostile with her at the end of Act 4
- Harvest Footpads, Harvest Grips (buy those from Homestead faction vendor as soon as you have the rep)
- try to get a good roll for offensive ability on the gloves (3%)
- Death’s Whisper Hood from Fort Haron (only if you are friendly with Kymon’s Chosen)
- if you are friendly with the Death’s Vigil, you can buy their Death’s Visage instead
- Death-Watcher Pendant, also from the boss at Fort Haron or purchased from this hidden vendor
- That vendor also sells a medal that can fix your chaos resistance for a while.
- Mark of Plagius, when you reach the last portion of Act 4
- Rings just cover resistances for now, but if you find a version of Cursebearer, that can be an excellent fit
- (optional) Devil’s Cuirass and Devil’s Shoulderguard (bought from Devil’s Crossing)
- Gluttony Relic, if you have not yet crafted it (blueprint sold by Devil’s Crossing)
- craft Silvercore Bolts as a weapon component for a big dmg upgrade (blueprint from Devil’s Crossing), if you have the materials for it
With some extra components we are ready to take on the boss.
(If you are still having energy issues, crafting an Arcane Spark (blueprint sold by Black Legion) for your medal can help)
– Level 40 Snapshot –
Leveling for 26-40 -- Act 3 & 4
Don’t put any points into Necro yet, instead put remaining points into
- Phantasmal Blades, only if your energy allows it, one point at a time
- Heart seeker to 10/12
- Pneumatic Burst (up to 8)
- Phantasmal Armor (up to 8)
- the Nightblade mastery bar for HP (maximal up to lvl 32)
After you have joined Kymon’s Chosen in Homestead
- Necro to 5
- max out Spectral Binding
- Necro to 15
- max out Spectral Wrath
DLCs and prep for Elite/Ultimate
In the Ashes of Malmouth DLC, we can pick up a few useful items to get extra skill levels.
- Packla’s Visage around the Gloomwald.
- unfortunately Packla has 6 different spawn points and only a 50% chance to drop the right hat.
- (alternatively) you can just wear a Legion Headguard instead (from the Black Legion) or continue to use the Death’s Whisper Hood
- Namadea’s Eye from the Barrowholm basement, after becoming hostile to them (50% drop rate)
- if you prefer to stay friendly, keep using Plagius’ medal
- Lunal’Valgoth’s belt
- for now either of his belts will be good enough (later we want the one with conversion for Elemental → Vitality damage NOT the one with +1 Necro skills)
- Ascendant Shoulderguards from mages around Malmouth
- low drop rate, but you might get lucky
- (alternatively) if it doesn’t drop, you can go into the Ugdenbog, past this barrier and get Kravall’s Shoulderguards (50% drop rate)
-
Legion Greaves and Legion Vestment (bought from the Black Legion)
-
Mortality relic (blueprint bought from the Malmouth resistance)
-
craft Silvercore Bolts as a weapon component for a big dmg upgrade (blueprint from Devil’s Crossing)
– Level 50 Snapshot –
Leveling for 41-50+ -- DLCs & Elite prep
-
Necromancer to 40
- 1 point into Siphon Souls and Blood Boil
- 1 point into Mark of Torment
-
More points into Phantasmal Blades only if you have the energy for it
Elite & Ultimate
-
update all gear to versions of the current level
-
Elite Harvest Grips and Footpads or Greaves, as soon as you have the reputation in Homestead
-
Malmouth Defender Cuirass (from the Malmouth Resistance)
This gear should be good enough to last you through Ultimate (with the upgrades that drop along the way)
– Level 75 Snapshot –
Leveling for 50-75 -- Elite, Prep for Ultimate
-
1 point into Bone Harvest
- max out Soul Harvest
-
Necromancer to 50
- Harbinger of Souls to 12
- 1 point into Ill Omen
-
Nightblade to 32
- 1 point into Nether Edge
- 8 points into Shadow Dance
Items for level 90+
After hitting level 90, it can be worthwhile to start farming for some upgrades.
Ultimate equipment setup:
-
Weapon: Spectral Arbalest
-
Helmet: Packla’s Visage
- Chest: Elite Malmouth Defender Cuirass (from Malmouth Resistance at Revered reputation)
- (alternatively) Korvan Plating from ‘Ancient Armor’ monsters around Forgotten Gods
-
Gloves: crafted Emberguard Grips with extra casting speed and useful stats. (The blueprint usually drops before you need it, otherwise hitting a few extra totems will provide it)
-
Boots: Crafted Intrepid Warboots (blueprint from the same sources)
- Pants: Anasteria’s pants
- She can drop 2 different types, both are fine, just redistribute the points from Shadow Dance if you find ‘leggings’ with better affixes
- Shoulders: Kravall’s Shoulderguard (50% drop rate)
- Kravall can be a deadly fight, my suggestion is to farm this one last
- Rings: Anything with resistances, until you can transmute into the Left and Right Hand of Carnage. See the chapter for Transmutation
- Amulet: Death’s Watcher Pendant with good rolls (farmed from Master Ravok or bought from Benevald)
- (alternatively) craft Venomfire (blueprint from the Cult of Solael), if you have gone hostile with Barrowholm
- (alternatively) craft Reaver’s Hunger if you are Revered with Barrowholm for extra Elemental → Vitality conversion
- Medal: Namadea’s Eye if hostile with Barrowholm
- (alternatively) Mark of Plagius, if friendly with Barrowholm, until you get Namadea’s medal from the Shattered realm
-
Belt: Lunal’Valgoth’s Girdle
-
Relic: Mortality until you can craft (for example) Impurity or Serenity
Leveling from 76 to 100
- max out Nether Edge and Phantasmal Blades
- max out Ill Omen
- Pneumatic Burst and Shadow Dance to 12/12
- Phantasmal Armor to 10/12
- Anatomy of Murder to 11/12
- remaining points into Mark of Torment
I had to drink a potion to reset my attributes as well, to get the requirements for my gear in cunning and physique. Every spare point went into spirit.
– Level 100 snapshot –
Augments for the final setup
Our desired augments are sold by all factions at ‘Revered’ standing. If you play through all three difficulties, you’ll reach that rep either late in Elite or after you have done their quests on Ultimate.
If you buy and read a “Writ” after you reach Honored with a faction, you will get bonus reputation for your future actions. Strongly recommended.
Various armor augments are used to fix our resistances, until they are all at least ~32% over the maximum cap, up to 50% still has some value. Pierce and Bleed resistance don’t need to be overcapped by much.
After we have reached our desired overcaps, we can use Solael Bloodbinding (Cult of Solael) or Wendigo Lifescent Powder (Barrowholm, only if friendly), to improve our pool of HP and Defensive Ability.
Rings and amulets are enhanced with damage augments, our main augments are:
- Wraith’s Scream (Coven of Ugdenbog) - flat damage, Offensive Ability
- Basilisk’s Rite (Coven) - HP, Stun res
- Irrah’s Blood (Cult of Solael) - Defensive Ability, Aether res
- Survivor’s Ingenuity (Devil’s Crossing) - OA & DA
- Arcanum Dust (Malmouth Resistance) - DA, Elemental res
Weapon augments are:
- Potent Coven’s Bane (Coven of Ugdenbog)
- Potent Ravager’s Harvest (Barrowholm, if friendly)
Transmutation into desired set pieces:
How to transmute
This build requires the Left and Right Hand of Carnage, until we replace those with better rings.
Instead of praying for drop luck and sacrificing bunnies to RNGeesus, we can utilize the mechanic of transmutation to (almost) guarantee those items.
Prerequisites
- Complete the quest for Kargon in the Conclave of the Three (return his book).
- Have some level 94 set pieces, iron bits (roughly 1-2 million will be good) and Aether Crystals.
Once the quest is completed, any inventor will offer transmutation services.
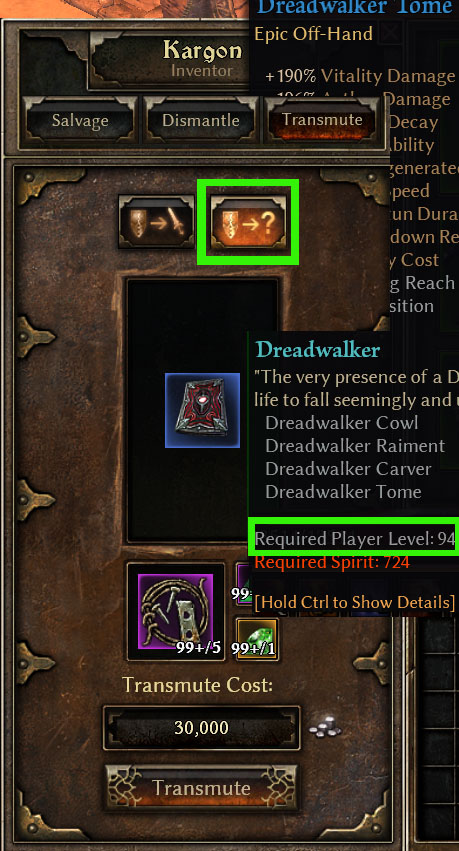
- Select Transmutation
- Select the right button (green square) to transmute into a different set of the same level.
- Take any random, blue level 82 or 94 set piece and place it in the empty slot
- Press transmute to change the item to a different set piece.
If you get any Carnage set pieces, keep them and repeat the process with items from different sets.
Eventually, you will have two random rings from the set.
Then, if you have 2 copies of the same ring, you can swap to the left transmute option and use it to turn a spare duplicate into the missing ring.
If you have spare resources, you can also reroll the values of your set items this way, but it gets very expensive quickly.
Farming and Crafting Guide
Selecting affixes and balancing stats
This build benefits from almost all types of stats, so it’s about finding the right balance:
- flat damage increases (not as important here)
- percentage-based damage increases (higher priority than flat damage here)
- offensive/defensive ability
- casting speed (should be capped at 200%)
- Health. Lots of HP.
Try to find a good balance that gives you the desired stats.
Currently I would try to hit:
- over 2700% increased vitality dmg
- 200% casting speed
- 18-20k HP
- 35-50% overcapped on most resistances, bleed and pierce don’t need much overcap.
- over 3000 Offensive Ability
- Defensive Ability no lower than 2500
- Elemental damage conversion to vitality damage, no less than 80%
Insane offense is pointless if you get one-tapped, so get a nice HP pool.
This build can leech life back to full in a second, if needed, as long as you don’t die too fast.
Farming for affixes
- The Spectral Arbalest should ideally roll with a vitality damage prefix and the suffix “of Decay”
- You can also get a rare suffix with vitality damage and the prefix “Decaying”, but that will be less damage overall
- “of Celerity” is a suffix that adds casting speed, but it’s better to cap speed with the gloves and get more damage on the weapon
- “Heart-Piercing” and “of Piercing Darkness” are two affixes that can roll on the crossbow and each adds +4 to Phantasmal Blades, which frees up points for other skills.
- Vitality damage has a great number of amazing rare affixes, like “Dread-Lord’s”, “Blighted”, “Demonic”, “of Soulwarding” and many more.
- Try to find those, that add useful resistances first for armor, then something that adds HP
- at least 2-3 armor pieces should add HP
- Amulet, belt and medal are your primary sources of extra offensive ability.
- try to look for “Aggressive”, “of Attack”, “of Readiness” or “of Clout”
- “of Butchery” is an item affix that can roll on rings, amulets and belts. It adds +2 to Phantasmal Blades, which can free up some skill points
- Crafting Emberguard Grips or Intrepid Warboots mostly costs iron bits and scrap. Get the scrap by blowing up extra purple items, get the money by selling all green drops.
- You will need to craft quite a few gloves and boots to get really good results. If you save your money through Ultimate you should have ~3-4 million iron set aside for crafting
- Gloves should be crafted with extra casting speed. Lots of prefixes are good, it doesn’t have to be something with vitality damage (but it also doesn’t hurt)
Farming bosses and vendors
- Benevald in the Bloodgrove can be vendor-farmed for the amulet. Reset his inventory by teleporting away, then returning after a few seconds
- The Spectral Arbalest is a guaranteed drop only from Rhowena Kur. Start from Broken Hills to get to her faster. You can ignore most mobs on the way, but check the map for the totem spawn.
- in the chamber just downstairs behind her, you can kill the boss for his rare resource
- Packla has 6 different spawn, which is rather annoying.
- Her 2 spawn points in the Eastern Gloomwald are pretty quick to reach from the Coven
- The other spawn points are in a square around Western Gloomwald, where you can also find a totem spawn
- Lunal’Valgoth, Kravall and Namadea each only have 50% drop chance on their items, you’ll just have to repeatedly farm them until you find what you need.
- if you befriended Barrowholm you can still get Namadea’s medal from the Shattered Realm
- For blueprints, random legendaries and epics, hitting totems that are on your farming route is the way to go, until you can roll through the Shattered Realm.
Crafting
Crafted items
Crafting items at the Blacksmith adds a “crafting bonus” stat, depending on the blacksmith.
My recommended smiths are:
- Kaylon, Steelcap District - for Freeze or Stun resistance
- Egellon, Sunbane Oasis (hidden) - for Slow or Reflect resistance
- Angrim, Devil’s Crossing - for Armor, Physique
If you don’t get your desired bonus, it’s not the end of the world, usually.
The bonus doesn’t apply to relics, they get a different bonus, unrelated to the blacksmith.
Iron (money), Scrap & crafting mats
- Collect green items and sell them all to have plenty of iron (money) for crafting
- Collect dynamite while you are leveling, to blow up Legendaries. Anything below level 84 can be blown to bits, without regrets. A lot of higher level stuff as well.
- This will provide the scrap needed for crafting and also the rare material that you don’t want to painstakingly farm
- Dynamite can be crafted from Aether Shards, shards can be crafted from crystals. Farming Aether Crystals (in the Warden’s lab for example) is going to yield more dynamite, than picking up individual sticks
Legendary gear and endgame farming
Instant item upgrades
-
Ring 1: Mythical Cursebearer
-
Ring 2: Mythical Signet of the Fallen
-
Pants: Reaper’s Legguards, once you reach Nemesis with Barrowholm or find them in the Shattered Realm
-
Gloves: high-rolled Emberguard gloves with good affixes and CC res bonus from the blacksmith
-
Boots: Mythical Boneshatter Treads
-
Set: Demonslayer’s Armament can be used with 3 pieces, or you can add the pistol
-
If using the full set, you’ll need a Groble Death Effigy for your other hand
Some gameplay vids:
(This only serves to showcase the playstyle and relative power level. I don’t necessarily recommend diving straight into the Shattered Realm, it’s just a way to show pure gameplay without major spoilers.)
Shattered Realm

- Lokarr fight -
Lokarr
Using an Aether Crystal for safety in the end.
Make sure you have your back to the wall and Mark of Torment on Lokarr.

- Endgame setups -
I will send you to the recent “Top 21” builds, where I can recommend the Demonslayer Reaper as a natural progression.
If you want to swap colors, you can also check out their Aether PB Reaper.
As usual, let me know if you spot any errors or have any questions.