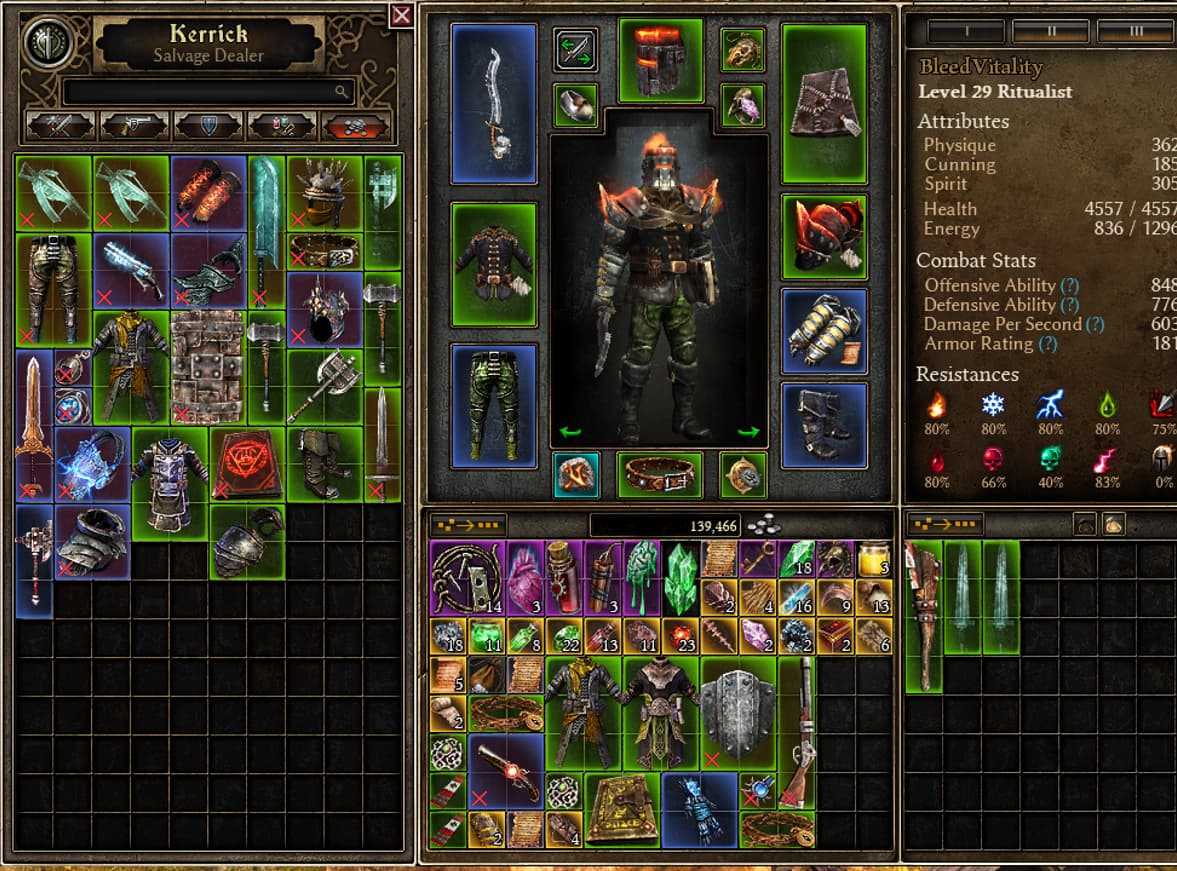
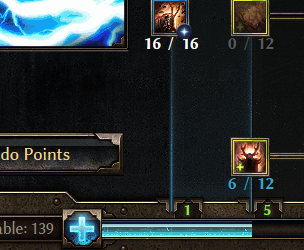
[Melee] [1.2.1.6] Bleeding/Vitality, Decay Hybrid Ritualist (Burebista)
- Damage: Bleeding, Vitality, Decay
- Active Skills: Siphon Souls, Savagery, Devouring Swarm, Wendigo Totem
Pros:
- Decent HP pool, 21k+
- Decent damage, especially DoTs, Hit-and-Run’em all.
- Great Resistance Reduction to both Vitality and Bleeding
- Good Self-Sustain:
- Siphon Souls, Devouring swarm skills have life leech
- Bat, Wendigo devotions have life leech
- Wendigo Totem grants ~3.5k HP regeneration/s
- 49% life leech from Savagery
- base 1k HP regen/s, 3k while Behemoth is active (i am still not sure about Behemoth)
Cons:
- Low (DA: 2500)/(OA:2800),
- Low Resistance Overcap
[i will sometimes use colored text to highlight the keywords and to make the text less boring (similar to how Grimtools Rainbow mod works), if its annoying, please leave a comment, i will stop using it in the future posts]
Hello everyone, this is a Cursed totally normal beginner NON-META guide, ha-ha, Why it is cursed? Grim Dawn encourages the player to main one damage type (like Fire, Cold, Lightning … etc.), but in this build i will try to use 2 damage types like Vitality, Decay and Bleeding Damage.
Usually if you try to run multiple damage types, you will simply be bad at both.
This is a hybrid build, most Hybrid builds are suboptimal, for example a build that uses Acid and Cold damage, if you crunch the numbers, in the best case scenario will be either as strong as a Pure (like Fire, Cold, Lightning … etc.) damage build, or it will be worse.
But that’s not quite the case if your Hybrid build is trying to combine Retaliation + normal damage type, or Bleeding + A normal damage type.
I believe such Hybrid builds have the potential to rival the One-Damage-Type builds.
I will likely fail XD
Even though i labeled this build as Beginner-Friendly, its not easy to replicate, and i would recommend this guide only if you seek to make an non-meta build, the main weapons used in this build can be bought from a merchant, the Bloodrender and Howl of the Wendigo from Barrowholm and Solael-Sect, just like the Death-Watcher Pendant from the blood grove. The Mythical Abyssal Mask can be crafted, the Lagoth’Ak’s Bloodbinding can be farmed from a monster, it drops with a 100% chance. The Wanton Carnage pair of rings can be Transmuted, i got the set super quick in my run.
But the rest of items you will need to get randomly, for example you need the Mythical Wendigomane Leggings, Mythical Bloodfury Spaulders and Mythical Boneweave Girdle, there are budget alternatives, and even without these items the build will still perform well, but the build is at its strongest only when the Siphon Souls reaches level 22.
Leveling:
LVL 1 - 23
YouTube Vod 1
Apologies, the first episode has lags and stutters, OBS often acts weirdly and i have to reset all the settings in order for it to work properly, i have checked the second episode and it looks like the issue was fixed…
Grimtools Link lvl 23
During your play
-
First, i must say if its your first Grim Dawn playthrough, then try to reveal and clear every location, without being overzealous, you will be fine if you miss a hidden chest or a breakable wall, you can also skip all Skeleton Key dungeons on Normal and Elite. Even if you have a couple of unfinished quests, it doesnt matter all that much. No quests or quest choices matter.
With the exception of Barrowholm faction, its important to join it and not destroy the location because we need the blueprints they offer for this specific build. -
If its your first character and you plan to play more GD later, then pick up every Rare item and sell it, you will need lots of coins to purchase every Blueprint/Recipe from factions, and they are expensive, you will need like 2 000 000 coins to purchase every blueprint from every faction.
Additionally you need coins to Gamble, similar to how Diablo 2 gambling is but slightly different.
If you want to see how i waste 5 000 000 coins i was collecting for 20 hours in under 3 minutes you can check this https://youtu.be/EZ-nO1zb3Ic?t=6231 ![]()
-
Try to store every component into the Shared Stash, especially on Hardcore, if your character dies carrying all those components inside his inventory or Personal stash you lose them, additionally if they all are stored in one shared stash, its easier to use them for crafting for all of your characters, the components will be used directly from your shared stash, so you dont have to drag any components manually into your inventory. Similar to how i do. Also, try turning your coins into Bars and also store them when you reach level 100.
-
Try to not loot hoard everything, the 99% of the items between lvls 1-84 are useless and too weak, maybe some low level sets are worth keeping like Explorer’s Garments, Herald’s Regalia, Royal Exuberance, The Praetorian, Adornments of Valiance. All other sets are ok’ish, but in my opinion too weak, only listed sets are decent. And even these sets are sort of obsolete after you get the Lokarr’s spoils set at level 100 on Ultimate from a secret quests, i usually dedicate only 2 stash windows for equipment and they are sufficient to level 90% of all builds.
Resistances
During your Leveling 1 up to lvl 94, just focus on Resistances and Skill Modifiers, having lots of Resistances on items is what you want. Damage and self-sustain will be secured by Constellations and your Class Skills.
And this can be applied to ALL builds, not just this one, Resistances play a vital role in all Builds.
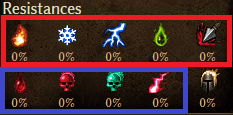
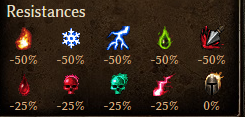
The upper resistances highlighted by Red are more common, and as a result slightly less valuable, and the lower resistance highlighted by Blue are less common, and more valuable.
Dont get me wrong, you want ALL of you resistances to be maxed 80%+ with some overcap +20% or so, except Physical Resistance which will play an important role when you are High level, but can be neglected during early leveling.
The Physical damage is the most valuable resistance in the late game, its rare and ALL enemies in the game deal Physical damage, and i mean ALL of them.
You see a Fire Mage Skeleton shooting a Fire Ball, the Fire Ball will deal 50% Fire damage and 50% Physical damage, this will be important later when you will switch the difficulty to Ultimate, around level 70+, so don’t worry too much about it, simply keep in mind that it’s important.
Itemization
When choosing your items, prioritize resistances, try mentally filtering the stats on an item like I do
Original item:
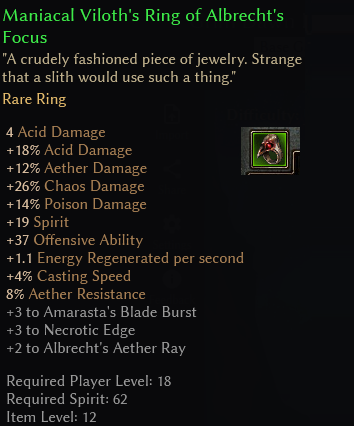
What i look at:
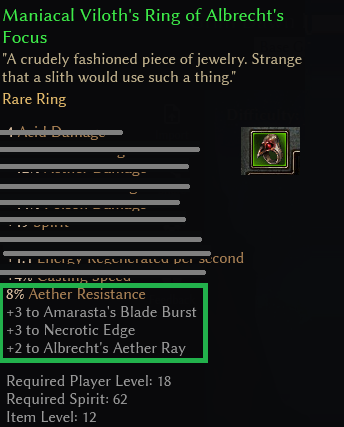
even though the item has tons of stats on it, it only grants 8% Aether Resistance , and the skill bonuses do not match the ones i use, so this item goes to the garbage bin.
Let’s try another example,
the original item:
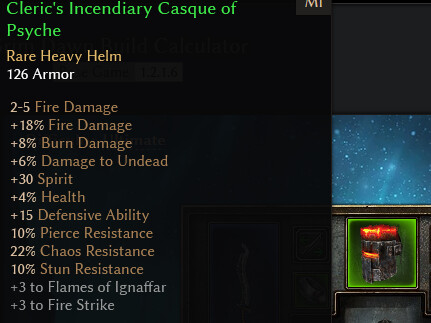
The stats i look at:
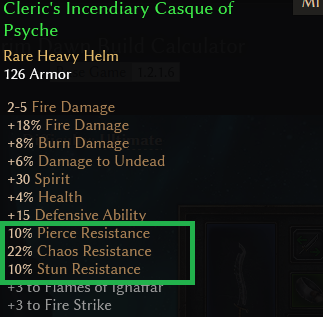
Even though the item grants Fire damage which is useless for us, it also has High Resistances, the Pierce and Chaos resistance is why i used it. If you look at the lvl 23 Grimtools link you might notice that all my items have somewhat decent resistances (dont forget to switch the difficulty in grimtools to Normal), and even with minimal number of components i already have lots of resistances capped at 80%.
Attributes
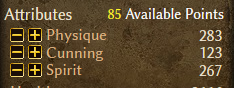
For simplification, invest 20 Points into Spirit (to be able to use Jewelry and Robes/ have extra Energy and Energy regeneration), 20 into Cunning (to be able to use Daggers, our final build is going to use a Dagger which requires 511 Cunning) and the rest of the points 80+ or so into Physique for HP and Defense Ability (DA is Dodge) for survivability.
Constellations
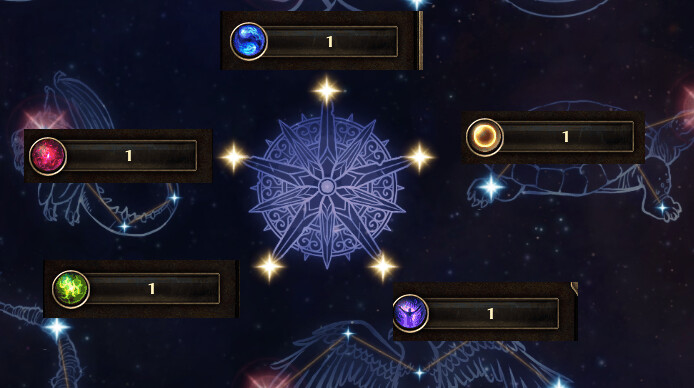
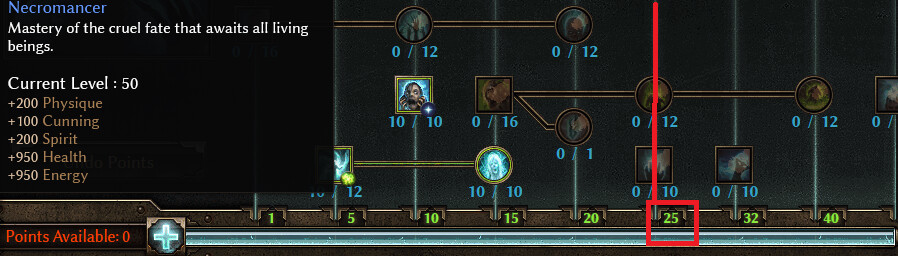
To unlock the constellations, you need Affinity.

The different colored globes on the left side, at the beginning you have 0 affinites, as a result ALL constellations are locked, you can earn some affinity by investing Devotion points into Crossroad and unlock the weakest/lowest tier constellations.
To earn Devotion points, you need to Restore Shrines in the game
The game has around 200 shrines across all 3 difficulties, while your character can have only 55 devotion points, even if you miss a shrine or two, its not a big deal, do try to clear everything tho, constellations makes your intredibly powerful, its like 50% of your character strength.
Due to 55 devotion points limit, you have to select your constellations carefully and sparingly.
My build will use Bat and Falcon constellations.

The constellations might appear scary at the start, because there are many of them, but in reality they are much, much more simple than they look like.
The constellations are simply skills or passives which are available to ALL characters, there are many of them because they support All damage types.
For example a Vitality oriented character, you will not need 85% of the constellations, you wont need Fire constellations like Fiend or Imp, or Acid constellations like Scorpion, you will want only Vitality oriented Constellations which you can filter in the game.
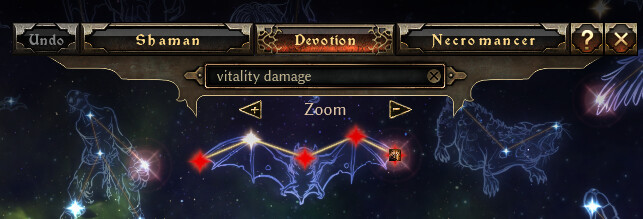
My build uses both Vitality and Bleeding, later also supported by easily accessible items, for this reason i also use Falcon, Falcon mainly deals Bleeding Damage with some Physical damage sprinkled on top, the physical part will be partially converted to Vitality damage by my items.
Skills
Grim Dawn game encourages you to use One main damaging skills, for example for Demolitionist, you can use Fire Strike or Cocktail, or maybe Cluster Bomb and Grenade, but never everything at once. You will not have enough Skill Points to use everything.
So if you use Fire strike dont use Grenades, another example Soldier, If you use Cadence then dont use Forcewave and Blade Arc. Chose something one. You can use Auxiliary skills which Debuff the enemy. There are exceptions ofcourse, but the idea is that you must use one skill and try to empower it as much as you can.
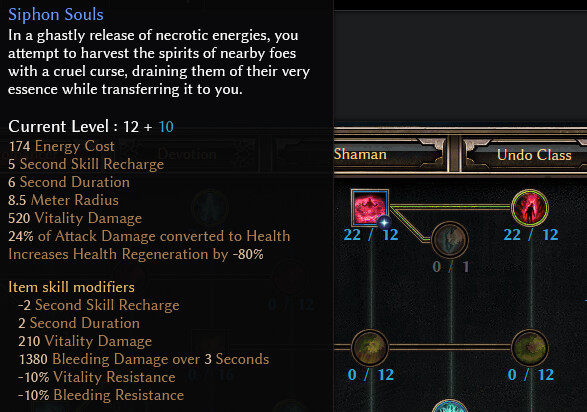
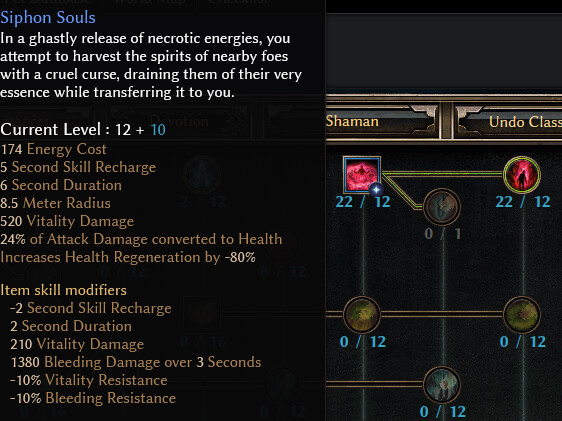
In my build, my main skill will be Siphon Souls.
But because the skill requires high mastery
I will not be able to use it right at the beginning of the game
So i will use Auxiliary Skills at the beginning, which i will also need in the late game for their debuffs like Devouring Swam.
At the start of the game it deals decent’ish damage and some sustain + Debuffs (weakens enemy Bleeding resistance and Vitality Resistance. These Debuffs are vital! especially on Ultimate, because on Ultimate most Main Game bosses and Dungeon Bosses will have like ~125% Vitality resistance and 98% Bleeding Resistance, so you won’t be able to deal any Damage if the enemy is not under Devouring Swarm Debuff.

Other Auxiliar skills i use is Ill Omen and Spectral Wrath
Ill Omen deals good AoE Damage at the beginning of the game, later i will need it for its Damage Reduction Debuff (-25% total damage dealt is insaaane).
Spectral Wrath is a passive, it actually deals insane damage for a passive at all stages of the game, and, just like Devouring Swarm, it also applies a Debuff which reduces the enemy Vitality Resistance.
And lastly, Spectral Binding for its bonuses, it grants a good chunk on Health, like 1k bonus HP and some Accuracy (Offensive Ability), the Aether damage it grants can be ignored, i will mainly deal Vitality damage.
Components
Components are extremely powerful and vital for any build, at level 20-25 you can craft most mid-level components, its easy to get confused and tangled up in all of the components and stuff, that’s why the community made a Components guide on Steam Forum Steam Community :: Guide :: Resistances by Components and Augments
If you dont want to spend much time understanding the components, you can use low level neutral components which fits all characters up to level 84.
If you are level 20-35:
For Chest, Shoulders, Pants use 3x Silk Swatch
For Belt, Boots,Helmet use 3x Antivenom Salve
For gloves use 1x Unholy Inscription
For rings use 2x Soul Shard
For medal, amulet 2x Wardstone
For weapon(s) Purified Salt or Imbued Silver depending on what you need more.
If you are level 35-84:
Not really much changes, but you can start using:
For Chest and Helmet Runestone or Sanctified Bone
For Medal and Amulet Aether Soul or Black Tallow
To craft these components you will require a Blueprint which can be bought from a Faction.
With these neutral components you will have decent amount of Resistances to survive most Bosses and areas. If you find some good Items with resistances you should be gucci.
At level 94+ you will need to use level 75 components in order to be strong, more about that later.
LVL 24 - 37
YouTube Vod 2
GrimTols Link LVL 37
Item Rarity/Affixes
One important thing i must highlight is that White(common) and Yellow(magic) items past level 10 are obsolete, you can filter them, they are simply too weak to be considered viable. The filter button is in the left corner of the UI, looks like a ring.
Second, Epic (Blue) items are NOT always better than the Green items, think of Epic Items as Extremely Specific build oriented items, in most cases the Epic (Blue) items you find will not fit your character, and usually the Epic (Blue) items do not have high resistances, as a result many Green items are simply better, especially if its a Monster Inferquent.
This is why you can see me often selling Blue items during the playthrough, if its not Vitality or Bleeding oriented, they go to the trash.
Monster Infrequent items, are items that drop from a specific monster, for example the Spectral Weapons like Spectral Longsword, Spectral Battle Axe, Spectral Bludgeon drops only and only from Ghosts which usually resides in the Ruins of Arkovia and sometimes from Totems.
And even though Monster Infrequent items [MI’s] share the same color as Green items they are way stronger than normal Rare Green items because they have innate stats. Also MI’s have a small distinctive gem in the name of the item to differentiate normal green items from MI’s.
![]()
![]()
Normal green items do not have gems.
Let me show how a normal item becomes green(rare):
Normal items do not have innate stats, are white/gray and start just like this
and when you kill an enemy, the item can roll 2 affixes (bonus stats) which can be Magical or Rare.
Magical affixes are generally speaking are weaker than Rare affixes.
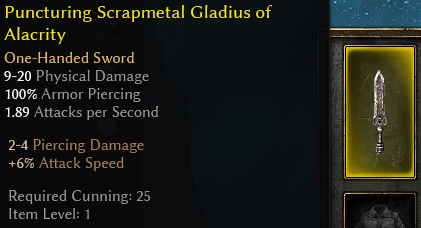
If both Affixes (Bonus stats) are Magical, for example Puncturing of Alacrity
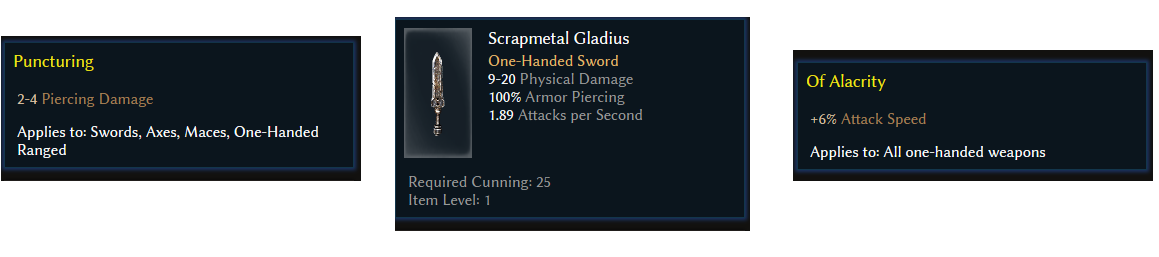
The item turns into yellow
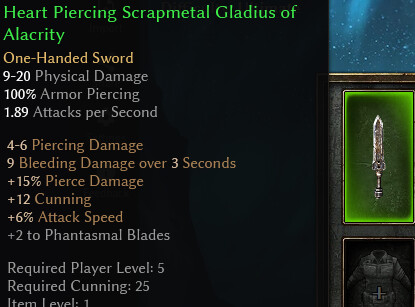
If one of the affixes is Rare like Heart Piercing , the item color changes to Green(rare)
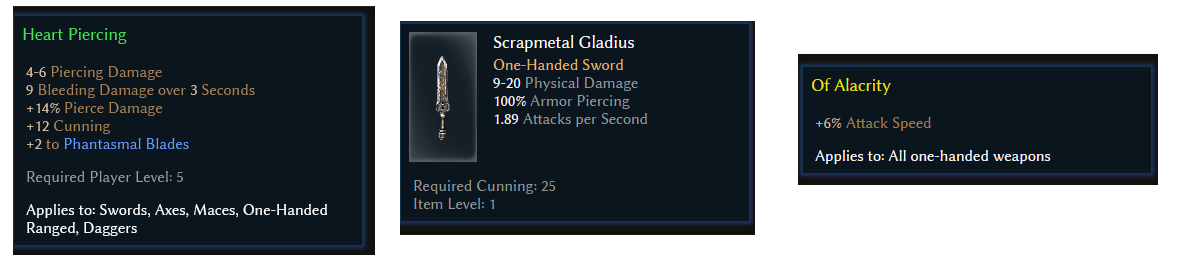
then the items turn Green
But even as a green item, at the core, the item is the same poopy white item, ha-ha :D.
Monster Infrequent Items are similar, they roll 2 random Affixes, but they have innate stats, which are Always present and have sometimes insanely strong Bonuses to Skills, like Spectral Warmaul
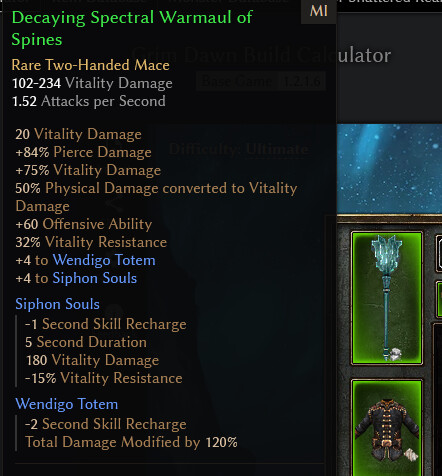
The ‘naked’ weapon without affixes looks like this
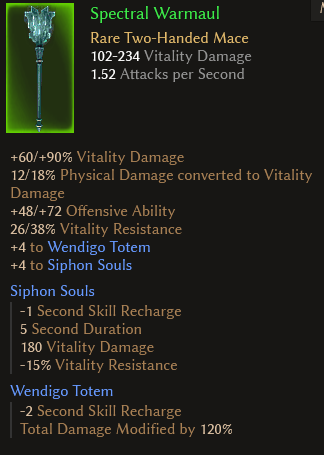
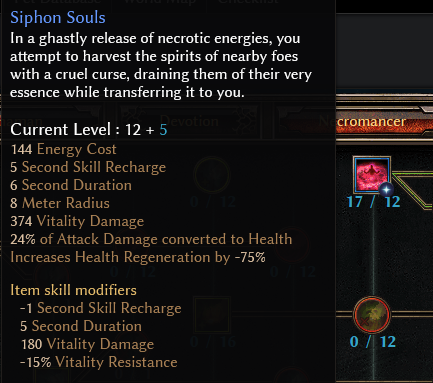
Look at the Siphon Souls part, it grants Extra damage to the Skill itself, the bonus granted is INSANE, lets look at the numbers.
The level 12 Siphon Souls deals 284 Vitality Damage per second, the item grants extra 180 on top of it, that’s 60% more damage. If you stack multiple Monster Infrequent items which empowers Just one skill, the skill will become incomparably stronger than the original Unbuffed skill.
Itemization
The final build will have items which increases both Vitality Damage and Bleeding Damage , but there are very few low level items which boosts both damage types, its easier to level with Vitality damage and Vitality oriented items.
One great option is Spectral Warmaul which drops from ghosts in the Arkovian Ruins or Steps of Torment, the drop chance is quite low, so its possible that you will have to go inside the key dungeon and purchase the Warmaul from the secret dungeon vendor on the 3rd level of Anguish.
But that’s risky, the Undead are basically immune to Bleeding Damage and Highly resistant to Vitality Damage , they are Dead after all, in order for Bleeding Damage to have an effect you will have to curse them with multiple debuffs we dont have yet. During my leveling i almost died to Ilgor boss ![]() and Alkamos was annoying as heck. So you will have to either waste time grinding ghosts or going into the key dungeon (wasting a skeleton key).
and Alkamos was annoying as heck. So you will have to either waste time grinding ghosts or going into the key dungeon (wasting a skeleton key).
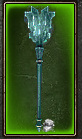
So as a second option you can use 2x Bonespike, its a much safer choice, you can farm them in the DeadMan’s Gulch, in order to Dual-wield them you will need the lvl 25 Bladesworn Talisman you can buy from Devil’s Crossing Faction vendor.
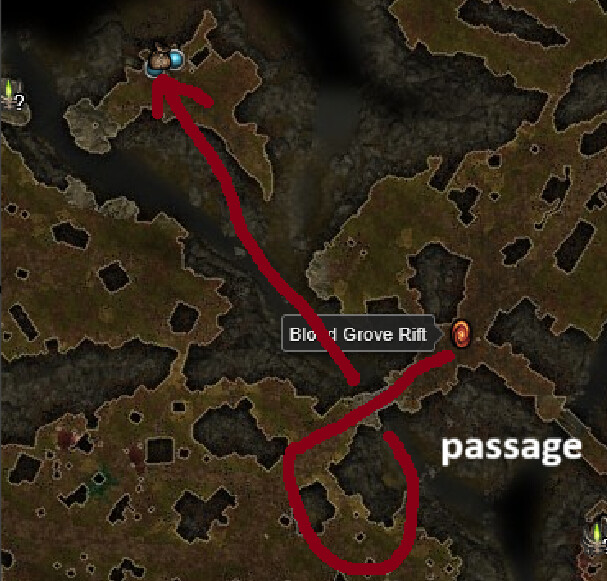
Get either the Warmaul or the Bonespike, you need them. Second must have item is the Death-Watcher Pendant which can be bought in the Blood Grove from a secret vendor located here:

It not only has insane Vitality Bonus but also has +1 To All Necromancer skills.
And the third item is Gollus’ Ring which drops from * Gollus, the Deepdweller [Map] located near Homestead inside the Insect Hive behind a secret breakable wall.
Skills
Nothing much changed, during the leveling the Devouring Swarm is used as Auxiliary skill
and we invest into Necromancy Mastery in order to reach Siphon Souls
There is one mechanic i must explain, as you can see the level of Siphon Souls is not 12 but 17, usually if you invest Skill points into a skill it wont go past a cerain limit, in case of the Siphon Soul its 12, but if you have items which grants +1 to Necromancer or +(*) directly to Siphon Souls then it will surpass that limit, its not a bug but and intended mechanic.
When you overlevel a skill this way, the damage the skill deals is increased tremendously, it goes from a LVL 12 Siphon Souls 284 to 374 at level 17, the difference is palpable. Combining this mechanic with Monster Infrequent like Spectral Warmaul we get a solid damage output.
Constellations
After getting Bat and Falcon, we invest into Chaos(Affinity) star in the Crossroads to reach 3 Chaos affinity and then we can reach the Huntress constellation, slowly moving towards Revenant.
This build uses Bat for its Vitality damage, Bat deals 50% pierce damage and 50% vitality damage , later i will have a weapon which will convert half of the global piercing damage to Vitality so later on Bat will deal mostly Vitality damage.
This build also uses Huntress for its Bleeding Resistance reduction and Bleeding damage, getting as much resistance reduction is the key of any good build, this is a hybrid vitality/bleed, but i still think its worth.
LVL 37 - 44
YouTube Vod 3
GrimTools Link LVL 44
Overall minor changes.
Skills:
I decided to continue progressing the mastery bar to reach Blood Boil node from Siphon Soul, Blood Boil is excellent, Vitality Decay damage it offers is great, dont look that its a DoT and not a Flat bonus damage, Vitality Decay is just like flat Vitality damage, but over time, most items and skill which are Vitality oriented also grant Vitality Decay damage bonuses +(*)%, so the damage of your DoTs will scale in the same way as your flat counterpart.
Additionally Blood Boil grants Bleeding damage , this is one of the reasons why this build will later become Hybrid, i want to make use of all of the Bleeding Damage Necromancer and Shaman has.
Constellations:

Jackal and Viper are temporary in order to reach Revenant, i will remove partially Jackal and completely remove Viper, the Revenant will satisfy its own Affinity requirement with its own Affinity bonuses in the final build.
Items:
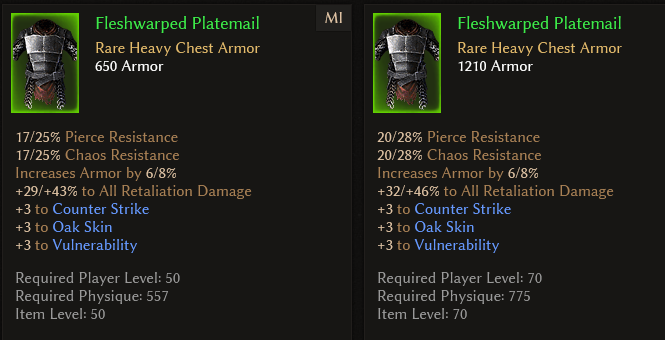
I have found a good chest armor:

Fleshwarped Platemail is a useful Monster Infrequent armor, it has innate Chaos and Pierce resistance, if you get lucky with affixes you can have really good resistance rolls. The armor drops from trolls right in front of the Homestead portal.
If it happens that you cannot find a good armor pieces you can visit the Devil’s Crossing Faction, the Devil’s Shoulderguard and Devil’s Chestguard might not be the best armor in the game, but the armor they sell have solid stats, you can always purchase and use them without worrying too much.
You will have to repair the bridge to the Bastion of Chaos, you will need 40 Scrap, to get lots of Scrap you can craft a bunch of Dynamite and Dismantle some items at the Inventor in the Devil’s Crossing.
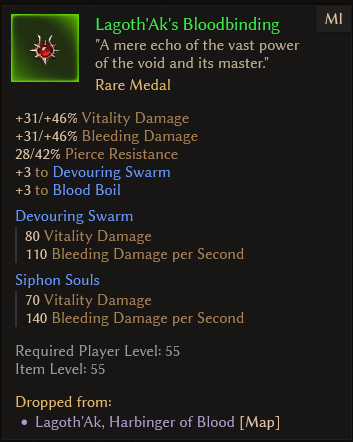
We need to clear the Bastion of Chaos because the boss inside the dungeon drops Lagoth’Ak’s Bloodbinding, with this medal both Siphon Souls and Devouring Swarm will become much more potent.
I have also found a Wreath of Souls i intend to use it up to level 94, it is that powerful, the +1 to Necromancer class bonus is simply too strong, unless i find an empowered version of the same item i am going to keep it, its a random drop so you might not find it during your run, but that’s fine, in the Malmouth DLC you can kill a boss called Packla that drops a specific Siphon Soul oriented helmet Packla’s Visage the boss is located here * Packla, the Turning [Map] it has many random spawn point but the areas themselves arent that big so you will be fine. Kill it until you get the Packla Visage and use it to empower Siphon Souls.
LVL 44 - 54
YouTube Vod 4
GrimTools lvl 54
Skills:
After finishing leveling Blood Boil its a good idea to level Harbinger of Souls, it grants excellent Vitality damage, both flat and +% bonuses, attack speed, 16% life leech and physical to vitality conversion.
I decided to level Shaman Mastery for now, and invest some points into the Heart of the Wind, this node is excellent, it grants a solid amount of +HP%, also the final build will be relying on Health Regeneration granted by Heart of the Wind, Mogdrogen Pact and Savagery’ node Tenacity of the Boar which i’m going to learn later.
I also invested one skill point into the Wind Devil and then attached the Falcon constellation to the skill, usually a Vitality oriented or Bleeding oriented classes do not need Wind Devil and the -% Elemental Resistance debuff it has, i decided to invest just 1 point into it just so it can function as a Constellation trigger.
Wind Devils are invulnerable player scaling pseudo-pets, your character summons 3 wind devils, because each wind devil is considered to be a separate entity, each Wind Devil can trigger Falcon Swoop separately and apply its own Bleeding Dot from the Constellation, and in this case, when each Wind Devil triggered the Falcon Swoop, we basically triple the Constellation damage.
The final build will have Prolonged Bleeding Duration , (around +160%-200% bonus duration) so all Bleeding Dots will last around 8-9 seconds, so in a long fight you have the opportunity to trigger multiple Falcon Swoops and apply its Bleed damage by each wind devil.
This is not mandatory really, the Falcon Swoop constellation damage is not extraordinary, so even in the best case scenario when each Wind Devil hits a single target with their Falcon Swoop, the damage output would not shock you, but its simply a nice mechanic to use when you can. (Other examples → Blade Spirits from Nightblade, Oathkeeper → Guardians of Empyrion and other summons in general).
As an option you can put Rattosh on Wind Devils for higher proc chance.
Constellations:
The plan is the same, after taking the Revenant we can take the Lizard and Wendigo , after completing the wendigo we can remove Jackal and Viper we dont need. This way the Wendigo and Revenant will satisfy their own Affinity requirements with the Affinity they grant after completion.
Revenant is an excellent constellation, even though it doesnt grant Bleeding Damage it grants Vitality Damage , attack speed, life leech and most importantly Revenant reduces enemy Resistances. As mentioned before on Ultimate lots of bosses have very high resistances, so we need to accumulate as many debuffs as we can, the constellation reduces All resistances so it also affects the enemy Bleeding Resistance.
Wendigo is a decent Vitality oriented constellation which deals damage and heals us for a portion of the damage dealt, similar to Bat.
Itemization:
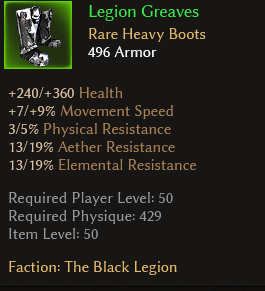
The items are mostly the same, but at the level 50 its a good idea to buy the Black Legion Legion Greaves, these boots are excellent on par with some lvl 50 legendary boots.
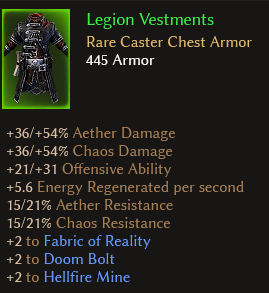
I got a legendary chest piece with some %Chaos Resistance and %Physical resistance, its a random drop, if you are unlucky and did not get any decent armor piece you can buy the Black Legion Faction Legion Vestments or Legion Chestguard for the resistances they grant, Legion Faction armor is quite formidable, and will remain formidable for at least 20 levels.
The Legion Headguard is also an excellent helmet, but i would still recommend using the Packla’s Visage.
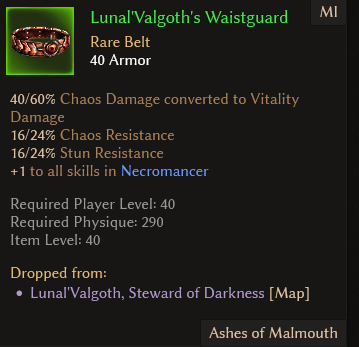
A good addition to your arsenal would be the Lunal’Valgoth’s Waistguard because of its +1 to Necromancer, it can be obtained in the Mourndale of Malmouth DLC from a boss* Lunal’Valgoth, Steward of Darkness [Map].
LVL 54 - 62
GrimTools lvl 62
YouTube 5
YT 5.5
Around Levels 55-60 You will finish the Normal difficulty including both DLC’s, usually i tend to skip Elite difficulty and hop directly to Ultimate. If you feel that your character is weak and cannot kill fast enough enemies on Ultimate you can switch to Elite.
On Ultimate your resistances will decrease,
so be careful and make sure that you have a resistance overcap to cover you on Ultimate.
Constellations:

After completing Revenant and Wendigo, we can remove Viper, and continue with Behemoth, i am still contemplating whether Behemoth is worth taking or not, on one hand we have Mogdrogen’s Pact, Heart of the Wild, Tenacity of the Boar which increases our regeneration, but even with these skills your passive regeneration without specific regeneration rings like Gollus will not surpass 1000hp/s, and with the Gollus rings it can reach 3000 with some good affixes, but it will heavily tank our damage output.
After some reflection, i have decided that Behemoth is worth taking, its not only passive Regeneration, but also more HP and armor, additionally when the Behemoth triggers our regen increases to 3.2k even without the rings. I like having some extra regeneration in case if i am unable to attack and Leech from enemies, or in case i am fighting a highly leech resistant enemy i will have a small safety net.
After Behemoth we need to gain 6 Order Affinity to unlock Rattosh constellation, initially i planned to use Crane constellation to unlock Rattosh, but Crane is a bit too weak, also after taking Rattosh we still have 3 dangling devotion points i used to invest into Jackal and 1 point into Throne, but now i realized that i can use them to unlock Ulo and Lion. Ulo constellation does not deal any damage, but it cleanses all your debuffs and all enemy buffs and auras. Linking Ulo to the Vanish Augment from Bysmiel Faction will secure that it will trigger 100% chance and also cleanse your character and the enemy. Rattosh is a must have constellation in any Vitality Build, it reduces the Vitality Resistance and deals solid damage.
And i know you might ask, why i’m not taking the Dying God constellation, its a strong Vitality oriented constellation, but its simply too expensive in terms of Affinities, and i havent found a way to effectively take Falcon, Huntress and Dying God without sacrifycing many other constellations like Bat and Wendigo. I believe Bat and Wendigo damage and heal are more valuable than Dying God, if it was a Pure Vitality build, i could have taken them all, but this is a hybrid so i have to make compromises.
Itemization:
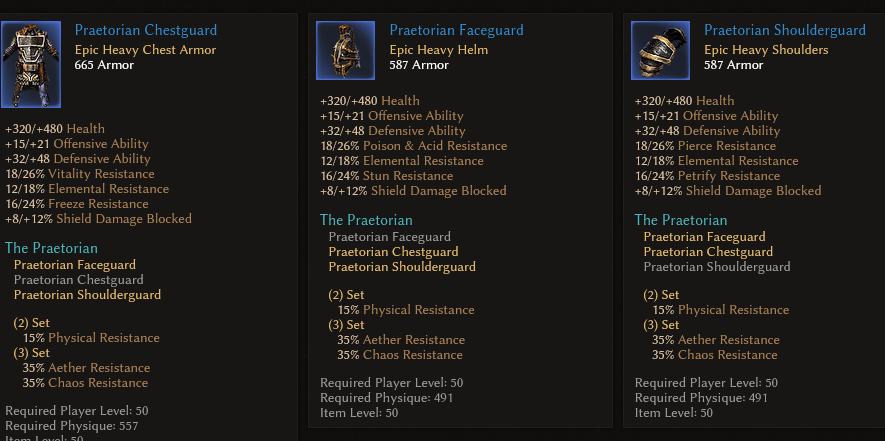
I was lucky to find the full set of The Praetorian, its one of the few neutral sets which fits almost any character. Its a random drop, but it’s not overpowered, its defensive oriented, during your run you can keep using the Legion Faction gear, or Monster Infrequent items like Packla’s Visage, Fleshwarped Platemail, Korvan Pauldrons instead of the Praetorian set, you will be fine with these MI’s.
As mention before Packla Visage drops in the Gloomwald from * Packla, the Turning [Map], the Fleshwarped Platemail drops from armored aetherials around Homestead and the Korvan Pauldrons drops from Animated Armor in the Forgotten Gods DLC.
Relic:
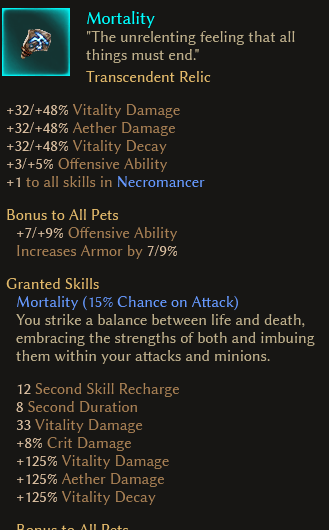
from level 20 to 50 i was using Equilibrium, nice Elemental Resistance coupled with AoE Stun makes this cheap relic pretty good for any character.
If during your run you stumble upon Vitality Relics like Deathchill, Sacrifice, Torment or Mortality then you can craft it and use it. The Mortality is the most powerful in the list, it has excellent damage and most importantly +1 to the Necromancer.
From this moment, the progress will slow down, you get only 2 skill points per level, and the gear will not change much, maybe i will get a higher level Spectral Warmaul.
Leveling the character from 60 to 94 is the most boring part of Grim Dawn, the progress feels stagnant, that’s only the case if its your first character, if you already have a leveled character you can buy Experience Potions from Malmouth and use Lokarr set to boost all incoming Experience by 140%, making leveling trivial, you can level a character from 1 to 100 in about 4-5 hours or even faster.
LVL 62 - 71
As you can see the build hasn’t changed almost at all.
And, as mentioned before, i completed the Ulo and Lion constellations.
And with 1 remaining devotion point, i have decided to invest into Empty Throne for 10% Slow resistance.

At level 62-71 its a good idea to get a higher level version of your Monster Infrequent Items . The items themselves remain the same, Packla’s Visage, Fleshwarped Platemail and the Korvan Pauldrons,
as you can see the items themselves do not change all that much, but they do get a good chunk of armor.
so do try to get a level 70+ versions of your items, not mandatory but nice to have.
You can also complete the Hidden Path quest on either Normal or Ultimate to get some extra points and get some unique pants
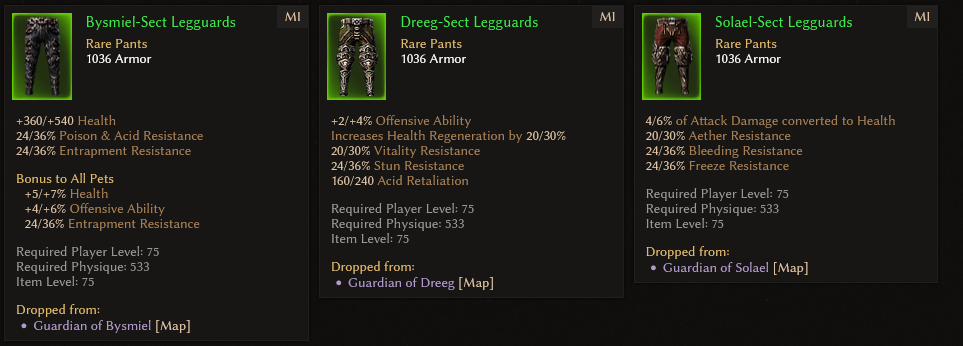
during the quest you will have to fight 3 bosses which drops unique Monster Infrequent pants, all of them are good with their own decent bonuses, just pick whatever has better resistances.
Also dont forget to get a higher level version of the Spectral Warmaul from the Steps of Torment, a level 70 will do, you can keep it up to level 94.
LVL 71 - 78
Skills:
As a Ritualist i had a choice to either use Bone harvest or Wendigo Totem,
usually i opt for the Bone Harvest, it grants a decent chunk of bonus Vitality Damage and bonus %Damage, but this specific build does not have Cold Damage conversions to Vitality Damage , its important to have Cold → Vitality conversions or Elemental Damage → Vitality Damage conversions because of the Soul Harvest node in Bone Harvest which grants a lot of flat Cold damage.
Soul Harvest buffs the user for a period of 7 seconds, in this period you deal extra Flat and %Damage, this bonus cannot be underestimated, with conversions you can gain extra 150-200 flat Vitality Damage , but without this bonus is about 88-90 or so.
Because of lack of conversions I decided to use Wendigo Totem,
the aura granted by the totem is similar in the bonuses to Soul Harvest.
Additionally, the Totem itself deals decent amount of damage and it heals the character.
The heal might not look like much but our Ritualist will have about 18-22K health.
That’s about 1400 (7%) + 740 = 2140 per 0.5 seconds, or 4280 per 1 second, and thats a lot.
LVL 78 - 83
We are slowly climbing towards level 94, on the way you might want to collect Vitality Oriented items for temporary use. The final build will use Hybrid Items, but while leveling or Farming the items you can use Vitality items .
And since the build hasn’t changed much, i believe its a good idea to start explaining the build itself past level 94. I will post 2 builds, one will be the budget version which will be easy to assemble, but weaker and the second build will be more optimized hybrid build but which will require some farm.
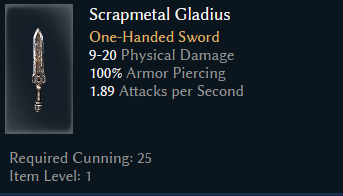
The final build is going to dual-wield two melee weapons, one will be the Bloodrender and the second will be the Howl of the Wendigo.
Both weapons can be bought from a Faction, so they can be easily acquired just by doing some Repeatable Factions Quests for 20-30 minutes or so.
Crafting them isn’t difficult either, both of them will requires 2 low tier relics and about 150k coins.
Both weapons are Hybrid and support Vitality Oriented builds and Bleeding Oriented builds.
If you look at the weapon you might notice that the base damage is actually Physical Damage , but this is not an issue, the Bloodrender converts all Physical damage to Vitality when we use Savagery.
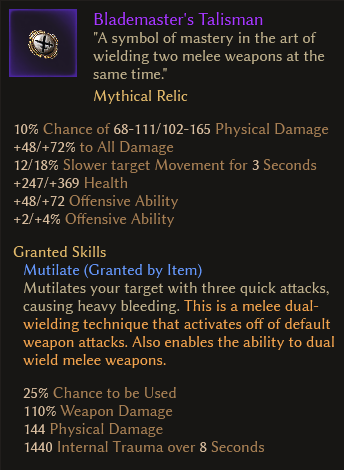
To be able to dual-wield them we will need a Relic like Bladedancer’s Talisman or Blademaster’s Talisman, i believe the level 35 Bladedancer’s Talisman is actually better than its higher level version Blademaster’s Talisman because the level 35 relic has slow and entrapment resistance, the CC resistances are usually sort of rare and the higher level version of the relic lacks any CC resistance and boasts only a slight bonus damage and technique trigger chance.
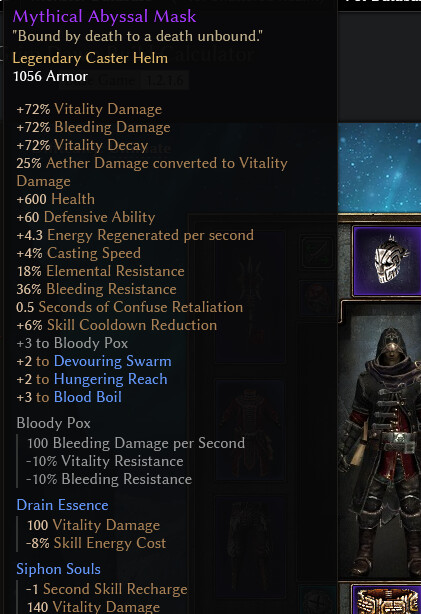
The next item we will need is also a Hybrid which supports both Vitality and Bleeding, its the Mythical Abyssal Mask, this item is slightly more difficult to get, this is not a faction item, but it has a Blueprint.
Grim Dawn does not have many Blueprints, so if you spend 3-5 hours of Totem Grinding, you are basically guaranteed to get most if not all Blueprints in the game. I understand that 3-5 hours might sound like a lot, and it might feel daunting, but you have to do it only once, all blueprints are shared among all characters, your other characters will also have access to these blueprints, so endure just this once.
The Mythical Abyssal Mask has everything we need, Vitality and Bleeding damage, Skill Modifiers to Siphon Souls and decent stats overall.
The second random item we need is Mythical Wendigomane Leggings, we need this pair specifically for its +2 to Siphon Souls, we want our Siphon Souls to be maximum level 22/12
this pair must drop randomly, it doesn’t have a blueprint so it might take a while, alternatively you can use the Secret Path Monster Infrequent items discussed in the previous section.
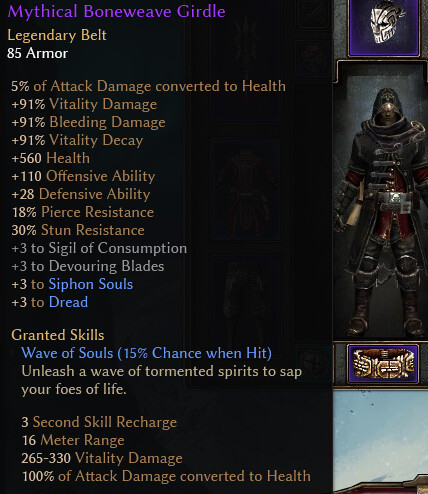
The next item we need is also random, its Mythical Boneweave Girdle, we also need it because it supports both Vitality and Bleeding and most importantly has +3 to Siphon Souls, items with bonuses to Siphon Souls are sort of rare. A budget version of the build can use a Lunal’Valgoth’s Waistguard with either a Vitality affix or Bleeding affix.
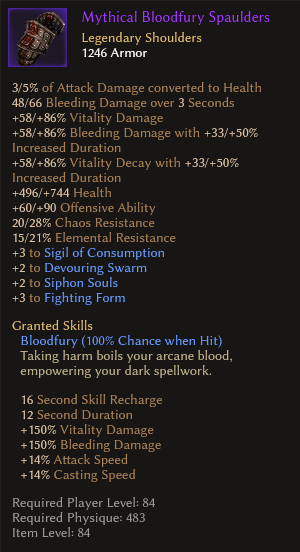
The next item we need is Mythical Bloodfury Spaulders, Mythical Bloodfury Spaulders is excellent, grants lots of damage, decent amount of HP and stats, but its a random drop, as a budget alternative you can use Mythical Cindervein Mantle or Elite Wendigo Vile Spaulders/ Elite Dreeg Vile Mantle.
The next item we need is also random but at least its an Epic and not Legendary, Mythical Skinflayer Raiment, on Ultimate difficulty the game showers you with both Legendary and Epic items so getting it wont be hard, you might get it while farming totems to get the Blueprint for the Abyssal Mask.
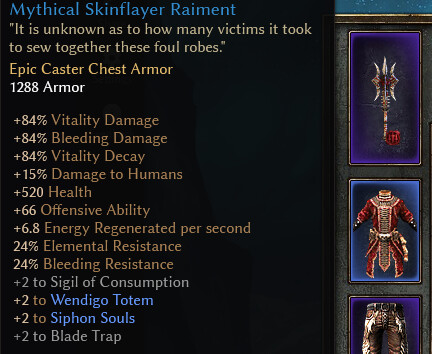
It has +2 to Siphon Souls and bonuses to both Vitality and Bleeding damage, as an alternative you can use a budget Elite Wendigo Vile Cuirass, you can simply purchase it immediately, but Elite Wendigo Vile Cuirass is not a Hybrid item and supports only Vitality damage.
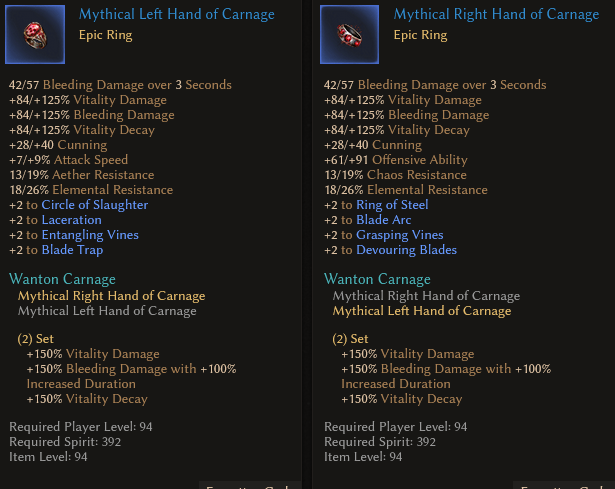
And lastly we need an Epic set of rings, Wanton Carnage, Epic items are common, if you find 2 identical rings you can transmute one ring into another at the inventor in any DLC.
I got unlucky during my Totem Farm so i did not get any Wanton rings, this is how i obtained the set, you just need some Scrap/Coins and any 2 Epic set items of levels 84-92, https://youtu.be/hYGuWKjuQ-I?t=618 you can see how easy is to obtain the set. (Even if you are unlucky, you should not waste more than 1 mil coins on rerolls)
Alternatively, you can use 2 Gollus rings for extra HP regeneration, but even though extra HP regeneration is nice, the damage Wanton set provides is simply too great, we basically get extra 300% both Vitality and Bleeding.
LVL 83 - 87
The old lvl 50 Praetorian set was simply too weak to support me at level 84, so i swapped it with some random Vitality items i found, Mythical Death’s Reach i have found is pretty good weapon, but its not Necromancer oriented, the Mythical Death’s Reach buffs Shaman skills, Occultist and Oathkeeper. Mythical Death’s Reach is excellent, but it doesnt fit this specific Ritualist, later i will swap the weapon and dual-wield the weapons mentioned earlier. I selected the items which either buffed my damage or granted resistances.
Gambling:
Similar to Diablo 2, Grim Dawn also has a similar mechanic like Gambling, but its linked to Crafting, after level 75 you might find blueprints for Emberguard Gauntlets, Plagueguard Grips and Stoneplate Greaves.

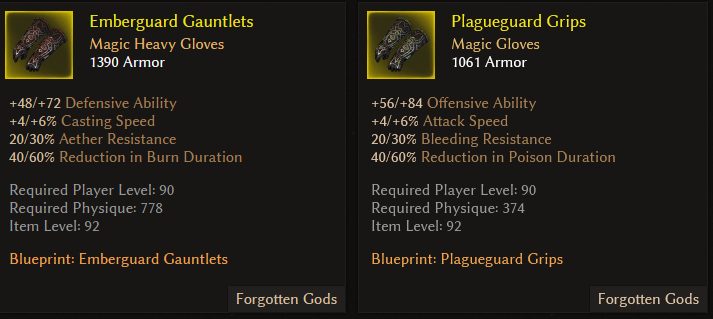
These items are similar to Monster Infrequent, because they have Innate Stats. You can see them in the image above.
Just like any item, when crafting them they can roll 2 affixes, and there is a small chance (4-5%) it can roll 2 Rare Affixes like this:
Combining into the item below:
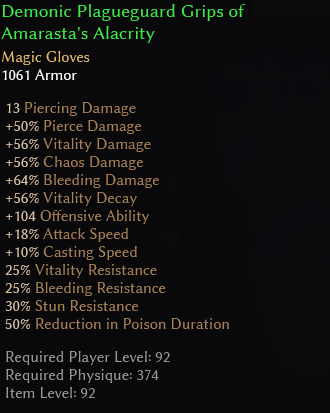

Obtaining extremely powrful, but rare items. I call them Double Rare, because they have 2 rare Affixes, or triple rare if the Item itself is also a rare Monster Infrequent.
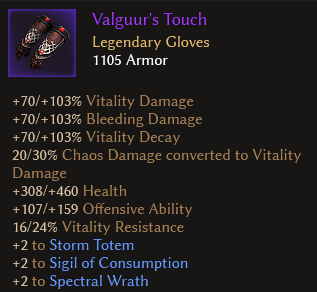
We will need to craft a lot of gloves and boots because the game offers very few Hybrid items for Vitality and Bleeding, one of such items is Valgur Touch, but it does not have any Attack Speed, so crafting a Plagueguard Grips with attack speed and Vitality/Bleeding damage would be excellent.
You will likely need to spend like 500 scrap 4-5 million coins on crafting gloves and boots to get a good hybrid item, this is not mandatory, even if you use some normal Vitality Mythical items like Morgoneth’s Grip, Mythical Voidrend Talons, Mythical Iceskorn Talons or Vitality boots like Mythical Boneshatter Treads, Mythical Voidwalker Footpads, the build will still perform quite well, but this will tank Bleeding damage by about 10%.
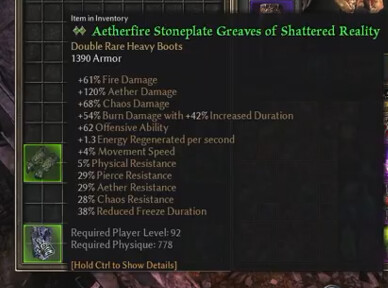
When i began crafting i obtained 3-4 double rare stoneplates, but unfortunately not Bleeding/Vitality oriented, a stoneplates with 2 rare affixes have 2 green crystals near its name:
LVL 87 - 97
I dont have much to say, the items are mostly the same, and the last 2 episodes are going to be simply grind to get level 100 and complete the main quests.
I can explain the importance of Techniques in Melee builds, our final build uses Vitality Savagery with the conversion from Bloodrender.
and overall the damage output of Savagery is decent, it deals both Vitality Damage and Bleeding Damage ,
when you are dual-wielding weapons your damage is not doubled, you dont strike with both your weapons at the same time, your character will attack with one weapon, then with the second one and sometimes, in about 30% of cases, the character will make a dual attack.
This is where Techniques will help to increase the total damage output of Savagery,

when a Technique is triggered the character strikes with both weapons at the same time, our future build will have 3 Techniques, 2 from Necromancer class and 1 from the Relic Bladedancer’s Talisman with these we will have ~56% chace to trigger a technique and strike with both weapons, i could have used a 2x Oleron’s Blood components or Seal of the Void to get 32% more, but i opted for Seal of Blades, the pierce damage from the Seal of Blades will be turned into Vitality damage due to Global conversions, it also grants Bleeding damage and bonus Armor, i think this might fit better a Hybrid Vitality Damage and Bleeding Damage build.
Sadly i cannot use something like Mythical Direwolf Crest to be able to dual-wield, Lagoth’Ak’s Bloodbinding is simply too valuable.
LVL 97 - 100
YT 11
YT 12
YT 13
YT 14
GrimTools 100
These last 4 episodes are mostly grind, blooms, aether crystals, coins, legendaries.
Its a good moment to explain why am i grinding for blooms and aether crystals, you need level 75 Components.
When selecting components first you need to secure 100% armor absorption, even when you wear a robe and dont have a lot of armor you need 100% armor absorb.
To secure 100% Armor Absorption you can use either:
For chest, helmet and shoulders slots
3x Living Armor
OR
3x Sacred Plating
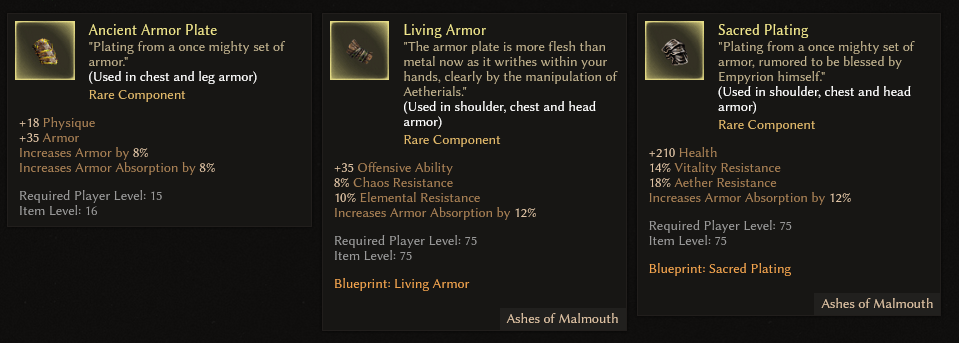
and for pants
1x Ancient Armor Plate
this setup fits a character that lacks resistances, you can combine the chest, helmet and shoulders slots, you can use 1 Living armor and 2 Sacred Plating or 2 Living and 1 Sacred, or just 3 Sacred Platings to secure 100% absorption, depends on what kind of resistances you are lacking, Sacred Plating is good for Vitality/Aether Resistance, Living Armor is good for Elemental/Chaos Resistace.
Alternatively, you can use:
For Shoulders/Helmet OR Shoulders/Chest Armor
2x Sacred Plating
OR
2x Living Armor
and for pants
1x Scaled Hide
With this you also get 100% Armor Absorption, but at the same time you use only 3 slots and not 4 like in the previous case, you have 1 Free slot either Chest Armor or Helmet.
This grants you some flexibility, if you need more Vitality Resistance you can use a
Prismatic Diamond into the Helmet slot, the Prismatic Diamond will also function as a mini-safety net in case you get low HP. Or a Titan Plating if you need more Armor and Pierce Resistance.
You can use a Kilrian’s Shattered Soul into the Chest Armor in case you need more Attack speed and some Vitality Resistance + some Vitality damage.
If you lack Offensive ability and Entrapment resistance then Chains of Oleron is also a decent choise.
As for the rest of the slots you can use these:
For Rings: 2x Bloodied Crystal or 2x Runebound Topaz
i recommend 2x Bloodied Crystal for Bonus Armor in 95% of cases.
For Amulet Seal of Annihilation for attack speed/debuff
For Belt, Gloves, Boots:
3x Spellscorched Plating or 3x Ugdenbog Leather
depending on what resistances you lack the most
All of these hight level components require lots of Blooms and Aether Crystals. So that’s the reason why i am grinding this much.
And for Weapons you can use either 2x Seal of Blades, or 2x Seal of the Void in case if you want more passive Techniques to empower Savagery → a cheaper alternative for Seal of the Void is Oleron’s Blood
i think Seal of Blades are better, the Pierce Damage will be converted to Vitality Damage, and the Seal of Blades grants a solid amount of Bleeding damage.
As for the Augments you can use
For Jewelry:
x3 Arcanum Dust from Malmouth, +30% total damage will boost both Vitality Damage and Bleeding Damage. Decent DA bonus + % elemental Resistance.
For Weapons:
x1 Hexxer’s Kiss,
Hexxer’s applied debuff stacks with all other debuffs, and due to our decent Attack Speed its basically always applied.
x1 Ravager’s Harvest
Armor Augments:
Depends on what you need, most potent Augments are located in the Forgotten Gods DLC and Malmouth DLC. You can check this community created Component/Augment guide, its slightly dated, some of the augmets received buffs so some numbers might not match and be higher Steam Community :: Guide :: Resistances by Components and Augments.
Performance:
Moosilauke - Arkovian undead Nemesis ~ 34 seconds
Benn’Jahr - Chthon Nemesis ~ 17 seconds
Grava’Thul - Chthon Nemesis 2 ~ 20 seconds dont tank his null-orbs
Valdaran - Aether Nemesis ~ 11 seconds
Kubacabra - Beast Nemesis ~ 29 seconds
Lokarr ~ 18 seconds
Clones ~ 2 minutes 30 seconds
Dungeongs:
Alkamos - Steps of Torment Dungeon Boss ~ 21 seconds
Shar’zul - Bastion of Chaos Dungeon Boss ~ 14 seconds
Aldritch - Port Valbury Dungeon Boss ~ 30 seconds
Gargabol - Ancient Grove Dungeon Boss ~ 21 seconds
Morgoneth - Tomb of the Heretic Dungeon Boss ~ 20 seconds
Celestials:
Mogdrogen ~ 2 minutes 50 seconds
Mogdrogen is quite easy once you learn how to dodge his Sunder Cloud and get extra 80% Lightning Resistance overcap. 2m50s kill is quite slow, but taking in count that half of our damage is Bleeding i will take it.
I do not recommend trying to kill Ravager and Callagadra without adjustments, and even with adjustments be careful, dont face tank, we deal lots of DoTs with Bleed and Decay, debuff and run will secure a relatively safe kill:
Ravager ~6 minutes, not my proudest kill, lost of running and clustering D: i aways chose to fight Ravager of Flesh, his hat with +12% HP is super useful. This time, i summoned Ravager of Minds i havent fought in like 10 major patches xD since when they gave him Nullifying Totems? xd null totems surprised me, not in a good way.
Callagadra ~5m30s, Callagadra is an annoying boss, Fumble, Sunder, random Shifting Sands and Tornado’s that can teleport and burst kill you in a second, but if you move → you are invulnerable, same strat, debuff/apply dots and run. With Serenity and extra 15% Physical Resistance from the Maw you should be fine.
Adjustments: Ravager slaps, and slaps hard, just like his sister Callagadra, one Sunder+a Crit or Nullification and you are dead, and this is applicable to most builds, unless you are a Warlord with 5500 armor and 50% Physical Resistance, but not every build is a facetanking Warlord.
I killed him with the old build while dual-wielding, but we can adjust our build to facilitate Ravager and Callagadra kill, i think something like Mythical Maw of the Damned, Howl of the Wendigo and Serenity would improve our Physical Resistance and survivability.
Shattered Realm, i dislike SR so havent run much, SR 26 - 28, SR 28 and below should be easy, a walk in the park, our high self sustain and resistance reduction should quickly get rid of most enemies, even after tanking 2 Sunder attacks of the Reaper of Souls under all his debuffs, i still had 50%+ HP, but everything above 28 is a risk, i managed to reach SR 32, but it wasnt fun, Moosi archers can deal 3/4 your HP with one Volley. Additionally, this character’s Freeze Resistance is quite low for SR, if you do want to farm SR, instead of a 1x Bloodied Crystal you can use a Frozen Heart, SR Moosilauke can permafreeze you if you dont use a Frozen Heart.
Final verdict?
The build is alright i guess.