This guide provides a set of high-level instructions on how to start modding with Farthest Frontier using the Mono build. It piggy-backs on other resources, such as an older IL2CPP FF Mod guide and a YT video for installing Visual Studio.
Disclaimer: I am very new to the modding scene, and am very much in the learning phase of C# so these instructions won’t be going into much depth about coding. The driver behind me doing this is my 8 year old son who thoroughly enjoys playing FF as much as I do who has created a long list of mod ideas for us to work on after I flippantly told him that 0.9.7 will make modding much easier and adds a lot more capabilities. I guess I have to eat my words now and try to implement some of his ideas! At least I’ll be able to work with him and explain some of the coding concepts.
Step 1 - Required software:
- Visual Studio 2022 (VS) Community/free version is fine. During installation, select the following items to be installed:
- .NET desktop development (required)
- Game development with Unity (optional)
- Farthest Frontier (FF) at minimum 0.9.7 (at the time of writing this, you’ll need to follow these instructions to download the beta)
Step 2 - Ensure FF runs in Mono mode:
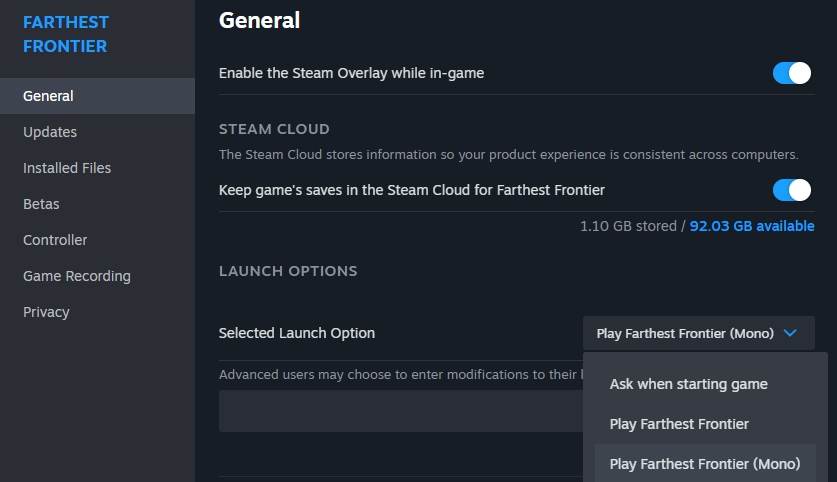
- In Steam, right-click on FF in your library and edit the “Selected Launch Option” to “Play Farthest Frontier (Mono)”. This FF build comes with MelonLoader pre-installed at the appropriate version (v6.6), as well as all the .dll files you’ll need to begin modding.
- It’s best practice to run the game once without any mods installed so MelonLoader can do its first-time configuration steps without any external factors so I’d advise to do this step now. Just getting to the main menu is fine and you can exit from there. You’ll have noticed that there was a terminal which opened before launching the game with a bunch of output. This is where any output you print within your mods, or errors, etc will be written.
- In Steam, right-click on FF → “Manage” → “Browse local files”. This takes you to your local installation of FF. It’ll typically reside in somewhere like “C:\Program Files (x86)\Steam\steamapps\common\Farthest Frontier”. In this folder, ensure you have a “Farthest Frontier (Mono)” folder and open it. This is the FF.exe, mods, etc. that will now be executed when you run the game.
Note: Having MelonLoader installed disables (whether you have any mods installed or not) any achievement progress from being made. That being said, you can uninstall/reinstall MelonLoader from your FF Mono folder at your own will, or you can simply direct Steam to open FF in non-Mono mode.
Step 3 - Create VS Project:
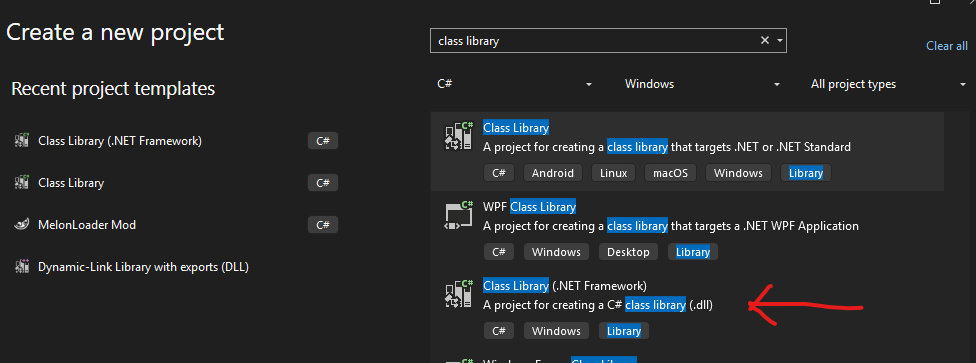
- Open VS & select “Create New Project” and using the search filters, select “Class Library (.NET Framework)” project template and hit “Next”.
- Enter your project name (this is difficult to change later, so choose wisely) and select a Framework version. I’ve always chosen the latest, but AFAIK it should be at least 4.7.2.
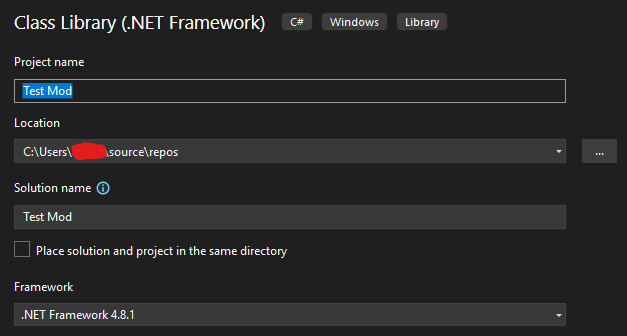
- Hit “Create” to create your project
Step 4 - Add project references
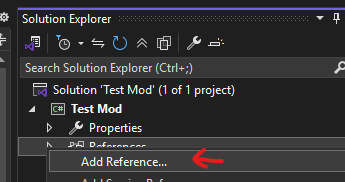
For your mod to be able to access the game’s code, you’ll need to add a few reference libraries to the project. To do this, in the “Solution Explorer” pane (if it is not visible in your project window, click “View”->“Solution Explorer”), right-click on the “References” list item and hit “Add Reference”
Navigate to the directory where we landed in Step 2, i.e. C:\Program Files (x86)\Steam\steamapps\common\Farthest Frontier\Farthest Frontier (Mono) . You’ll need to select a few files from a few different locations using this folder as the starting directory.
- MelonLoader\net6\MelonLoader.dll (required - mod loader)
- MelonLoader\net6\0Harmony.dll (optional - extra library to do cool stuff)
- Farthest Frontier_Data\Managed\Assembly-CSharp.dll (required - game’s code)
- Farthest Frontier_Data\Managed\UnityEngine.dll (required - Unity Engine to run 2D & 3D games)
- Farthest Frontier_Data\Managed\UnityEngine.CoreModule.dll (required - fundamental classes and functionalities)
- Farthest Frontier_Data\Managed\UnityEngine.InputLegacyModule.dll (required - handles user input (mouse/keyboard/etc))
- further libraries may be required depending on your mod’s scope, but these are the essentials.
Step 5 - Copy some code
I’ll shamelessly copy the instructions and code from Average Enjoyer on their guide posted here. This example mod will achieve two things, on T-press, the application will be terminated, and on V-press, a new villager will be spawned underneath the mouse pointer.
- In the “Solution Explorer”, now expand the “Properties” with icon tool above “References”. It contains a file named “AssemblyInfo.cs”. Open it and add this to the top of the file:
using System.Reflection;
using System.Runtime.InteropServices;
using MelonLoader;
using Test_Mod;
// ...
[assembly: MelonInfo(typeof(Class1), "Test", "0.0.0", "ϞϢϘ") ]//MelonInfo(typeof(ClassOfMod), "Game Mod Name", "Version", "Author")
[assembly: MelonGame("Crate Entertainment", "Farthest Frontier")] //MelonGame("Studio", "Game")]
- Now lets add some features to the mod, open up “Class1.cs”, delete everything and paste this:
using UnityEngine;
using MelonLoader;

namespace Test_Mod
{
    //The class called by MelonLoader. This class has to inherit of MelonMod main class
    public class Class1 : MelonMod
    {
        public override void OnUpdate()
        {
            //This is one of Melon API function we can use to add features : https://melonwiki.xyz/#/modders/quickstart
            //Here only a key to exit the game and another to spawn a villager on cursor position
            if (Input.GetKeyDown(KeyCode.T))
            {
                Application.Quit();
            }

            if (Input.GetKeyDown(KeyCode.V))
            {
                MelonLogger.Msg("V pressed");
                GameManager gameManager = GameObject.Find("GameManager").GetComponent<GameManager>();
                if (gameManager != null)
                {
                    Vector3 mousePosition = Input.mousePosition;
                    Vector3 terrainWorldPointUnderScreenPoint = gameManager.terrainManager.GetTerrainWorldPointUnderScreenPoint(mousePosition);
                    gameManager.villagerPopulationManager.SpawnVillagerImmigration(terrainWorldPointUnderScreenPoint, true);
                }
            }
        }
    }
}
Step 6 - Build and Install mod
- Ensure your files are saved
- Build your mod by hitting “Build” → “Build Solution” on the top menu banner. Or press “CTRL+SHIFT+B”
- There should be some output in the “Output” pane that ends with something like this:

If this is not the case, you’ll likely have some errors stating what the issue is. At this stage, ensure that you have the correct versions of everything installed (follow this guide again), as well as ensuring the correct project references have been added (Step 4). Also ensure that the code was copied in its entirety and there aren’t any syntax issues. - Navigate to the directory where your build is (hint: see the directory in pic above) and copy this file
- Navigate to the “Mods” folder in your FF (Mono) folder from Step 2 and paste your mod library here.
That’s it! Now just run the game. You can now press T to exit the game, or press V to spawn a village underneath your cursor position.
If you want to explore all the possibilities of what you can do within your mod, select the “Assembly-CSharp” object in the “Object Browser” within VS.
Thanks for reading and enjoy!
I look forward to seeing your mods in game!