Hi, everyone! This is my first posted build so let me know if I did anything wrong or anything needs clarifying in this first post. The ToteMortar Elementalist, as the name implies, makes use of Storm Totem & Mortar Trap to do most if not all of its damage. It’s a bit like an “active pet” build, in that it’s fast paced but the stuff you put down does all the work for you. I designed the ToteMortar character around three ideas that I personally jive with:
- 1. I am very bad at aiming in ARPGs. I need skills that aim for me or have large AoE, but I hate the passive playstyle of pets. I like hitting buttons.
- 2. I would like it to clear fast while also being relatively tanky.
- 3. I don’t want to have too many skills. Having huge set-up scares me!
Surprisingly, I managed to fulfill all three - while technically broadening my horizons a little bit on point #3. I have more skills than I would have imagined when I was planning, but their cooldowns work in tandem very well so it’s never a hassle. Before I go into this too much deeper, here’s some links:
Grimtools w/ +Skills & Devotions (and my gear)
https://www.grimtools.com/calc/aZqadwdZ
Grimtools w/o +Skills or Gear
https://www.grimtools.com/calc/RZRnL19Z
Important break points (regardless skill allotment w/o gear) ::
You want to keep these skill values at this point. Re-distribute your Skill Points if you get new gear and go over them while levelling!
[ul][li]MAX Mortar Trap + Heavy Ordnance + “The Big One”[/li]
[li]MAX Storm Totem[/li]
[li]12 Raging Tempest (-res% falloff)[/li]
[li]10 Thermite Mine (-res% falloff)[/li]
[li]10, 14, OR 18 Blast Shield (+max res% break points)[/li]
[li]11 Vindictive Flame (Total Speed% break point)[/li]
[li]12 Ulzuin’s Wrath (100% knockdown retaliation)[/ul][/li]
Devotions & Assignments ::
[ul][li]Dryad’s Blessing + Flashbang (Dryad) :: Often heals you when you throw a flashbang.[/li]
[li]Healing Rain + Mogdrogen’s Pact (Tree of Life) :: Makes you very tanky in combination with healing flashbangs.[/li]
[li]Elemental Storm + Wind Devil (Rhowan’s Crown) :: Provides more resist reduction and small damage over time.[/li]
[li]Reckless Tempest + Storm Totem (Tempest) :: Procs often, increasing damage. Works almost the same as Storm Totems’ default.[/li]
[li]Arcane Bomb + Mortar Trap (Widow) :: Provides more lightning resist reduction; is on Mortar because it doesn’t need proximity.[/ul][/li]
Stat Sheet (only aura buffs on) ::
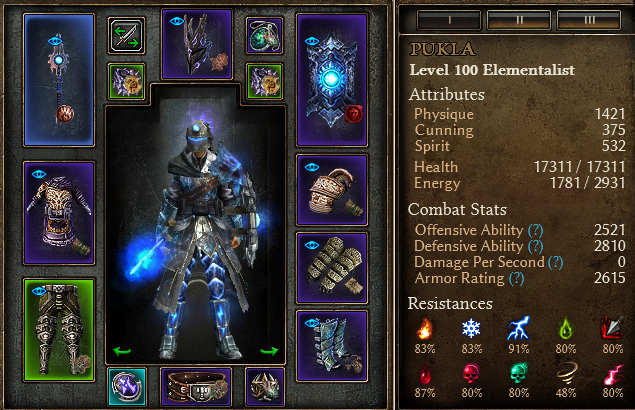
Sadly, you will not look this cool by default. Illusionist is your friend!
My Gear ::
[ul][li]Helm :: Dagallon’s Faceguard + Leathery Hide[/li]
[li]Shoulder :: Mythical Light’s Defender Epaulets + Living Armor[/li]
[li]Chest :: Mythical Light’s Defender Plate + Living Armor[/li]
[li]Main Hand :: Malmouth Stormcaster + Seal of Destruction/Malmouth’s Heart[/li]
[li]What?! A blue?!?! Yeah, the +1 to both masteries is best imo.[/li]
[li]Off Hand :: Mythical Skybreach Bullwark + Seal of Might/Malmouth’s Heart[/li]
[li]Gloves :: Mythical Wyrmbone Handguards + Spellwoven Threads[/li]
[li]Belt :: Mythical Hammerfall Girdle + Ugdenbog Leather[/li]
[li]Pants :: Stonehide Dreeg-Sect Legguards of Kings + Ugdenbog Leather[/li]
[li]What?! A double rare?!?! Yeah, just use any good resist Green here.[/li]
[li]Boots :: Mythical Wyrmscale Footguards + Mark of Mogdrogen[/li]
[li]Ring :: Preserving Living Ring of the Basilisk + Runebound Topaz/Kymon’s Vision[/li]
[li]Ring :: Incorruptible Living Ring of Attack + Runebound Topaz/Kymon’s Vision[/li]
[li]Not double rares, but still good. Try to get ‘of the Basilisk’ & ‘Incorruptible’ Living Rings. The other mods don’t matter.[/li]
[li]Amulet :: Mythical Celestial Stone of Halakor + Tainted Heart/Kymon’s Vision[/li]
[li]Medal :: Mythical Mark of Divinity + Tainted Heart[/li]
[li]Relic :: Eye of the Storm[/ul][/li]
Required / Suggested Gear ::
[ul][li]Main Hand :: Malmouth Stormcaster (Honored w/ Malmouth Resistance)[/li]
[li]Very easy to get by Elite, when you can use it.[/li]
[li]Helm :: Dagallon’s Faceguard (Craftable, at least. It gives +1 to Mortar Trap Summon Limit.)[/li]
[li]Amulet :: Mythical Celestial Stone of Halakor (Not required to play, but +40% Crit Damage to Mortar Trap is too good and it has +1 Summon, too.)[/li]
[li]Notes :: Anything with +1 Mortar Trap Summon is very good. +1 Storm Totem Summon is not as good; we can’t cast it fast enough.[/ul][/li]
General Gameplay & Skills Used ::
As I said above, I made this to be a ‘lazy’ kind of build that’s not as passive as pet or retaliation. I needed the Storm Totems & Mortar Traps to aim for me, but still wanted to be clicking and hitting buttons ideally. Most fights go like this:
![]()
[ul]1. Storm Totem & Mortar Trap :: Drop one of each. Put these on a key you are okay with hitting often.
[li]2. Wind Devil :: Drop one. Put this on a key you are okay with hitting often, too.[/li]
[li]2a. Thermite Mines :: Not necessary unless there’s a chunky hero in the pack. Hit it once or twice, but not more (6 summon limit).[/li]
[li]3. Flashbang :: Throw one, then keep throwing them until step 1 is off cooldown. I put this on right click. Repeat![/ul][/li]That’s it! Very simple to play and it all loops back well. You can usually throw 2 - 3 Flashbangs before you reset to step 1.
![]()
These buffs just stay on at all times. They are…
[ul][li]Presence of Might (Shield Component) :: +% Phys, Pierce, Vitality, Bleeding Resist.[/li]
[li]Stormcaller Aura (Relic) :: +% Lightning & Electrocute Damage, +% Lightning Resist.[/li]
[li]Flame Touched :: +% Fire, Lightning, Burn, Electrocute Damage.[/li]
[li]Vindictive Flame :: +% Total Speed, Stun/Knockdown/Slow retaliation.[/li]
[li]Mogdrogen’s Pact :: +Regen, +% Health, +% Pierce Resist.[/li]
[li]Stormcaller’s Pact :: +% Crit Damage, +% Electrocute Damage, +30% chance of extra Lightning Damage.[/ul][/li]
Build Positives ::
[ul][li]No Aiming or even Attacking :: As I said above, I’m bad at aiming. You don’t even need to attack, just drop stuff and watch damage.[/li]
[li]Good Single Target & Area of Effect :: Storm Totem covers weak mobs and provides consistent single-target damage while Mortar Trap throws huge punches. Both of them cover single and multiple targets easily.[/li]
[li]Very Easy Leveling :: You only need to respec once at level 20. After that you can cruise on Storm Totem & Mortar Trap through everything.[/li]
[li]Very Safe :: Even before the build is complete, you don’t need to be in enemies’ faces ever. You can sit on the sidelines throwing Flashbangs out of harm’s way.[/li]
[li]Very Good Farmer :: You can sprint through a lot of content, even endgame dungeons, very quickly and safely.[/ul][/li]
Build Negatives ::
[ul][li]No Aiming or even Attacking :: This is a negative, too?! Yeah, if you would be bored without attacking, this may not be your build.[/li]
[li]Crucible is Just OK :: Aspirant and Challenger are a breeze; Gladiator is possible but not very easy. Damage pools will kill your stuff pretty fast if you aren’t vigilant, especially on high waves.[/li]
[li]Initially Very Delicate :: Most of your survivability comes from your gear, since we are not Soldier. We have Blast Shield, but even then if you are caught in a bad place while undergeared you may be in trouble.[/li]
[li]Aura Reliance :: This one’s not very major, but heroes and bosses that purge your auras or drain your energy are a hassle. We have a lot of those, and they all contribute a lot - losing them sucks.[/ul][/li]
How To Level ::
A lot of build guides don’t include a how to level it section, but I would like to. This build sails smoothly through Normal and Elite on just Storm Totem & Mortar Trap, and even does well in Ultimate so long as you’re careful. First, we have things to prioritize:
[ul]1. Resistances :: These are critical. Bonus Damage% doesn’t matter very much, you will shred stuff very well with the sheer volume of your dropped stuff.
2. Health :: This is pretty important, too. If you couldn’t tell, we care less about damage and more about living while leveling. You can get enough from just boosting your Skills.
[li]3. Move Speed :: You will be strafing and kiting a lot while throwing Flashbangs, moving faster is good. I recommend a Traveler’s Mark on all boots while you go.[/ul][/li]Okay, but now how do you level? Here we go.
[ul]Step #1 :: Choose Demolitionist. Get 1 Fire Strike, then 12 Explosive Strike. You will use this (probably with a rifle) until you beat the first big boss. Save your points until Level 10, then choose Shaman and start investing purely in the Mastery Bar.
[li]Step #2 :: Respec at Lv20! Get rid of Fire Strike & Explosive Strike, charge up the Shaman Mastery Bar to Storm Totem and buy as much of it as you can.[/li]
[li]Step #3 :: Max Storm Totem, then increase Demolitionist Mastery until you can get Mortar Trap - max that, too. You are now set for Normal and most of Elite.[/li]
[li]Step #4 :: Get 1 Wind Devil, then get Raging Tempest to 12.[/li]
[li]Step #5 :: Get 1 Flashbang, Searing Light, Flame Touched, Vindictive Flame, Ulzuin’s Wrath, Maelstrom, Mogdrogen’s Pact, Heart of the Wild, and Oak Skin.[/li]
[li]Step #6 :: Get 10 Thermite Mines.[/li]
[li]Step #7 :: Finish Shaman Mastery, get 1 Stormcaller’s Pact.[/li]
[li]Step #8 :: Finish Demolitionist Mastery, max out Heavy Ordnance & “The Big One” as you go.[/li]
[li]Step #9 :: Fill out Flame Touched, Heart of the Wild, and Stormcaller’s Pact.[/li]
[li]Step #10 :: The rest is up to you, really. There’s no big deal how things are spent at this point![/ul][/li]How about Devotions?
[ul][li]Step #1 :: Spend 1 Point on Primordial (Blue) in Crossroads.[/li]
[li]Step #2 :: Fill out Tsunami, bind it to Fire Strike. Refund Crossroads.[/li]
[li]After you respec, bind Tsunami to Storm Totem.[/li]
[li]Step #3 :: Spend 1 Point on Eldritch (Green) in Crossroads.[/li]
[li]Step #4 :: Fill out Quill & Scholar’s Light. Refund Crossroads.[/li]
[li]Step #5 :: Spend 1 Point on Ascendant (Purple) in Crossroads.[/li]
[li]Step #6 :: Fill out Rhowan’s Crown, bind it to Mortar Trap.[/li]
[li]Step #7 :: Fill out Sailor’s Guide, refund Tsunami.[/li]
[li]Step #8 :: Fill out Tempest, bind it to Storm Totem.[/li]
[li]Step #9 :: Spend 1 Point on Order (Yellow) in Crossroads.[/li]
[li]Step #10 :: Fill out Dryad, bind it to Flashbang.[/li]
[li]Step #11 :: Refund Order (Yellow) in Crossroads.[/li]
[li]Step #12 :: Fill out Widow, bind it to Mortar Trap. Rebind Rhowan’s Crown to Wind Devil.[/li]
[li]Step #13 :: Fill out Eel.[/li]
[li]Step #14 :: Fill out Solemn Watcher, Lizard, and Lion.[/li][*]Step #15 :: Finish with Tree of Life, bind it to any Aura.[/ul]