Introduction
(this section will repeat between my build overviews; you can skip to Build Concept if you’ve read one of my overviews before and are familiar with my rating system and test criteria)
Patch 9.8 brought, among other things, major changes to the Shattered Realm. Given that SR is where I do my endgame build testing, with the release of the patch I decided to redo all the testing for all my builds. And since I’d be putting in the time and noting down all my results anyway, I thought I might as well post the builds and their scores publicly for others. Who knows, maybe you’ve been thinking of trying something similar and are curious if it even works. Or maybe you’re just morbidly curious and like that tickly feeling in your brainhole when you see someone play something utterly stupid.
Now, what exactly does this testing entail? Each character has to do 10 SR75-80 runs (I used to do 5 runs but I’m expanding it to 10 for this second wave). Every run completed within timer counts as a success. It takes 6 successes (over 50 % success rate) for me to consider a build complete. If a build keeps failing to meet that quota, I keep improving it till it works. Ergo, no build I post here will have a lower score than 6/10, because if it doesn’t have over 50 % success rate, I’m not done improving it and it doesn’t get posted.
Three rules were followed to make the results more representative:
- no consumables other than healing and energy elixirs can be used;
- no shrines can be taken; if a build has bad resists, it’ll have to make do with bad resists, Rattosh isn’t gonna be saving its ass;
- no mutator hunting; if I get shitty mutators, I’ll have to succeed with shitty mutators.
Other than that, it doesn’t matter in what manner the runs are completed. If a build takes twice as long to finish a run than others do, that’s perfectly fine as long as it successfully finishes. Doesn’t matter whether the build has to dodge Nemeses in shards like the plague or whether it hunts them for sport, doesn’t matter if it has to kite like crazy or stands its ground with ease, doesn’t matter if it completes the runs deathless or not. Only thing that affects the score is completion within timer. Generally, a weaker build that is slow, fragile, hard to play etc. will end up with a lower score regardless because its shortcomings will affect its reliability across the 10 runs.
Now, two final things before we get to the build itself:
-
As mentioned in the title, this is a build overview, not a build guide. What’s the difference? Well, a build guide says “this is the way you should build this type of character”. What I’m saying is rather “this is what I did, here’s why I did it this way, here’s how it turned out”. It’s more of a documentary, a post-mortem, rather than an example to be followed. “Wait, that’s just a fancy way of saying you make shit builds,” you might say. No, not exactly. I try to make a strong character without deviating from the concept of the build. But the concept of the build might not necessarily be something one should even be doing in the first place
 While my build concept and the in-game support will often align to create a reasonably predictable, almost cookie cutter build, just as often I’ll just be doing something abundantly demented for my own reasons. I’ll always endeavour to explain in the Build Concept section why I chose to do a thing a certain way, but I don’t want you to get the impression that what I’m presenting is a thing you should necessarily be doing.
 -
I’m also by no means hyperfocused on optimising the crap out of a build once it’s in a workable state. There will almost always be things to optimise on my characters, but frankly, I prefer spending an hour theorycrafting a new character rather than shuffling an existing character’s devo tree, gear, component and augment setup just to squeeze 5 % more damage out of it. I don’t care that much.
With that out of the way, let’s get to the build itself.
Build Concept

STOP! Hammer time!!
When AoM came out, I set myself the goal to create at least 3 characters centered around each of the two new masteries. This build concludes that series of “mandated” builds.
The issue when coming up with a third Inquisitor build was that the two Inquisitors I made before that, the Gunslinging Runecaster Infiltrator and the Flames of Ignaffar Purifier, already used up almost everything the Inquisitor mastery had to offer. In fact, the only skill on the Inquisitor tree not used by either of the two builds was Storm Box of Elgoloth. Not exactly an easy centrepiece to a build. Damage-wise, while I didn’t venture into any major conversions, like through FoI’s transmuter node, I also covered both the Elemental and the Pierce aspects that are at the core of the mastery. But there was one other damage type kinda peppered across various skills in the mastery that I haven’t explored: Physical. At the time, I only had one physical build, a fledgling sword’n’board Commando that I had every few ideas for and very little interest in playing (that build would eventually veer off into Fire Retal and become an absolute endgame monster). The Commando at the time was using Blitz and Cadence, but I had yet to do anything with Forcewave or Blade Arc, Soldier’s other two major damage skills. And so I created this Tactician to give the Soldier mastery its chance to shine at last and explore the support side of Inquisitor.
Setup
1.2 UPDATE: Build has gained about 9k DPS due to improved damage scaling on Forcewave. While some other FW items have been nerfed to compensate, this build uses none of them, so it only benefits. The removal of the Null Field modifier from Inquisitor Seal and its replacement with Runic Seal makes that an attractive option for this build. Particularly due to the need to relocate to avoid Sunders, the ability to place Seals at a 1 s cooldown is very desirable. 1 point removed from Vigor and moved to Runic Seal. Build can run 80-81 but it feels a bit fragile. The leech nerf definitely hurt this build; its leech was very low to begin with, and it relied mostly on just being able to put out good unresisted physical damage and leech some through Maul. With all that sustain nerfed, I probably wouldn’t try to push 85 with this level of sustain.
Initially, I tried combining the two aforementioned skills, using Forcewave as spam and Blade Arc with Clean Sweep as a nuke in between. The playstyle of the two skills didn’t gel well, though, as Forcewave promoted a ranged playstyle and would often erase enemies before they’d get close enough for Blade Arc to do anything. So I eventually streamlined the build to just pure Forcewave spam.
As luck would have it, supporting spam Phys Forcewave on Tactician is pretty damn breezy. Stonefist Rebuke is custom-made for this playstyle and there’s a bunch of gear between the Octavius set, Earthshatter Treads and Grasp of Unchained Might that all promote various combinations of Tactician skills on Physical, so even if we’re not using all the skill modifiers or bonuses (such as Rune of Kalastor on the boots and the set), there’s no shortage of %damage and flat damage with relevant skill bonuses on all the various slots. In fact, with what the aforementioned pieces of gear bring, the build ends up with a hilarious choice from 4 different Exclusive skills, as they each work well with Physical damage.
Funnily enough I even wound up getting Storm Box of Elgoloth in there in the end. There was only really one amulet worth considering for the playstyle, Shambler’s Heart. However, the skill bonuses it provided were mostly useless, as Forcewave’s main node was exceedingly easy to cap, and while the flat damage modifier was nice, the build wasn’t taking full advantage of what the amulet provides, as the CDR has no effect and the flat damage is reduced by 18% through the Forcewave spam transmuter. With all the flat damage Forcewave already has on it from %WD, item modifiers and the main and second node, the extra 90 flat just wasn’t leaving a particularly impressive mark on the DPS. Reducing enemy Phys res and adding another independent source of damage through the Storm Box Conduit not only yielded more damage, it also brought in DA reduction for better crit chance, which is important for phys builds due to their core devotions, and it covered the last part of the Inquisitor mastery that was left untouched. And of course, the increased survivability through the raised resistance caps never hurts.
Filling the rest of the slots is rather easy, as most of the gear is just premade for excellence. We got two resistance reduction rings, the usual phys godpants (even though, technically, Aleks Chausses would let me hardcap Rending Force, were I so inclined), no-brain medal choice. Pretty much the only parts worth mentioning are the belt and the helmet. Obviously the helmet is BiS, you’re not gonna be looking for a substitute. But depending on what rolls you get on it, you might be able to spare yourself the hassle of having to farm the belt. Finding the Supremacy affix on the belt isn’t that hard but it’s also not strictly necessary, Forcewave is cappable even without it. The bigger issue is the resistance coverage. If your helmet rolls bad on the resists you’re gonna need to make up for it on the belt. But if you get good resist on the helmet, you might be able to save yourself the trouble with the belt and just grab Reforged Chains of Oleron for some easy premade flat and % damage. The resist roll on the Conduit is also going to play a major role in that decision.
Is anybody surprised? Well, actually, I am, just a little bit. I was expecting a 10/10 but I did actually fail a run. Before we get to that, let's discuss the build's strengths.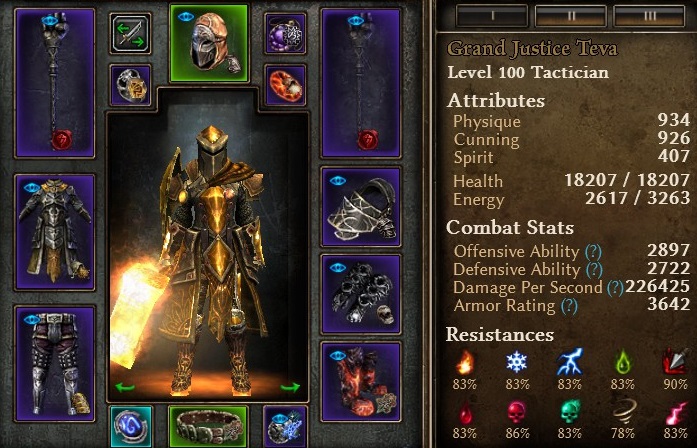
First and foremost, it’s a Phys build. That automatically eliminates enemy resistance issues other builds would run into. Combine that with just filthy damage output on both flat and DoT, solid cast speed, massive native AoE on the core skill, solid OA baseline, plus a good bit of peak OA when Fighting Spirit and Deadly Aim are up, plus around 250 DA shred between Storm Box, and either Rebuke (granted skill from the weapon) or the reduced DA proc on the weapon’s 4th line and you’re already set for victory there. The only thing that could possibly prevent you from rolling over the opposition is survivability. Which is also excellent. A very nice health pool, solid resists with increased caps, ton of armor, solid phys res, nice CC res across the board, % DR, flat absorb. The health and DA are good enough that full Cunning dump is not an issue, only further enhancing the already great damage output.
The one place where the build can falter and the one thing that resulted in a failed run in these 10 attempts is that there’s a pretty noticable difference between what the build’s peak survivability is like and what its on-the-go survivability is like. When the build is fully set up ready to deliver damage, it’s sitting on anywhere between 15 to 29 % DR, depending on whether War Cry is up or whether you’re relying on the Ground Stomp from the boots. In addition, while there is no % absorb, there’s at least the 210 absorb from Seal. Not much, cause there’s no extra Seal points on the build beyond the Conduit, but it’s not nothing either. And there’s also extra armor from Ulzaad’s Decree once you War Cry. But when moving through a Chunk, none of that is up. War Cry doesn’t have full uptime, so you’re not gonna be popping it on the go unless you’re ready to stand and fight, cause it comes bundled with phys RR you’ll want ready when a fight is about to happen. Ground Stomp does have full uptime but its AoE is tiny in comparison to War Cry, so you’re not reducing damage from much beyond what’s immediately around you. And you’re obviously not dragging Inquisitor Seals with you while you’re running. As a result, it’s surprisingly easy for this build to get pincushioned by projectiles on the go. Normally that’s not a worry, since you’ll just kill what you see and then move on. The one situation where that is not the case is where I died and ran out of timer. In the Gazer Prime chunk, you have no incentive to fight every damn eyeball on the way. You want to get to Gazer and kill him ASAP to move on. But if you just run through the Chunk, you’ll be pulling a convoy of eager eyeballs behind you in addition to whatever it is you’re going to fight around Gazer. And so, I reached Gazer, set up my Seal…and got blasted to pieces before the Seal effect was even up. No projectile evasion, no % absorb and no DR being up will kinda do that to you sometimes in SR78. While I did kill Gazer on the second go by being a bit more diligent about killing stragglers, the lost timer left me 20 seconds too short on time in the boss room and I failed the run. That is an avoidable issue. All I needed to do is be more careful on the first go, clear my way through to Gazer and I’d be fine. But since the build was blazing through everything so fast and so easily, I overestimated how much survivability it has, in general and on the go, and got punished. So while this really should be a 10/10 build, and if I were to do another set of runs, I have no doubt it would be, I think a 9/10 is still a fair score because it shows that the build, while powerful, does have some points of vulnerability still.
Another weakness worth pointing out is the low leech. In normal circumstances that is not an issue. The build’s damage output is so great, so poorly resisted and its area coverage is so massive that it just slurps health back no problem. The one place where that can be an issue is if you encounter some of the sturdier foes that are capable of outputting high damage of their own. Of the encounters I’ve had with this build, that only applies to Iron Maiden, because of her high DA, high Armor and high Phys res, combined with strong nukes. While she’s not a problem per se, she does make it quite evident the sustain could be better. One of her bigger hits landing or, god forbid, critting will definitely take a notable chunk off of your health and it will take you a few attacks to recover all of that back. If another big hit lands in between, you’ll probably end up in Ghoul/Menhir’s Will territory, which isn’t quite where you’d like to be. I’ve never died to her, mind you, in fact I never even got close, but out of all the enemies I’ve faced across the 10 runs, she was most definitely the toughest opposition. Tougher than Rashalga (whose return projectiles can’t even fire cause Forcewave doesn’t proc them), tougher than Theodin, tougher than Morgoneth. I haven’t fought Korvaak but he’d definitely be even worse than her. All the other enemies are a breeze. Fabius sometimes dies before he even puts up his Blade Barrier, Reaper is a joke because the skill disruption on Break Morale disrupts the on-death debuff explosion of the Wraiths he summons and there’s just nothing any of the other enemies can really do. Grava’s a joke cause his fumble doesn’t apply to Forcewave, same for Kaisan. In fact the only enemy I seemed to be taking a surprising amount of damage from other than Iron Maiden was Alkamos. Not sure where that was coming from but he did hurt more than I expected. He’s entirely manageable and safe to fight, but he did surprise me. As an aside, since I’m talking about this build’s opposition, this is the only build I’ve ever killed Crate with, cause it has that magical combination of ranged damage output, i.e. kiting capability, and phys damage, which Crate isn’t too resistant against. Make of that what you will, there’s only a limited number of characters I’ve even tried Crate with cause I was confident enough in their power, so my experience with the boss is limited. And yet, with that limited experience, this character did it. Twice.
One final thing worth pointing out is that the build offers a surprising amount of choice in terms of playstyle. When I was coming back to this build to test it I’ll admit I wasn’t particularly eager to have another go at it cause I remember testing it in 9.5 and being kinda bored, cause all you do is place a Seal, camp in it, make sure your WoR is up and then you just spam Forcewave, apply Storm Box and use War Cry on cooldown. I was blasting through enemies like nothing and it didn’t even feel like I had to do much of anything. But you can play the build super lazy like that, or you can turn it into a real piano if you choose. Aside from the aforementioned skills and the mobility rune, the build has 3 other potential buttons to press: the Ground Stomp from the boots, Rebuke from the weapon and Doomforce from the relic. Now, out of these, only Rebuke actually does more damage per hit than Forcewave does, so the rest of the skills are just a net negative and you could say a waste of time. However, they each have their merits. Like I mentioned before, War Cry does not have full uptime on this setup. There’s no CDR anywhere so there’s 2.5 s of DR downtime to cover. Ground Stop might not be debuffing the whole screen or providing as much DR as War Cry, but less is better than nothing. And unlike War Cry, it has full uptime. So you should be using Ground Stomp in between to cover that DR gap. Plus, while the damage it deals is nothing compared to Forcewave, it’s still another source of Internal Trauma that can be ticking in the background while you’re spamming. Doomforce is the same deal. The skill’s upfront damage is absolutely atrocious, way worse than even Ground Stomp’s let alone Forcewave’s. But the Internal Trauma it applies is quite sizeable. And unlike all your other skills it has cc on it in the form of knockdown (well, there’s stun on the medal proc but that’s bearly noticable). So it’s worth using for the Internal Trauma alone, even if just every 13 s or so (cause of all the trauma duration we got) but it can also boost survivability through cc and improve damage by gathering enemies into a narrower line for Forcewave. At the same time, while you can be playing this like a piano build, you have to find the right balance to make sure you don’t overdo it. Again, Rebuke is the only skill out of the three that actually does enough flat damage on use to warrant skipping a Forcewave cast (yes, cast, don’t ask me why Forcewave is a spell but it scales with cast speed). The other two skills only really have the Internal Trauma damage to speak of, and once that’s applied, you’re just losing damage recasting the skills. It’s really easy to overspam Doomforce and Ground Stomp. I’m pretty sure, even though I’m trying to be mindful of it, I overspam Doomforce and Ground Stomp a lot and I could possibly be better off just ignoring Doomforce altogether and just going back to lazy mode spamming Forcewave all the livelong day. Whichever way you choose to go the build will still perform, it’s just up to how much you care about squeezing every little bit of damage out of the build and how engaged you want to be in the gameplay. If you’re up for some lazytime, this build can definitely provide. When I tested the build in 9.5 I got 5/5 out of it and Rebuke and Doomforce weren’t even on my skill bar ![]()
That’s it for this one. Here’s the usual SR75-76 and SR80 segments of one of my runs. Note the completion time and the mutators. The build’s this fast with 20 % reduced cast speed and -10% TDM.

