
Introduction
This build goes fast and throws fire bombs.
Ingame stats:
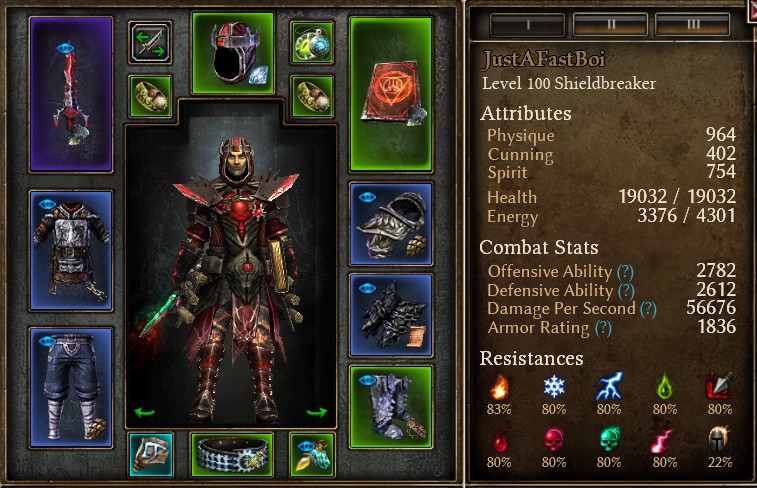
→ GrimTools lvl 100 with all skill points ←
Strengths and Weaknesses
- Goes fast
- Good AoE
- Great damage when ramped up*
- Will avoid most hits while moving**
- Can farm more items to go even faster.
However
- *Damage needs to ramp up to reach highest potential
- **Relies on mobility for survival - if you try to face-tank you die
- Some enemies with “ranged retaliation” auras will occasionally instantly kill the character
How the build works
Vire’s Might (VM) is a movement skill in Oathkeeper, which leaves behind a trail of fire.
The build uses that trail and the multi-hit property of VM, in combination with devotion procs, to create a stacking area of fire damage.
The gear is tooled to reduce the cooldown on Vire’s Might as much as possible to stack more fire patches and go even faster.
In addition, Thermite Mines and Blackwater Cocktail provide more debuffs and act as additional damage and proc sources.
![]()
![]()
General advice for new players
- Do all the quests, at least on your first play-through. They give you reputation with factions and keep you on track to level 100.
- Explore the map, especially if it’s your first time playing. Finding stuff like shrines is quite important.
- Prioritize resistances first, damage second
- Use crafted components from the smith to fix missing resistances
- Use 2x Scaled Hide (crafted) in pants, chest or shoulders to fix your armor absorption
- The inventor can recover components from your outdated gear, whenever you swap to a better piece
- Additionally to components, you can apply augments, which you buy from the faction vendors. They also sell great gear and blueprints, for leveling and even late-game setups.
Faction choices
-
It is extremely important that you go hostile with Kymon’s Chosen eventually, so that you can farm a Skybreaker Circlet.
-
Ideally you side with Kymon’s Chosen on Normal difficulty, then, after buying all their important stuff at max reputation, switch sides to join Death’s Vigil. However, for that to work smoothly, you would need a Mandate from a previous character.
Just go hostile from the start if you don’t want to worry about any of that. -
I prefer Cult of Bysmiel on normal, for the Emblem of the Leaping Mantis. If you desire a different movement skill, the choice is all yours. Alternate cults between difficulties to rank them up evenly.
-
Friendly with Barrowholm. This one mostly, so we can fight Ravager later. If you want to have this fast character to farm the Barrowholm basement instead, go hostile on Ultimate, after buying all their augments and blueprints.
-
Friendly with Outcasts provides an alternative source of shoulders, which you will never use, so do as you please
Leveling & gearing up!
I recommend starting with Demolitionist as your first mastery and leveling with Blackwater Cocktail and Thermite Mines, until higher level. Alternatively you can try to start with Oathkeeper and level with Vire’s Might, which might have some more mana issues.
Here I will present the Demo leveling path, which I used.
Items listed should be picked up when it is convenient. The stats on the items will vary, don’t farm for exact copies of my example setups.
If an item slot isn’t listed, then I just assume you will fill it with anything that seems to fit, and the exact item isn’t as important.
The guide will provide links to item locations, if you absolutely don’t want (minor) map spoilers, don’t click on those links.
There will be a character snapshot roughly every 25 levels, which will include the devotion progression (just scroll through the bar on the bottom in the devotion page).
Stat points are split between Physique and Spirit, with a few saved if they are needed for Cunning.
The final build needs roughly 800 Physique, 740 Spirit and 400 Cunning, so there are only a few spare points.
Level 1-25 -- Act 1 & 2
Items to get:- Martin’s Crest (Moneybags Martin)
- Incendiary Shoulderplates (Cronley’s Gang)
- (optional) Incendiary Casque
- Equilibrium relic (blueprint from Devil’s Crossing faction merchant) or Guile relic (at level 25)
(For Act 1 and the first part of Act 2, just use any caster off-hand (books etc) and a caster-dagger or scepter, ideally with a fire damage affix. You can also craft a “fire implemement” as soon as you unlock the blacksmith, which will give you a level-scaled caster-weapon with fire bonuses.
For the first levels, until Thermite Mines are unlocked, throw a Searing Ember on one of your items and you will get a fireball skill to throw around)
Leveling up in order:
-
Demolitionist to level 5
- Blackwater Cocktail to 3
-
Demolitionist to 10
- 1 point High Potency
- Blackwater Cocktail to 9
- a few points into Vindictive Flame
-
Demolitionist to 20
- Demon Fire to 9
- then maxing Demon Fire and Blackwater Cocktail evenly
-
Demolitionist to 32
- Thermite Mine to 10
- optionally some points into Blast Shield for safety
If you followed the quest-line, you should be roughly in Twin Falls or Broken Hills (if you play on Veteran or grind more XP you might be higher level, which shouldn’t be an issue.)
After crafting the relic and fixing the resistances, using components from the smith, the build looks something like this:
Level 26-40 -- Act 3 & 4
At this point you should have the Dynamite from Cronley’s Hideout to start the Hidden Path quest-line in Lower Crossing.
We need that to acquire our pants.
Items to get:
- Dreeg-Sect Legguards from Guardian of Dreeg
or (depending on resistances) - Solael-Sect Legguards from Guardian of Solael
- Zarthuzellan’s Book (either version works, preferably the Blackwater Cocktail version for now)
- Harvest Footpads/Greaves, Harvest Grips from the Homestead faction vendor
- (alternatively) Rhowari boots or rare boots with fitting resistances
- Gollus’s Ring from the Deepdweller (one ring will do)
- Solar Revolver from the Homestead faction vendor (if you have the rep, otherwise any fire stick will do)
- (optional) update Incendiary Shoulderplates and Casque, Martin’s Crest to the level 40+ version.
Leveling:
- Demolitionist to 40
- max Agonizing Flames
- max Thermite Mines
- max Vindictive Flame
- Flame Touched to 5
At this point we are about ready to take on the final boss of the main campaign (after fixing our resists again):
Level 40 snapshot before the big boss fight
After finishing the vanilla campaign you can either go directly to Elite (or even Ultimate), but I recommend to go through some parts of the DLCs to get to the factions first, so you start gaining reputation with them.
This also allows you to pick up better gear for the higher difficulties, which mostly means improved resistances.
DLCs to level 50+
Items to get:
- Ugdenbog Flamestrife from Janaxia (don’t grind too much for perfect affixes on this one, if you get at least one fire or elemental affix you are lucky. Keep any extra Flamestrifes for crafting later on)
- Legion Headguard, Chestguard and Greaves from the Black Legion faction vendors
- Endurance relic blueprint (bought from a Cult faction vendor in Forgotten Gods)
- (optional) Gargoyle belt for +1 Oathkeeper (only if you get a lucky drop from gargoyles in the Forgotten Gods DLC) or
- (optional) Chosen Cord or Waistguard (crafted, blueprints from Kymon’s Chosen faction vendor)
- (optional) Vilgazor’s Heart
- (optional) Living Rings from any plant enemies or Vinelton
- updated Dreeg-Sect pants
Leveling:
-
Oathkeeper to 10
- 1 point into Vire’s Might
- 1 point into Resilience
-
Oathkeeper to 15
- Haven to 5
-
Oathkeeper to 20
- 1 point into Volcanic Stride
Now, after reaching level 50, the setup should look sth like this:
As soon as you and your resistances feel ready for Elite, I would head there, to pick up additional shrines if nothing else.
You probably don’t need to do a full play-through of Elite, but it can smooth out the progression to Ultimate.
Level 50-75 -- Elite, Prep for Ultimate
Items to get:
- updated Incendiary Shoulderplates and Martin’s Crest
- Zarthuzellan’s Archive (the version for Vire’s Might this time)
- Skybreaker Circlet from Sister Bravna
- (optional) Malmouth Arcane Waistguard (crafted, blueprint from Malmouth Resistance faction vendor)
Leveling up:
- Oathkeeper to 32
- 1 point into Tectonic Shift
- 1 point into Guardians of Empyrion
*Oathkeeper to 50
- 1 point into Divine Mandate
- max out Celestial Presence
- 1 point into Rebuke and Temper
- remaining points split between Volcanic Stride and Tectonic Shift
With a few extra levels, fresh new gear and components and a few augments, the build should look similar to this:
After we get the Skybreaker Circlet, Zarthuzellan’s Archive and Volcanic Stride and Tectonic Shift have been increased a bit, the play-style will shift from a build that mostly throws fire-bombs, towards a “Skater”.
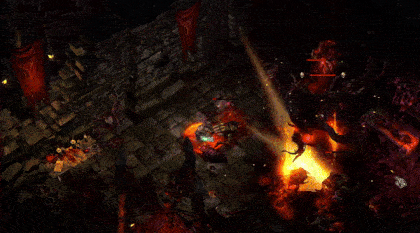
You can now start to deal significant damage by boosting through enemies with Vire’s Might, back and forth, to add more patches of burning ground.
Add the debuffs from Blackwater Cocktail and Thermite Mine first, the dash through enemies repeatedly for the best results:
If you want better control over your movement, you can disable the target-lock on monsters, by using the “Force Move” hotkey. Bind it to a button you can hold down while playing:
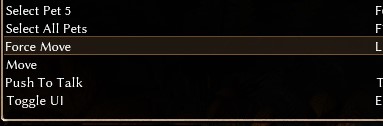
As long as you hold that button, you won’t dash into enemies, instead your Vire’s Might will always try to go to your cursor location.
Do shorter dashes to stack damage quicker and to stay close to enemies, who get more dangerous at range.
Long dashes to avoid melee attacks from big enemies and to travel across the countryside.
Level to 100 and farming the final setup
At this point a full play-through of Ultimate will provide the experience and most of the faction reputation needed.
Once you reach “Honored” with a faction you should buy and read a “Writ” to increase the reputation gain with them, for the grind to “Revered”.
Once we reach about level 90 and Honored/Revered with factions like Coven and Barrowholm, we can start to farm, buy and suit up in some endgame gear:
Items to get:
-
Zarthuzellan’s Archive (ideally with 2x fire affixes and 17%+ cooldown reduction)
-
Skybreaker Circlet from Sister Bravna (ideally with Celestial or Interrogator’s prefix)
-
2 Gollus rings
-
Stoneplate Greaves (crafted, blueprint drops often from Totems etc)
-
(alternatively) Elite Legion Greaves or Mythical Molten Walkers (mostly for the VFX, good Stoneplate Greaves will add more safety)
-
Mark of Harvoul (doesn’t drop with fire or elemental affixes very often, settle for any usable affixes)
-
(alternatively) Mythical Volcanum (Blueprint occasionally drops or is sold by a hidden vendor) or Stonefather Mark (random drop or transmuted)
-
Hexflame, crafted (blueprint sold by Coven of Ugdenbog)
-
Chains of Ordas from Port Valbury (do this one last, as it has the longest travel time)
-
3-4 random level 94 blue set pieces for transmutation, see below
-
Ideally Mythical Obsidian Grasp, but any blue or green gloves for fire/elemental will do
-
Eastern Legguards (see “Transmutation”) or Dreeg-Sect Legguards or crafted Rimeguard Chausses
-
Flamekeeper chest and shoulders, if they should drop (otherwise, “Transmutation”)
-
once you have reached “Nemesis” status with Eldritch monsters, you can farm Kaisan for an amulet with +1 to all skills. Vilgazor’s Heart or any blue with +1 Demo or Oathkeeper will do fine until then.
You can also find Mythical Alazra’s Ruby, which is an excellent blue amulet.
Leveling up:
- With Demo at 40, Oathkeeper at 50
- 1 point Ulzuin’s Wrath
- max out Volcanic Stride and Tectonic Shift, if they aren’t already maxed.
- max out Flame Touched
- 1 point Acension, Clarity of Purpose
- Haven to 10/10
- remaining points into Divine Mandate
I typically drink a potion to reset my attributes, to get the requirements for my final gear in cunning and spirit. Most spare points went into physique.
Level 100 snapshot, with good (but realistic) affixes
Transmutation into desired set pieces:
How to transmute
This build requires 2 pieces of the Flamekeeper Set.
Instead of praying for drop luck and sacrificing bunnies to RNGeesus, we can utilize the mechanic of transmutation to (almost) guarantee those items.
Prerequisites
- Complete the quest for Kargon in the Conclave of the Three (return his book).
- Have some level 94 set pieces, iron bits (roughly 1-2 million will be good) and Aether Crystals.
Once the quest is completed, any inventor will offer transmutation services.
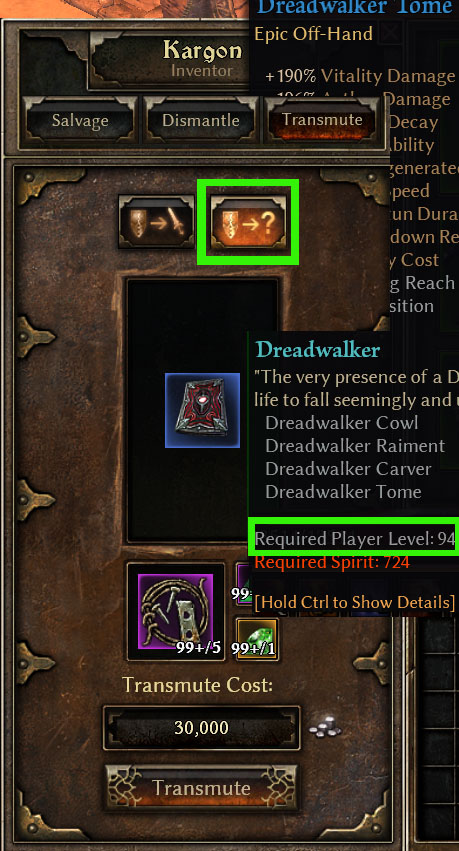
- Select Transmutation
- Select the right button (green square) to transmute into a different set of the same level.
- Take any random, blue level 94 set piece and place it in the empty slot
- Press transmute to change the item to a different set piece of the same level and rarity.
If you get any Flamekeeper set pieces, keep them and repeat the process with items from different sets.
Eventually, you will have two random Flamekeeper set pieces.
Then swap to the left transmute option and use it to turn those into the chest and shoulder pieces.
You can also use this process to get the Eastern set pants and gloves.
If you have spare resources, you can also reroll the values of your set items this way, but it gets very expensive quickly.
Augments for the endgame setup
Our desired augments are sold by all factions at “Revered” standing. If you play through all three difficulties, you’ll reach that rep either late in Elite or after you have done their quests on Ultimate.
If you buy and read a “Writ” after you reach Honored with a faction, you will get bonus reputation for your future actions. Strongly recommended.
Various armor augments are used to fix our resistances, until they are all ~30% over the maximum cap, ideally.
After we have reached our desired overcaps, we can use Bysmiel Silversand (Cult of Bysmiel) to gain extra HP regeneration and Defensive Ability or Solael Bloodbinding (Cult of Solael) and Wendigo Lifescent Powder (Barrowholm), to improve our pool of HP and Defensive Ability.
Rings and amulets are enhanced with damage augments, our main augments are:
- Irrah’s Soulfire (Cult of Solael) for Defensive Ability
- Osyr’s Wisdom (Cult of Dreeg) for Offensive Ability
- Arcanum Dust (Malmouth Resistance) for elemental resistances and defensive ability
- Survivor’s Ingenuity (Devil’s Crossing) for offensive and defensive ability, can be quite a big boost and is accessible very early.
- Witch’s Black Flame (Coven) if you need extra stun resistance and HP
Weapon augments are Solael’s Vision (Cult of Solael) or Malmouth’s Heart (Malmouth Resistance)
Some gameplay and “performance benchmarks”:
(This only serves to showcase the playstyle and relative power level. I don’t necessarily recommend diving straight into the Shattered Realm, it’s just a way to show pure gameplay without major spoilers.)
Shattered Realm Run, 26-27 in ~8 minutes (used to be SR 65-66)

Lokarr dead in 30 seconds (some spoilers)
Messy Ravager fight in budget gear:
Click me (spoilers)

Helpful farming and crafting guide for gear pieces listed above
Farming
-
Zarthuzellan’s Archive: It can be hard to get a useful prefix and suffix together with a good roll on the cooldown reduction. At least the build is fast, so the runs are tolerable.
If you can, try to farm one with a rare prefix and the “of Scorching” suffix. -
Skybreaker Circlet: When you farm Sister Bravna using Vire’s Might, pay attention to her retaliatory lightning barrage. It can cause huge amounts of burst damage when you VM directly into her, and can easily kill the character.
The best prefixes are the ones with cooldown reduction, “Celestial” and “Interrogator’s”, possibly "Magi’s. -
Rings, amulet and medal should ideally cover your Offensive and Defensive Ability, and also add some vital resistances, possible some HP.
Crafted items
Crafting items at the Blacksmith adds a “crafting bonus” stat, depending on the blacksmith.
My recommended smiths are:
- Kaylon, Steelcap District - for Freeze or Stun resistance
- Egellon, Sunbane Oasis (hidden) - for Slow or Reflect resistance
- Angrim, Devil’s Crossing - for Armor, Physique (even pierce resistance can help)
If you don’t get your desired bonus, it’s not the end of the world, usually.
The bonus doesn’t apply to relics, they get a different bonus, unrelated to the blacksmith.
Scrap & crafting mats
- Collect dynamite while you are leveling, to blow up Legendaries. Anything below level 84 can be blown to bits, without regrets. A lot of higher level stuff as well.
- This will provide the scrap needed for crafting and also the rare material that you don’t want to painstakingly farm
- Dynamite can be crafted from Aether Shards, shards can be crafted from crystals. Farming Aether Crystals (in the Warden’s lab for example) is going to yield more dynamite, than picking up individual sticks
"Retaliatory" auras and abilities wreck this character: A summary
Some enemies cast self-buffs that trigger “ranged retaliation” effects when you damage them with projectiles.
Vire’s Might causes lots of separate hits.
Vire’s Might (or at least parts of it), also counts as a “projectile” for some reason.
So when you charge into an enemy, who has such an effect up, you can easily just watch your character perish in a barrage of spikes, lightning or even invisible damage procs that are caused by Vire’s Might.
This isn’t strictly speaking “retal” type damage, nor is it reflect, but I cannot find a better term to describe it.
The enemies I found to have this effect:
Sister Bravna
Rashalga, the Mad Queen
Durg the Stormborn (a big beetle)
Valdaran, the Storm Scourge
For this reason, I can’t really recommend the character for hardcore.
Take care, when you see these enemies out there.
Possible endgame upgrades
-
Vanquisher Set is specifically made for this playstyle.
It can be farmed from the final treasure chests in these 4 skeleton-key dungeons: Steps of Torment, Port Valbury, Bastion of Chaos, Ancient Grove. Each dungeon drops one specific set piece. -
Shard of the Eternal Flame - Massive cooldown reduction to Vire’s Might. Fair warning: If you use it with the Skybreaker Circlet, the build becomes almost too fast. Or maybe I am just old.

-
Korvaak’s Deception relic or Serenity
-
Mythical Warpfire - The dagger grants a proc, which lowers fire resistance. This makes the build less reliant on Thermite Mines.
Hope you enjoyed the read.
Let me know if you spot any errors, there will be some, no doubt.
