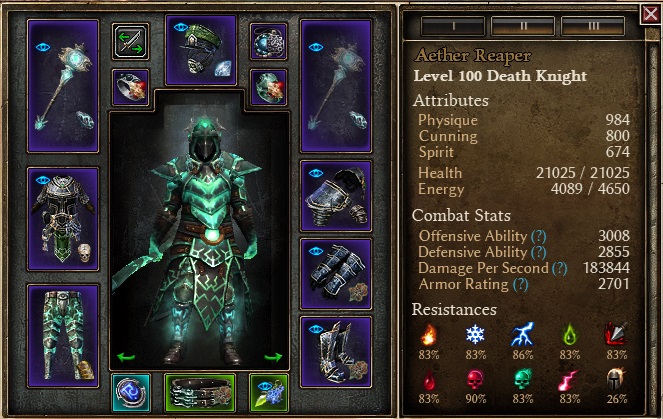
Aether Reaping Arc Death Knight
Aether Death Knight uses typically Krieg’s set as a base. I decided to use Reaping Arc from relic to have more free skill points which I put into Bone Harvest and Reap Spirit. At first I went more heavily into attack speed and aether damage for Reaping Arc but I found out that defenses were lacking in higher SR so I then redid the build with conduit for Bone Harvest primarily for the +3 max all resistances and with time dilation from devos to proc faster defensive skills. Bone Harvest and Reap Spirit deal a lot of damage so you don’t need to lean fully into Reaping Arc. Your defenses are made around ADCtH which is 39 % and around defensive procs like Menhir’s Will at 16/16, Ghoul, Mark of Torment at 10/10, proc from Prismatic Diamond and finally Time Dilation that lowers their cooldown significantly. You also use Ill Omen at 17/10 for high permanent damage reduction of 32 %. Build has nice aether RR of up to -115 %. You have damage conversion of 100 % from vitality to aether due to belt and weapon. And that helps a lot with damage. Damage output is good even in higher SR. Racial damage to chtonics, aetherials and undead helps with that. This build can do SR 90 if you play well. And even finish outside of the timer with few deaths in SR 95. SR 80-81 is easy.
GRIMTOOLS
Death Knight, Level 100 (GD 1.2.1.2) - Grim Dawn Build Calculator
Download
_Aether Reaper.zip (1.2 MB)
This build is just a template. Customize it to your own liking. Crafting bonuses are to armor.
You have an option to use different skills. If you want to use Blitz that the set supports, you will get a little stronger build than mine with Reap Spirit. Here is the GT link for it Death Knight, Level 100 (GD 1.2.1.2) - Grim Dawn Build Calculator
Reaping Arc with Soul Harvest only
SR
I finished SR 80-81 5 out of 5 times within the timer. It is easy.
In SR 85-86 I finished 5 out of 5 times within the timer. You will finish it within the timer even with one death but you will not die if you pilot well. Build is fast. You can facetenk Valdaran through his aura with MoT.
In SR 90 I finished 3 out of 5 times within the timer. If you die once you will most likely finish within the timer. Damage output is good. DoTs are dangerous. Avoid ground damage and traps in the first three shards. Fabius and his DoTs are dangerous. Use MoT and potion when he has barrier and disengage for its duration. Don’t facetank Valdaran through his aura with MoT. Use MoT and potion and run around him with his aura up. You can sometimes facetank him but not always. Be sure to pull Valdaran and Fabius away from other bosses so that you have room to run around them and don’t agro more bosses. Avoid Fabius and Valdaran in the first three shards. No boss is impossible.
In SR 95 it can always be finished but not within the timer. You will die a few times. Physical damage hits hard and DoTs are dangerous. Damage output is still good. No boss is impossible. Boss rooms are easier than the first three shards. Avoid nemeses in them.
Celestials
I tried Ravager of Flesh and was able to kill him without pharma with the Blitz version of the build. Energy regen would be an issue with Reap Spirit. With Blitz you still have to take some energy potions during the fight. Don’t stand in his energy burn pool.