Introduction
Panetti’s Replicating Missile. (PRM)
The currently best spell to start with as Arcanist.
The closest you will get to D2 Javazon.
This quick guide will get you to the edge of endgame and to the point where you can comfortably farm legendary sets in any content, to upgrade the build further.
→ Suggested GrimTools lvl 100 ←
→ Suggested GrimTools with fewer Epics ←
Strengths and Weaknesses
- Easy to gear
- great AoE
- flashy fireworks
- nice legendary endgame set
However
- pure single target damage is not the greatest
- not omega-tanky
- no life leech without legendary drops
How the build works
Cast magic missile (PRM) until the enemy is dead. The missile pierces and spawns new projectiles every time it hits a monster, so lining them up increases your DPS greatly.PRM is mostly converted to ‘Elemental’ damage with the medal the build uses.
However, because “Proliferation” is a separate part of the skill, we additionally need global conversion to convert the ‘Aether’ portion of that node, which adds a lot of damage.
There’s also Word of Pain and Stormbox to debuff and trigger devotion procs.
And Inquisitor’s Seal ![]() for safety.
for safety.
If you don’t think that’s enough buttons, you can add Mirror of Ereoctes and Nullification, but for most fights they are not required.
![]()
![]()
General advice for new players
- Do all the quests, at least on your first play-through. They give you reputation with factions and keep you on track to level 100.
- Explore the map, especially if it’s your first time playing. Finding stuff like shrines is quite important.
- Prioritize resistances first, damage second
- Use crafted components from the smith to fix missing resistances
- Use 2x Scaled Hide (crafted) in pants, chest or shoulders to fix your armor absorption
- The inventor can recover components from your outdated gear, whenever you swap to a better piece
- Additionally to components, you can apply augments, which you buy from the faction vendors. They also sell great gear and blueprints, for leveling and even late-game setups.
Faction choices
- Side with Kymon’s Chosen on normal and Elite, the after buying all their important stuff at max reputation, switch sides if you want to.
- not a hugely important choice. If you’re on your first play-through, either faction choice works fine.
- I prefer Cult of Bysmiel on normal, for the Emblem of the Leaping Mantis. If you desire a different movement skill, the choice is all yours. Alternate cults between difficulties to rank them up evenly.
- Friendly or hostile with Barrowholm, both work.
- Outcasts do not matter, do as you please
Progression through the game
We start by leveling as a Arcanist, using Panetti’s Replicating Missile (PRM) right away.
Stat points are mostly invested into physique to wear armor at the start, with a few into cunning and spirit for gear requirements.
Then spirit is pumped heavily to keep up with energy consumption.
In the end, the build needs about 780 physique, 400 cunning, everything else into spirit (may vary depending on gear).
Devotion progression is included in the GT links, open the devotion tree with (S) (D) and then scroll through the bar on the bottom.
Items used will usually drop along the way while questing, or are purchased from faction vendors.
Farm an upgrade for your green items, if the level falls too far behind (~15+ levels).
When you reach level 90+ you can put in some extra effort to farm a version of these items with good affixes.
However, for some items it might be easier to farm a legendary upgrade, rather than a green one.
Normal difficulty progression:
(links lead to the map with the drop location)
Act 1:
- Groble Sky Effigy from Narbalgal South of Ulgrim’s island
- (optional) any caster weapon with the affix “Incanter’s” or “of the Sage” for +2 PRM
Act 2:
- Ulpranax’s Sting
- Equilibrium Relic
Don’t forget your components, most of them crafted at the smith.
– Level 25 Snapshot –
Leveling for 1-25 -- Act 1 & 2
Leveling up in order:
-
1 point Arcanist
- 5 points into PRM
-
Arcanist to 15
- Max out Distortion
- Maiven’s Sphere to 4 (or more if you play HC)
- Arcane Will to 1
- a few points into Iskandra’s Elemental Exchange
- a point into Mirror if you can stand the extra button
- remaining points into PRM
Act 3-4:
- Groble Stone Effigy (from Tyrant’s Hold or the surrounding areas)
- Gollus’ Ring
- Bloodsworn Sigil
- Dreeg-Sect Legguards
- Fleshwarped Casque (drops around Homestead)
- Harvest Footpads, Harvest Grips (buy those from Homestead faction vendor as soon as you have the rep) or any boots/gloves with move speed/casting speed
- (optional) Chosen Arcane Spark (if you have the rep with Kymon’s Chosen)
- (optional) Death’s Cord (if you have the rep with Death’s Vigil)
- (optional) Kymon’s Badge (for chaos res, can be bought from a hidden vendor)
- (optional) Ascended Epaulets (if one drops) or Devil’s Shoulderduard (if not)
- (optional) Ascended Vestment (if one drops) or Chosen Vestment, Devil’s Chestguard (if not)
- (optional) Rhowari Wrath Seal (if you somehow have the rep with the Rovers in Old Arkovia)
With some extra components we are ready to take on the boss:
– Level 40 Snapshot –
Leveling for 26-40 -- Act 3 & 4
Leveling:
-
Arcanist to 25
- Supercharged to 10
- 1 point into Nullification
-
Arcanist to 40
- max out Proliferation, Supercharged, max out PRM (until every node is maxed)
- if mana starts to deplete too fast, points into Iskandra’s Elemental Exchange, Mental Alacrity
- 1 point into Overload
- 1 point into Overload and Mental Alacrity (or more if mana gets really bad)
-
Inquisitor to 10
- A few points into Word of Renewal until the heal feels good and movement speed is capped
DLCs and prep for Elite/Ultimate:
- Wendigo Eye (from Barrowholm basement if hostile, from the 3 quest monsters like Ollivioth if friendly)
- Ugdenbog Waistguard (in the Barrowholm Mine or bought from Vinelton in the Ancient Grove)
- Living Rings (bought from Vinelton or dropped by plants)
- Legion Aetherspark (bought from Black Legion vendor) or Bargoll’s Heart or Ascendant Conduit (sold in Steelcap District or farmed around Malmouth)
- Legion Greaves (bought from the Black Legion)
- Valaxteria’s Skytorn Robes, if no Ascended Vestment dropped.
- Haunt Relic (BP can sometimes be bought from Vinelton or the vendor in the Steelcap District)
– Level 50 Snapshot –
Leveling for 41-50+ -- DLCs & Elite prep
-
Inquisitor to 20
- Some points into Vigor (max it on HC)
- 1 Point into Deadly Aim
- 1 Point Storm Box of Elgoloth and Lightning Tether, to bind Eldritch Fire devotion to
-
remaining points into the Inquisitor mastery bar
Elite & Ultimate
- just update all gear to versions of the current level
- grab the Fettan Mask on Elite at level 75
- if you can’t find any better, you can buy gloves with cast speed and resistances at a vendor
– Level 75 Snapshot –
Leveling for 50-75 -- Elite, Prep for Ultimate
-
Inquisitor to 32
- 1 point into Steel Resolve
-
Inquisitor to 50
- max Aura of Censure
- 1 point Word of Pain, Word of Agony (for devotion procs)
-
a few points into Inner Focus (Arcanist passive)
-
max out Maiven’s Sphere now, if you haven’t already
Level 90+
- Collect 3-4 blue lvl 94 set pieces for transmutation (see chapter below: Transmutation)
- Transmute 2 of the pieces into The Paragon of Panetti
- Buy the blueprint for Heart of Malmouth from the Malmouth Resistance faction vendor (as soon as you have the rep) and craft it
- Craft Stoneplate Greaves and/or Emberguard Gloves for speed, HP and resistances (blueprints will usually drop from totems)
- (optional) craft Stormguard Leggings for HP and resistances or transmute into Eastern Legguards
- (optional) Coven Spellweaver as a weapon, until you can find a better replacement
- (optional) Runesinged Handguards and Mythical Astral Robes are two random blue Epics, which drop very often and fit the build quite well
- (optional) Mythical Signet of the Runefather or Mythical Lorekeeper’s Band, if you find them, can replace Living Rings or Bloodsworn Signet
Leveling to 100
- max Inquisitor’s Seal.
- then max out Inner Focus, Vigor, Steel Resolve, Iskandra’s Elemental Exchange
- one point Elemental Balance, Overload, Fabric of Reality
- get Mental Alacrity to the soft-cap for cast speed
I had to drink a potion to reset my attributes as well, to get the requirements for my gear in Physique and cunning. Every spare point went into spirit.
– Level 100 snapshot before grinding for some upgrades –
Augments for the final setup
Our desired augments are sold by all factions at “Revered” standing. If you play through all three difficulties, you’ll reach that rep either late in Elite or after you have done their quests on Ultimate.
If you buy and read a “Writ” after you reach Honored with a faction, you will get bonus reputation for your future actions. Strongly recommended.
Various armor augments are used to fix our resistances, until they are all ~33% over the maximum cap, ideally.
After we have reached our desired overcaps, we can use Solael Bloodbinding (Cult of Solael) or Wendigo Lifescent Powder (Barrowholm), to improve our pool of HP and Defensive Ability.
Bysmiel Silversand (Cult of Bysmiel) can be a great way to get more health regen, which is our only way of sustain until we find legendary gear to add weapon damage or life leech to PRM.
Rings and amulets are enhanced with damage augments, our main augments are:
- Osyr’s Wisdom (Cult of Dreeg) for offensive ability
- Rhowan’s Wisdom (Rovers), if you need the extra cast speed
- Arcanum Dust (Malmouth Resistance) for elemental resistances and defensive ability
- Survivor’s Ingenuity (Devil’s Crossing) for offensive and defensive ability
Weapon augments only have one real option, Dreeg’s Foresight (Cult of Dreeg)
(maybe Creed’s Cunning…)
Transmutation into desired set pieces:
How to transmute
This build requires 2 pieces of the Paragon set.
Instead of praying for drop luck and sacrificing bunnies to RNGeesus, we can utilize the mechanic of transmutation to (almost) guarantee those items.
Prerequisites
- Complete the quest for Kargon in the Conclave of the Three (return his book).
- Have some level 94 set pieces, iron bits (roughly 1-2 million will be good) and Aether Crystals.
Once the quest is completed, any inventor will offer transmutation services.
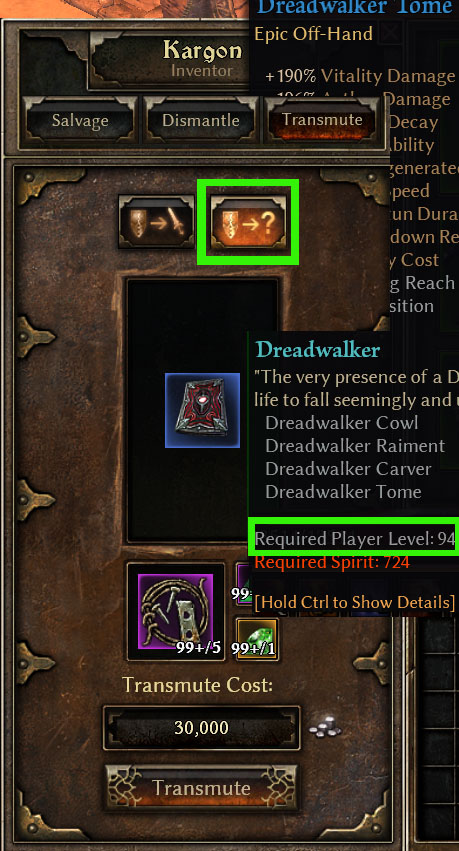
- Select Transmutation
- Select the right button (green square) to transmute into a different set of the same level.
- Take any random, blue level 94 set piece and place it in the empty slot
- Press transmute to change the item to a different set piece of the same level and rarity.
If you get any Paragon set pieces, keep them and repeat the process with items from different sets.
Eventually, you will have two random Paragon of Panetti set pieces.
Then swap to the left transmute option and use it to turn those into the helmet and shoulder piece.
You can also use this process to get the Eastern set pants.
If you have spare resources, you can also reroll the values of your set items this way, but it gets very expensive quickly.
Farming and crafting guide for gear pieces listed above
Farming affixes
Don’t spend too much time farming perfect affixes for this gear. You will replace most of this with the Invoker set, and other legendary gear, long before you find “perfect” affixes
Besides “elemental damage” and resistances, look for cast speed, health, offensive ability, HP regen and defensive ability, in roughly that order.
- You can vendor farm at Vinelton for the belt and Living rings. Reset the vendor by leaving the area at the Northern exit, wait a couple seconds, then return and his stock will be refreshed. This is probably your best bet to get some extra cast speed.
- Farming Bargoll for his heart is easy, as he spawns a few steps from a way point. But it will not be easy to get cast speed on it. You’ll replace it with a purple weapon anyway
- Groble Stone Effigy is a little painful to farm, as it only drops from regular grey shamans around Tyrant’s Hold. That means the affixes will be pretty bad, usually. Try to get cast speed, if you can.
- For blueprints, random legendaries and epics, hitting totems that are on your farming route is the way to go, until you can roll through the Shattered Realm.
Crafted items
Crafting items at the Blacksmith adds a “crafting bonus” stat, depending on the blacksmith.
My recommended smiths are:
- Kaylon, Steelcap District - for Freeze or Stun resistance
- Egellon, Sunbane Oasis (hidden) - for Slow or Reflect resistance
- Angrim, Devil’s Crossing - for Armor, Physique (even pierce resistance can help)
If you don’t get your desired bonus, it’s not the end of the world, usually.
The bonus doesn’t apply to relics, they get a different bonus, unrelated to the blacksmith.
Iron (money), Scrap & crafting mats
- Collect green items and sell them all to have plenty of iron (money) for crafting
- Collect dynamite while you are leveling, to blow up Legendaries. Anything below level 84 can be blown to bits, without regrets. A lot of higher level stuff as well.
- This will provide the scrap needed for crafting and also the rare material that you don’t want to painstakingly farm
- Dynamite can be crafted from Aether Shards, shards can be crafted from crystals. Farming Aether Crystals (in the Warden’s lab for example) is going to yield more dynamite, than picking up individual sticks
Endgame item upgrades:
Legendary drops to look out for
Relic: Iskandra’s Balance
Weapon: Panetti’s Replicating Wand
Weapon: Mythical Arcanum Sigilis
Helm: Mythical Spellgaze (blueprint)
Belt: Mythical Scales of Beronath (once you have part of or the full Invoker set for conversion)
Off-Hand: Mythical Tome of Names
Medal: Mark of the Shadow Queen (once you have part of or the full Invoker set for conversion)
Shield: Mythical Elementium (a “low budget” alternative that makes you quite tanky, but sacrifices some offense)
Set: Invoker’s Set
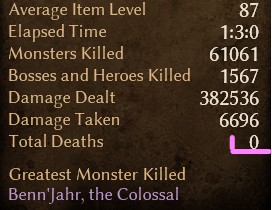
Some gameplay and “performance benchmark”:
(This only serves to showcase the playstyle and relative power level. I don’t necessarily recommend diving straight into the Shattered Realm, it’s just a way to show pure gameplay without major spoilers.)
Shattered Realm 26-27 in ~9:20