
DO NOT PICK NECROMANCER UNTIL YOU SIDE WITH KYMON’S CHOSEN OR YOUR BUILD WILL BE BRICKED!

![]() Introduction
Introduction ![]()
For the levelling portion in this guide, I will explain the thought process behind picking and choosing items. Based on your own playthrough you will obtain different (and potentially better) gear, use them when you unlock them.
Pros:
- Very strong single target damage
- Good AoE damage (when compared to other dual wielding peers)
- Very strong mobility
- Strong defensive tools against boss fights with Ill Omen and Mark of Torment
- Everything is target farmable Budget version is VERY cheap and FAST to gear.
Cons:
- Whilst strong against boss fights, more susceptible to larger hoards (especially squishy at the start of Ultimate)
- Base stats are low (not very high base HP)
- EVERYTHING is target farmable. Be prepared for average of 100 skeleton keys to finish the build.
![]() Playstyle
Playstyle ![]()
The build is auto attack focused, using Beronath’s Fury as the default auto attack replacer, utiltizing weapon pool skills such as Necrotic Edge, Whirling Death and Execution as our primary sources of damage.
Whilst auto attacking, you weave in skills like Bone Harvest every 8 seconds to give yourself steroid buff, and casting Ill Omen and/or Mark of Torment against boss fights to make yourself tankier.
![]() Devotion Path
Devotion Path ![]()
+Green Crossroads
+Scholar’s Light
+Blue Crossroads
+Eel
+Amatok the Spirit of Winter
+Red Crossroads
+Viper
+Murmur, Mistress of Rumors
-Green Crossroad, Red Crossroad, Blue Crossroad
+Quill
+Empty Throne
+Hyrian, Guardian of the Celestial Gates
+Rhowan’s Crown (do not finish, up until the skill)
-Eel
+Toad
+Raven
+Leviathan (do not fully finish, only 6 points)
+Blind Sage (4 points)
![]() Attribute Points
Attribute Points ![]()
Full send Physique, or 6:1 Physique:Cunning are both fine. Endgame spec will swap to more Cunning for Offensive Ability
![]() Faction Choices
Faction Choices ![]()
MUST SIDE WITH KYMON’S CHOSEN. OTHERWISE, BUILD IS BRICKED!
Side with Barrowholm for access to Ravager fight and 4%HP Augments
Cult choices do not matter. You will farm so much all will be maxed anyways. Pick Dreeg if you’re uncertain.
Angrim was picked for Blacksmith. Endgame crafting will be done in Malmouth
Level 1-4
Level 4 Grimtools
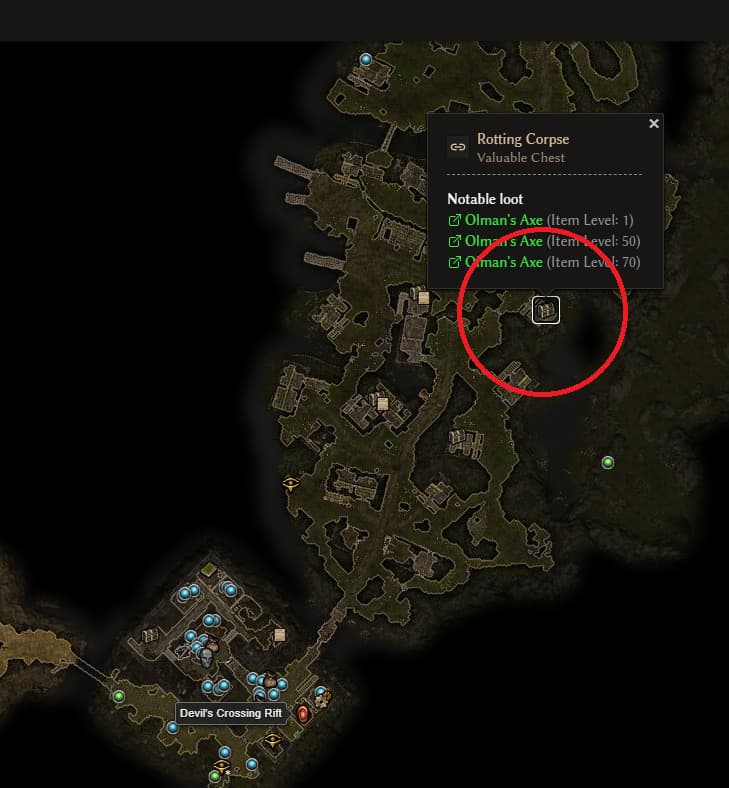
When starting out, immediately rush here and pickup an Olman’s Axe. Point at least 1 point in Dual Blades in Nightblade. Then relog and do it again for a second one. Congratulations, you’re a Cold damage dual wielder!
Level 10 Update
The starting damage/AoE will be really weak. Put two Chilled Steel’s on your weapons, and use the granted skill for clearing out mobs. Complete the sidequests in this region to get Isaac’s Shoulder and Sister’s Amulet for decent starting items.
Level 20-30
This is where the game begins to get interesting. Upon completion of Act 1 at the death of Warden Krieg, immediately bumrush this cave:
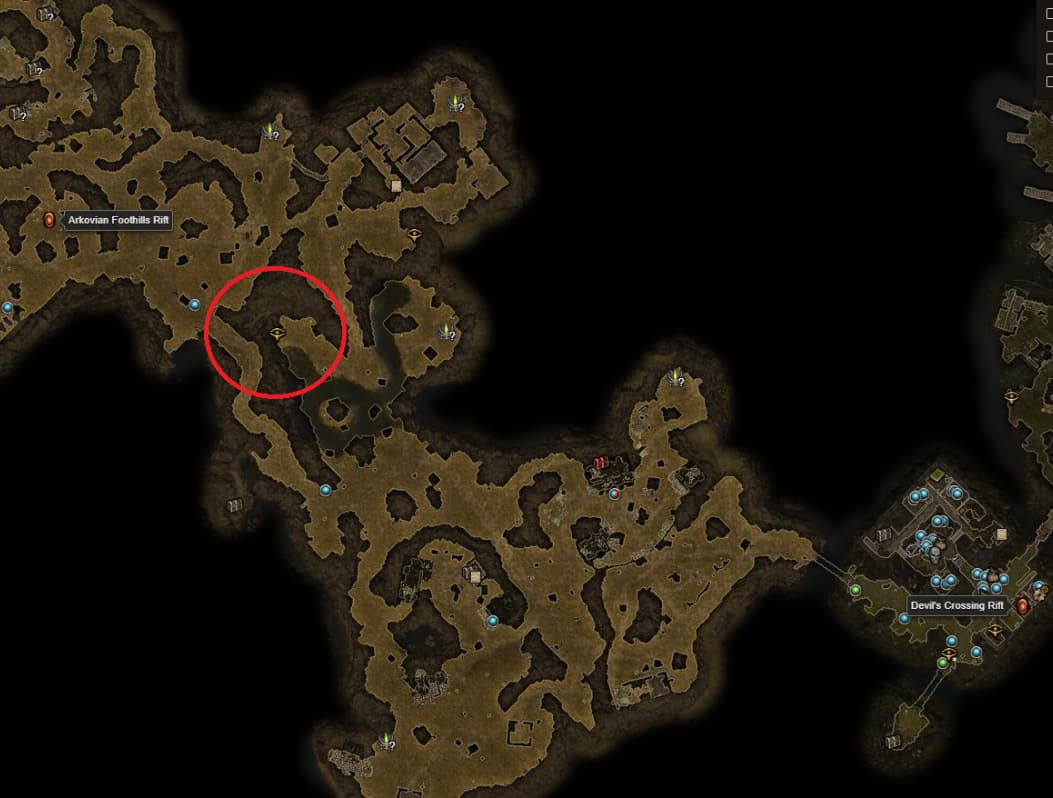
In here, you now gain access to your first best in slot weapon: Spectral Battle Axe. The boss monster in here has a guaranteed chance to drop one of the Spectral weapons, and the ghosts individually have smaller odds too. Fully clear out this cave.
This cave scales to your level. You may return at any point in time to obtain a stronger version.
They also drop a Spectral Longsword, which isn’t best in slot, but still a very strong pickup at this stage in the game. I farm this cave until I get one of each.
Level 30-40
ONCE YOU ARE AVAILABLE TO PICK A FACTION SIDE IN HOMESTEAD, PICK KYMON’S CHOSEN!!!
Around this point, you will be arriving at Homestead soon. From mostly this point onwards, character resistances begin to matter a lot.
The methodology behind picking and choosing items should ALWAYS be defenses first, damage second. If you find an equip that gives a lot of cold damage, but you find another with no damage bonuses, but tons of resistances, then you must always go with the one providing damage resistances.
Primary Resistances (such as Elemental, Pierce, Acid, etc) are the most important, then tertiary resistances (third page tab, or primarily Stun, Slow, and Freeze) with health and defensive ability tied afterwards at last.
Because of this, worry about what stats you are beginning to equip on your character, and not what specific item choices I will have on mine. Based on your own playthrough, you will find and equip different items than I did.
These pants are very strong generic pants that provides resistances and lifesteal. Must have for levelling.
Some other items that are recommended at this point in time:
Squire’s Greaves - Requires blueprint, but I find its very common to find
Otherwise, the Devil’s Crossing faction shop, and Rover’s faction shop have very strong, guaranteed items. Mix and match based on what your resistances are to get beefier.
Level 40-60
THE POWERSPIKE ACT!
The very first thing you want to do after picking Kymon’s Chosen, is to complete all of their quests at Sorrow’s Bastion. Their HQ is on the right side.
Once you have completed enough of their quests, you will have one called “The Sacred Ashes.” Its fucking time.
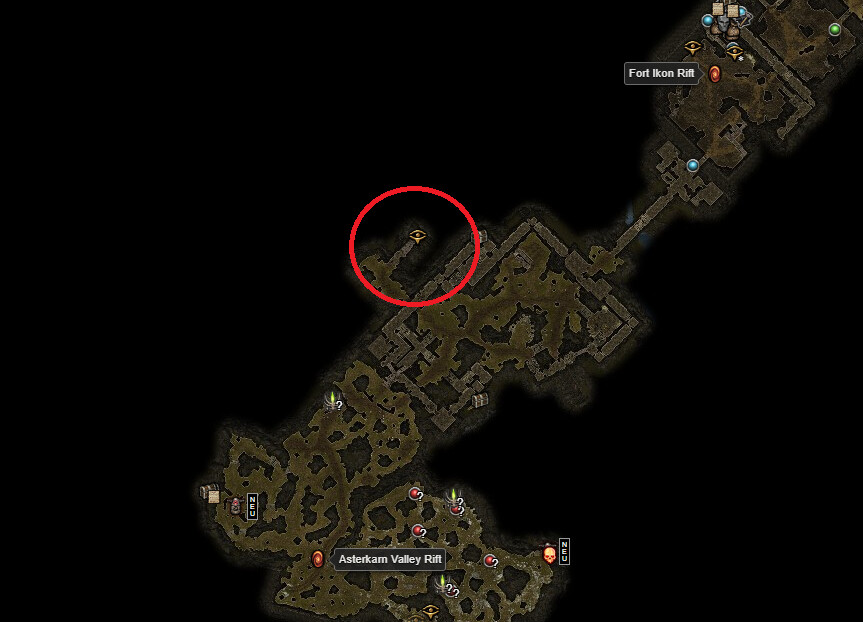
Bumrush this cave inbetween Fort Ikon and Asterkarn Valley rift. In here, we will find Malkadarr’s Dreadblade, our best in slot sword. From now on, you dual wield Spectral Battle Axe, and Malkdarr’s Dreadblade.
Afterwards, proceed as usual, finishing Act 4 and killing Loghorrean.
Once act 4 is completed, you have now Ashes of Malmouth unlocked. Ignore that for a second, and proceed to run Forgotten Gods (the yellow desert area that is bottom right of your map).
Complete Forgotten Gods, and at the very final rift, you will be at the Eldritch Gate. Here we farm for some BiS items.
These are the spawn points for Gargoyles (credit to Coincident’s Youtube)
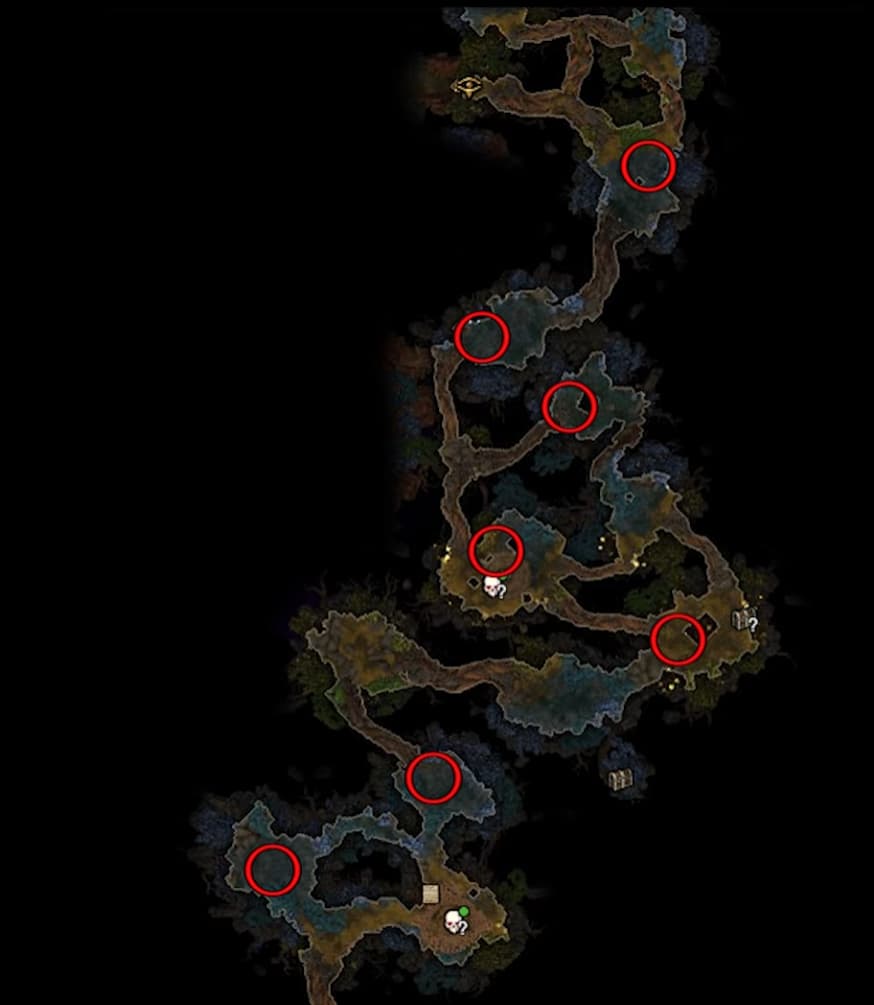
Now we get the BiS belt, the Gargoyle Waistguard.
The other items, such as Gargoyle Gaze, and Gargoyle Spines, are not best in slot. But, while you’re already here, if you pickup a decently rolled helmet and shoulders, why not use them? They give decent resistances and cold damage, might as well!
Level 60-70
Its around this point in time where you really start to feel Cold Reaper’s damage output. The upgrades here are little more challenging, but not the worst to deal with.
To continue getting stronger, you will need to enter two different skeleton key dungeons, the Steps of Torment, and the Feral Thicket.
The first dungeon, the Feral Thicket, you want to enter exclusively for the shopkeeper. They sell Shard of Beronath blueprint. This will replace your default auto attacks. You don’t need to actually complete this dungeon, you can just exit the game once you have gotten this blueprint.
The second dungeon, Steps of Torment, you are looking for Ilgorr’s Eternal Vigil. It drops from Ilgorr, on the 4th level of the dungeon, on the level “Suffering”

Afterwards, while you’re already here, the 5th level has two interesting portions.
The first, is the shop keeper in the final level.
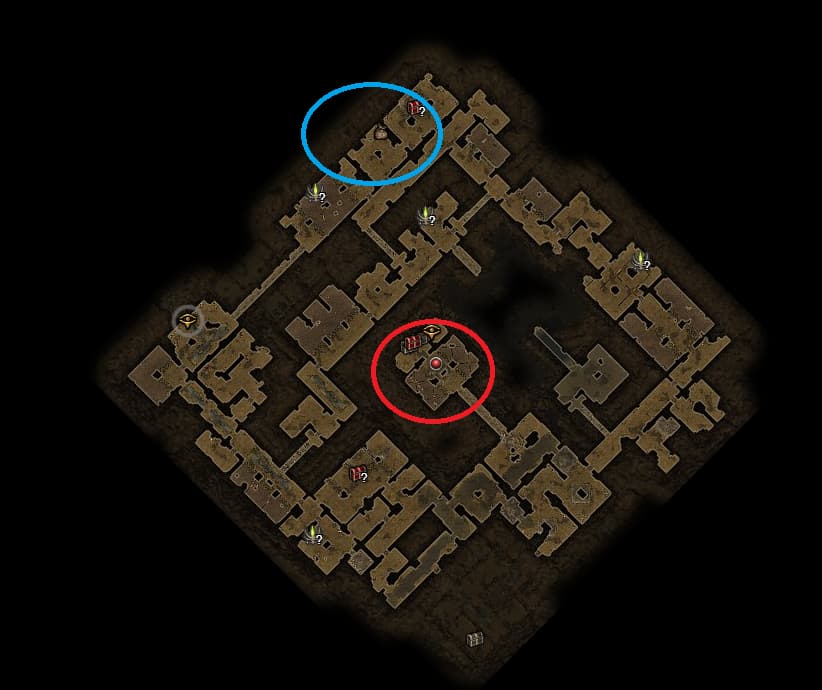
Blue highlighted for shopkeeper, red for the boss.
He sells Spectral Battle Axes, usually with very well rolled combinations. If your weapon isn’t “Chilled Spectral Battle Axe of Shattering,” its worthwhile checking him out incase he sells that exact roll, as its BiS.
The boss drops Alkamos rings. On Ultimate, we will farm him (too much), however he still drops the epic variants fairly common, around 30%. While you’re farming for Ilgorr’s Eternal Vigil, complete the dungeon while you’re at it, and maybe you’ll pick one up.
Soooo I did manage to find a lower level Alkamos ring from the above mentioned farming. If you don’t have one, its not a big deal. Use any other ring you find as an alternative.
This will be the start of the beginning of Ultimate difficulty. Before we proceed, I picked up a level 65 Malmouth faction shop chest piece which gave very good resistances, and makes me much beefier.
Ellena’s Necklace is BiS for levelling. It unlocks at Honor level Devil’s Crossing, and can be very easily farmed.
At the start of Ultimate, Isaac’s Shoulders are a really strong early item that always dumps a ton of strong resistance stats on the item. Very easy to get, and very powerful.
Level 100, Budget Setup
Now we are at the lategame. This is a level 100 character with all beginner, easy to obtain budget items.
Fettan Mask is the staple of budget setups. Super easy to get.
Bysmiel’s Chilling Seals gives +2 to Pneumatic Burst, and everything you could want on a cold damage setup.
Elite Malmouth Defender Cuirass gives tons of resistances, but also +3 to Ill Omen, which is another 3% damage reduction to enemies. Makes you super beefy, was my preferred choice here.
Plagueguard Grips are craftable, super easy to obtain gloves. I rolled mine with elemental damage, but anything with attack speed, cold damage, offensive ability, or resists are all viable.
Intrepid Warboots are also craftable, super easy to obtain budget shoes that are often time BiS in the endgame.
Elite Wendigo Bladed Pauldron’s are a direct upgrade to the ones prior. Flat cold damage, and good stats. Everything I can ask for here.
Level 100 Finished Endgame Setup
Many have done Cold Reaper at the endgame, this is my version that I play. Minor tweaks can be made based on what items you obtain and how you play.
How to farm for these items?
Let’s begin with the easiest ones, and in the order you should farm them.
Chilled Malkadarr’s Dreadblade of Shattering is the best “realistically” rolled weapon. Can be farmed for first.
Gargoyle’s Waistguard - Preferably with Aggressive prefix for 7% offensive ability. Also one of the easiest to obtain first.
Intrepid Warboots - With the rolls you need in your build to cover up resistances, arguably BiS. Some legendaries can replace these, boots are the most flexible slot.
Nemesis - BiS relic. RNG for blueprints, but not too hard to obtain once you have the recipe down.
After you have the easy ones down, its now time to prep for the grind.
Grava’Thul’s Legguards provides effective -6% resistance reduction in this build. Farm for Nemesis with Cth’thonic faction first, because while you are farming for these pants, you will also rack up Blood’s of Cth’thons, which are materials you need to craft skeleton keys with.
With Skeleton keys crafted, onto the Steps of Torment.
Chilled Spectral Battle Axe of Shattering is the best “realistic” rolled version. This is surprisingly easy to get, as the shop keeper in the Steps of Torment sells well rolled versions of this axe. Take a visit by his shop each run.
Alkamos Ring #1 and Alkamos Ring #2 will take average of 60~ skeleton keys to obtain both. In my first ever attempt in farming these, it took me personally 115 skeleton keys. Be prepared to sit here all day.
Ilgorr’s Eternal Vigil - This isn’t BiS as Mythical Dreadchill Mark is the only non target farmable item in our build. However, if you find one that has very good rolls, it can match Dreadchill Mark.
Now Steps of Torment is complete. Time to farm another 40~ average skeleton keys, and onto Morgoneth’s lair, the Tomb of the Heretic.
Armor of the Eternal Night is the 4 piece Morgoneth set we will be using. The boots are not part of the set. Follow the guide for items here.
Kaisan’s Amulet here replaces Ellena’s, giving +1 to all skills and no longer just nightblade. Farming Morgoneth’s dungeon so many times will give you Nemesis reputation, which means in the runs you will be doing farming Morgoneths dungeon, you will spawn Kaisan and it will be farmed for you.
And now the build is complete!
The build can take on and clear all content in the game.