Version 1.3.0.0
Update – 2026-07-25
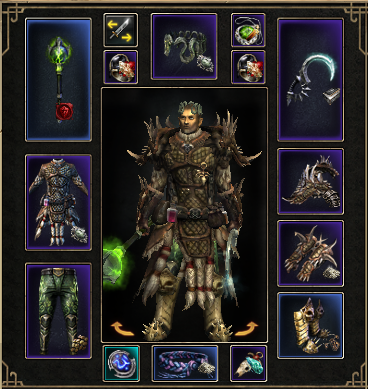
The build is mainly designed for CR, but it can comfortably handle SR, superbosses, and regular Ascendant Mode clearing.
Based on the previous version, I completed the full set of Ascended affixes on every piece of gear and replaced the amulet with the Awakened Blightshard Amulet . All other equipment remains unchanged.
The monsters in CR 180-190 EX hit much harder now, and the continuous cleansing effect from the Purification Totems is extremely dangerous. In the demonstration video, I intentionally stood still and face-tanked everything during a 7-run streak , which required using 3 Aether Clusters .
Compared to the previous version, this setup now requires not only the 4 Tribute buffs , but also the Vanguard Banner . I also adjusted my positioning to stand at the lower-left side of the banner, allowing more pets to benefit from its buff and improving clear speed.
As long as you keep an eye on the game in windowed mode, the build is generally very stable. However, if you completely alt-tab out of the game, there’s a high chance your character will die. I’ll continue optimizing both the gear and the Ascended affixes, but this version should already be a solid reference for anyone interested in the build.
Potion Setup
Crucible
- Menhirus + Savillis
- Phillom + Revurrum
Other Content
- Menhirus + Sansochromatis
- Sanso + Alterom
My Current Ascended Affixes
These are not mandatory . Any Ascended affixes that improve your survivability or increase your pets’ damage will work. The GrimTools version differs quite a bit from my actual character.
- Weapon: Mogdrogen’s Pact — +5% Crit Damage
- Off-hand: Mogdrogen’s Pact — +15 DA, +50% Health Regeneration
- Ring: Spectral Binding — +2% DA / +6% Movement Speed, +6% Maximum Movement Speed
- Amulet: Mogdrogen’s Pact — +5% Crit Damage
- Medal: Spectral Binding — +100 Health, +200 Health Regenerated per Second
- Helmet: Spectral Binding — +2% DA
- Chest Armor: Mogdrogen’s Pact — +15 DA, +25% Health Regeneration
- Legs: +8% Healing Effectiveness
- Shoulders: Mogdrogen’s Pact — +3% Crit Damage
- Belt: +30% Poison Resistance, +2% Maximum Poison Resistance
- Boots: Spectral Binding — +2% DA
- Gloves: +8% Healing Effectiveness
Ideal Setup: Ritualist, Level 100 (GD 1.3.0.0) - Grim Dawn Build Calculator
My Current Setup: Ritualist, Level 100 (GD 1.3.0.0) - Grim Dawn Build Calculator
Version 1.3(Public Test)
Update – 2026-05-23
Videos of Cru、SR、Boss
Grim Tools Builds
Compared to the previous version, I’ve made some adjustments to adapt the build for all content, including the Cairn world, Shattered Realm, and Celestials. The main changes are as follows:
- Replaced Blightshard Amulet with Heart of the Mountain. The Chillmane is now suitable for all scenarios and no longer suffers from the frequent HP loss issue like theBlighted Rift Scourge does.
- Moved Ground Slam to Raging Tempes to provide a slow effect, offering light crowd control and improving survivability.
- Adjusted weapon augments and jewelry enchantments. In open-world content, everything can reach a full 80% cap, allowing comfortable handling of Shattered Realm. With Arena buffs, the build can also withstand enemy resistance reduction stacks, and pets are now very tanky and rarely lose HP.
- For Celestials (Callagadra and Mogdrogen), temporarily switched all jewelry augments to Atf’s Will to improve player survivability and pet damage. For Ravager, use 2x Atf’s Will and 1x Guardian’s Binding Dust (to compensate for Vitality resistance). Also removed 1 point from Skeleton Ascension and invested it into Totem healing.
- In Cru farming runs, a full buff cycle is stable at around 7 runs, sometimes slightly more, depending on the relatively average ring rolls, while other gear is high rolled.
- For Hardcore mode, it is recommended not to step away from the screen after shard 160, as the final wave can be dangerous—especially combinations like Archmage + GravaThul + Fabius, which can become Sundered + Nullification.
- Adjusted AFK farming position—see video. This spot allows faster monster grouping.
- Further adjustments will be made according to the 1.3 official release.
Version 1.2.1.6
Crucible ATK Video
Grim Tool BUILD
This build from last year. It can AFK farm in the Crucible with no input required, and you can collect the chest every 2:30 to 3:00 minutes(It depends on gear variables.).
The build allows flexible gear combinations. I’ve used the cheapest blue items here, but you can also use better and more powerful green gear according to your preference.
Warlord retaliation AFK builds have existed for a long time, but this time we’re using a pet AFK build, which is a bit more efficient.
There’s no guarantee of 100% survival. There’s a 5–10% chance of getting Sundered and Nullified from GravaThul , and hit by the Archmage’s Meteor at the same time, you will easily die.Other Nemesis combinations pose little threat.
AFK Crucible Process:
Translated by AI. There may be some inaccuracies, but the general meaning should be understandable.
Difficulty for AFK farming: Gladiator
Map selected: Death’s Crucible
1 Pre-fight prep: Enter the game, summon your AFK pet(s) first. After summoning, find the NPC to activate 4 buffs.The NPC is located in the middle-left of the Death’s Crucible map. After activating the buffs, talk to Lokarr, and select the dialogue options in this order:
The NPC is located in the middle-left of the Death’s Crucible map. After activating the buffs, talk to Lokarr, and select the dialogue options in this order:
① “I want to raise the stakes”
② “Alright, but I bet you I can go even higher”
③ “Start at wave 150 (spawn extra enemies)”
2. Positioning: Stand south of the pillar in the lower-middle section of the map, right next to the pillar.
3. Farming range: Farm from Wave 150 (with extra enemies) to Wave 160 (with extra enemies). Collect your reward after clearing Wave 160.
4. Loop the run: After collecting rewards, talk to Lokarr again and select:
① “I wish to challenge the Crucible again”
② “Yes, let me through (restart the run)” You will return to Wave 1, then repeat the wave selection process above.
5. Buff & Cost Efficiency:Buffs last 25 minutes. A single run from 150ex to 160ex takes under 3 minutes, including reward collection time. With one buff active, you can complete 7 to 8 runs.Each buff costs 12 Tributes, so 8 runs cost 48 Tributes total. A single 150ex to 160ex run rewards 10 Tributes, meaning you only need to farm 5 runs to break even.Therefore, you never need to save buffs—activate them whenever they are available.
Crucible Difficulty Unlock Tips:
How to unlock Challenger difficulty from Brawler difficulty:
1.Enter the game on Brawler difficulty, talk to Lokarr, and select Wave 100.
2.Clear up to Wave 110, collect your reward, then talk to Lokarr and select “Return to checkpoint”. This will set your wave count to 90.
3.Clear from Wave 90 back to Wave 100. After the run ends, Challenger difficulty will be unlocked.
How to unlock Gladiator difficulty from Challenger difficulty:
1.Enter the game on Challenger difficulty, talk to Lokarr, and select Wave 100.
2.Clear up to Wave 110, collect your reward, then talk to Lokarr and select “Return to checkpoint”. This will set your wave count to 90.
3.Clear from Wave 90 back to Wave 100. After the run ends, Gladiator difficulty will be unlocked.
How to unlock Gladiator difficulty (Extra Enemies mode) from Gladiator difficulty:
- Enter the game on Gladiator difficulty, talk to Lokarr, and select Wave 100.
- Clear up to Wave 110, collect your reward, then talk to Lokarr and select “Return to checkpoint”. This will set your wave count to 90.
- Clear from Wave 90 back to Wave 100. After the run ends, Gladiator difficulty (Extra Enemies mode) will be unlocked.
Shared Unlock Tip:
If you already have one character that has unlocked Gladiator difficulty, that character can purchase Gladiator’s Merit from the merchant. Place the item in your shared stash, and it will instantly unlock Gladiator difficulty for all your other characters. You will only need to unlock the Extra Enemies mode once more on Gladiator difficulty for those characters.
 )
)