GRIMTOOLS - MAIN BUILD
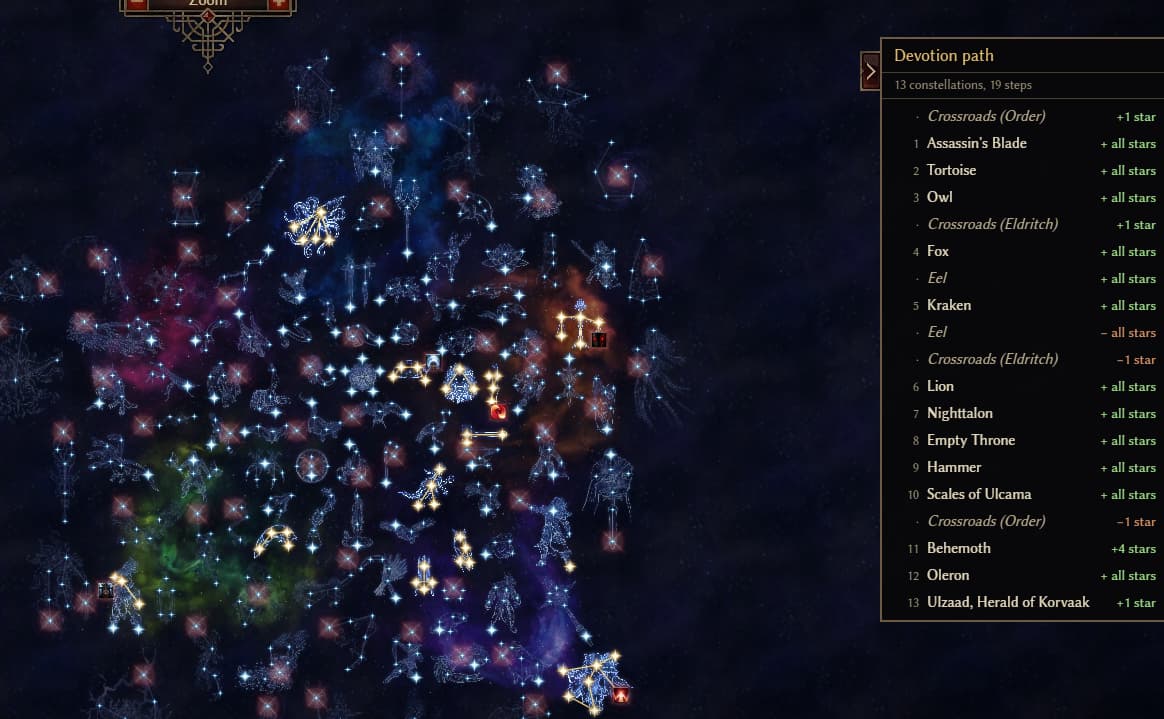
MORE SUSTAINABLE HIGH-SR DEVOTION SETUP
Masteries: Oathkeeper + Berserker
Main skill: Eye of Reckoning
Damage: Physical / Bleeding / Internal Trauma
Weapon: Two-handed melee
Current results: SR38 | Crucible 180-200 | Celestials and Ascendant endgame (BOBR not killed)
Overview
Hello everyone!
I would like to present my first reasonably successful Zealot build: a two-handed Physical/Bleeding/Internal Trauma Eye of Reckoning spinner.
At its core, the build is a reinterpretation of this Physical Eye of Reckoning Warlord, but it has its own identity thanks to the mechanics introduced with Berserker. Its sustain comes from extremely high attack damage converted to health, backed up by the defensive tools from both masteries and the devotion setup.
This is a very straightforward spin-to-win build, and I am not claiming that it is anywhere near the top of the meta. It is especially vulnerable to stuns and sudden burst damage while its defensive skills are disrupted or unavailable. The build is fairly consistent overall, but I would not recommend it for Hardcore.
It has cleared all currently available Ascendant content and the Celestials, with the exception of bobr. It cannot kill bobr before its regeneration becomes overwhelming, and the build generally performs much worse against isolated single targets than it does in dense fights.
Ideal situation is spinning inside a large pack of enemies, constantly healing from everything around us. Because of this, Nemeses such as Zantarin and Moosilauke are among our favourite matchups.
Against bosses, circle around the target while channeling Eye of Reckoning. This avoids a large part of their attacks without sacrificing damage. Celestial bosses cannot simply be facetanked unless you understand their mechanics and know which attacks must be avoided.
Performance and playstyle
Crucible
Crucible 180-200 is comfortable with the full set of buffs
Running it without buffs is much riskier. On wave 200, a badly timed skill disruption followed by Dread’s orb can easily kill the character, but i sure that it is 100% possible
Shattered Realm
The current record is SR39 but i have no demo, demo is only available for SR 38. I will keep trying to push higher, although the result depends heavily on mutators and boss combinations,
For regular farming, I recommend SR32-36:
- SR32-34 feels like an easy stroll.
- Above that, you need to pay more attention to mutators and adapt your positioning to the encounter.
For higher Shattered Realm pushes, the more sustainable devotion setup is often the better choice.
Celestial and superboss notes
Ravager - any version
Avoid the Sunder attacks and move away from the totems so that you do not get caught at point-blank range. The build can comfortably survive a few fireballs, but taking the entire volley directly to the face is almost guaranteed to be lethal.
Avatar of Mogdrogen - Wolf
Mogdrogen is not particularly dangerous above 50% health. Below that threshold, you can get chain-stunned or hit by several burst mechanics at once.
Try to kill the bears and disengage whenever your defensive cooldowns are unavailable or the bears are positioned badly.
Callagadra
Callagadra is the build’s true nightmare. Her extremely high resistance to our main damage type makes the fight painfully slow, while her winds prevent us from simply outhealing the incoming damage.
The encounter requires kiting and careful play around cooldowns. Expect a long fight that demands full concentration from beginning to end.
Lokarr and Crate of Entertainment
There are no special build-specific tricks required for either encounter.
Dread
This is mostly a facetank encounter. Move out of the large empowered ground effect. The kill is slightly faster if you avoid the life-stealing attack.
BOBR
Not killed with this build so far. We cannot burn it down before the regeneration becomes overwhelming, and this setup is generally not at its best against a single isolated target.
Stats, gearing and cheaper alternatives
Attack speed
Once you reach level 94 and begin assembling the final setup, the first stat I recommend checking is attack speed.
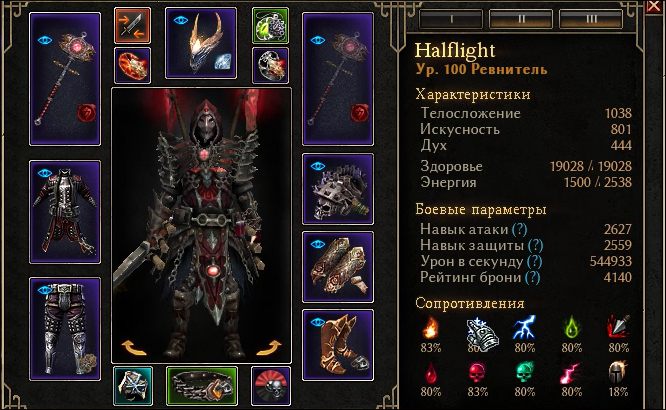
Aim for roughly 180-190% attack speed before combat procs. Once the build’s temporary bonuses activate, this should bring you to the desired 200% cap.
Damage priorities
If you are missing some of the final items and need more damage, look back at the Physical Warlord linked above and use items from that setup, or similar alternatives, as temporary replacements. Prioritize physical damage first.
Our DoT damage does not become truly significant until we equip the medal that improves Bloodborne. I would not invest too heavily into that part of the build until the core setup is complete.
High rolls on percentage physical and bleeding damage are important. The difference is very noticeable, so you will immediately feel the damage loss if a rerolled item ends up worse than the original.
Belt, amulet and rerolling
The belt and amulet shown in the final setup are BiS rolls. Do not worry if yours have weaker suffixes; they can be rerolled later.
However, I strongly recommend against rerolling an item that is currently irreplaceable. The build’s damage is surprisingly sensitive to individual affixes, and replacing an average but useful suffix with complete garbage can make the character feel much worse.
Offensive Ability
After meeting the build’s other requirements, invest everything you can into Offensive Ability. Berserk benefits greatly from critical hits, and reliable crits provide a major increase to both damage and survivability.
Any remaining investment should go into Offensive Ability and Total Damage. Together, they provide a very substantial overall increase.
Ascended affixes
There are not enough Ascended affixes in the game to fundamentally transform the setup, but several of them are particularly valuable.
The most important one is the weapon affix that extends Ascension. In prolonged fights, it gives us almost permanent uptime on the buff.
I also use one additional Ascension-related affix on another slot. While maintaining focus on the target, this helps keep both damage and survivability consistently high.
It is also very useful to have one item with the affix that allows critical hits to refresh Battle Surge. A single source of this effect is enough and provides a considerable amount of extra comfort.
The remaining affixes can be adjusted to your character’s needs:
- Armor
- Offensive Ability
- Attack Speed
- Any missing defensive or offensive stats
This is why I recommend securing the Ascension affix on the weapon first. The other item slots can then be used to fine-tune the build around your particular rolls.
Alchemy modifiers
Alchemy is extremely valuable for this build. The additional life steal and crowd-control resistance make many otherwise dangerous situations much more manageable.
Leveling and devotion setups
The original idea for this build existed before the release of Fangs of Asterkarn. The character was initially leveled to 50 as an Oathkeeper.
Almost any Oathkeeper leveling setup should work. The mastery can level comfortably with either a shield or a two-handed weapon, so progressing through the campaign should not cause any serious problems.
Once you reach level 94, start assembling the final setup and follow the gearing priorities described above.
The main build is the default setup. For higher Shattered Realm pushes, however, it may be worth switching to the more sustainable devotion setup. Its devotion route sacrifices some DPS in exchange for slightly more Defensive Ability and a better chance of surviving sudden burst damage.
Videos
Final notes
I do not claim to be an expert build crafter. I am simply sharing my experience with a combination that I found interesting and enjoyable while experimenting outside established build guides.
Suggestions, criticism and improvements are always welcome. I would be happy to learn more about this mastery combination and explore how far the two-handed melee archetype can be pushed.