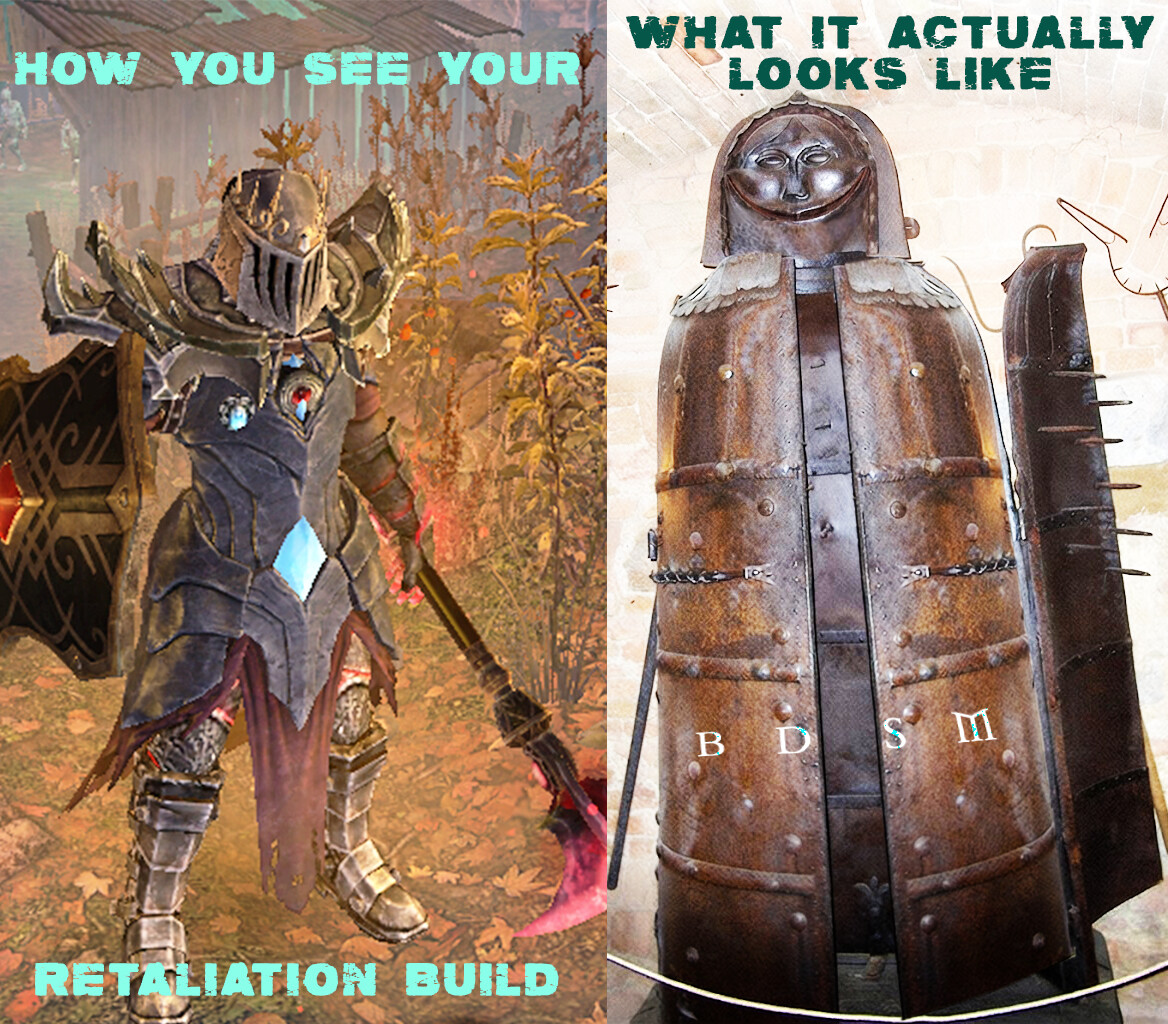
I didn’t updated this Fire Retaliation Commando 1.1.3 build for ages, it’s like 7 years since I did that post. And after release of new DLC it took time for some playtests and a time to update this on forum as well.
A B O U T :
This is a classic archetype of retaliation build mostly playing through basic mechanic “monsters dying by hitting you” + Сounterstrike that was so many times since 1.1.3 updated to new era of 1.3.0 and also quite nice improvement of Ulzuin’s Choosen that give some additional charges and chance of CD to Grenado and Canister bomb - which helped make this build a fully-fledged engineering build with the ability to play the role of a tank and a mid-range caster (if needed) at the same time. This build setup is quite expensive, with a lot of MI’S items and high affix and suffix requirements, but even at less than double rarity, it’s quite good—and not much inferior to more expensive versions, especially since crafting has made them more accessible. Below is a link to a more stripped-down version of the grimtool, which only uses legendary items.
GT Current Setup: Commando, Level 100 (GD 1.3.0.6) - Grim Dawn Build Calculator
GT Cheaper MI’s: Commando, Level 100 (GD 1.3.0.6) - Grim Dawn Build Calculator
GT Legendary Items Only: Commando, Level 100 (GD 1.3.0.6) - Grim Dawn Build Calculator
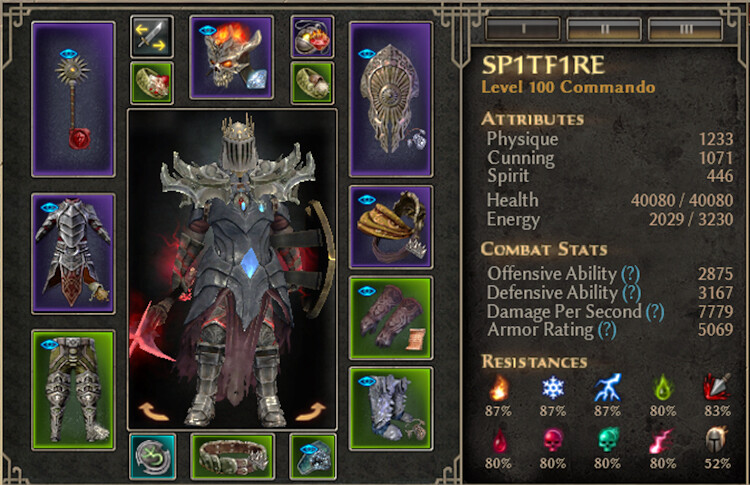
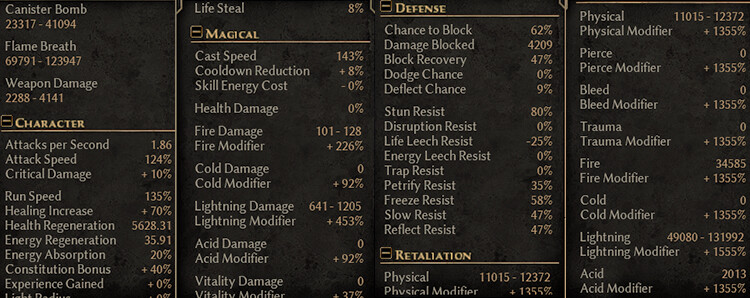
All stats in the screenshots are in a passive state. Giant, Tree, Obelisk of Menhir, Overguard, Blast shield, Mehirs Will, Blade Barricade are non active.
V I D E O
Shattered Realm 41 Video [Boss Room]
Beronath Corruptor of Asterkarn [Ascendancy Altar x6]
Ravager of Minds [Ascendancy Altar x6]
Callagadra Scion of the Sands [Ascendancy Altar x6]
G E A R
The basicly this build requires Dawnseeker’s Light Set and Mythical Mask of Infernal Truth. The whole set is the core for base lighting retaliation mixed with a fire retaliation (previously was only fire) set has good support and synergy with skills, stats, and giving truly amazing shield that feels even better than old MI’s Collossal Bulwark. Mythical Mask of Infernal Truth has modifications to Canister Bomb, Grenado, and makes actually possible to have good AOE retaliation skill for fast mob cleaning but single target damage not really high actually. [I’m feeling that only 18% retaliation damage to canister bomb along with a long CD not very cool, while other archetypes has Onslaught or 250% attack speed with a tons of flat damage in millions in seconds, this helm should be buffed on CD and % to retal damage a bit, 2-3 casts with a pause not really great performance.]. Gildor’s Guard armor has a very important +3 Shield Training, I’ll be honest, it’s really noticeable in the shield’s performance, the ability to speed up block cooldowns, and the bonus to Counter Strike, which allows you to keep another +2 skill points for other needs. Besides this, it has heavy armor with a good set of defensive mechanics. Relic is optional between Serenity and Aurora. It’s fair to say that Serenity’s proc is superior for surviving in Hardcore. It’s like a lifeline when nothing else can help. In this regard, Aurora’s proc is practically useless on this type of tank. While 12,000 absorption and 2% max resistance sound great, in practice, if you’re standing there absorbing massive amounts of damage from various sources for a long time, the proc wears off in 1-3 seconds and is essentially on cooldown. And while Serenity’s proc works very rarely, it’s there when it matters most. I’d say the only slight advantage in Aurora’s favor is the strong mana regeneration bonus, which drains fairly quickly even with the Tree of Life active, and the 6% physical resistance is also solid when you need to be in close combat all the time. But I certainly see Aurora as a useful relic for mid- or long-range builds, where the relic’s proc unlocks its greatest potential. If you choose Serenity, be prepared to replace the powder on one of your rings with energy regeneration. You’ll lose a little less HP, but you’ll get your energy regeneration deficit back.
Gollus Rings are a key part of the green item set. Their primary function is to provide +3 to Vindictive Flame and +3 to Menhir’s Bulwark. In addition to the base regeneration stats, they also boost two defensive skills that further enhance regeneration. For Commando, this is the perfect solution for building a health regeneration mechanic. Suffixes and affixes here can range from double rarity to basic ones. The most important thing is to: have at least one with a bonus to energy regeneration, a set of different resistances, and minimal bonuses to OA, DA.
There are two green belt options: one is the crafted Stoneplate Waistguard, the other is the Ugdenbog Girdle. Both provide +1 to Soldier, which is what’s needed, as well as armor, which will be lacking along with physical resistance (until item ascension). The Drangol affix will be prioritized; this creates a kind of legendary belt, Ulzin’s Torment, the only difference being that it’s more soldier-specific and more for armor bonuses.
The build clears all basic content on Ascendancy and can give many extra survival on hardcore. It’s good only for slow reaction players who are not bored to fight super bosses more than 3 minutes or so and want to feel some old vibes of tank builds (Taking into account, of course, that you won’t be hit by Nullification, Sunder, and crit of Zantarin’s Vital Brust at the same time… even God won’t save you from that :). Since this build is focused on getting and sharpening items for defensive mechanics, which of course will cost of dropping DPS a lot you will not be able to do speed challenges or fast farm, I warned you. One of strong sides for this Commando is Co-Op as with lot’s of buffs it can really nicely take all the agro on this one (but who need this, if you can just take pets).
Ikrix Scale medal has excellent synergy with the legendary set I mentioned before, and it compensates for the significant skill point deficit for the Overguard skill. The +3 bonus frees up much-needed skill points for at least some OA compensation through other skills. Suffixes and affixes are recommended to increase attack and armor first, followed by health, defense, and resistances.
Stoneplate Greaves and Emberguard Gauntlets Both are craftable items that are fairly easy to obtain, but require a lot of materials and money to craft different versions. Priority here will be given to suffixes and affixes such as Seraphim, Ulzuin’s Flame,of Blades—they will help supplement the flat retaliation damage pool. OA DA and resistances are also important if you haven’t managed to obtain them through other green items.
Dreeg Sect Legguards the key choice for these MIS pants is the health regeneration bonus and the percentage of OA (Offensive abbility is always hard to stack on retaliation). Choosing the of Blades or of the Ulzuin’s Flame affix would be best.
Overall, what’s important to know for the stability of this build is the need to reach 3100 (I justify this by saying that the health steal mechanic from a caster tank isn’t as relevant without a basic attack like the Guardian’s Savagery) and also good for extreme content like Shattered Realms 40-41 (but why just go there, maybe just for a few laughs?). All items should be prioritized by upgrading them at the blacksmith for the best roll of physical and armor resistances (if boots have 4%, increase to 6%) and the counter damage added by the item (a shield with 1410 and 1900 added damage makes a big difference). Then prioritize OA and DA, with less attention to other stats. The offensive abbility non less than 2800 it also compensates by skill Flashbang but it still not always helps to beat some bosses DA. It’s important to understand that you’ll need a lot of Iron and Ashes of Awakening for this…
Prioritize Ascension, focusing on adding armor, physical resistance through jewelry, and several bonuses to Counterattack or damage counterattack. It’s a good idea to get at least one Ascension with the new mechanic of healing health once per second and 2% to the Field Commander, as the large HP pool provides a significant bonus to this mechanic.
S K I L L S
Soldier skills are entirely defensive. With a high enough defense, you can take a few skill points from Military Conditioning and transfer them to Battle Cry, as the damage reduction is very significant (it can be better if your item setup is far from perfect on some stage). Also, if you’re not lacking armor and defense, you can transfer 1-2 points from the Field Command to Fighting Spirit to compensate for the lack of attack.
Demolitionist class are attack skills, enemy effectiveness reduction, offensive skills, and health regeneration. Flashbang reduces monster defense, thereby adding 210 attack, meaning 3000 attack is quite attainable. Ulzuin’s Chosen made this type of character play possible; a minimum of 8 points is required, including overall damage and the chance to re-throw projectiles (grenades and canister bombs). Due to the focus on defensive mechanics and a lack of available skill points, the primary offensive abilities are unfortunately far from maxed out. A more aggressive setup could certainly be created, taking more from defensive abilities and maxing out the Grenade and Canister, but such a setup doesn’t offer much of a damage boost, and would require further sacrifices in survivability, such as choosing constellations like the Messenger of War and the Phoenix. However, this setup lacks the proper fire-to-lightning conversion.
D E V O T I O N S
Constellations perform several important functions specifically for survivability. These include increasing DoT resistance, increasing the chance to survive critical hits from Sanders by absorbing large, sudden bursts of damage that often lead to death in a split second, supplementing shield work, and attempting to compensate for the lack of mana regeneration for casts. Resistance cutters are generally scarce, and there’s no easy way to obtain them in large quantities, so the Cursed Tincture potion is also used. Another important defensive element is the Anvil constellation. Its principle could be described as follows: the more pressure you’re under, the more it increases your resilience, and it’s essentially the only source of health steal in the build (otherwise, regeneration plays a more important role).
L E V E L I N G
I can’t say much about the new meta in terms of leveling; I’ve only just started leveling my third character with a Berserker + Warder class. Before that, I was leveling Commando (right after my very first character died on stream), and I essentially played it on Normal and a little on Elite, focusing on dual pistols and Fire Strike. It’s just the classic way to play around fire and burning damage without engaging in melee combat, maintaining high resistances (on Hardcore) and average DPS. I don’t see any point in playing a build focused on retaliation damage, and after level 94, you can easily switch to another build. The old problems with retaliation damage builds persist, and caster opponents take less damage, but the game has become more hardcore and challenging, so there’s little point in enduring the pain in melee without proper gear while leveling. I’m sure there are some great guides on the forum from more experienced and knowledgeable folks, covering things like Commando upgrades.
Build issues—can I call it an immortal tin can? Probably not, this isn’t the 1.1.3.0 meta. In the current environment, Sunder mechanics and Nullify often create huge risks, and monsters won’t spare you, reducing your regeneration and damage by 70% and reducing your defense by 1000. So, standing still like in the old days is definitely not possible in certain circumstances and situations. The most challenging opponents are probably Shriek, Ixal, Gravathull, Ravager of Minds, champions with Nullify and regeneration slows or reductions—this is a direct vulnerability for the build.
C E L E S T I A L S
Could this build kill a beaver (Nerfatal)? Theoretically, it couldn’t due to lack of DPS, but the game gave us such a wonderful medal as this one:
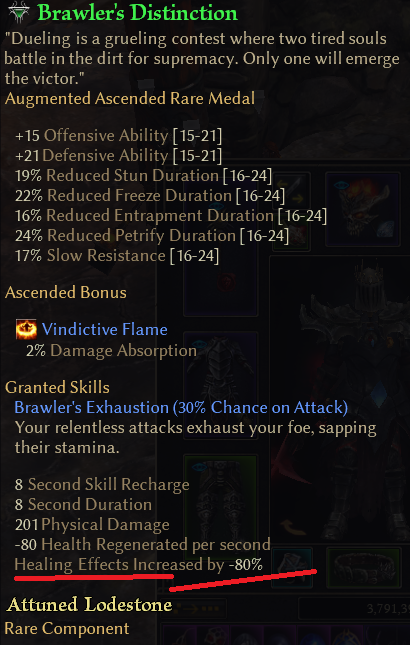
And for builds that lack of DPS this is a gift that doing this possible. I tried Nerfatal with this medal and yes it was enough to reduce his damage even through lifesteal. I beat to him around 19% of HP and then just dropped that fight because my FPS was like 1 and game was lagging a lot (video card Radeon RX Vega 56). So theoretically… Yes it’s doable, but long - possible 9 minutes fight.
Beronath + The Dread (YES ITS HAPPENED TO ME AGAIN)  and I must say exactly same character on second visit to Beronath, I was just like… whaaat? But this time I beated them both! Beronath + The Dread [Ascendancy win] Run time 4:15+?~ This time it was like more comfortable to take them both down as I did already Ascendancy on items and battle was more smooth so I had much more time to stand and taking hits\giving them hits. But I guess if The Dread spawned earlier like 100% health of Beronath - possible debuffed -75% to my damage arena would not help me to win.
The Crate of Entertainment this is the second time I beat it. Once with guys in Multiplayer but that was long time ago. And on other more DPS char. I risked a lot to go there this time in solo on HC, I was sure that it’s doable after ascendancy, but actually after win and looking on video, it was like on the edge, any mistake can be last one. Crate Boss Video [Ultimate] Run time 2:45~
Callagadra hard one on Ascendancy but after item upgrades, goes smooth even through Sunders, you can facetank it and feels good old vibes. (But with Altar x6 on +350% damage to boss - please pay respect to this mighty guard of Korvan Sands, as she hits like a truck and can cut your head off with sunders. Even 58% phys resist she was piercing like a knife through skin, but actually with good control this build clears it very ok). Average time 2:50~ Callagadra Scion of the Sands Video [Ascendancy no altar]
Mogdrogen the Wolf, Aside from his insane lightning resistance and massive regeneration, coupled with his constant mob spam, he’s arguably the easiest superboss for this build, even without item ascension—but that’s only in this case; he’s a much more dangerous opponent for other classes. Overall, it’s definitely not worth wasting your time with this character; the fight lasts a full 10~ minutes, as he doesn’t attack with a melee attack. Mogdrogen the Wolf [Old Video]
The Dread solo requires more attention to his attack and casts before ascendancy items and less after, and it involves the speed of cleaning reducing the lenght of fight in total like from 8 minutes to 5:35~ The Dread Video [Ascendancy]
Lokarr & Avatar of Mogdrogen as well as all Nemesis are really ok to deal by this setup, but requires some minor attention to few of their mechanics.
Crucible & Shattered Realm
Normally cleans SR38 with average speed, I wrote about the build’s weaknesses above, so it’s critical for the character to try to avoid these mechanics and their deadly combination along with the enemy density. I closed shards 40 and 41 during testing, taking into account the feeling of unevenness in the power of the Shattered Outcast, compared to the damage of other bosses, but this often applies to many Shattered enemies, which sometimes penetrate many defense mechanics at once, but I also passed Lucius and Shattered Gargabol in SR40 with good skill management. But if you do encounter a Rot Reaper with this build, even at level 38 you might not be able to counter his regeneration (or lifesteal)—it’s just too much. In any case, I just went there to test the limits of the build; there’s little point in going there without a reward.
Crucible progression varies, but is fairly consistent. However, if you encounter two Ixals and one Shriek, be prepared, especially at wave 200. This is perhaps the worst-case scenario, and the speed of wave 200 can be dangerous. (This can be easily avoided with a good build with high damage.) As for buffs, adding a banner with Resistance Reduction and the Might of Amatok tribute is a good idea to speed things up.
 but as I mentioned in video, this build get’s it full power of defense on perfectly polished MI’s setup, that’s why it requires so much resourses and time to farm, but Legendary setup will give more damage and the game will be at quite comfort level if you not planning to do some extraordinary things like getting Nullify and Sunders at same time. Both setup requires some attention to ascendancy +3% phys res, it is crucial for melee retal