[v1.0] - A self-compiled Compendium to playing Bone Harvest
Builds are at the bottom! 
Introduction & Personal Note
Are you a complete noob and picked Bone Harvest because it looks rad? Maybe you haven’t picked out a character at all yet and are looking for something to play. Or just maybe you’re a thousand-and-a-half hours into playing and you’re not tired of it.
Whatever your reason for seeking to extend your knowledge of bones, your choices are abundant, and this compendium was put together to reanalyze old builds, showcase new ones and become a source of feedback for the community to share their thoughts on Bone Harvest related content.
God I love Bone Harvest.
Disclaimer to the Vets - I’m not a Vet
This is my first real forum post, let alone a guide and furthermore a compendium. At 1600 hours, my knowledge is still so small compared to the highest echelons of builders.
This is not meant to be an end-all post; it is intended to be a source of updated knowledge for an ability I have a lot of passion about. Many if not most builds pre-FoA are better off after the years, and so they should still be functional to their prior capacity. However, this post is also to show how well these builds hold hold up under the weight of the new expansion drop.
Many might not be exactly duplicated, since it’s obvious many are pre1.2 and their Armor/OA/DA will not hold up in today’s game, and as a result may have armor or OA/DA tweaked upwards where able. The core concepts of any previously established builds shall be preserved for testing, however.
Rating Criteria & The Big “Is it Good?”
Bone Harvest most certainly is a good ability. An important thing to keep in mind is that the ability greedily demands a 2-handed weapon to do maximum damage. Bone Harvest does not do damage with both weapons, only your Main Hand. So if you are dual-wielding, you’re only using the damage from a single weapon. Any setup using a 1-handed weapon(s) with Bone Harvest as its core-damaging ability will typically fall behind 2-handed setups.
The criteria I’m rating each setup by is SR31, Tomb of the Heretic, Tempest Totem, Aforementioned with +3 to +5 Ashes activated, and Celestials-Slain.
We’ll split the criteria into 4 tiers, but only the first 3 are actually relevant.
• Tier 1 - Completes SR31 in time, ToH and Tempest Totems with NO Altar active.
• Tier 2 - Completes SR31, ToH and Tempest Totems completed with +3 Altar minimum active. Tier 2 setups might kill Ravager or Callagadra but will not kill New Mogdrogen.
• Tier 3 - Kills New Mogdren or Bobr + Aforementioned content. If it kills new Celestials, it should kill old ones as well.
• Tier 4 - Capable of completing literally all content.
To make a clear note, none of these setups are killing Ravager of Minds in less than 30 seconds, but a good handful do ALL content, even Bobr. Take that as you will. I try to only test on Ravager of Minds because I feel it makes for a more organic result.
Another point, Mogdrogen mogs harder than Bobr, damage wise. Bobr simply has a DPS requirement. As a result, some builds here struggle with Mogdrogen way more than Bobr. It’s not really a phenomenon, more a result of two different fight mechanic requirements.

Let’s talk Leveling
There’s only a handful of MIs for Bone Harvest.
Some classes will be more effective at leveling Bone Harvest to others by a large degree. At times, it may be more efficient to select another ability to level with based on your class and for many setups you’ll be required to do so for 1/3 of the game anyways. There is a large degree of community resources available for leveling.
For the reason that there is numerous builds here, I’ll only be going over the MIs that affect Bone Harvest and where to acquire them and not an in-depth guide to leveling as each build.
• Death’s Whisper Hood gives 80% Weapon Damage and a 2 meter range increase. This is mandatory for many setups and requires you to side with Kymon’s Chosen for your Homestead faction choice questline if you don’t have a secondary character to farm this helmet on. It is obtained from Ravok in Fort Haron. You cannot side with Kymon’s Chosen if you are a Necromancer so you must play as your alternative class until making your choice in Homestead. Afterwards, you may reskill your mastery points into Necromancer without fear of being locked out of the Kymon’s Chosen faction.
• Bonescythe is a 1h-Axe that allows you to literally spam Bone Harvest if dual wielding them. Very early item. It is very effective to level with in my personal experience. Conveniently, you’ll obtain it after you side with Kymon’s, so you’ll notice a sharp power increase after Homestead. The easy way to acquire one is through Benevald in Blood Grove’s secret vendor area. Turns Bone Harvest to Vitality.
• Chillblood’s Carcass is from Karnath in the Arkovian Colosseum, obtainable very early. Great for SnB (shield) builds. Turns Bone Harvest to Cold.
• For those with merits unlocked, you can immediately obtain Grul’Thunn’s Cleaver from the Obsidian Wound. For new players, this is a mid-game item not available until half-way through the new FoA expansion, which furthermore cannot be started until after you reach Fort Ikon. It cannot be obtained for some time. Turns Bone Harvest to Physical.
• The Hypporaven Feather can be farmed from Hypporavens in Ulos’ Springs, in FoA. Another later-game item. It turns Bone Harvest into more of a Decay [DoT] ability and is only recommended if you’re playing an Apostate or have no other options. Other items will be better to level with, even as an Apostate.
• Finally we have the Korvan Reaping Halberd as our best-in-slot leveling weapon for Bone Harvest leveling period, now a certified classic with the release of FoA. Bone Harvest deals the most damage when we have a 2h because it doesn’t hit with both weapons if you’re dual-wielding; Bone Harvest only deals damage with your main-hand. Getting your hands on one of these will carry you straight to 94. Update your MIs’ levels periodically as needed by getting a new one. They’re dropped from any animated statue in Forgotten Gods DLC areas, namely the Remnants of Korvan City on your way to the Tomb.

End-Game Building
If there is a video missing for a build, it’s because I was lazy or because The Dread didn’t spawn within a time I was willing to wait for his punk ass. Thank you for understanding…
Setups with a  next to them ~did not struggle~ in their tier. This means that the Frostshriek Veilwalker went through all of the criteria it tested through with flying colors. No struggle involved.
Setups with no star next to them ~may have struggled~ with certain criteria, typically their Celestial kills, such as the Death Guard Veilwalker.
All of these end-game builds complete world content at a minimum of Ascendant level with no Altar affixes. Many complete much higher levels of content, while some are simply what they are.
Looking for a build by damage type? Open all the class-dropdowns, and press Ctrl+F to search the webpage by damage type, E.G ‘Aether’ or ‘Acid’. The appropriate builds will be highlighted.
Apostate
[Cold] Preserver Weapon
[Aether] DW Veilripper
[Elemental] Arcanor
[Aether] Dreadscorcher
Death Knight
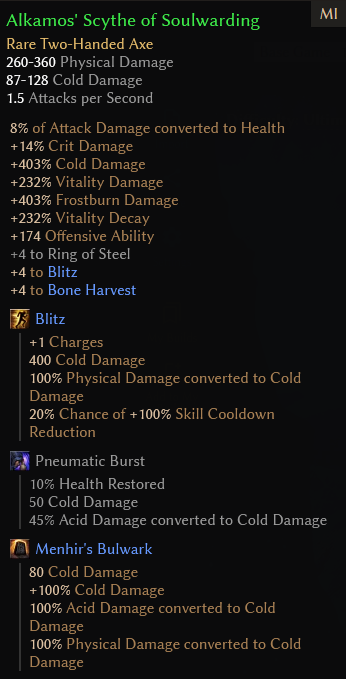
[Tier 4 - Cold] Frostshriek

The namesake of the post! This beast is comfortable to play, it dishes some serious damage, you have absolutely insane mobility with 2 charges of Blitz and it feels like you’re playing something akin to Frost from World of Warcraft but on crack.
Bobr was a bit of a struggle to get, and requires certain potion modifiers, but everything else is smooth-flowing. No ToH+5 video bc I’m lazy and he already does Bobr.
[SR31]
[Tempest Totem +5]
[New Mogdrogen]
[Dread]
[Bobr] - I didn’t think he’d do it… albeit you do have to take Amplicorum and Sanginis with Base-Potency Increase and even then the timer is still strict. But hey… Bobr! WOOOO
[Tier 2 - Cold] Awakened Chillgore + Chillblood’s Carcass (SnB)
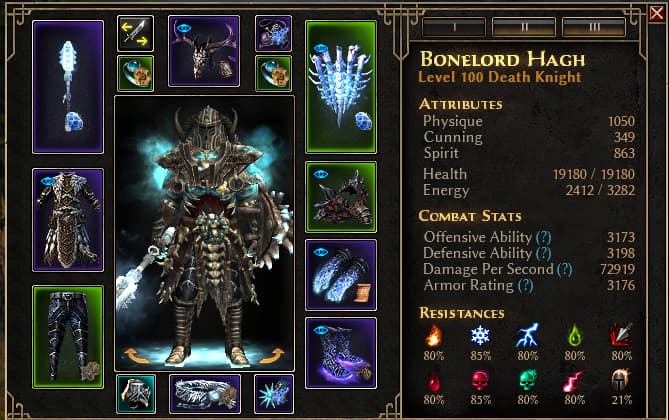
This was suppose to be a meme, but honestly turned out much finer than I expected. It took some fiddling to get good damage but it’s there! I’m quite satisfied with this for a SnB build. I hope Chillblood’s Carcass may receive some buffs or tweaking to be designed for DK’s too. Be sure to spec into Overguard because I didn’t… minimal issues but still do it because any issues I did have would be nullified by it.
[SR31]
[ToH +5] - Things get a bit dicey at Morg but otherwise fun and comfortable enough. Didn’t even spec into Overguard, so make sure you do that and you should have 0 issues.
[Tempest Totem +5]
[Ravager]
[Tier 4 - Aether] Soulsplitter
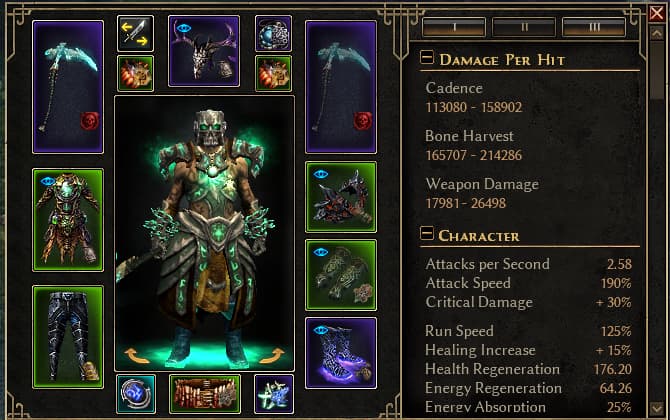
Our resident 2-hander receives a beautiful update with the modifiers for WPS, giving our Death Knight the AutoAttack damage it needs for good sustain, and consistent DPS. Bone Harvest on this variant isn’t absurdly strong, but still serves as insane wave-clear as seen in SR and rounds our DPS out nicely.
Very balanced, but would be nice to have a little more damage so we don’t feel a need to use Amplicorum Potion (no star because of this); please let us have teal Bone Harvest with our 20% TDM Transmuter btw  as is, it is blue because of the Cold conversion.
For an alternative variant– you will use the ‘Aether Cadence’ Conduit instead of the ‘Aether Bone Harvest’ Conduit, since Soulsplitter is intended by design to be used as an AutoAttack WPS weapon. Both work, though the total damage is greater from our Bone Harvest conduit.
NOTE: If you take the skill transmuter for 20% increased Bone Harvest damage, your damage does go up, but you lose cool points because your teal Bone Harvest is now blue for Cold due to the conversion changes.
Ascendant Bonuses help this build a lot. We’re receiving -12% Aether Res from our current bonuses-- not negligible, but it won’t break your build if you’re not attempting Celestials.
[SR31],
[ToH +5],
[Tempest Totem +5]
[Ravager]
[New Mog]
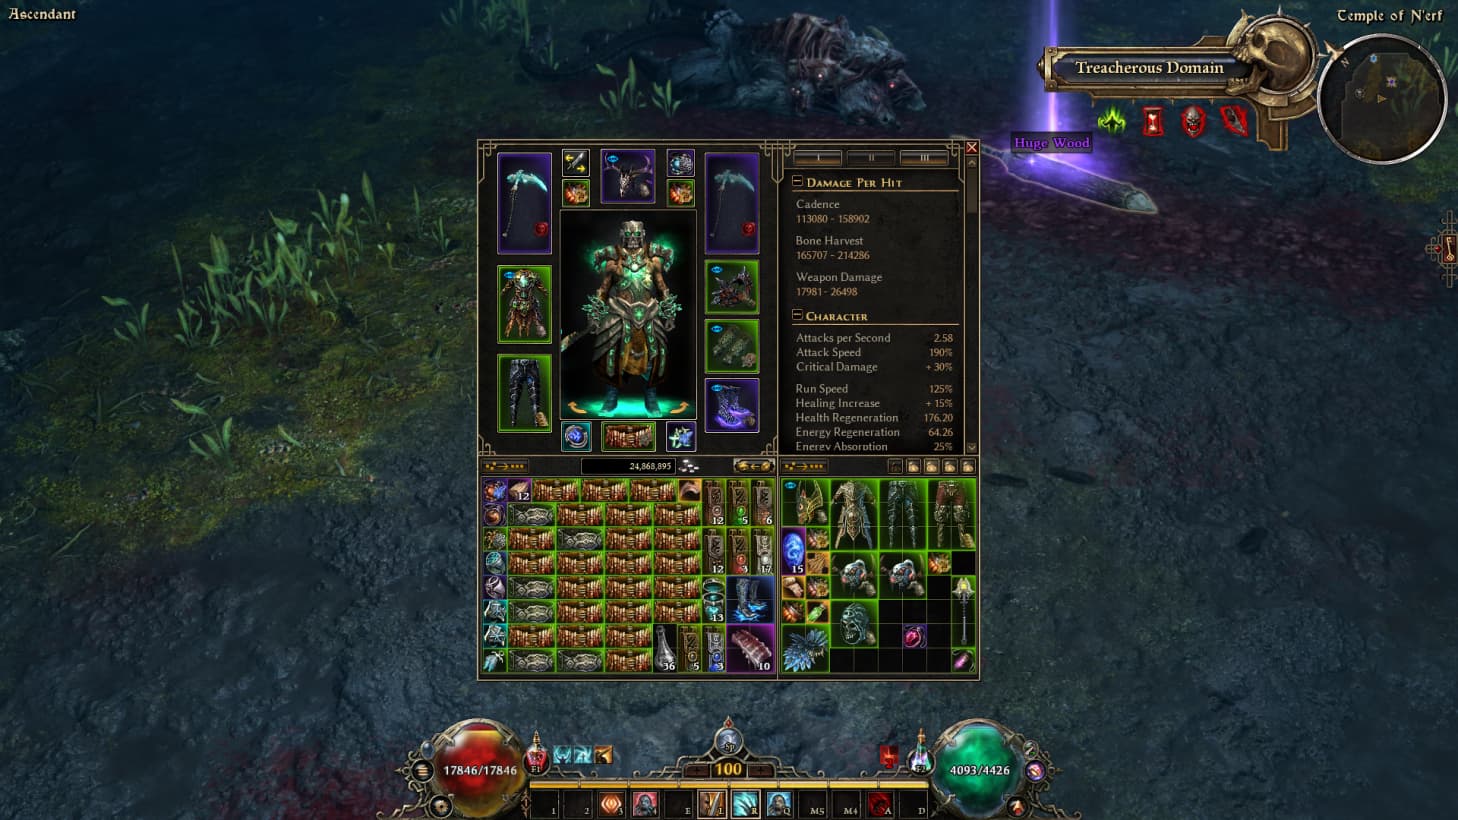
[Tier 2 - Vitality] Reaping Halberd Blood Knight
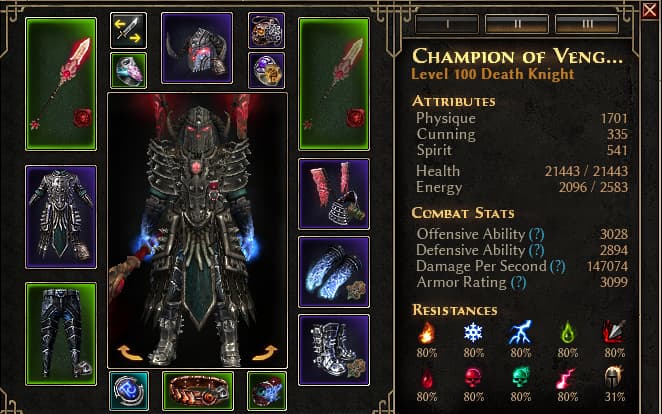
Such an iconic set… needs mebe small buff? Why DK damage so shit all the time?
OA/DA and armor have been updated compared to previous versions on the forums, as Ascendant mode and new SR31 requires a bit higher defense. This build struggles to play with Altar affixes, especially Ashes of Awakening. It is comfortable at a maximum of +3 where you’ll start to experience some issues with ToH, and some Tempest Totem-Titan combinations.
I struggled frustratingly to tune this to do +5 but I can’t get it to do so comfortably, or reliably with this set up. The Blood Knight set still makes a very solid T2 build for Death Knights.
It’ll do Ravager and Old Mog albeit it’ll take 5 minutes. Will not do other Celestials, likely. The damage isn’t high enough for reliable sustain-- maybe with Potion Modifier. Idk.
[SR31],
[ToH +3],
[Tempest Totem +3]
[Ravager] - I was being lazy and watching YouTube while playing. I died as a result. But obviously this kills Rav in about 4 minutes. I didn’t feel like rerunning the fight just to prove the kill when surviving deep into phase 2 is the only relevant detail.
Reaper
[Tier 2 - Cold] Soulrend

Unfortunately our original build has fallen from glory. Cold Bone Harvest hails a new king with our review of Frostshriek.
Has issues against Morgoneth with Altar additions [ToH+5 Run Failure]. Otherwise, it’s a decent Tier 2 build. Does [Ravager] and Old Mog.
[Tier 2 - Cold] DW Dreadweavers (Low-CD)

Fun to play when you can spam Bone Harvest on a 1s CD but it isn’t insanely damage-intensive. The OA/DA are frustratingly low as well.
You’ll most definitely have issues above +3 Altar with this build, possibly before. Piloting this requires Bone Harvest on your Left-Click and adaptation to playing it this way for max-DPS. Some pilots may struggle with Ravager using this setup, but it’s very doable. I forgot to take a video and didn’t want to rerun a 5 minute kill.
Just have the SR video because I was honestly getting tired of testing lower power builds. Don’t let my opinion or personal standards fool you. This build may have issues in world content, but makes a great SR farmer.
[Tier 4 - Acid] Death Guard (Low-CD)

Pneumatic Burst is active in Picture
This is probably going to end up in a tier list somewhere, even still. It’s consistent, and the damage ramp is almost non-existent. You may have issues with Dread and new Mogdrogen as your armor is a bit low for this set up; Terrobullum Potion Modifier is the first suggested improvement for this.
You can strip some points away from Shadow Strike to place into Nightblade’s defense nodes like Dual Blades for extra %Armor but it’s kinda negligible with how little armor you already have.
BUT nonetheless Bobr was done with 11/16 SS and 12/12 (Softcapped) Nidalla’s Justifiable Ends. Points into Shadow Strike MASSIVELY increases your single-target damage for this build, and for those unaware, SS is a core-damaging-ability for this setup. Be sure to spam it next to Bone Harvest for max dps.
[SR31],
[ToH +5],
[Tempest Totem +5],
[Ravager],
[New Mog],
[Bobr]
[Tier 2 - Vitality] Reaping Halberd Blood Knight
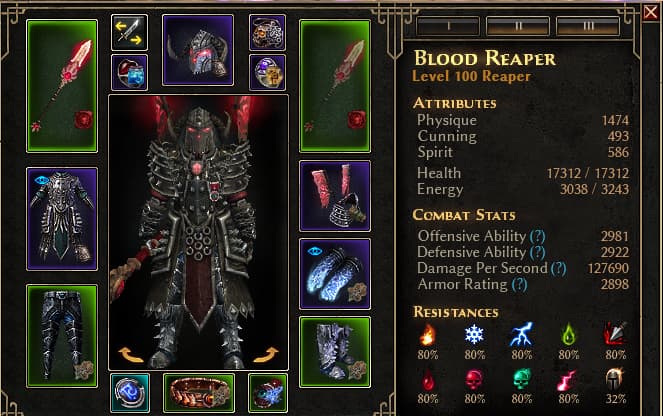
Solid Tier 2 setup. Virtually no changes between this and any other Blood Knight. It’s a very standardized setup. The OA/DA lacking below 3.2k marks still hurts us pretty bad, but Reaper plays the set much better than DK overall (with Ritualist playing the set better than Reaper).
You may run into some issues playing with the Altar, as you see with the ToH +5 Failure I’ve decided to still post, to highlight more realistic play. I’m not here to hype all builds. Some are simply lacking.
No Tempest Totem showcase-- I’m testing so many Bone Harvests builds I might actually get sick of the ability after finishing this guide.
[SR31],
[ToH +5 Failure @Morg],
[Ravager]
Ritualist
[Lightning] Elysian Gavel
[Cold] Chillblood Dreadweaver (CDR on Block)
[Vitality] Reaping Halberd Blood Knight
[Vitality] DW Bonescythe Blood Knight (No-CD)
[Vitality] DW Ravager’s Bite Blood Knight
[Vitality] Dark One DW Bonescythe (No-CD) by Mad Lee
Mad Lee configured a fully target-farmable end-game setup. This is a very special build as it is entirely farmable with no real RNG regarding waiting for certain legendaries to drop. This setup is something you can steadily progress toward acquiring with extreme reliability-- that is very important for newer players with a lack of immediate access to legendary items.
It is capable of old Celestials and definitely still clears SR31 like cake so any brand new player can start farming legendary items en-masse.
Veilwalker
[Tier 4 - Cold] Wight Frost’s Edge
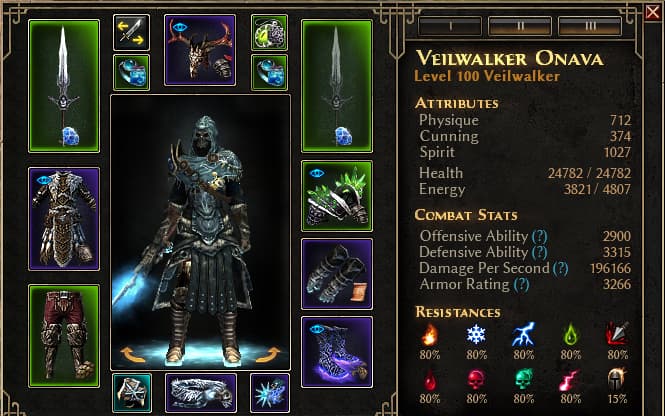
This is an AutoAttack setup. You can still flex Skill-Points into Bone Harvest and its nodes, so it’s still in the guide. Use similar or same Skill-Tree as Frostshriek setup with hardcapped WPS Skills if you want to use Bone Harvest as a core damage-dealer.
Think of this version as the more AutoAttack focused variant, and Frostshriek as the Bone Harvest focus. Your damage is 60/40 AutoAttack:BoneHarvest here. Not a bad thing, honestly preferential.
This thing does Uber Bobr with AutoAttack variant so obviously the damage can be tuned around so you can play with Bone Harvest still, albeit you may give up doing Uber Bobr to only do normal Bobr… not much of a difference there… have fun!
This build fucks hard
[SR31],
[ToH +5],
[Tempest Totem +5],
[Uber Ravager lol],
[Dread +5],
[New Mog],
[Uber Bobr 1 & 2]
[Tier 4 - Cold] Frostshriek
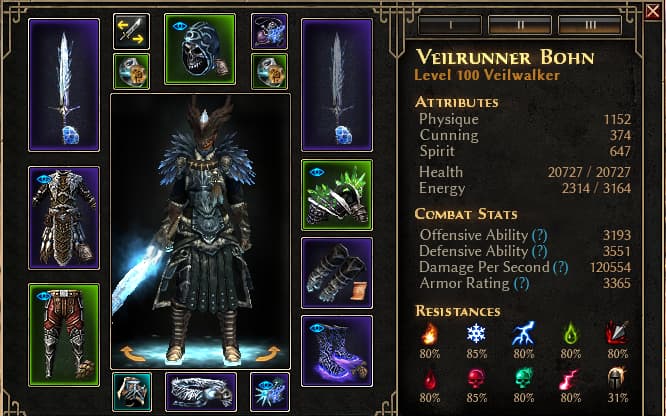
Onslaught warps the new meta for Bone Harvest by enabling us to hit massive whoppers like NEVER before, alongside our new favorite weapon for the ability… Frostshriek! You’ll find that hitting ‘max DPS’ entails Bone Harvest spam off-CD, so you won’t be maxing out your Onslaught stacks; however, this only applies to doing Bobr!
Another note: you’ll see I’m not using Sif Rings. You can absolutely use them, as they are honestly just good stat-wise, even with giving no innate skill increases.
Wearing 2 Sif Rings = +14% Attack Speed (+20% or more if you have Alacrity on one or both) = Onslaught-Stacks Higher before BH is Off-CD = More Total DPS.
However, this setup is using Allostria’s in order to get skill bonuses to Endless Rage, so we can max out our total stacks higher than with Sif’s, for larger Bone Harvests overall, albeit the total DPS might be lower. I don’t use any meters to check, and I didn’t test Sif’s to see if it felt better.
Feel absolutely free to max your Onslaught Stacks for negligible DPS loss and ‘funner’ wave clearing. Probably more optimal to max stacks before casts in Crucible, to note-- untested.
What a wonderful setup. My biggest was 5m.
Now that’s a big bone!
[SR31],
[ToH +5],
[Tempest Totem +5],
[Ravager],
[New Mog],
[Bobr]
[Tier 4 - Cold] Deathshriek
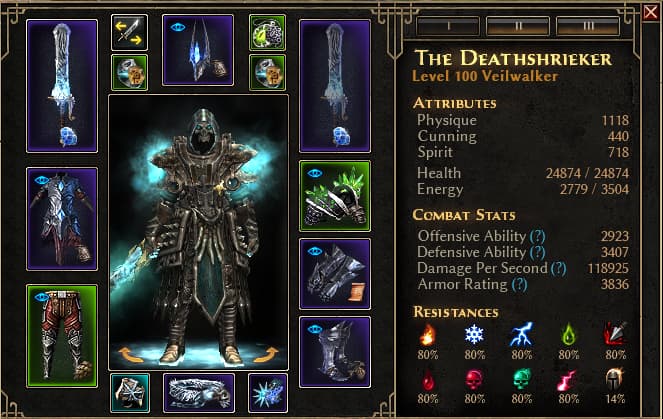
This is an AutoAttack build but I still stuffed it here because you can easily ignore Siphon Souls and continue to focus on Bone Harvest for a bit of additional wave-clearing. Use similar or same setup as Frostshriek.
With being a melee WPS setup your wave-clearing will be very forefront focused and having Bone Harvest combined with Onslaught stacks is still extremely good. Siphon Souls is really busted for SR clearing though. This thing feels invincible in large waves-- This build is probably a blast in Crucible.
[SR31],
[ToH +5],
[Tempest Totem +5],
[Ravager],
[Dread]
[New Mog],
[Bobr]
[Tier 4 - Acid] Death Guard
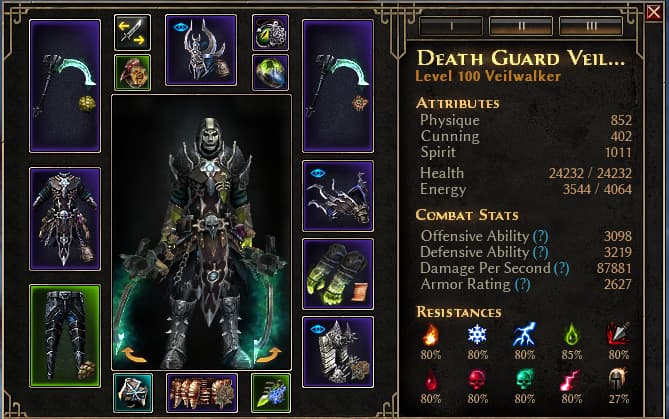
This setup lets you spam Leap AND Bone Harvest at a lower CD. It’s strong and is pretty fun to play. Lacks major defenses without Terrobullum potion modifier but it gets jobs done quickly with its high mobility… ~6min SR!~ Dead enemies = no damage. There’s not much to complain about except a lack of defense… you feel it on Mog. Take Terrobullum potion modifier if you need to; video shown does NOT use it.
I think the Death Guard set is most intended to be Nightblade + (Necro or Berseker), but it’s fun that it works for Veilwalkers (Necro+Bers) too. Death Guard needs armor buff if Veilwalker is intended by design-- Reaper and Reaver won’t be taken much higher than they already are by a simple armor increase. It would be nice extra comfort though, seriously.
[SR31]
[ToH +5]
[Ravager]
[NEW Mog] - Potions must be used as circuit breakers, and be sure to take Terrobullum modifier for armor.
[Bobr] - Amplicorum was used for Potion Modifier for 15% increased damage… otherwise the build doesn’t seem like it will do Bobr without Damage Modifier Increase. Wasn’t really a struggle with modifier, but because of the necessity to use it in the first place, no star.
[Chaos] Lohkor’s
This is a Wereraven Bone Harvest spam setup. Every time you use your AutoAttack, Bone Harevest’s CD has a chance to reset. However, orion_epsilon figured out a way to completely ignore that, and just spam Bone Harvest.
His definitely blows whatever I was testing out of the water, so definitely check his out instead.
• [Vitality] Reaver’s Hunger Onslaught is Vitality Onslaught-Stacks for Bone Harvest. Untested-- the setup will lack RR from Berserker but Onslaught might carry that to be viable still? It does so for Death Guard… why not?
Ascended Bonuses
It doesn’t really matter what you end up getting. They’re not going to make or break your build but will definitely improve it. Many of these setups will require some stretching to cover your resistances; Ascended gear bonuses can help cover these since those setups won’t have damage worth being affected by the bonuses.
For most of these setups, you’ll want %WPS Chance and Attack Speed. Bone Harvest Weapon Damage % is only warranted if you’re using a 2h weapon. The sustain from your AutoAttacks is a good portion of your damage, for all of these builds. %WPS and Attack Speed will directly increase that while giving you more survivability through your ADctH (Attack Damage converted to Health). Otherwise, using the bonuses to cover resistances where needed or to grab some extra Physical Resistance, Attack Speed or Resistance Reduction on your accessory items (rings, amulet, medal, belt) is a great thing too.
 They are old/known setups and they’re all PRE-1.2 so they need some work.