If I can make at least one person say “Play Ring of Steel” instead of “Play Forcewave” to a new player then I’ll be happy
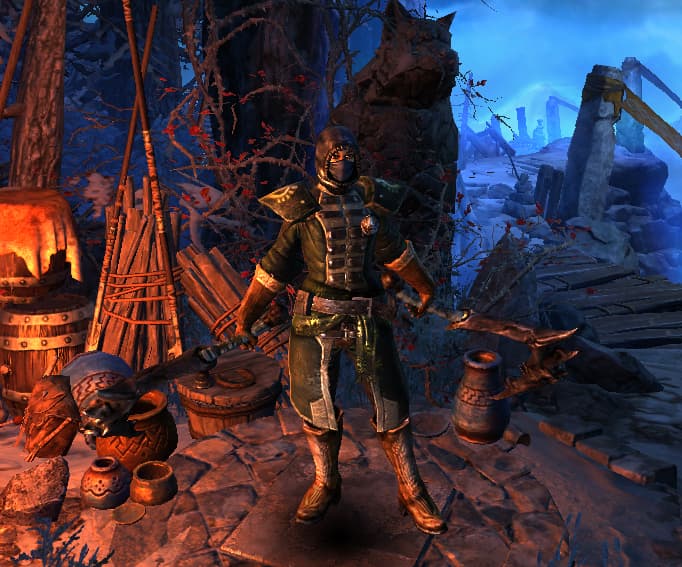
Taken just before Part 4
This is meant to be a companion to my Endgame Pierce RoS Reaver build. I was bored with trying out new GDstashed setups in the public test especially with Grimtools not yet updated. At the same time I had the urge to play Solo Self Found which I haven’t done since June 2026 and before that the last time I played fully legit was in AoM when I made a purifier guide.
This means this won’t be as comprehensive of a guide as most levelling guides will be, but this is intended to show the actual journey, including all my mistakes and my stupidity. Especially my stupidity and ignorance of campaign maps
If you need a guide that is already complete with all the equipment benchmarks, check out RSnoomak’s guide. The benchmarks this guide will have will all correspond to where I stop in every playthrough video, which will be very inconsistent in length as it will depend on how much gaming time I have for a certain day. This also means there won’t be daily updates because life is a thing and touching grass is a thing sometimes.
EDIT: I am adding a “Tips, Tricks, and Learnings” section for everything I have learned during the playthrough. It still wouldn’t be as comprehensive as a level-for-level guide but it would be something that would be useful from level 1 - 100.
GOALS and NOTES
1. Start from scratch with no twink gear, no blueprints, no anything. Totally fresh save and fully SSF.
2. End with a full endgame setup with proper affixes on gear. Not necessarily the exact same as my endgame build post, that needs to be updated once 1.3.1.0 hits anyway. Just something that will fulfill the next item.
3. Clear Crucible 180-200 Extra Spawn with no buffs in less than 5 minutes, and clear SR 30-31 in 4:30. That’s what the current performance of the endgame build is in my hands. Fingers crossed zantai won’t nerf this too much that even the gdstashed version can’t do it.
Things to note:
1. This is SOFTCORE. I will never ever be a Hardcore guy. Not in any game. But @Rsnoomak has posted a HC guide, so this should be HC viable if played properly. HC is more about your own skill anyway and the presence of mind to exit the game before you die.
2. At the time of writing, I am playing on the Public Test Patch for 1.3.1.0. The current live version is 1.3.0.8, but it doesn’t matter. Levelling doesn’t change and in fact this build is already nerfed as soon as you can take Onslaught around level 10 but it’s still very smooth so far. Game version will be updated to whatever is the latest during recording.
3. I’m not a very experienced beginner guide writer so there might be terms or concepts I use that I forget/fail to explain. Don’t hesitate to ask what anything means here. I will always reply, or someone else might get there before me. We gamers help each other here.
4. If you see some weird or long pauses in the videos, either I’m talking to someone or I’m looking up grimtools or other references to find something cause I’m map ignorant.
PLAYTHROUGH
Each part will be accompanied by a video, alongside a description on what my goals are and what I did in each part
Now onto the playthrough, enjoy!
CHAPTER 1 - LEVELLING
PART 1 - Starting up and killing Krieg

Ah! A fresh start! What better to do than to kill some stuff and get stronger. In that part I just do whatever every fresh new playthrough does. Go rush and murder Krieg. I start getting Nightblade and use Amarasta’s Blade Burst while working through the tree to get Ring of Steel (RoS). NOTE: you don’t need to follow my exact skill point patterns. Bottom line is get to RoS ASAP cause that’s the entire reason we’re playing this build. After that, get as many points in RoS as possible, taking a detour to Berserker tree at level 10 to get Onslaught and get the stacks.
NOTE: to new players who aren’t aware, Onslaught generates Onslaught stacks. Onslaught stacks are consumed when you cast your next cooldown skill, which RoS is one, to give 12% more damage per stack (15% in 1.3.0.8, the current live version as of the time of writing).
Again, what I do here is standard to all new playthroughs progressing the campaign. Do main quest, do some sidequests, get shrines. When choosing the blacksmith in Burrwitch Outskirts, Choose Angrim.. This allows you to craft the Honed Longsword, which is a strong weapon of choice up until the level 30s.
The only thing outside the norm I did is fighting Gutworm so early. Gutworm drops the Gutworm’s Mark, which gives a substantial boost to your RoS and is one of your core items even into the final build (always update your MIs when you hit level benchmarks).
Finally at the end I just get to Krieg and destroy him easily with my Gutworm-boosted RoS. Probably the easiest SSF Krieg of my life (not that I had many).
GRIMTOOLS AT VIDEO END:Reaver, Level 18 (GD 1.3.0.8) - Grim Dawn Build Calculator
PART 2 - Zooming to Darkvale

I start by going to Forgotten Gods DLC to buy a movement rune. I choose Dreeg for endgame considerations (Dreeg’s Omen is the best general purpose armor augment after Wendigo Lifescent Powder, and I won’t be getting the latter until very late cause I’ll be killing Scorv for the helm.) but this caused me to get locked of the rush movement rune which is available at Solael (you need Friendly reputation to buy the runes). I try to fix things by running the FG campaign more but later on decided it’s not worth it and went with the teleport rune instead from Dreeg.
Afterwards I continue through the base game campaign, getting key MIs along the way, such as Murderer’s Cowl (gives RoS points and bleed is okay early on) and Bloodbriar’s Thorn (Cooldown Reduction and Crit to RoS, one of the very core items up until endgame). Cronley and Gollus Rings are nice too but not core (in fact the first thing I do next episode is try to replace them). Dermapteran Slicers in the Royal Hive will be your best weapons until you get to mid AoM, so farm a few good ones when you get to the hive.
At the end I get to Darkvale, kill Karroz, and do some quests for the Death’s Vigil (btw, I don’t think the faction choice matters so I go with the good guys in lore) to get to level 35, which allows me to equip Devil’s Crossing and Homestead gear.
Skill points: I get points in Dual Blades (damage and armor) and Night’s Chill (RR) then wwork through the Berserker tree with the goal of getting the exclusive skill.
GRIMTOOLS AT VIDEO END:Reaver, Level 35 (GD 1.3.0.8) - Grim Dawn Build Calculator
PART 3 - The best mobility in the game

Technically the title belongs to Zakull in live patch but it gets nerfed next patch and the mobility just isn’t the same.
Here I start by getting to Fort Ikon, and making a detour to early Fangs of Asterkarn, just up to the first rift, so I can start farming one of the best items in the entire expansion - Covenant of Siff. Covenant of Siff will be one (well two) of the core items of this build until the endgame, giving us 6 points in Dual Blades, and some valuable pierce damage and attack speed stats.
After farming my Siff rings, I finish the base game campaign with no sweat and proceed to Ashes of Malmouth, still proceeding as normal until I get to Mourndale, where I start farming the items that will finally make the THE RoS build - Servitor’s Slicer.
NOTE:Two Servitor Slicers and a Bloodbriar Amulet will bring down your RoS cooldown to 1 second. The slicers also give additional area to RoS, increasing your coverage. And then each slicer gives one charge to Leap, giving this build the best mobility in the entire game.
SERVITOR SLICER IS A TOTAL BITCH TO FARM, HOWEVER. According to RSnoomak, the best way to farm it is Lunal’Valgoth in Mourndale and even then it’s so much of a nuisance because he drops three different MIs. Still better than farming random servitors though.
In the end it’s all worth it farming for slicers. After farming for slicers, I go to some shrines I missed before getting to Malmouth, unlocking Steelcap District before I stop for the night.
Skill points-wise I just work through the Berserker tree with the goal of getting to my exclusive and also picking Bonechilling Cry for RR.
NOTE on Barrowholm: I kill Scorv here cause I want his helm on Ultimate. If you don’t wanna kill him, I list alternatives on the endgame build.
GRIMTOOLS AT VIDEO END:Reaver, Level 46 (GD 1.3.0.8) - Grim Dawn Build Calculator
PART 4 - AoM Complete and First Death

In this part I decide to complete Ashes of Malmouth campaign. Still pretty easy overall but I’m starting to feel squishy. It’s fine though, I’m approaching level 50 where I can start equipping Black Legion gear. After AoM completion I proceed to farm some more items for my level but it turns out I screw up and dismantle my belt just as I lose all my iron bits. So I farm money, die my first death in the process, before ending the session. Pretty aimless part overall but next part I have a more concrete path, which is just doing FoA campaign.
Skill points-wise I continue working through Berserker tree to finally get Bloodborne, our exclusive skill, then continue levelling that skill and Bonechilling Cry.
GRIMTOOLS AT VIDEO END:Reaver, Level 52 (GD 1.3.0.8) - Grim Dawn Build Calculator
PART 5 - All Normal Mode Campaigns Done

NOTE: I use the altar here filled with Aether Shards to max my reputation gain. This will help me get to revered (and nemesis) faster, which will accelerate my progression by a lot.
In this part I decide to finish FoA campaign first. Why Fangs before Forgotten Gods? Well, officially FoA is Act 7 and FG is Act 8. Also I just like FoA campaign more than FG. Pretty much the entire vid is that, except I had to actually finish FG campaign before FoA because the final FoA quest requires you to go to one of the final areas of FG so might as well complete it.
After I’m done with the campaign I farm some totems, cause I noticed level 60 relic blueprints were dropping, so I went and farmed for Belgothian’s Carnage. This is going to be my endgame relic, so feels good to already have it as soon as I can equip it.
Except it requires a total of 12 Manticore eyes. I go for one run of manticores before ending the session
Skill points-wise Max out Bloodborne and Bonechilling Cry. Then Nightblade bar cause I’m starting to run into issues with spirit investment.
GRIMTOOLS AT VIDEO END:Reaver, Level 60 (GD 1.3.1.0) - Grim Dawn Build Calculator
PART 6 - Preparations for Ultimate and getting my endgame relic

NOTE: You will notice I’m using full altar again for reputation gain. In every session, I go and farm Galakros and Malmouth Crown Hill to replenish the aether shards used and to also get reps for Malmouth Resistance and Black Legion.
In this part, I decide to fully skip Elite and prepare for Ultimate while still on Normal. My main goal for this session is to farm enough Manticore Eyes to get my Belgothian Carnage relic, but each session is kind of a waste if all I’m doing is kill manticores, so I slap aether shards at the altar for full reputation and farm for rep for the following factions: Malmouth Resistance and Black Legion (Farm at Malmouth), Rovers (Farm at Steps of Torment), then Homestead and Coven of Ugdenbog (all the beastkilling I do for the manticore eyes already contribute to this). Getting to revered in as many factions as you can enables multitudes of options for Ultimate and also saves you from the hassle of farming the reps in Ultimate when everything is harder.
Honestly the entire part 6 vid is just me doing the above over and over again until I get my relic, which is already near perfect.
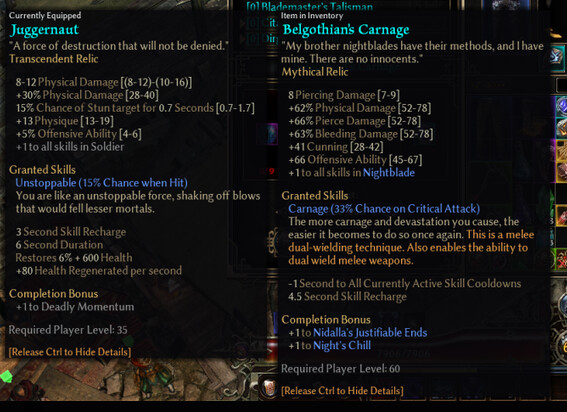
Skill points-wise Just work on nightblade tree. We need to max out the stats for future equipment reqs.
GRIMTOOLS AT VIDEO END:Sorry nothing cause I forgot to save the link before I recorded part 7, sorry. But there’s mot much gear change compared to in Part 5
PART 7 - Preparations for Ultimate 2 - Gearing up

NOTE: You will notice I’m using full altar again for reputation gain. In every session, I go and farm Galakros and Malmouth Crown Hill to replenish the aether shards used and to also get reps for Malmouth Resistance and Black Legion.
Now that I have my relic, the next thing to do is to just get my reps up for Black Legion, Malmouth, and Rovers, get some additional devotion points, and then gear up at level 70. In the next part I will be jumping to straight to Ultimate (don’t mind the pierce res I got a solution at level 75).
Skill points-wise Just work on nightblade tree. We need to max out the stats for future equipment reqs.
GRIMTOOLS AT VIDEO END:Reaver, Level 70 (GD 1.3.1.0) - Grim Dawn Build Calculator
PART 8 - Ultimate Start

NOTE: Before starting Ultimate, if you have Revered Reputation with Malmouth then do yourself a favor and buy Tonics of Clarity. There are the exp potions and these will make your journey so much less of a slog and your farming time will drastically reduce.
In this part I finally feel ready to start Ultimate. I don’t have my pierce res solved yet but pierce res won’t be an issue until Act 2 when we start going against Cronley’s goons. And I did get to level 75 just before Act 2, so I could equip the Legplates of Valor, which solves the pierce res problem.
After that I just rush through the base game campaign, then the FoA campaign (while getting a nearly ideal double rare siff ring on the way) until the point where I meet Scorv again. This is when I start the Scorv farm for the endgame helm, which is going to take a fuckton of time.
Skill points-wise I actually forgot what I did here, I went on vacation during the weekend so  Just refer to the grimtools I guess. At this point anyway, you’re mostly just filling out buffs and stats.
GRIMTOOLS AT VIDEO END:Reaver, Level 90 (GD 1.3.1.0) - Grim Dawn Build Calculator
PART 9 - Scorvin' Around (and actually getting to 100 and farming most of my stuff before I get the helm)
The video is in 2 parts but this is actually a 5.5-ish hour farm across multiple days that even crossed a vacation. I even almost ran out of storage at one point which is why there are two vids.


NOTE: Scorv’s Visage is a very rare item with only 1.2% drop chance from Scorv. It also requires you to be hostile to Barrowholm, which explains my choice in Normal. If you don’t want to undergo this hassle, pick up a Fettan Mask instead until you get to the point when you can kill Ravager or Dread, then use their helms.
In this part I. Farm. Scorv. That’s it. It took me 5 hours and 30 mins, from level 91 to level 100 and then some to finally get it.
In the way to getting this helm I got:
- Level 91-100 without any further campaign progress
- All my component blueprints except for Seal of Blades
- My endgame gloves
- All my endgame gear blueprints that I need except for Really Great Pants
Yep. I’m almost done farming the base no ascend endgame setup and all it took was to kill scorv a thousand times (exaggerating).
GRIMTOOLS AT VIDEO END:Reaver, Level 100 (GD 1.3.1.0) - Grim Dawn Build Calculator
CHAPTER 2 - GEARING UP
PART 10 - Small Gearing Updates

Not much happened here really, just some farming. I had the bright idea of wanting to wait until I’m altar ascendant capable before completing the campaign but an hour later and I realized it’s gonna be a pain to farm Kurn and Witch God reps if I do that so near the end I start the Ashes of Malmouth campaign and get to Gloomwald before I stop.
GRIMTOOLS AT VIDEO END:Reaver, Level 100 (GD 1.3.1.0) - Grim Dawn Build Calculator
PART 11 - Ultimate Campaign Done

Just finishing Ultimate campaign. Not much else done here
GRIMTOOLS AT VIDEO END:Reaver, Level 100 (GD 1.3.1.0) - Grim Dawn Build Calculator
PART 12 - Big Bird Duties

Went on to max out reputation for basically everyone relevant except Kurn. So yeah I do whatever Big Bird wants me to do and also kill a lot of Chtonians on the way to repair my relationship with my beloved Scorv.
NOTE: I use max reputation altar here again. As always, refarm the aether shards at Malmouth (Galakros + Valaxteria + Three idiots route) every session.
BIGGER NOTE: I LOST AROUND 1.5 HOURS OF FOOTAGE AROUND 18 MIINS INTO THE VID. I went out to buy something and forgot to resume the recording. sadge.
GRIMTOOLS AT VIDEO END:Reaver, Level 100 (GD 1.3.1.0) - Grim Dawn Build Calculator
PART 13 - Climbing SR and Getting Some Great Pants
Split into two vids this time:

One of the last few things I need aside from gear upgrades is to complete my skill and attribute points, so I do just that. Majority of my lacking ones are from SR so I climb to around 25. Then I do the remaining quests until I only lack the final point from killing Dread (though I think I can get that final point from Kasparov on Elite). Anyway I still had some time so I load the game again and climb more until SR 28 so I could farm my pants blueprint easier and would you look at that, My Really Great Pants blueprint just drop before I end the session.
NOTE: Really Great Pants is the best pants here if you’re using Scorv Helm because it helps a lot with the spirit requirements while still having solid stats after that fact. If you’re not using Scorv Helm go with something green that has HP, like Alex Pants.
GRIMTOOLS AT VIDEO END:Reaver, Level 100 (GD 1.3.1.0) - Grim Dawn Build Calculator
PART 14 - Ashes Farming and HUGE Upgrades

Here I start farming for better gear and going with Full Altar Ascendant to farm for Ashes of Awakening and Soul Echoes/Fragments. At the end I get some giga upgrades for the weapons, now nearly BiS.
THE FARMING ROUTE is courtesy of @RSnoomak. Check the video explanation in his channel!. He also has another guide for an even easier farm (which yields less materials) but I find the “advanced” route is already very doable even at this stage. How you do it is basically this:
- Go to Ascendant and Activate the Altar with 3 Ashes of Awakening and 2 Frozen Asters
- Go to Fort Ikon Armory (the area with Commander Lucius) and just open every chest on the way. Chests have a high chance of spawning Chtonian ambushes which drop a lot of Ashes and Soul Echoes.
- Go to Depraved Sanctuary (area needing Strange Key and the boss is Salazar) and do the same. Keep in mind that clickable corpses and rocks also count as chests for this purpose.
- Rinse and Repeat.
There’s a chance to spawn Grava/Benn’Jahr and Dread during this route. When I started farming I can already handle the nemeses so no big deal. That’s one more soul fragment source, but if you can’t handle them, either run away or just don’t kill too many enemies in the first place (second one is how RSnoomak does it). As for Dread, he’s even easier to outrun, and in my case he didn’t spawn in the route until way later when I already have really good gear.
NOTE: This seems to be the best Ashes farming spot in the game so you’ll be coming back here a lot while finalizing the build. For Soul Echoes I think the best eventually goes to killing a bunch of Nemeses, once your build can do that.
GRIMTOOLS AT VIDEO END:Reaver, Level 100 (GD 1.3.1.0) - Grim Dawn Build Calculator
PART 15 - Farming, Climbing SR, Achieving one Goal, and more Farming
Two Videos:


Here I farm my potions and start climbing SR. Before I get to SR31 I get my BiS Weapon, a Tyrant’s Servitor’s Slicer of Ruthlessness. And so I farm the Seal of Blades and equip that weapon. I run SR30 -32 and voila! I ALREADY ACHIEVE MY SR GOAL. ON THE FIRST RUN. It’s in the video above but it’s also here:

After that I farm more ashes and shoulders, and iron bits and everything in between to ascend more stuff
GRIMTOOLS AT VIDEO END:Reaver, Level 100 (GD 1.3.1.0) - Grim Dawn Build Calculator
TIPS, TRICKS, AND LEARNINGS
I know this is a beginner guide but I'm not gonna sugarcoat anything here. The world of Cairn is ruthless.- From level 1 to the point where you get Ring of Steel, just do whatever you want. If you still need a guide for level 1 to 10, even as a new player, this game isn’t for you
- Before you get to Servitor Slicers, use weapons with 100% Armor Piercing as much as you can. The recommended route for levelling is to go from Honed Sword at level 15 to Dermapteran Slicers at level 30ish but you might have the mind to explore. This is a pierce build so use pierce weapons. For new players, “Armor Piercing” is found below the base damage, and it indicates the % conversion of your physical damage to pierce. If it’s not present, it means no conversion to pierce will happen.
- Familiarize the game scenery and lore. You don’t need to be a nerd, just enough to learn that aetherials do aether damage, chthonians do chaos damage, cronley’s goons have guns so pierce and fire but then later on you see the aether green on them so those guys must do aether as well. This is very important because in the next point…
- Prioritize your resistances. You want your resistances on Page 1 of the char sheet all capped, at 80% except for physical (where it’s literally impossible to reach). However, in the early game you won’t have the luxury of components, augments, and better drops to guarantee capping your resists. This ties to point 3, where if you know what damage types enemies will deal, then you know which resists to prioritize just for that area, then adjust later on. This is a part I didn’t get to emphasize much in my playthrough because this build was so strong I never really cared. But reading some comments it seems like maybe I just was playing better.
- PRIORITIZE YOUR RESISTANCES. ALL CAPS THIS TIME BECAUSE THIS IS THE MOST IMPORTANT STAT IN THE GAME BAR NONE. But don’t think about overcaps until you’re way later in the game (like after Ultimate campaign). Some people overrate overcaps because they live in a patch far far away in time, when it was more important. Overcaps are useful but sometimes you literally can’t afford them.
- Farm your “set” ASAP. As soon as you can get the core items, stop whatever you’re doing and farm them. Maybe with the exception of Gutworm if you’re too low level. One of the best parts about this build is that your items are farmable from low level until endgame and you’re basically just farming for a higher level version every time.
The core items are (search the items and the monsters in grimtools if you’re not familiar):- Two pieces of Servitor’s Slicer - Farm from Lunal’Valgoth (See Part 3 of Playthrough). Also drops from every Servitor type mobs but not worth farming them intentionally.
- Gutworm’s Mark - Farm from Gutworm (Part 1 of the Playtrough)
- Bloodbriar’s Thorn - Farm from Ol’ Bloodbriar (Part 2 of the Playthrough)
- Two pieces of Covenant of Siff - Farm from Siff Icehowl (Part 3 of the Playthrough)
You’ll notice that all of the items above are present in my loadout since Part 3 until the end of the playthrough.
- Play aggressively. Use your mobility. It’s the best in the game. You won’t be deathless, but learn from every death. No matter what you do, this build is never meant to be a tank. But you should have enough defenses to withstand some hard hitting attacks, and it’s also yout job to learn which attacks you’ll survive and which ones you won’t. If you’re playing HC, then you should already know to dodge dangerous stuff. If you’re new and still playing HC, then delete your char and learn the game in softcore. Or not, but don’t be bitching about the game when you don’t even know the game yet.
- In conjunction with point 7, preparation is key. You’ll see in my playthrough that I spend two parts just gearing up for Ultimate. I didn’t plan those parts beforehand. It just came to me while playing that I want my run to be as smooth as possible and in Ultimate you get punished if you even have one resist uncapped. If you want more challenge, then sure, be less prepared, but that’s on you and not the build.
- Get Revered from factions as soon as you can, ideally once you complete the Normal Campaign (including all DLC). It’s a lot easier to do now with the Altar in Kurnhold. It’s imperative that you have access to decent gear by Ultimate and you need components, augments, and oftentimes faction gear for that. It’s also easier to kill anything in Normal while also giving the same reputation.
DO ALL REPUTATION FARMING WITH MAXED REP ALTAR - 5 AETHER SHARDS
GET THESE REVERED ASAP (on Normal):
- Black Legion (for Legion Gear to be used from Level 70-94) - Either kill outcast over and over again, or see Malmouth Resistance route if you’re friendly with her (which I am).
- Malmouth Resistance (has some level 65 gear useful till 94, and best jewelry augments in the endgame. EXP POTIONS) - Port to Malmouth Candle District, kill Galakros (and all aether crystals on the way to replenish supplies used for Altar). Then port to Crown Hill, Kill Valaxteria, then proceed to Theodin Marcell’s place, killing all bosses on the way. Once you’re Honored with them, get the side quest from Korinia to unlock the Chamber of the High Council. Now instead of running all the way to Marcell, just go there from Valaxteria and kill the three idiots in every session.
- Homestead (nice boots, useful till level 100 until you get a good intrepid craft) - Literally the route for farming Bloobriar is the route for Homestead reps. And since you’re also farming Siff and Gutworm, that’s additional reps. Very easy to max out.
- Coven of Ugdenbog (nice armor augments, and blank illusions for the fashion) - same route as Homestead. You max this around the same time as them.
- Rovers (Also nice boots, and some good armor augments) - Steps of Torment. All the way to the final boss. It’s easy on Normal.
GET THESE REVERED on Ultimate:
- Witch Gods (very solid armor augments and Solael has the second best weapon augment for pierce) - You complete these just by finishing the Forgotten Gods campaign twice and some sidequests, but don’t forget to max the altar so don’t do FG until you’ve unlocked Kurnhold.
- Kurn (best weapon augment) - Finishing the campaign twice with full rep altar gets you a long way. Then go World Tear after that.
- Barrowholm (best armor augment provided resists are covered) - FoA campaign gets you far. Then the farming route for the weapon also gives a decent chunk. If you wanna all in on the rep then do Bastion of Chaos (worst dungeon in the game). IMO, regardless of if you wanna go hostile with Barrowholm at the start (for Scorv’s helm) or not, it’s still not worth getting to revered in the early game because BoC is such a shit dungeon.
YOU DON’T GIVE A FUCK ABOUT THESE:
- Devil’s Crossing - too much of a hassle to rank up. Cronley’s goons are to few and they don’t scale in Normal.Shame cause they got good intermediate gear.
- Order/Kymon - doesn’t matter which one you pick btw. And they go up automatically since aetherial/chthonians are plentiful but they don’t give anything noteworthy.
- I don’t think I’m at revered (nemesis for kymon) with all these three lmao. - Get Nemesis for UNDEAD as soon as you can. Moosilauke’s Shoulderguards is your best shoulders… until 1.3.1.2, which is very close to releasing, where I’ll use Fabius shoulders but even then, Fabius is such a pain to farm while Moosi is easily spawned in SoT. You should be Nemesis with them soon after you’re revered with Rovers.
- SKIP ELITE. Or else you’ll burn out before you even get to Ultimate.
- UPGRADE GEAR IN BATCHES, except for the core “set”. What I mean by this is that if you find a cool chest armor, chances are you equipping it won’t mean much and will probably be a negative somewhere. Better farm some more so you upgrade 2-3 items at once and the effect is more felt, while the drawbacks are better accounted for.
Note that this doesn’t apply to the core “set” mentioned in item 6, where you just upgrade them the moment you get a higher level or better affix version.
- Always keep your eye on Mythical Grasp of the Unchained Might (search in Grimtools if not familiar). That might as well be part of the core set but it’s a high level legendary and will only drop at level 84+
- Key MI affixes for the endgame:
- Weapons: Heart Piercing, Sinister, Tyrant, Aggressive, Puncturing, Superior of Ruthlessness, Slayer, Untamed Fangs, Alacrity, Spines. Double rare is always better than single rare, Only one Tyrant weapon is needed. Best in Slot is Heart Piercing Servitor’s Slicer of Rutlessness and Tyrant’s Servitor’s Slicer of Rutlessness
- Amulet, Rings, Medal, Belt: CUTTHROAT of The Eagle, Fox, Wolf, Prowess, Landslides, Shadows. Animal suffixes are better until the point you get to 574 Spirit and 712 Physique with minimal stat allocation, ideally less than 10 points total. These are the reqs for Scorv Helm and the gloves, respectively. If you’re not going the Scorv route, then your Spirit goal is just 400. After you get those breakpoints, then rare suffixes are more desirable. Cutthroat is the only prefix worthy of endgame consideration.
- Armor: Merciless, Menacing or anything that fixes resists of Vicious Barbs. The total number of Vicious Barbs suffixes is ideally 2, but can be 1 if using Moosi shoulders. If there’s enough Vicious Barbs then go Vitality or animal suffixes if you need more of those.
- Chest and Head (if going Dread Mask) Prefixes: Prefix can be one of the chest/head specific affixes that have pierce damage. Butcher and Dervish are the ones I have experience using.
- Boots specific: Best suffix is Survival for the freeze resist. Otherwise, just see the general armor section.
- Pants: Pants is your flex slot, so this is where you fix all your holes. I went with Really Great Pants which is best if you’re going Scorv Helm because Spirit. Otherwise, use the best pants you have in solving your problems, meaning hoard a lot of non-heavy MI pants since that’s where the answers will come from. - Relic: Belgothian’s Carage, Aurora, or Beronath’s Howl. I use Belgo in this playthrough, while an Aurora setup can be found in my endgame thread (link at the very start of this thread).
- Farming for Ascension Materials: See Playthrough Chapter 2 Part 14. If you find the route hard, then farm totems on no altar ascendant. You don’t need to farm the materials for the entire endgame build at once. Farm enough for rerolling and ascending a couple items then do something else before farming again. One of the things I learned in this playthrough is that “no ascend” endgame builds are pure bullshit.
- Rerolling affixes: Farm an MI with one affix you want (look at item 14). Then use the inventor to reroll to your desired other affix until it gets too expensive. How expensive is up to you, I stop when rolls cost 5 ashes. Keep in mind affix rerolls share the same reroll count as ascends so your ascends will also get more expensive as you reroll. Because of this, it’s better to reroll affixes first before ascending, because this build has no mandatory ascends.
- Ascension: This build has no mandatory ascends, so anything that’s useful i.e. no retal or wps or wereforms is fair game. Best ones are OA, Crit, Phys Res, Health. But the health and phys res ones are very rare so learn to be satisfied with worse ascends. Build is already very strong even without them.
- Shattered Realm: I can’t really give too much tips on this other than git gud and don’t pull 4 bosses because there’s no bonus in doinng so. SR in itself requires a guide of its own but it’s better if you just practice rather than look for a guide that will be inadequate.
- Crucible: Again, just git gud but this probably lends more to guides than SR because you have no choice but to pull all bosses and while the bullshit has been toned down, wave 200 is still bullshit especially with extra spawn. But still, it’s a test of skill especially once your build is good enough.
- I’m tired of writing maybe I’ll add more later.
I think once I’m done with the playthrough I’ll make a list with all the tips and tricks I used (EDIT: I already did), some I learned during this playthrough. I know it’s a slog watching through all these vids (this is really just for documentation).
Anyway, I hope anyone who reads appreciate this. Thanks for reading!
And always remember:


 Not that far along as usual for me.

