Introduction
Even if Rah’Zin Witch Hunter (Nightblade, Occultist) is not so popular anymore, it is still one of the special archetypes in Grim Dawn. And now that I finally got “my” blueprint for Mythical Fang of Ch’thon, which was the missing weapon for a SSF Rah’Zin Witch Hunter, it was time to finally get my own Witch Hunter to level 100. This was the third attempt (after Dreeg’s Evil Eye and ranged Amarasta’s Blade Burst), and the first one that wasn’t cancelled on the way to level 100.
The honour of creating the first Witch Hunter guide belongs to Silent_N with his [1.1.9.5-1.1.9.7] Beginner's Acid Shadow Strike Witch Hunter Guide. It is a dual wield acid shadow strike character. For other budget / beginners builds check Beginner build guides Compendium (for AoM + FG expansions).
A Chaotic Path
This character also uses two “melee weapons”, but instead of a Shadow Strike focus, the core idea was an auto attacker - to have the later Rah’Zin gameplay as early as possible. The idea was also to do chaos damage as early as possible - also to avoid levelling with Amarasta’s Blade Burst for the Lethal Assault buff. Using chaos damage however means that the character has no native resist reduction. Furthermore, I don’t use any of the two mandatory chaos devotions (Dying God, Abomination - so these have to be levelled up later). If you can’t handle this, you should stop reading here and now.
The basic weapons are two Bloodsworn Scepters, which are used as melee weapons instead of being a caster’s scepter. However, their bonuses to Sigil of Consumption are too valuable for not to be used and therefore shape the character. The weapon drops relatively often, but can also be bought from two merchants (Benevald and Karros Adal). The character also uses a relatively large amount of faction gear and only needs three Monster Infrequents (MI) to be farmed. The components are also relatively cheap. The most expensive part of the final is the final Relic (it should be used as a replacement one with +1 to the Occultist mastery), as well as the medal.
The basic gameplay consists of auto-attacks with the Nightblade auto-attack replacers and Sigil of Consumption for Area of Effect (AoE) damage, as well as substain. This combination works quite well and carries the character through harder fights. Enemies with high chaos resistance (Harbinger) take a little longer, but are not a major problem. Whether the maximum level reached in the end in the Shattered Realm would also have been reached with a more damage-oriented version, dunno, but the more defensive design of the character suits me better.
Self Found?
Only self-found equipment and self-found crafting materials were used while levelling. Also, no mandates were transferred, writs were bought as soon as possible. However, all necessary blueprints were already found with earlier characters. The character was started in 1.1.9.6 and finished in 1.1.9.7 - the shift occurred at level 55.
Current Character
Grimtools of the current character. 50 points were invested in Physique to increase health, the Defensive Ability (DA), and to be able to wear the chest armor, the remaining points were invested in Spirit to increase the damage.
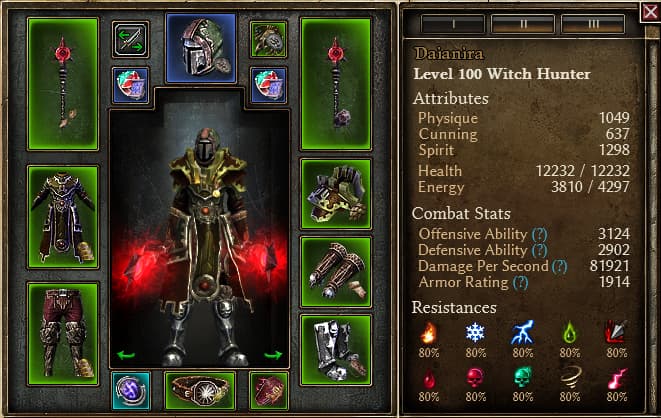
[Beronath’s Fury, all permanent buffs]
A naked character (means no affixes) with the same gear, components and augments has already capped resistance, so each affix without parasitic damage conversion will improve the build. The build can focus stronger on damage, or defense like the final build.
Performance
The full campaign (softcore) with both expansions was finished in all three difficulties (Veteran, Elite, Ultimate). Monster totems were activated on sight - after cleaning the surrounding area. Deaths happened, but were rather rare (in total 16, most at level 100). The campaign and both expansions were finished using the non final level 100 character (see Character Snapshots). The final build was only used for testing the build in the Shattered Realm, Morgoneth's dungeon and against Lokarr.Most challenge dungeons were finished in Ultimate relatively painless (well, one death against Morgoneth). Shard 35 was tested for the additional skill points (one death, group of Arcane heros waited at the entry), stress tests were a 50/51 run (no death, within time) and a 65/66 run (1 death against Reaper of the Lost, out of time, with Corrupted and Shattered Mutator). For each of the Shattered Realm tests a waystone was used. The following nemesis were slain in Ultimate: Kubacabra, Valdaran and Kaisan. Lokarr is doable (after two deaths), it was a slow but a also rather interesting fight (using the complete map) - as it is not the standard facetanking.
Levelling / Skills
The character starts as a Nightblade. At the first level up, 2 points are invested in Dual Blades (and two weapons are used) and 1 point in the Nightblade mastery. With the following level ups, it is 2 points in the mastery bar and 1 point in Dual Blades. The idea is to reach Belogothian's Shears relatively early to have at least a multi-damage attack at this early stage. Once 5 points in the mastery are reached, the next step is to invest 1 point in the mastery (up to level 10), 1 point in Dual Blades and 1 point in Belogothian's Shears (up to level 5). Once the Nightblade mastery reaches level 10, 2 points go into Pneumatic Burst (Healing, Speed, Offensive Ability) and 1 point into Breath of Belogothian, then Dual Blades is maximised. The idea in this early phase is to boost your attack with Dual Blades (hence the Serrated Spikes in both weapons), do some AoE damage, and have a minimal healing skill. For a very long time, by the way, the normal no skill attack is the used standard attack.Then the journey as a Witch Hunter begins and the Occultist mastery is started. The mastery bar is brought to level 5. After that, with every level up, 1 point goes into Solael’s Witchfire (damage and attack speed), Pneumatic Burst and the Occultist mastery bar. Around character level 25, I was able to switch to chaos damage (two Bloodsworn Scepter - with the change, also use chaos components in the weapons). Once you have these, the next time you level up, 1 point should go into Sigil of Consumption. From now on, attack the main target, cast Sigil, which then provides AoE damage and healing. Sigil remains a relevant damage component until the very end. After Pneumatic Burst is maximised, 2 points go into Occultist mastery bar and 1 point into Solael’s Witchfire. After the latter is maximised, the distribution changes to 2 points in the Occultist mastery bar and 1 point in Sigil of Consumption. Once level 25 in the Occultist mastery is reached, the distribution is 1 point in the Occultist mastery bar, 1 point in Destruction (more Sigil damage for less Energy) and Second Rite (damage). As soon as one of the skills is maximised, the “free” point is also invested in the Occultist mastery. The goal is to have both skills and the Occultist mastery bar maximised.
After Warden Krieg is beaten, craft a Bladesworn Talisman (for the dual wield WPS) and get a movement rune from the Forgotten Gods factions (here: Vanish). As soon as possible (hopefully around character level 35) craft a Rhowari CordRhowari Cord - even if we don’t invest even one point in Doom Bolt, we still want Doom Bolts for our build. The belt can be replaced with the better versions as soon as possible. Note: While it is no problem at the end to have all resistances at an adequate level, this is a bigger problem at the beginning. Almost all the equipment in this phase (and it takes quite a long time) was selected primarily according to its resistance values. Good items were collected in order to be able to change if necessary, but more than once a piece of equipment that was better in itself could not be used because critical resistances would not be high enough. The increase of damage comes mainly from the two scepters, the devotions and the Occultist mastery.
The next target after bringing the Occultist mastery bar to 50/50 is Possession (damage, damage reduction) which should be maximised. This will be however the last new skill for a very long time. Continue with the Nightblade mastery bar until it is also maximised. Around character level 65, it is worth checking whether the Malmouth chest (Malmouth Void Cuirass) and shoulder (Malmouth Void Pauldrons) armor is better than the current gear. Here, the caster version of the chest armor (Malmouth Tainted Vestments) was even used in the levelling phase (was a mistake, but at least the extra energy regen didn’t hurt.) Around level 65, it should also be possible to craft a Shard of Beronath at the latest, this replaces the component in one of the two weapons and the skill is used as a standard attack. If the worst comes to the worst, the Blueprint can be bought from Vinelton. In this phase, one of the used weapons should have the “of the Abyss” suffix for the damage reduction - if there was no random drop, power shopping can come to the rescue.
After the Nightblade mastery bar has reached level 50, 5 points are invested in Execution (single target damage) followed by 5 points in Whirling Death (AoE damage), then Sigil of Consumption is maximised. This is followed by Blood of Dreeg (Offensive Ability and health regeneration) and Aspect of the Guardian (physical resistance) - for me it was 1 point per skill per level up. Then I maximised Blood of Dreeg. The amulet with the extended duration for Blood of Dreeg even allows you to use the skill quite well for healing as a kind of second healing potion in boss fights. When you reach level 90, you should upgrade your faction gear and have the elite Fettan Mask. With these gear changes, all Nightblade skills should be reduced by 1 (so that they have the same level as before), also maximised skills of Occultist mastery should be checked for overinvestment (either in Grimtools, or ingame by buying back 1 skill point as a test - note: overinvestment is not visible in the game).
After Blood of Dreeg is maximised, Shadow Dance (Defensive Ability, Defence) is brought to 12/12 (with equipment), then one point goes into Phantasmal Armor and Anatomy of Murder, and four points into the last Nightblade WPS not taken so far: Amarastas Quick Cut (so 5/5 with equipment). The last 7 points are freely available - could be either invested in Doom Bolt, or Shadow Strike, or as here in the Nightblade WPS and Phantasmal Armor and Anatomy of Murder.
Factionwise, the character sided with Order of Death’s Vigil (well, chaos Occultist and Kymon’s?) - however, this decision is not really important. Barrowholm was kept friendly to be able to fight Ravager. All three cults are needed in the end at max level, so select the one you prefer while keeping this goal in mind. In Ultimate, select the one you prefer (e.g. because of the movement rune from the quest). It is however rather important to have Malmouth Resistance at maximum reputation at the end of Elite - to be able to buy their faction gear.
Character Snapshots
level 10: Nightblade, Level 10 (GD 1.1.9.7) - Grim Dawn Build Calculator
level 20: Witch Hunter, Level 20 (GD 1.1.9.7) - Grim Dawn Build Calculator
level 30: Witch Hunter, Level 30 (GD 1.1.9.7) - Grim Dawn Build Calculator
level 40: Witch Hunter, Level 40 (GD 1.1.9.7) - Grim Dawn Build Calculator
level 50: Witch Hunter, Level 50 (GD 1.1.9.7) - Grim Dawn Build Calculator
level 60: Witch Hunter, Level 60 (GD 1.1.9.7) - Grim Dawn Build Calculator
level 70: Witch Hunter, Level 70 (GD 1.1.9.7) - Grim Dawn Build Calculator
level 80: Witch Hunter, Level 80 (GD 1.1.9.7) - Grim Dawn Build Calculator
level 90: Witch Hunter, Level 90 (GD 1.1.9.7) - Grim Dawn Build Calculator
level 100: Witch Hunter, Level 100 (GD 1.1.9.7) - Grim Dawn Build Calculator (reaching level 100 - used for finishing the main campaign amd both expansions in Ultimate)
level 100: Witch Hunter, Level 100 (GD 1.1.9.7) - Grim Dawn Build Calculator (current status)
- savegame folder:
_Daianira.zip (1.1 MB)
Devotions
- Crossroads red
- Ghoul
- Crossroads green
- Fox
- Eldritch Fire
- remove Crossroads red
- Crossroads purple
- Empty Throne
- remove Crossroads purple
- Chariot of Death
- Crossroads blue
- Viper
- Revenant
- Sailor’s Guide
- Solemn Watcher
- Eel
- Korvaak, Eldritch Sun (minus proc)
- first node of Aeon’s Hourglass
The devotion setup is rather defensive instead of damage oriented. We start with Ghoul for the Attack damage converted to health (Adcth) and Ghoulish Hunger (as emergency proc). The next target is Eldritch Fire for the resist reduction, Fox is taken to have the necessary green affinity (and the Adtch). Empty Throne and Chariot of the Death both boost the resistances (including Crowd Control), the latter also the Offensive Ability (OA). The next target is Revenant for the resist reduction (and Adtch, as well pet damage), Viper brings the necessary red affinity and a nice OA bonus. Sailor’s Guide has - beside the blue affinity - some nice defensive bonuses, Solemn Watcher increased the Defensive Ability. The next target is Korvaak, the Eldritch Sun for the additional damage and OA. Eel brings us the necessary blue affinity. The proc of Korvaak is not taken, the first node of Aeon’s Hourglass brings one “of Eagle” suffix for free.
Eldritch Fire is bound to Sigil of Consumption (as it was the best skill available at the time), Raise the Death (Revenant) to Beronath’s Fury - to have as much skeletons running around as possible.
Notable missing from the devotion map are Abonimation and Dying God (both with huge bonuses to chaos damage and damage orientated procs) - both are used in almost all chaos builds and the not taking them will surely be considered as heresy by some. I just preferred the more defensive orientated setup - and found the +2600 (2000 + 600)% chaos damage acceptable enough.
see Grimtools
Gear
This build relies on specific Monster Infrequent items. Core item is the Bloodsworn Scepter with is vitality to chaos damage conversion as well bonuses to Sigil of Consumption. It is also a relatively easy to get weapon.In some cases, it is important to farm suitable version more than once. However, while levelling, acceptable ones will be good enough, as they must be exchanged later by higher level versions.
In case of amulett and medal, a good rolled lower level version might be better than a not so good rolled higher level version. For the boots and gloves slot random non faction drops or Epic / Legendary items might provide better stats.
Monster Infrequents:
weapon: Bloodsworn Scepter - chaos damage, Sigil of Consumption bonuses, damage conversion - can be bought from Benevald and Karros Adal
amulett: Putrid Necklace - +1 to all skills in Occultist, can be farmed from Primordian, the Forgotten One
medal: Rylok Mark - chaos medal, bonus to Sigil of Consumption and +3 to Destruction
pants: Solael-Sect Legguard - Adcth, resistances, can be farmed from Guardian of Solael
Faction Gear:
chest: Elite Malmouth Void Cuirass - +3 to Solael’s Witchfire
shoulder: Elite Malmouth Void Pauldrons - +3 to Possession
rings: Solael Warped Seal - faction chaos damage rings, with bonus to OA
boots: Elite Legion Greaves - physical resistance faction boots
gloves: Rhowari Grips - faction gear attack speed gloves
girdle: Rhowari Girdle - +1 to all skills in Occultist, chaos damage bonus and Doom Bolt
Epic items
head: Fettan Mask - +1 to all skills, guaranteed drop from Urn Cluster
Relic:
Solael’s Decimation - +1 to all skills in Occultist, chaos damage and bonuses to OA (Blight is a lower level alternative with +1 to all skills in Occultist)
What Else / What Now
Go Farming and build your own Rah’Zin Witch Hunter. The character is able to farm totems, challenge dungeons and nemesis and in the Shattered Realm in Ultimate relatively safe.
The most updated (and shared) endgame Rah’Zin build is [1.1.9.0] Rah'binger Witch Hunter wins the game: SR75+, Celestials, Crucible consistent <6 mins, 9.5 sec dummy, 3.8 sec MadQueen. All on the same 0 green build, an slightly older build can be found here [1.1.5.1] (2H Melee) Rah'Zin's Slaughterhouse - Yet Another Chaos WH [c+] [sr+].
Other endgame Witch Hunter can be found in the Build Compendium X (Forgotten Gods) - #37 by Stupid_Dragon