Grim Dawn CCG/Deckbuilder idea

Update with example of Mobilize mechanics rough sketch just for visualization purposes.

Skill w/Mobilize being examined: Blitz.

Blitz
Tier 3 Soldier Skill
CD: 2 turn cycles
Activate: Deal 3 damage to a Character in your opponent’s territory. Adjacent Characters are Knocked Down.
Mobilize.

Blitz is a powerful Soldier card that can completely disrupt the opponent’s tactics. Lets take a look at the 3 step effect Blitz has on the game board.

First, a more clear look at game board properties;

While the Gauntlet (the center 3-slot corridor of the board) is clearly identified in the above image, Blitz is not concerned with it. I just wanted to give you a good picture of it for future reference with other cards that ARE concerned with it.

Now, lets imagine its your turn, and you play Blitz, targeting one of the Monsters in your opponent’s Territory. First, Blitz will attempt to deal 3 damage to that target. If the target has a higher DA than your OA, Blitz will miss. Also, if that target has at least 3 Armor, Blitz will hit, but it wont do any damage. Lets assume the target has a lower DA than your OA, and 0 Armor. Blitz hits and deals 3 damage to the target.

Next, Blitz will afflict any characters in adjacent character slots with Knockdown, causing them to be placed on the bottom of their owner’s decks. In this case, the opponent’s NPC is knocked down to the bottom of their deck, and your Monster is knocked down to the bottom of your deck (Monster cards played from your deck are placed on character slots in the opponents territory)

Now comes the final and most significant part- Mobilize! All Monster cards in character slots are moved into those same character slots on the opposite side of the board. This is to provide the feeling of movement, as though you just Blitzed into your opponents territory and knocked them senseless.

On top of that, NPCs are unaffected by Mobilize, and Monsters cant be moved into a character slot if an NPC is already there- in this kind of situation, the Monster is instead considered to be knocked down, placing it back on the bottom of its owner’s deck! This means Mobilize can be played around and used in conjunction with NPC board placement for some really great tactics!

Every Mobility Skill has the Mobilize keyword, but each will exhibit different effects on the board. I am working on an example for Vire’s Might.

1 Like

Before I give another example of Mobilize, I need to explain another important factor in the game’s mechanics thats very similar to “counters” in MTG.

COINS

Coins are used in order to track a variety of in-game factors, from buffs and debuffs, to charges, to damage over time ticks- Coins are often what track these values. Any coin can be used for this purpose, but important to note is to be able to distinguish between them by size or color in the case where different sources are placing coins on multiple cards, or the same card.

In the absence of coins, dice can be used to track the number of coins on characters, but the terminology is still “Coin”. If you use dice, be sure there are enough and in a variety of colors to differentiate between coin sources.

EXAMPLES OF COIN SOURCES

Probably the most common sources of Coin effects are Damage over Time (DoT) effects, and Devotion abilities/passive skills, but other cards can be coin sources as well.

DoT EFFECTS;

Burn, Frostburn, Electrocute, Poison, Bleed, Internal Trauma, and Decay are all DoTs that are represented in-game as coin sources. Different classes and factions are partial to specific types of DoTs. When a character is affected by any of these sources, an indicated number of coins will be placed on that character. Each turn, during the Draw phase, the affected character will take damage in an amount equal to the number of coins on it which are associated with that DoT, then 1 of those coins is removed from that character.

EXAMPLE: The opponent plays a card that afflicts you with “Bleed: 3”. You set 3 Bleed coins aside next to your deck. The turn passes to you. Your Draw phase begins. You take 3 damage from the Bleed effect, then remove 1 Bleed coin from yourself. Next turn you will take 2 damage and remove a Bleed coin, and the turn after that youll take 1 Bleed damage and remove the last coin.

SECOND EXAMPLE: Your opponent uses am ability that afflects one of your NPCs with “Burn: 2”. You place 2 Burn coins on that NPC. The turn passes to you. At the beginning of your Draw phase, that NPC takes 2 Burn damage, then you remove 1 of the Burn coins from the NPC. Next turn that NPC will take 1 Burn damage, and the last coin will be removed.

For a visual example of this, we’ll be looking at another card with the Mobilize keyword. The skill we’ll be examining will be Vire’s Might;

Vire’s Might
Tier 3 Oathkeeper Skill
CD: 2 turn cycles
Activate: Deal 2 damage to a character in your opponent’s territory.
Mobilize, then afflict all Monsters in your territory with Burn: 2

Again, lets assume the target has lower DA than your OA, and 0 Armor. Vire’s Might deals 2 damage to the target, then Mobilize resolves;

Notice nothing happens to the NPCs, as NPCs are unaffected by Mobilize. Unlike Blitz, Vire’s Might doesnt cause Knockdown. Instead, its unique strength is that it applies Burn DoT effects to all Monsters in your territory AFTER Mobilize resolves. Lets see what that looks like;

Now every Monster in your territory has a bubble butt! Hah, just kidding. Those circles symbolize “Burn” coins, which I envision being orange. But I dont have my colored pencils handy so, its bubble butts all day. Lets see how this plays out;

At the beginning of the opponent’s Draw phase after you used Vire’s Might, each monster in your territory is dealt 2 damage (due to 2 burn coins being on them). Then, 1 burn coin is removed from each affected monster. And so on.

And so on, and so on, until no more coins remain (DoT wears off).

UNDERSTANDING THE GAUNTLET

In this game, there are special “zones” on the game board that game mechanics interact with. One such zone is known as “the Gauntlet”. The Gauntlet is composed of the middle 3 character slots on BOTH SIDES of the game board. Cards that affect characters in the Gauntlet usually will affect both sides of the game board, but only in that zone. One example of a skill card which exhibits this behavior would be Forcewave;

Forcewave
Tier 1 Soldier Skill
CD: 2 turn cycles
Requires: Shield or 2-handed weapon
Activate: Deal 2 damage to all Monsters in the Gauntlet. Monsters dealt damage this way are Stunned.

Notice Forcewave will automatically target ALL Monsters in the Gauntlet corridor. NPCs are unaffected by Forcewave.

SKILL TRANSMUTERS

In the video game, many skills have “Skill Transmuters”, which change how the skill behaves. The CCG version will also include this aspect of the game. Skill Transmuter cards will always indicate which Skill they affect. This is designated in the “Transmutes” area on the card. Some Skill Transmuters have specific gear requirements. These are listed on the card in the “Requires” section.

Skill Transmuters are cards with the “skill card” type, but classified as “Transmuters”. On a card, this reads as “Skill - Transmuter”. As the Transmuter is played, it’s placed underneath the Skill card its Transmuting, so the card name is clearly visible behind the Skill card, allowing players to understand its there. Lets look at an example of a Skill Transmuter below;

Skill Transmuter being examined: Tremor

Tremor
Tier 2 Soldier Skill - Transmuter
Transmutes: Forcewave
Requires: 2-handed weapon
-1/2 damage to Forcewave, rounded up.
Forcewave doesn’t Stun targets it hits.
-2 CD to Forcewave.

As you can see, the Transmuter changes how this skill behaves in a significant way. Lets take a look at what these different effects look like on the board when used both with and without the Transmuter.

FORCEWAVE W/O TRANSMUTER;

Assuming all monsters in the Gauntlet have a DA lower than your OA, and 0 armor, Forcewave will hit them all…

Once the damage is dealt, Stun is applied to all monsters damaged by Forcewave, and Forcewave is flipped face-down to enter Cooldown. 2 CD Coins are placed on the card. At the beginning of each of your turns, you would remove 1 CD coin from Forcewave. When the last is removed, Forcewave comes off Cooldown and is turned face-up, ready to be used again!

FORCEWAVE W/TRANSMUTER;

As you play the Forcewave Transmuter “Tremor”, it enters play and is placed underneath Forcewave, with the card title clearly visible so players can tell its there. Now, when Forcewave is used, it affects Monsters in the gauntlet a little differently!

1 Like

SKILL MODIFIERS

Similar to Skill Transmuters, Skill Modifiers cause changes to Skill behaviors by adding effects. Using the above example of Forcewave, with the Tremor Transmuter, lets see what happens when the Rending Force Skill Modifier is added to the Skill Card.

Skill Modifier being examined: Rending Force.

Rending Force
Tier 3 Soldier Skill - Modifier
Modifies: Forcewave
+1 damage to Forcewave
Armor Shred: 1

With the Tremor Transmuter, Forcewave can be used every turn since there is no cooldown. If Rending Force is added, Forcewave can deal double the normal damage every single turn if used, but only to Monsters in the Gauntlet.

EMPOWERING SKILLS

Investing skill points into skills and skill modifiers youve already unlocked increases their potency. Skill Transmuters cant be Empowered. Each skill point invested in Empowering one of your Skills will give +1 to its stat buffs, and/or -1 to its stat debuffs. In the case of Rending Force, for instance, it would get an additional +1 to damage to Forcewave, and its Armor Shred would become 2. If you then leveled up again, and put another point into Rending Force, it would get another +1 to damage, and Armor Shred would become 3, and so on.

The maximum number of times each skill can be Empowered is listed on the card in the card text as “Max Level”. When enough skill points are invested in a skill to hit its Max Level, the skill no longer counts against your maximum number of skills.

1 Like

You are seriously nailing it with the design ideas and the details. I know next to nothing about game design and card games but a lot of these things are really interesting.

1 Like

Thanks man, nothing can be confirmed as officially nailed without playtesting though. Im still working on all the aspects of design to get it to that stage, where it can even be playtested.

The mechanics of the game board are pretty solid, but the bigger challenge will be balancing all the mechanics on skill and gear cards, and then balancing their interactions with Monsters, NPCs, and the game board.

If anything, the process of attempting to design this on paper definitely gives an appreciation for all the hard work Zantai and the other Crate staff put into balance and skill/gear changes each update that has new content.

Im really enjoying this experience though- I think the most fun part about this is being able to implement changes to the game that you always wanted but never happened. One specific example? Mind Control.

Yes, thats right, I am bringing it back! And its actually going to be useful!

EDIT: Speaking of balancing/design changes, Ive just learned I need to change part of the XP/leveling specs, to account for Devotion points, as introducing Shrines may clog the board and overcomplicate everything. Going forward, the below amendment is in effect;

If you defeat Monster/NPCs whose total Level exceeds your turn number, you will gain a Devotion point. Devotion points are like Skill points, only they are used to unlock Devotion abilities specifically. More on that later. Player XP values reset every turn and always begin at 0, regardless of player level.

1 Like

A big piece of mechanical works here in the making, below is an Combat and Gear related update, picture examples to assist with visualization to follow as soon as i get home from work/have time to make them;

SKILL USE LIMIT AND THE BENEFITS OF BASIC ATTACKS

Because players can only use one skill per turn, Basic Attacks are essential to effectively control the board. You may need that extra swing to gain a level, and without an effective basic attack, that wont happen. Numerous factors play into the overall effectiveness of your basic attacks. Lets start at the beginning. By default, players and characters can attack once each turn. Some classes, NPCs, and Monsters are capable of multiple attacks per turn, however.

Regardless of how many attacks a character makes each turn, all turn actions are reliant upon the Speed stat. Characters with higher Speed will take action first in the Combat Phase. If 2 or more characters have the same Speed, Monster actions occur first, then NPC actions, then Player actions. This order of operations is referred to as the “Strike Exchange”.

If a character is able to attack twice in one turn, they’ll attack once, but must wait for all other characters to take action before attacking for the second time. When a character enters the Strike Exchange queue for their second attack in a turn, if any other characters are also attacking again, each character’s action is ordered by their Speed stat as normal. This order of priority is consistent through all Strike Exchanges during the combat phase.

CALCULATING HIT SUCCESS AND DAMAGE FROM BASIC ATTACKS

Basic Attacks and Skills follow the same criteria in regards to successful hit and damage calculations. Each requires you to have a higher OA than the target’s DA to hit successfully, and a damage value that exceeds the target’s Armor rating in order to deal any amount of damage successfully. Skills and Attacks with Armor Piercing will disregard a target’s Armor rating altogether, and damage will be dealt as though the target had 0 Armor.

SOURCES OF OA/DA

Being that OA and DA play such a significant role in your combat performance, there are multiple sources of OA and DA. The most basic and common source of these stats is your class. Each class begins with different values for these stats, and provides a permanent bonus to these stats in an amount equal to their starting values every time you level up. Lets take a look at the base values youd have at the start of a match for each class, with the level up stat bonuses in parenthesis;

Soldier;
DA: 3 (+3)
OA: 2 (+2)

Demolitionist;
DA: 2 (+2)
OA: 2 (+2)

Occultist;
DA: 1 (+1)
OA: 1 (+1)

Nightblade;
DA: 2 (+2)
OA: 3 (+3)

Arcanist;
DA: 0 (+0)
OA: 1 (+1)

Shaman;
DA: 2 (+2)
OA: 1 (+1)

Inquisitor;
DA: 1 (+1)
OA: 2 (+2)

Necromancer;
DA: 1 (+1)
OA: 0 (+0)

Oathkeeper;
DA: 3 (+3)
OA: 1 (+1)

As you can see, the Arcanist and Necromancer are the weakest classes here in regards to base OA/DA values and their level-up bonuses. Dont worry- these classes more than make up for it in other areas.

ADDITIONAL SOURCES OF OA/DA

Beyond class stats, players can increase their OA/DA stats with Gear cards, Skill cards, and Devotions. For the purposes of addressing basic attacks, lets focus on Gear Cards for now…

GEAR CARDS

The Gear card type includes 4 sub-types. These sub-types are Weapons, Armor, Accessories, and Relics. For the purposes of discussing basic attacks, lets focus on Weapons specifically.

Weapons are the main factor in determining player damage when using basic attacks. This stat is known as POWER. For Players, Weapons are the source of their Power stat, which indicates the amount of outgoing damage when a basic attack hits its target successfully. Lets look at an example of a Weapon;

Razorleaf Glaive
Level 4
Epic Sword - Two Handed
4 Power
4 OA
Brandish: Recover 7 HP
Bolster: +1 to all Shaman Skill Cards
Materials: Mark of Mogdrogen

Razorleaf Glaive is a strong 2-hander that Empowers all Shaman skills by 1 skill point while equipped. It also provides a nice Brandish effect, healing you for 7 HP whenever its first equipped. As a level 4 weapon, thats extremely helpful, since its likely youve sustained some amount of damage by the time you hit level 4, and are able to shuffle the Glaive into your deck.

A fearsome blade, it also boosts your OA by 4. That may not seem like a lot on its own, but on a well built Shaman it is a force to be reckoned with, giving +1 to ALL Shaman skills. This makes the weapon useful in the long game as well.

BUT WHAT IF I HAVE A WEAPON EQUIPPED WHEN I DRAW RAZORLEAF GLAIVE?

Equipping and Unequipping weapons is no different than equipping and unequipping other gear- It cant take place outside of the Gear phase (unless a card or effect allows it to). Like any Item or Gear card drawn during your Draw phase, it will be placed into one of your Inventory slots if no item or weapon slots are available at the time when you draw the card. Then, during your Gear phase, you can choose to unequip your currently equipped weapon, and equip the Razorleaf Glaive in it’s place. The unequipped weapon would then be placed into one of your inventory slots.

FULL INVENTORY AND SCRAPPING/STASHING

If your Inventory slots are full when you draw an Item or Gear card, you can do one of two things; Scrap, or Stash.

SCRAP

Each Item and Gear card has a “Materials” section. When an Item or Gear card is Scrapped, it’s removed from the game completely in exchange for the indicated Materials it generates upon Scrapping. These Materials, or “Mats” for short, are indicated in the Materials section on the card, and are generally rare Components that cant be gotten any other way.

Razorleaf Glaive, for example, provides 1 Mark of Mogdrogen when its scrapped. This is a rare Component with potent healing effects, that also boosts your Speed. Most potent of all, however, is its Application effect;

Mark of Mogdrogen
Rare Component - Armor
+5 to max HP.
+2 Speed.
Application: Full Heal

As components are Applied to Gear, they exhibit different effects. These effects will trigger upon Application when the Component card enters play and is placed underneath the Gear it’s enhancing, as seen in the example below;

Because destroying your Razorleaf Glaive can feel quite weakening, its given the silver lining that you will be receiving a useful Item in exchange, which can completely heal you. Very handy in a pinch!

NEW RELATED KEYWORDS ADDED

Application: An effect thats triggered by applying a Component or Augment to its targeted item type.

Disarm: A player-specific effect that causes the player its targeting to unequip their weapon

Unhand: A Gear-specific effect that triggers when the Gear becomes unequipped.

1 Like

OTHER WAYS YOUR WEAPON CAN BECOME UNEQUIPPED

Some cards have the “Disarm” keyword. This effect will cause a targeted gear type to be unequipped from your Character, and can be executed outside of the Gear phase. Disarm can be particularly brutal if it occurs prior to the Combat phase, however there are also cards that enable strong utilitarian tactics by way of this keyword and the Brandish keyword as well…

Angrim
Level 2
Devil’s Crossing
Legendary NPC - Human Blacksmith
Speed: 2
DA: 4
OA: 1
Armor: 4
POWER: 2
HP: 6
Activate: Disarm owner.
Activate: Scrap any 1 piece of Gear in your Inventory.

Angrim is one of several Blacksmith NPCs. Blacksmith NPCs have unique Activated Skills that can enable certain Gear-related game mechanics outside of their “legal” phases. As you can see, Angrim has 2 of these Skills. Like Players, NPCs can only use 1 Skill each turn. When an NPC uses a skill, 1 Cooldown (CD) coin is placed on that NPC so Players can clearly see its been used that turn. At the beginning of your next Draw phase, that CD coin is removed from the NPC, and its able to be used again.

Exceptional for the purposes of exploiting Weapon Gear card Brandish and Unhand procs (effects on weapons that trigger whenever the weapon is equipped and unequipped), Angrim is also useful for Scrapping. He can be used to harvest your Gear cards when your inventory isnt full, say, in the case where you have a piece of Gear that provides really strong Mats, but you have no other way to Scrap it.

Each of these options make Angrim deceptively powerful, as he can prove to be an outstanding utility tool to have in your arsenal, when combined with certain cards. Using the above Weapon card as an example, Lets see how Angrim can be used to exploit its Brandish proc;

Weapon card being examined: Razorleaf Glaive

Razorleaf Glaive
Level 4
Epic Sword - Two Handed
4 Power
4 OA
Brandish: Recover 7 HP
Bolster: +1 to all Shaman Skill Cards
Materials: Mark of Mogdrogen

Youve taken some damage from Monsters the previous turn, so your HP is down to 13. You draw Razorleaf Glaive. At the time you draw it, you happen to have no weapon equipped. You decide to equip the Razorleaf Glaive. As the Razorleaf Glaive becomes equipped, its Brandish ability triggers, restoring 7 HP and bringing you back to your max HP…

During your turn and the opponents turn, you take 7 more damage, so youre back down to 13 HP, but fear not! You have Angrim on the board! Using Angrims Disarm skill, youre able to unequip your weapon without equipping a weapon in its place. This means that you can both unequip and re-equip the Razorleaf Glaive in the same turn, gaining another 7 HP. Under normal circumstances, this would not be possible because to unequip the glaive, you would need to equip another weapon in its place, and only one weapon can be equipped per turn…

Weapons can be used in this way to provide a tactical edge in gameplay, so long as you have a good Blacksmith at your side!

Beta testin’

2 Likes

NEW KEYWORDS, AND A NEW CARD TYPE

Going to do an overhaul of this thread soon. Lots of work updating this game and developing it further has caused me to change a few things around, but what im most excited about right now is this…

EVENT CARDS

Event cards are powerful, single-use, Faction-specific cards that can change the board state in a variety of ways. The purpose of Event cards is to represent Faction participation, based on Faction game lore and resources. These cards are designed to enhance specific playstyles, and to give the player the feeling that their chosen Factions are supporting their efforts in the battle, beyond what NPCs can do.

ADDING EVENT CARDS TO YOUR DECK

Event cards are only added to your deck by completing Quests, from cards with the Quest mechanic. The Quest mechanic is a mechanic which almost always appears on Faction cards. The card will enter play and establish some parameters that can be met in order to trigger a certain reaction, rewarding you by shuffling some “Event cards” into your deck. Event cards will act like skills when drawn, having an immediate effect on the game, but rather than going into cooldown, these cards are removed from the game entirely- a one-time effect, only attainable through meeting the requirements of cards with the Quest mechanic.

Quest: A card with the Quest keyword will proc a reward (one-time effect) when the indicated conditions are met. The one-time effect of meeting these conditions is referred to as “Completion”. If the card with Quest is for some reason no longer on the battlefield when you meet the conditions for Completion, you do not get the rewards. The card with Quest must be in play at the time of Completion in order for you to reap the benefits.

EXAMPLE OF AN NPC WITH THE QUEST MECHANIC, AND AN EVENT CARD;

Weapon Master Borrov
Level 3 NPC
The Black Legion
Power: 3
Speed: 2
OA: 3
DA: 5
Armor: 3
HP: 3
Deploy: Spawn the Legendary Aetherial Monster, Herald of the Flame, in any vacant Character slot in your territory.
Quest: Destroy Herald of the Flame.
Completion: Shuffle 3 Heavy Artillery Event cards into your deck.

Heavy Artillery [Lost Armaments]
Event Card
The Black Legion- Weapon Master Borrov
Deal 3 damage to ALL Monsters in your territory.
Draw a card

HOW DOES SINGLE PLAYER WORK?

The basic mechanics of this game function the same in Single Player as they do in 1v1. There are some minor differences to how certain mechanics operate. One example of this would be Territory, and the effect it has on your basic attack.

With no opponent, both rows of game slots are technically considered your Territory. This being the case, the first row (closest) is considered your “Immediate Territory” in this mode. Monster cards are placed in your Immediate Territory when drawn, unless there are no open slots there. In that case, they are placed in the “Rear Territory”. You are only able to use your basic attack on Monsters in your Immediate Territory. Also, Monsters in the Rear Territory cant attack you if you have any NPCs in your Immediate Territory, and will instead automatically focus their attacks and abilities on said NPCs. This is a big difference from 1v1, where Monsters cant target NPCs with attacks and abilities.

Outside of this, the other main difference between 1v1 and Single Player is the win conditions. In Single Player (and co-op), players will choose a campaign at game start. Campaigns follow specific game paths, incorporating specific Monster, NPC, and Gear cards pulled directly from the game content relative to them, rather than utilizing any monster, NPC, and Gear cards in the players collection as can be done in 1v1 mode.

For each campaign there is a Boss. Players must survive long enough to level up and add the Boss Monster cards to their decks, then defeat them in order to win. Below are the default campaigns, their Bosses, and respective “zones”;

The Ch’thonic Menace: Defeat Loghorrean, the Voice of Ch’thon
-Devil’s Crossing
-Wightmire
-Burrwitch Outskirts
-Burrwitch Village
-East Marsh
-Warden’s Laboratory
-Old Arkovia
-The Four Hills
-Twin Falls
-Broken Hills
-Smuggler’s Pass
-Deadman’s Gulch
-Pine Barrens
-Homestead
-Rotting Croplands
-Blood Grove
-Darkvale Gate
-Asterkarn Valley
-Fort Ikon
-Plains of Strife
-The Necropolis
-Tomb of the Watcher

The Liberation of Malmouth: Theodin Marcell, Master of Flesh
-Gloomwald
-Coven’s Refuge
-Ugdenbog
-Barrowholm
-Malmouth Outskirts
-City of Malmouth
-Fleshworks

The Eldritch Sun: Manifestation of Korvaak, the Eldritch Sun
-Conclave of the Three
-Korvan Plateau
-Tomb City of Osir
-Korvan Sands
-Cairan Docks
-Bonebleach Basin
-Sunbane Oasis
-Vanguard of the Three
-Basalt Crags
-Lost Oasis
-Remnants of Korvan City
-Tomb of the Eldritch Sun

If players wish to experience a longer game, they can choose to experience the Grand Tour, and fight through all 3 campaigns, respectively. The win condition in this mode being that the player must defeat all 3 bosses.

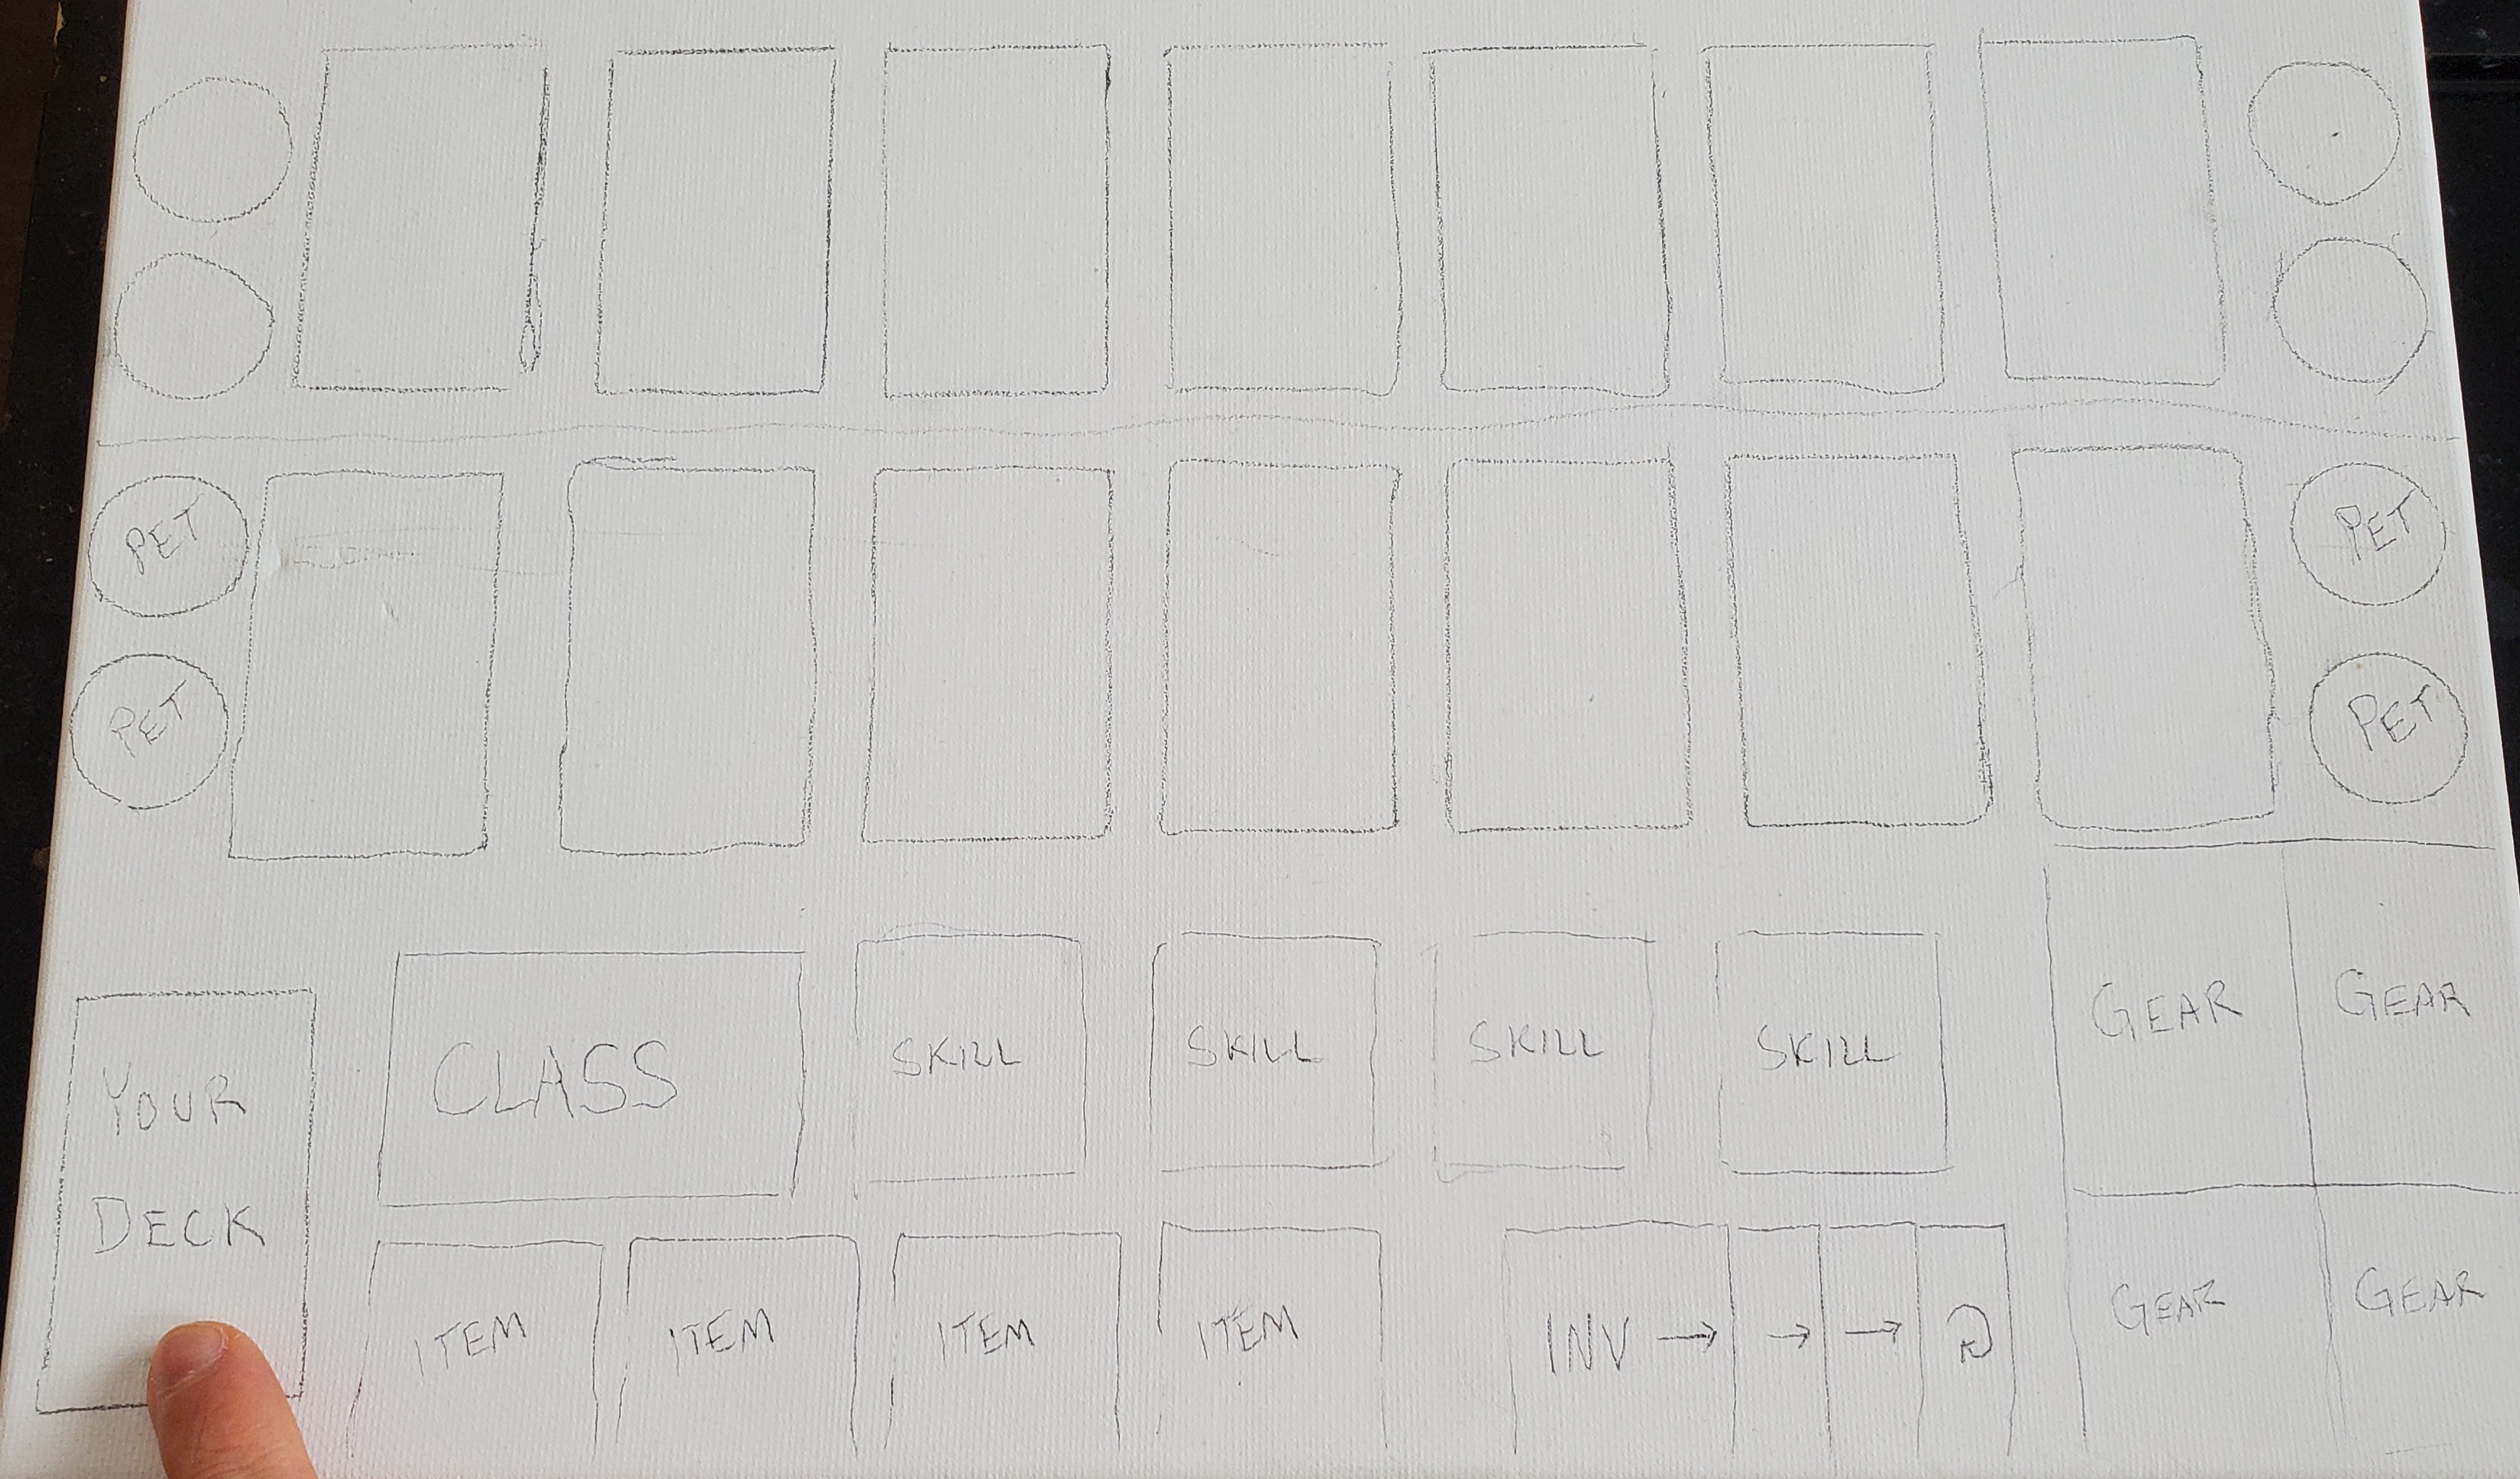
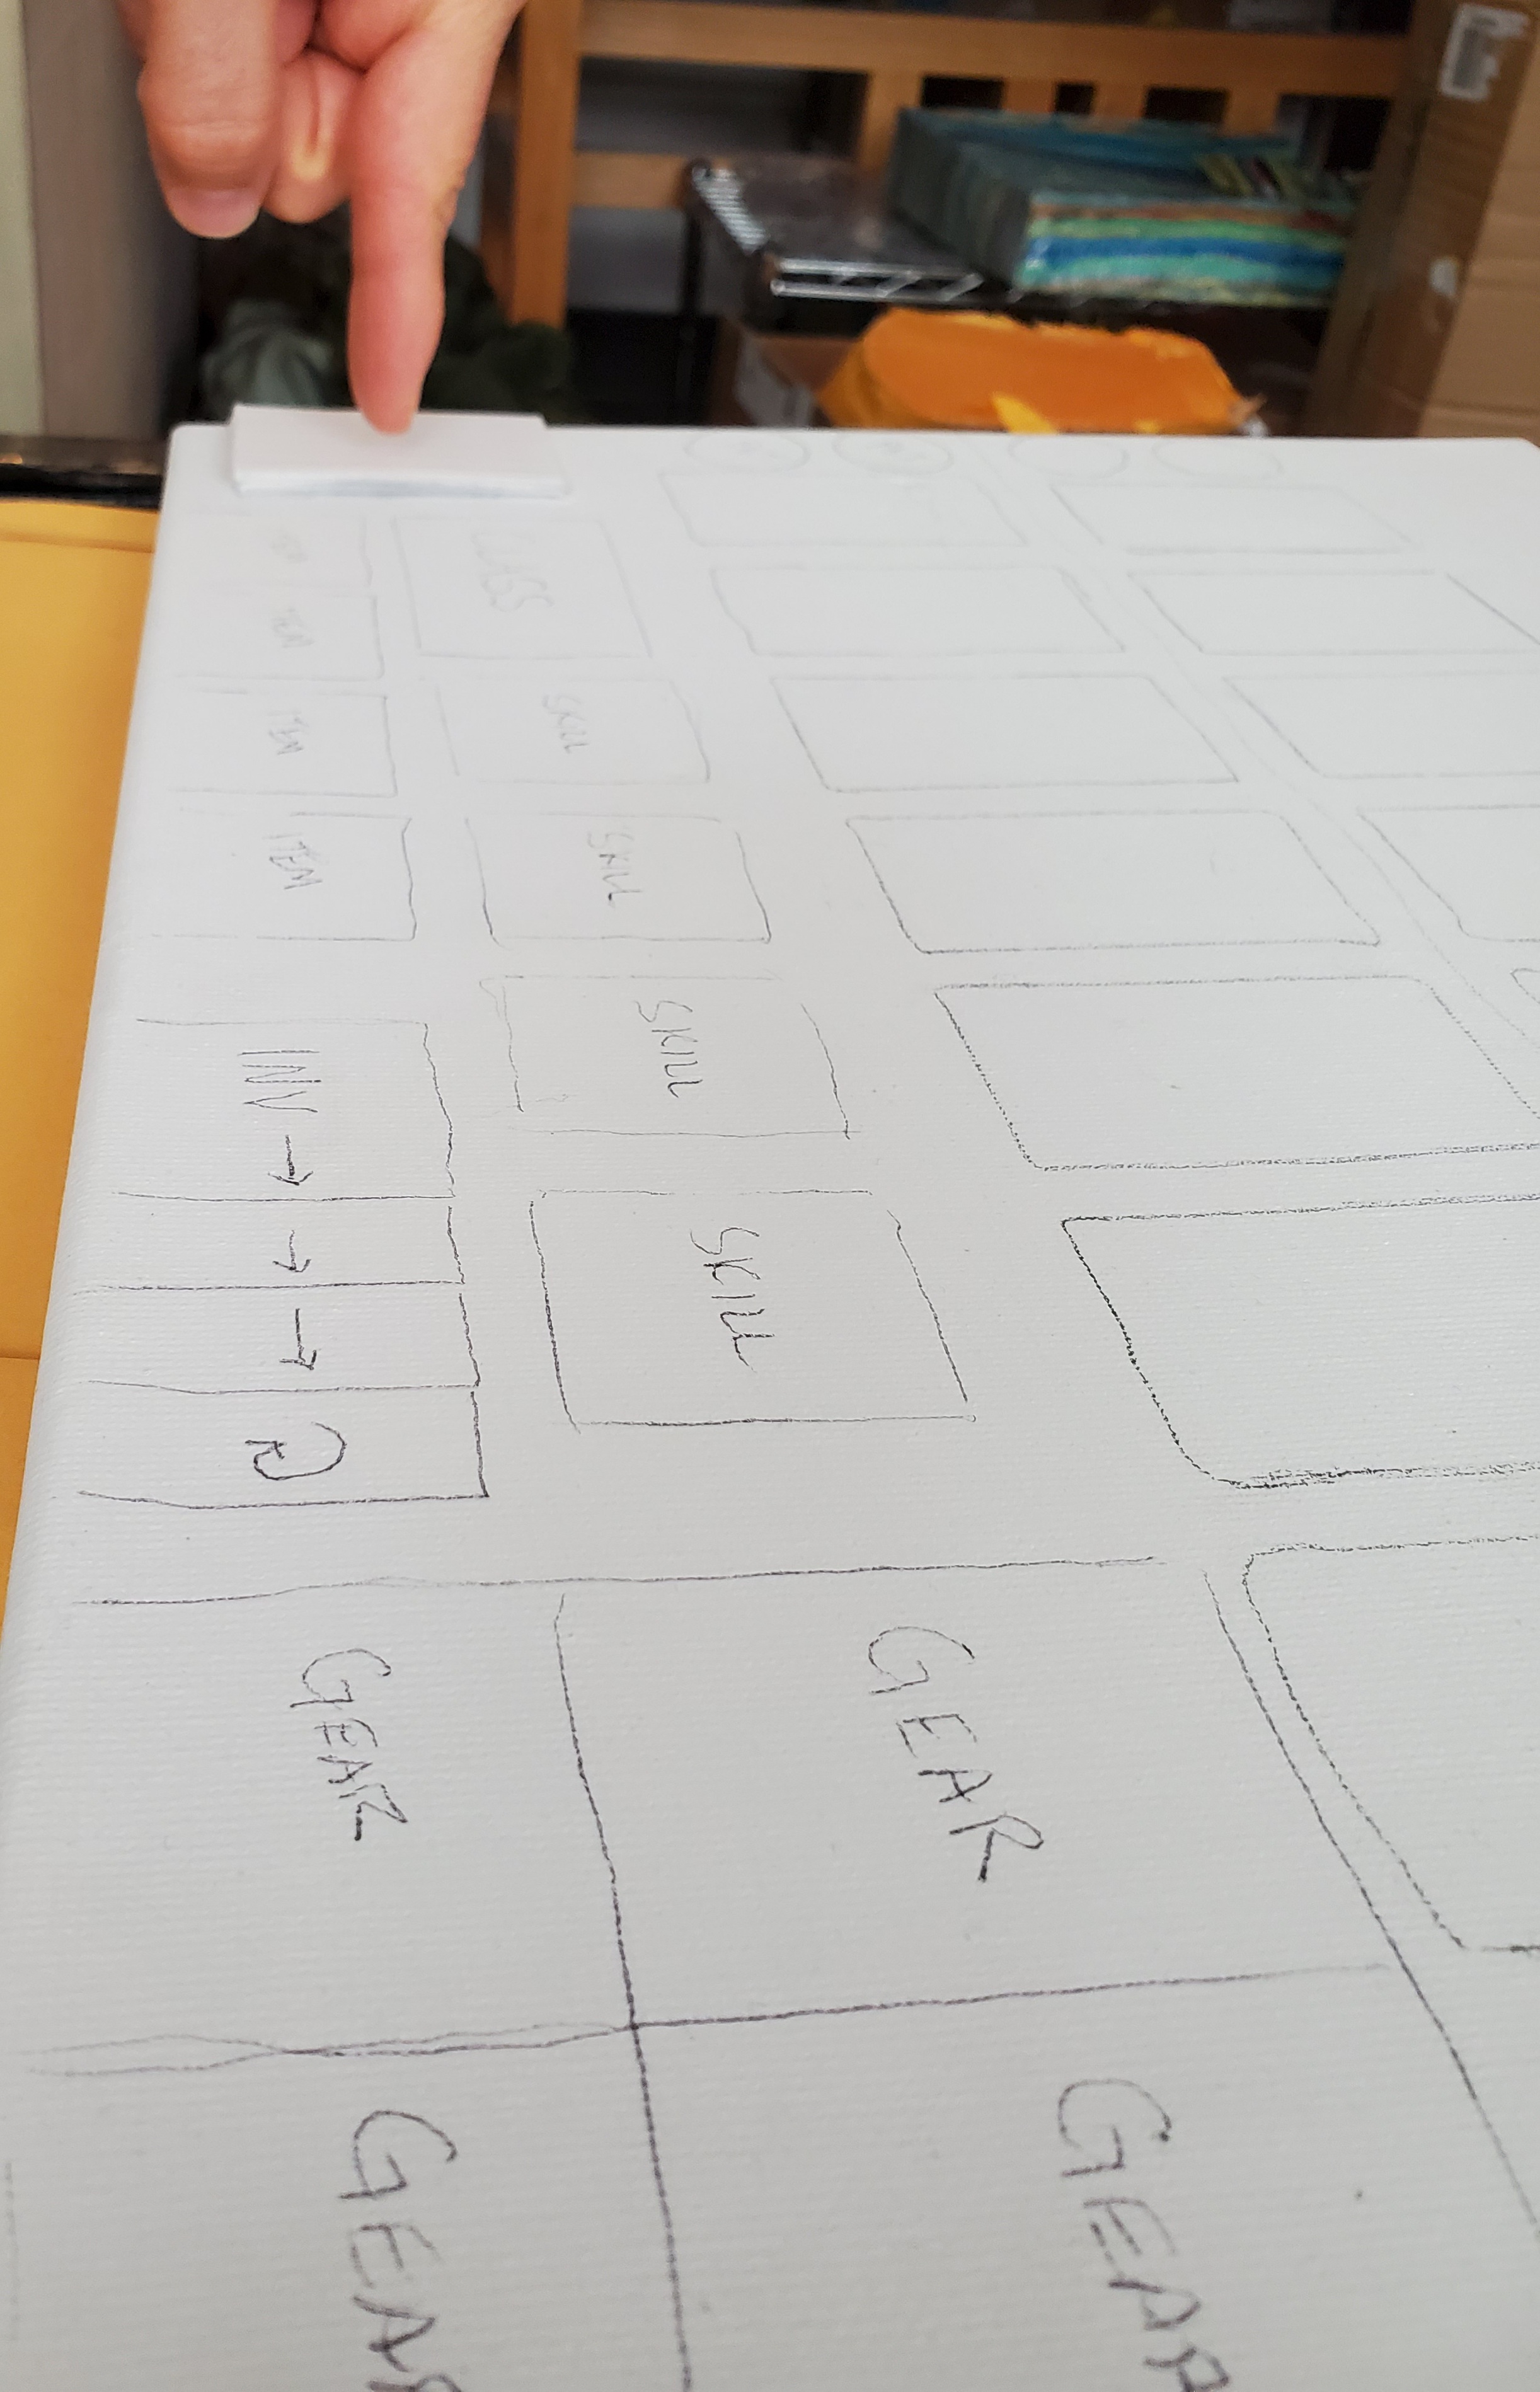
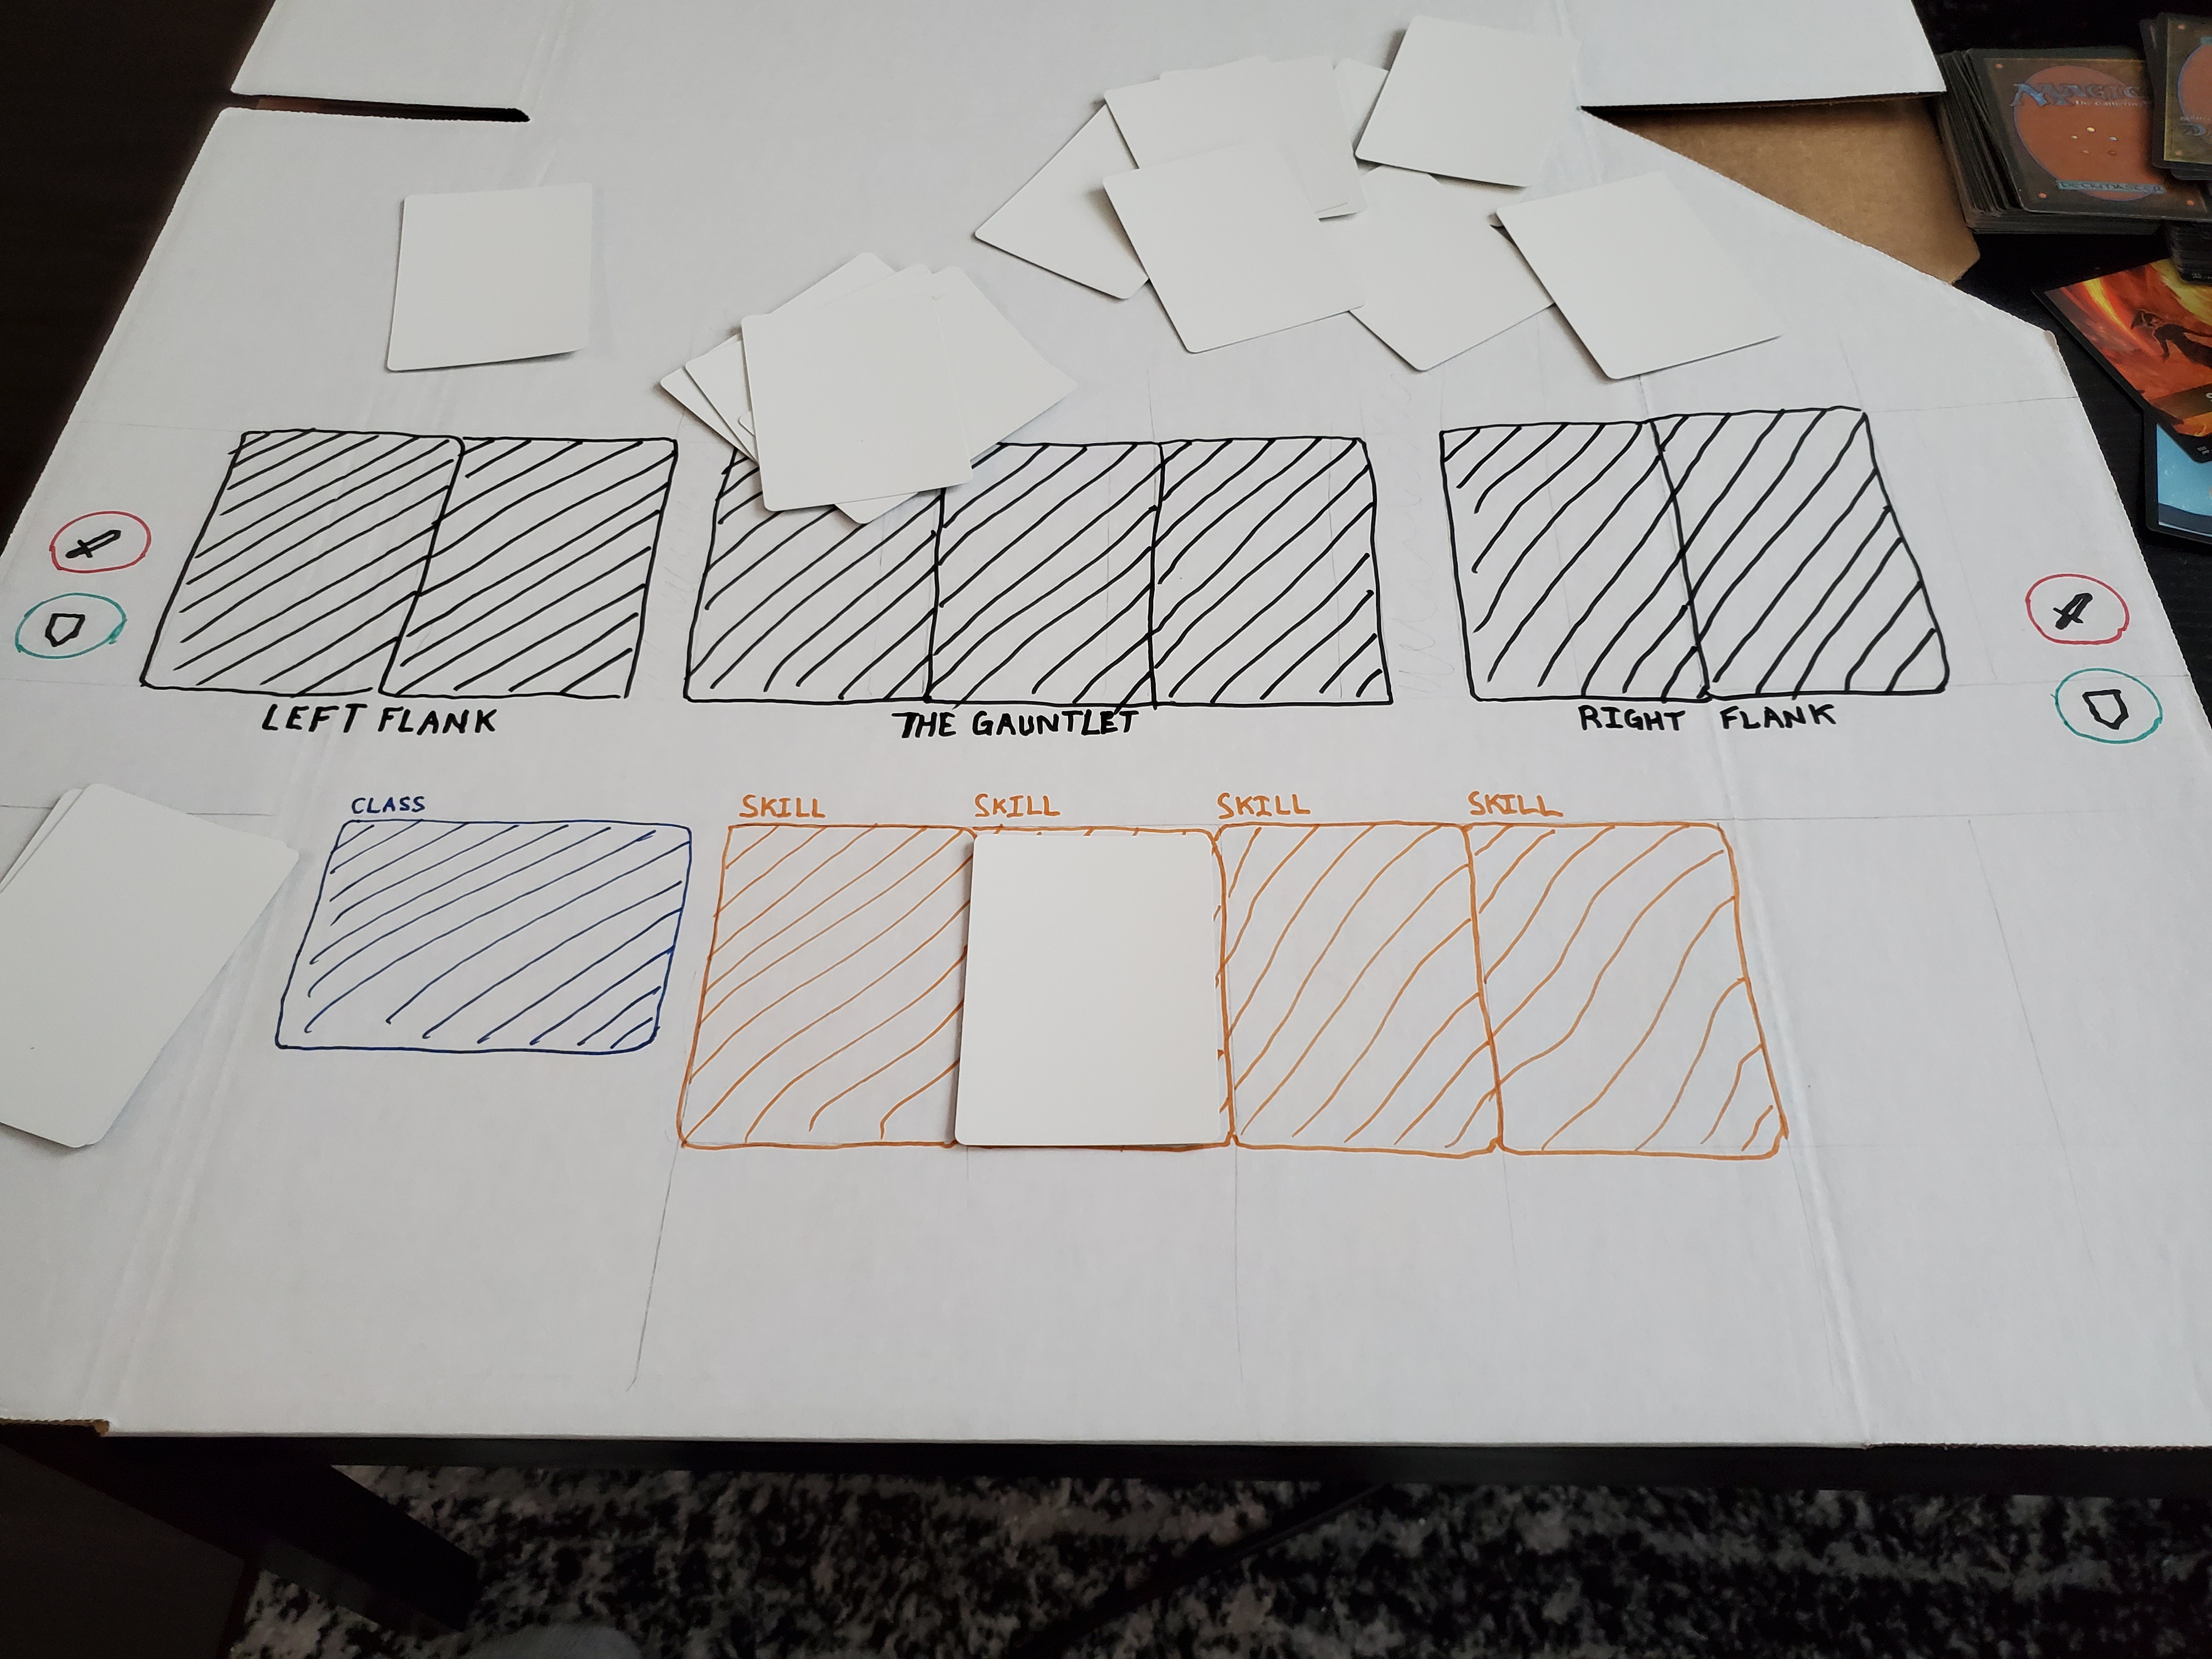
As a means to better assist the members of this community in visualizing how this game actually plays, I will take you through an example of gaining the first 3 levels in the Single Player mode below. Please bear with me as I dont have the major arts and crafts skills to make a polished prototype. The “cards” ill be using are suboptimal, and strictly low quality to i can just focus on experimenting with game mechanics to see how this all works out. This is nowhere even close to being finished and an ongoing project;

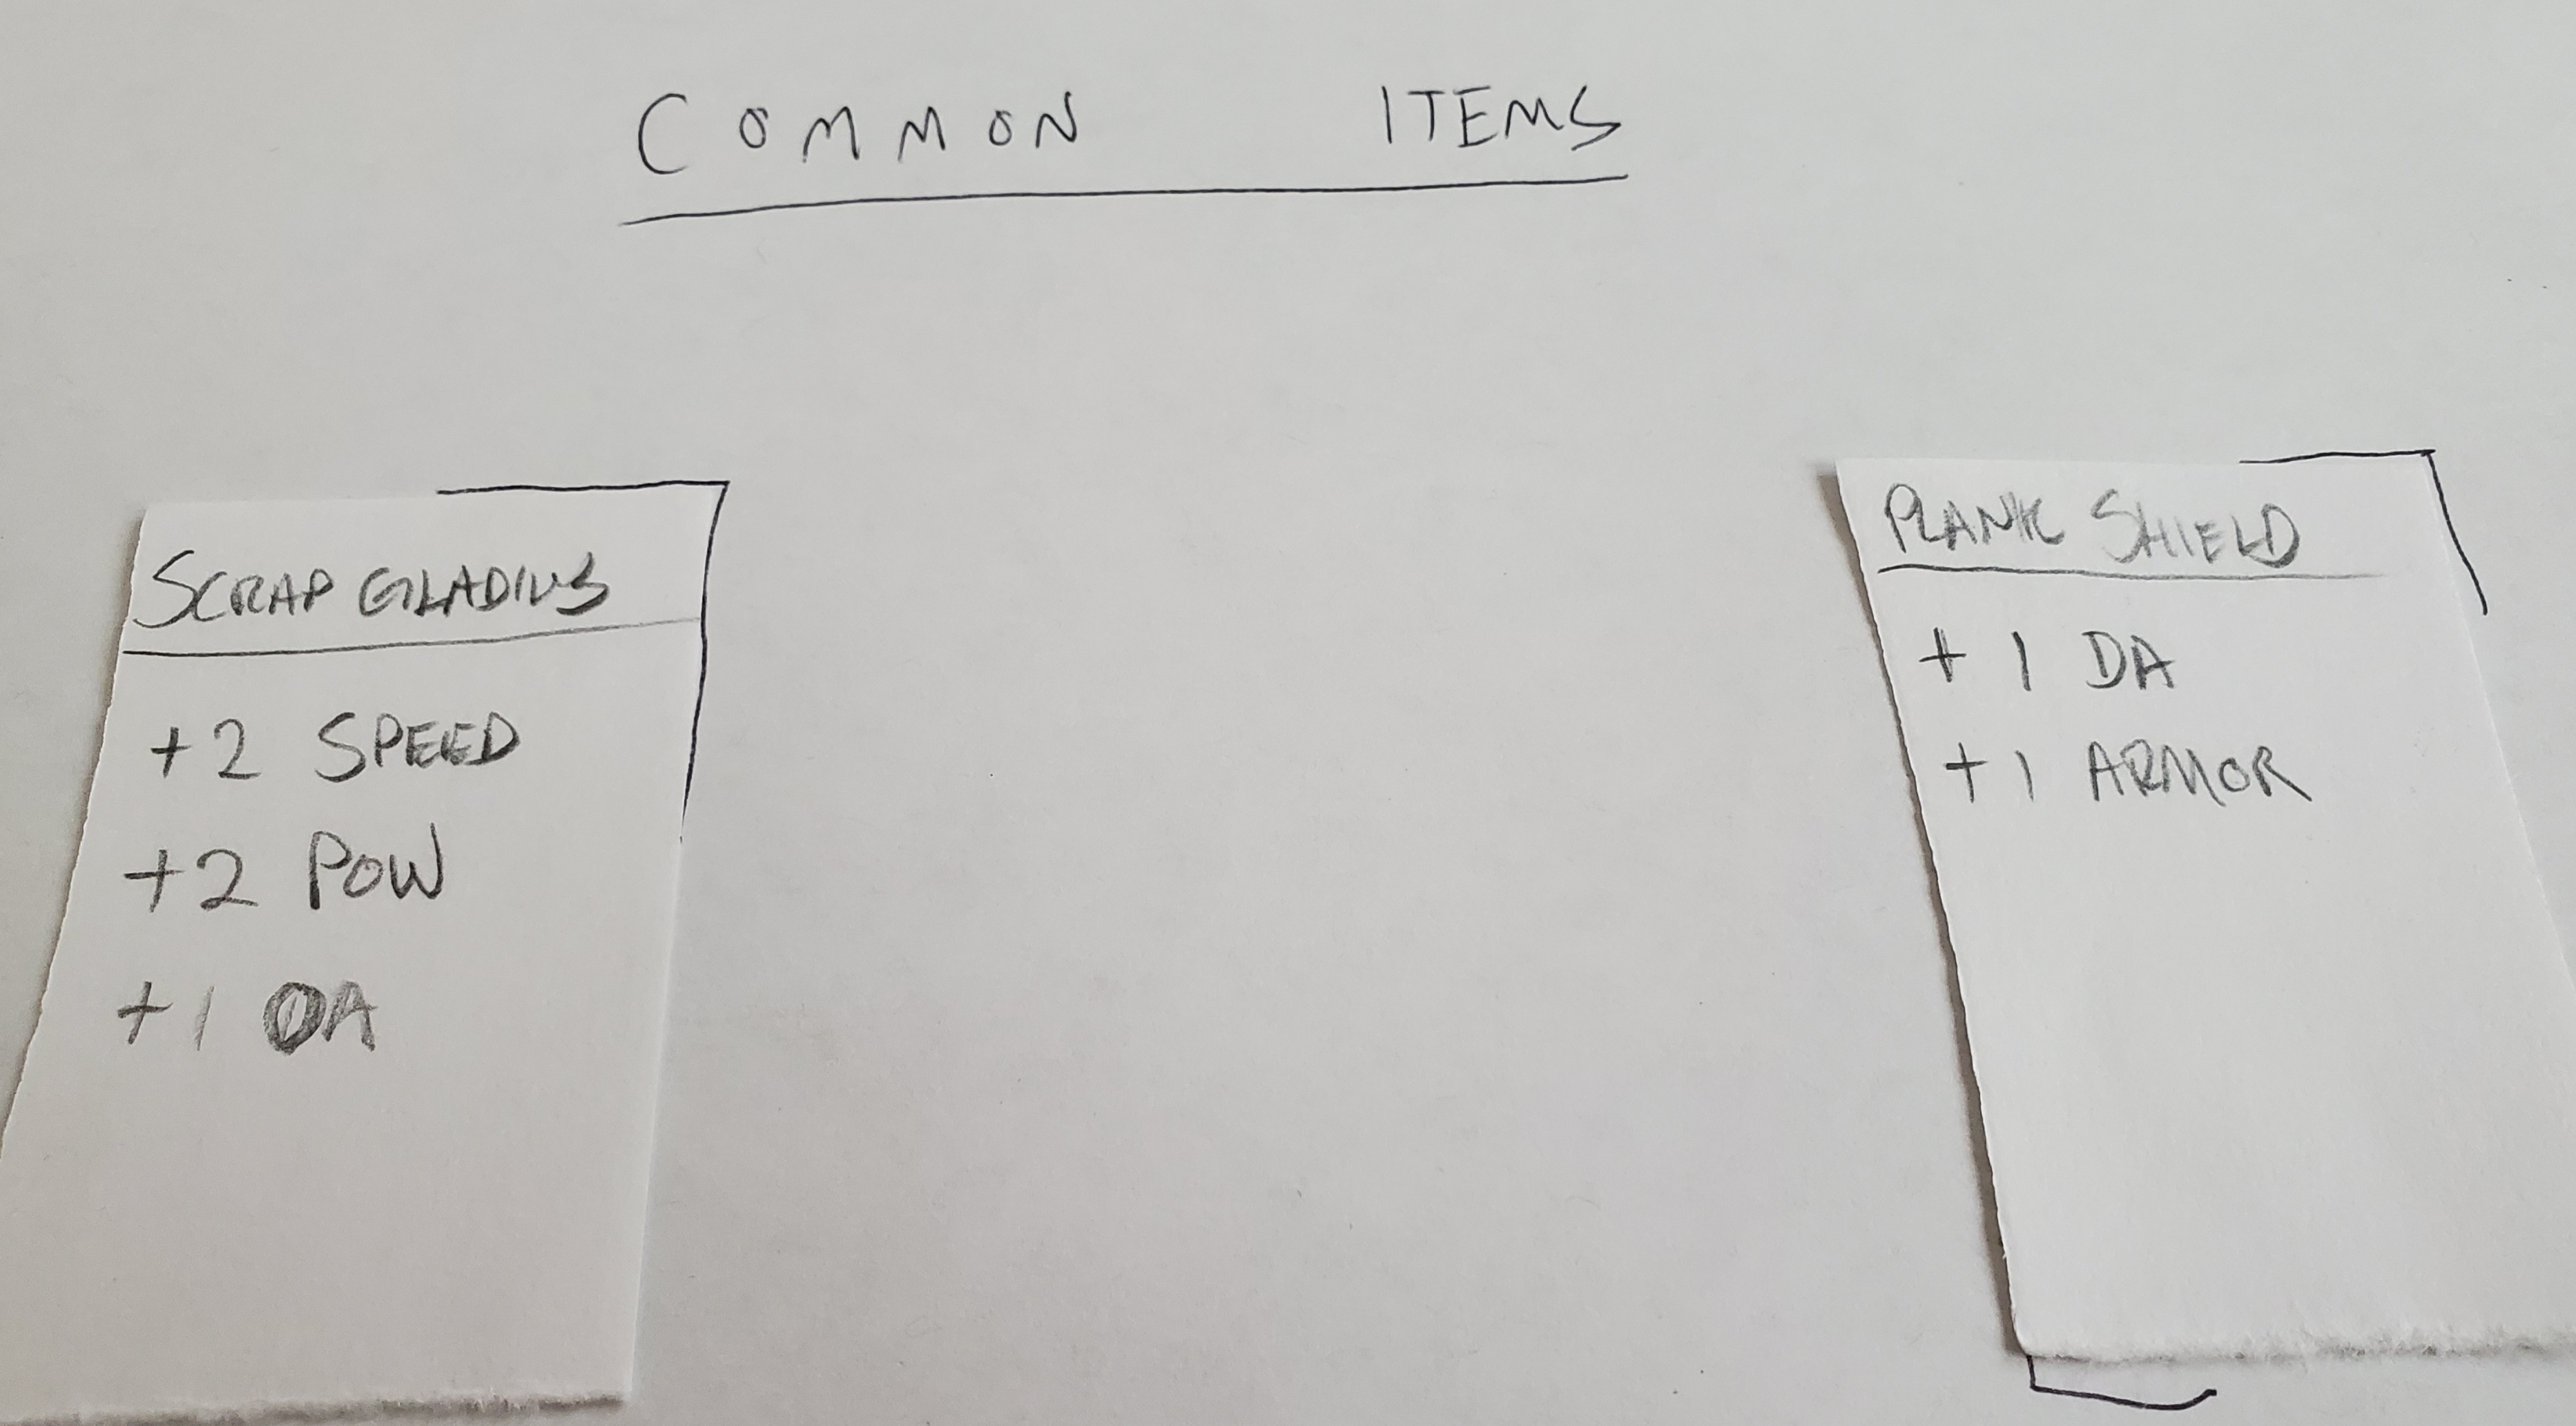
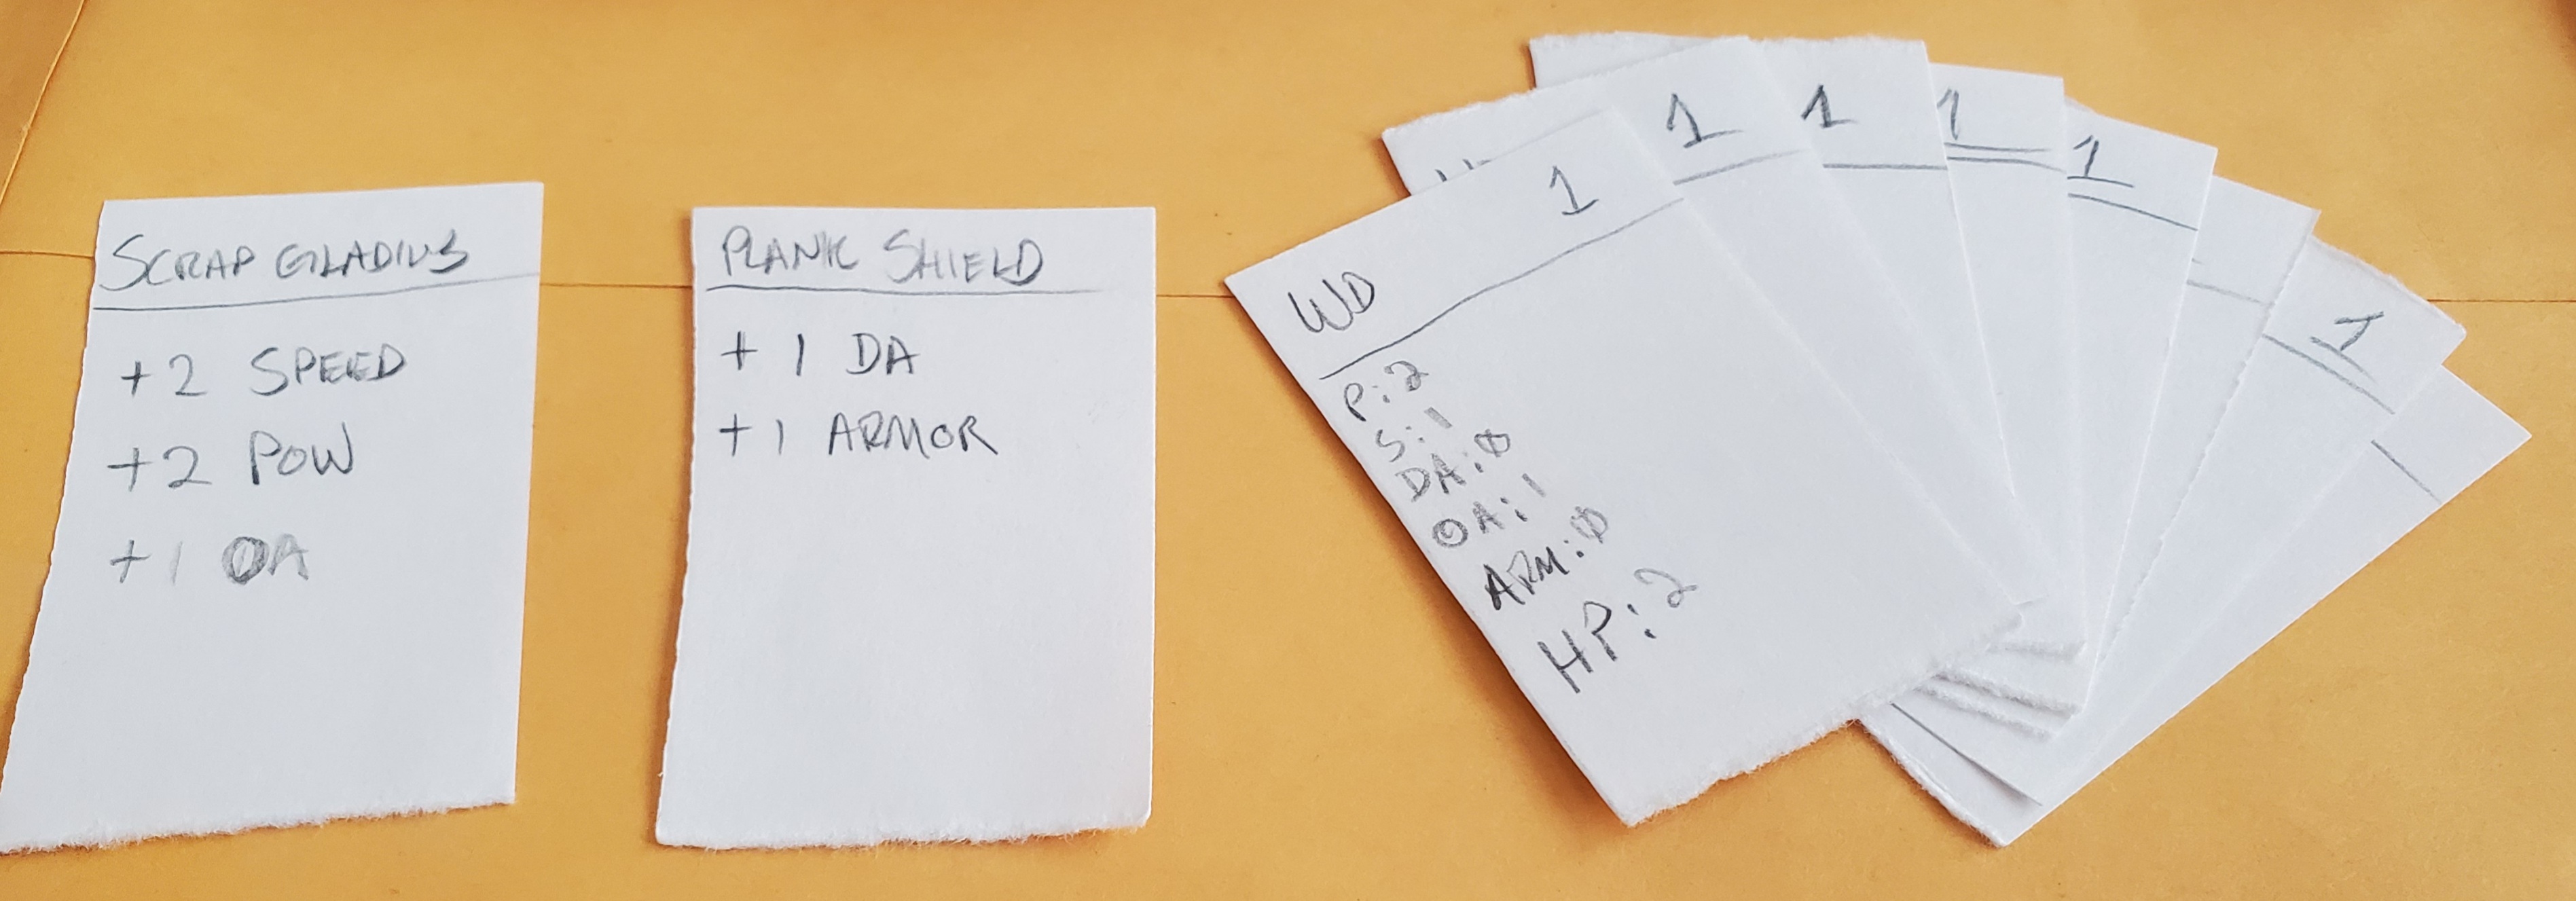
STEP 1: CHOOSE 2 COMMON ITEM CARDS AND 8 LEVEL 1 MONSTER CARDS FROM YOUR STASH

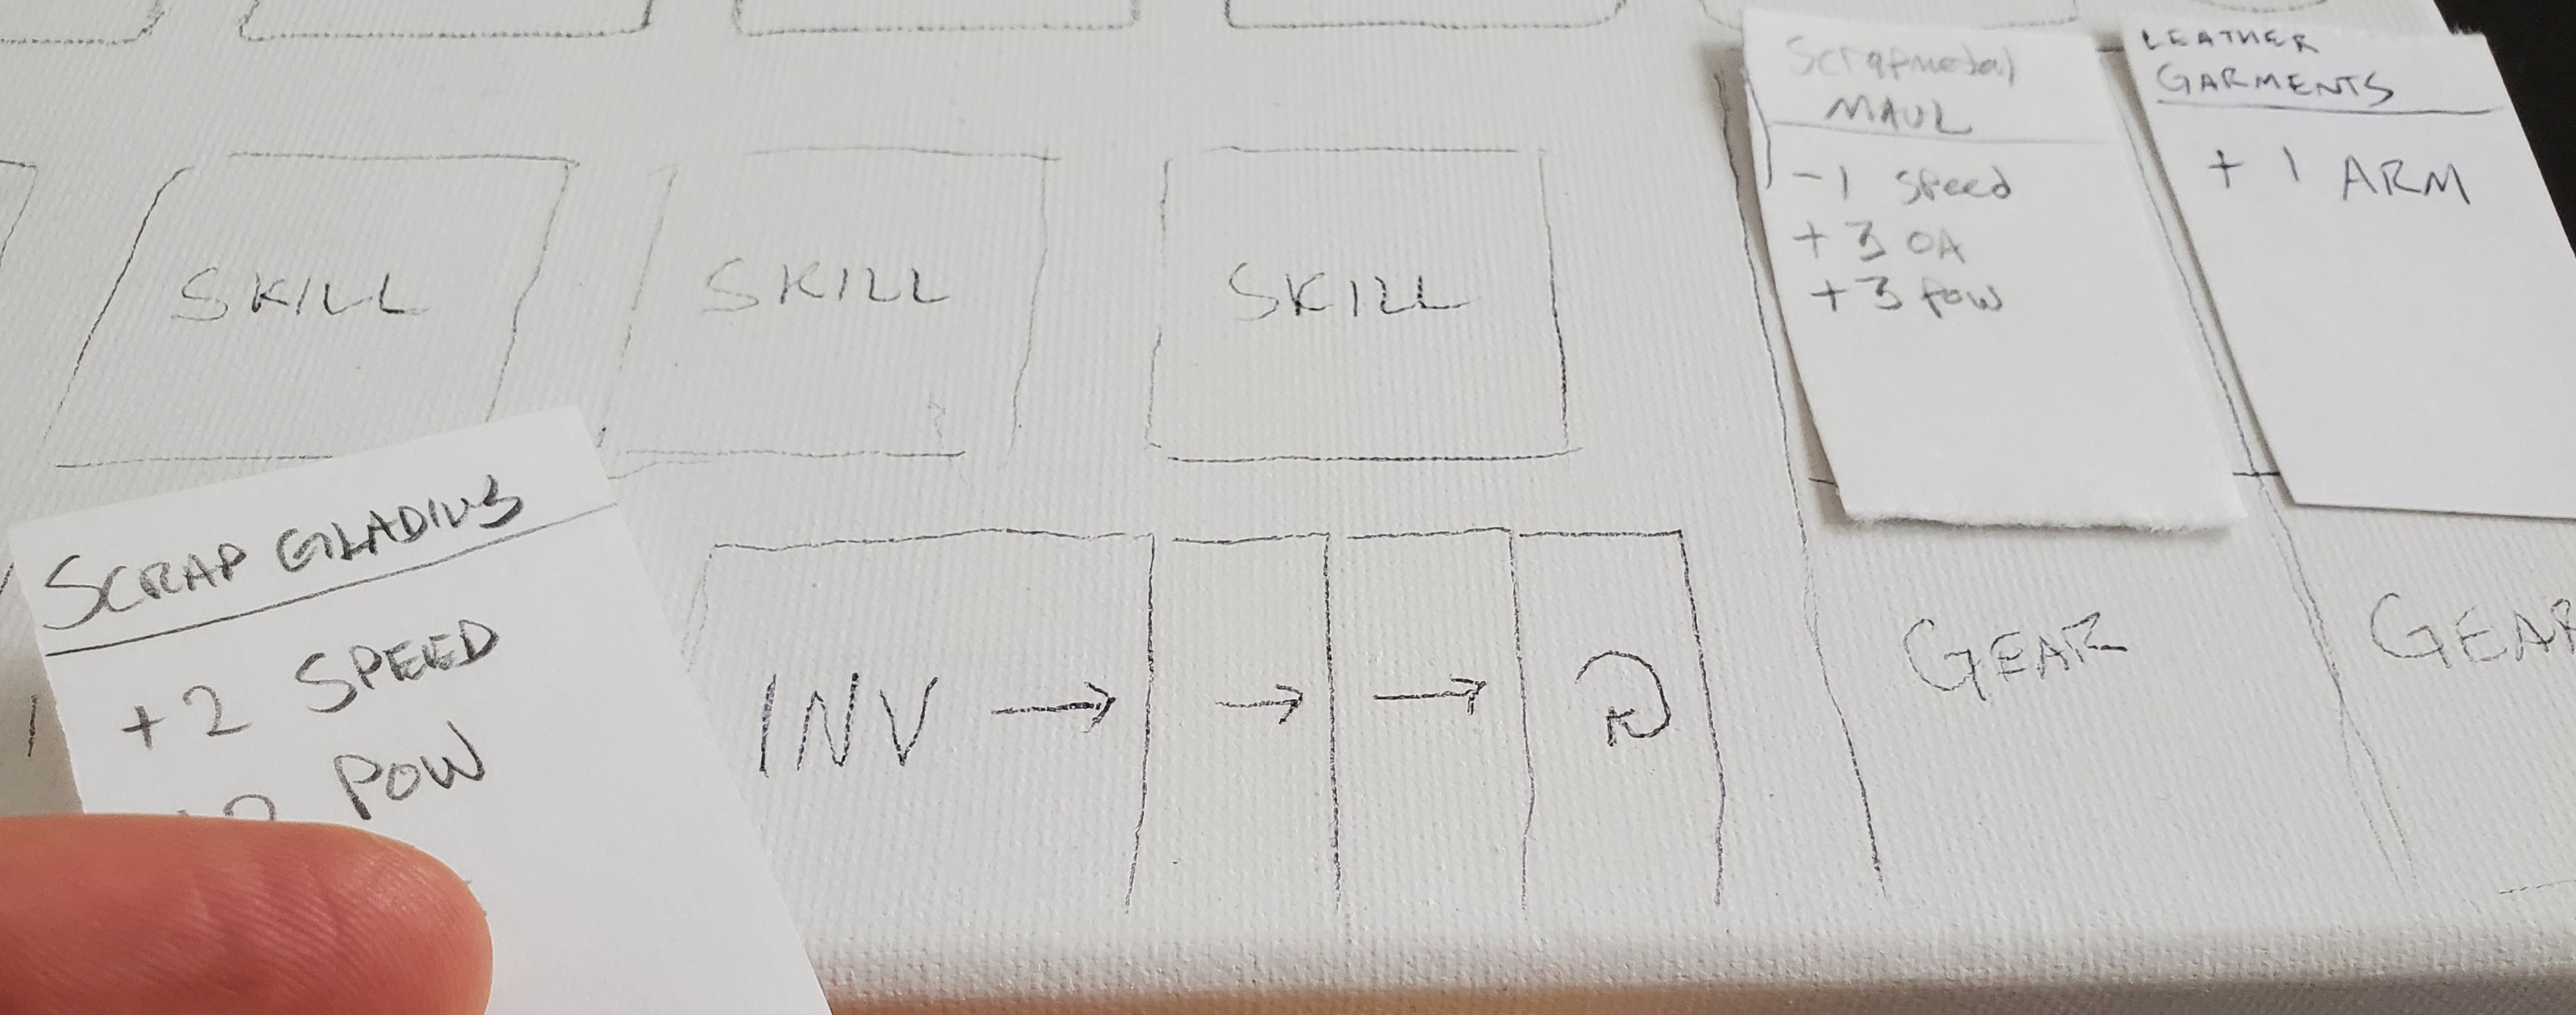
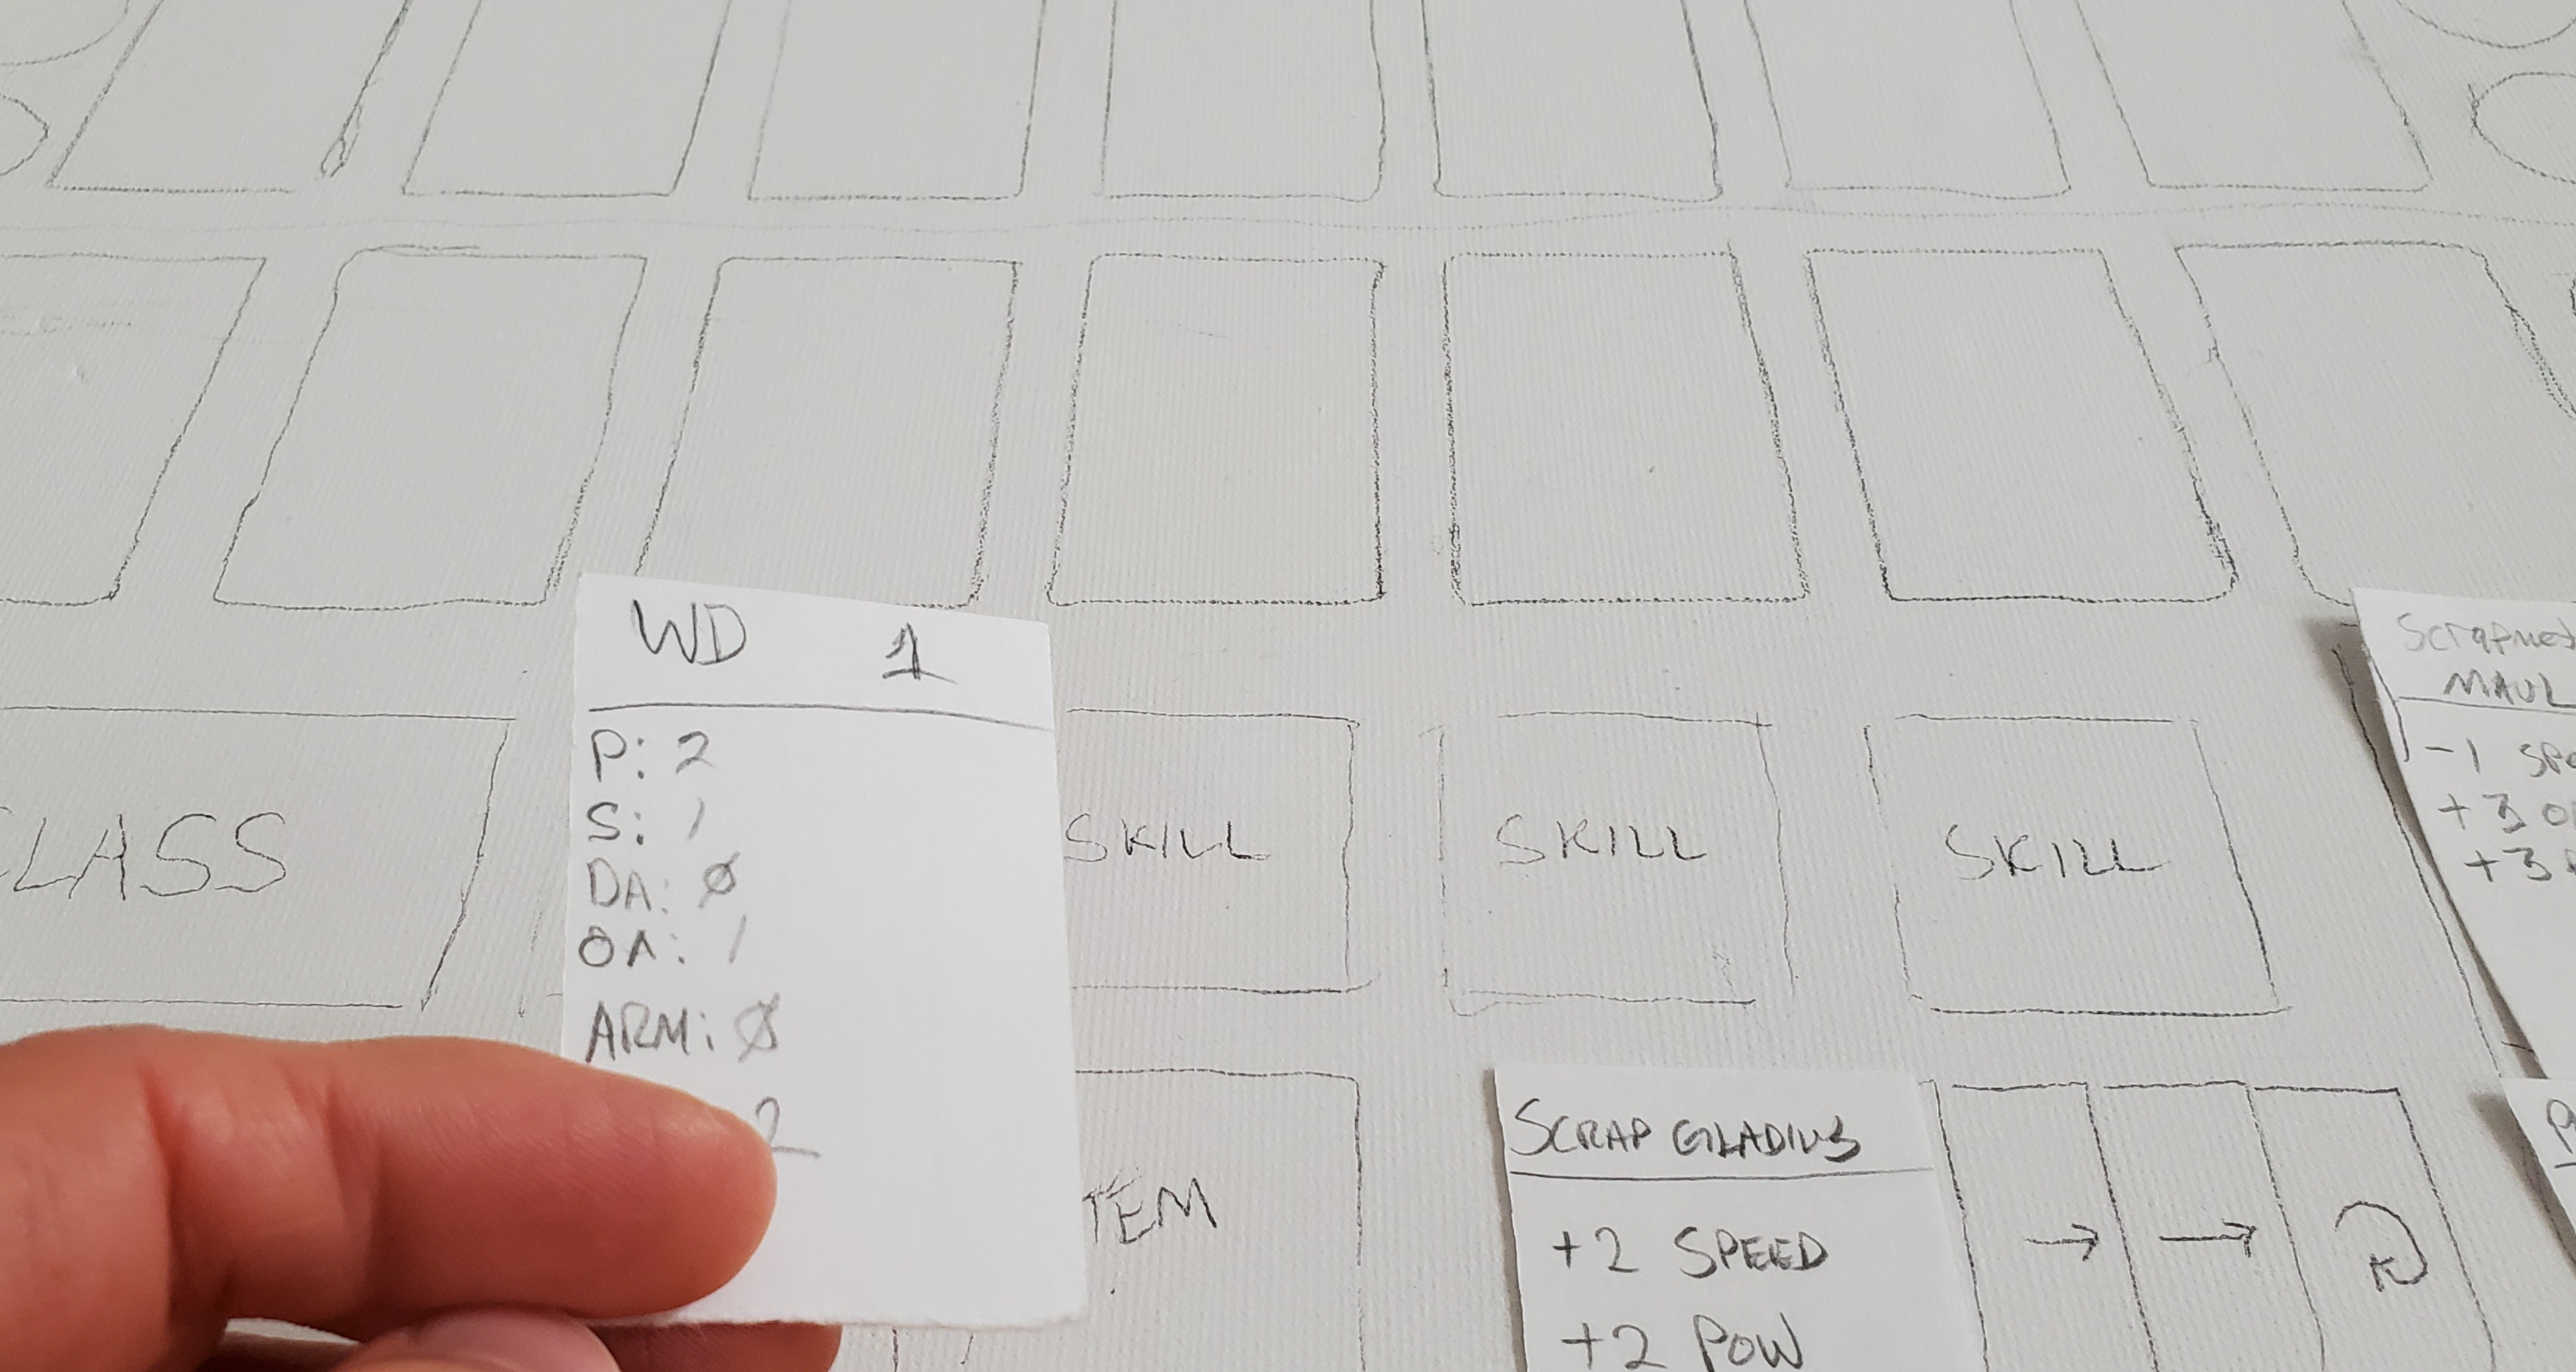
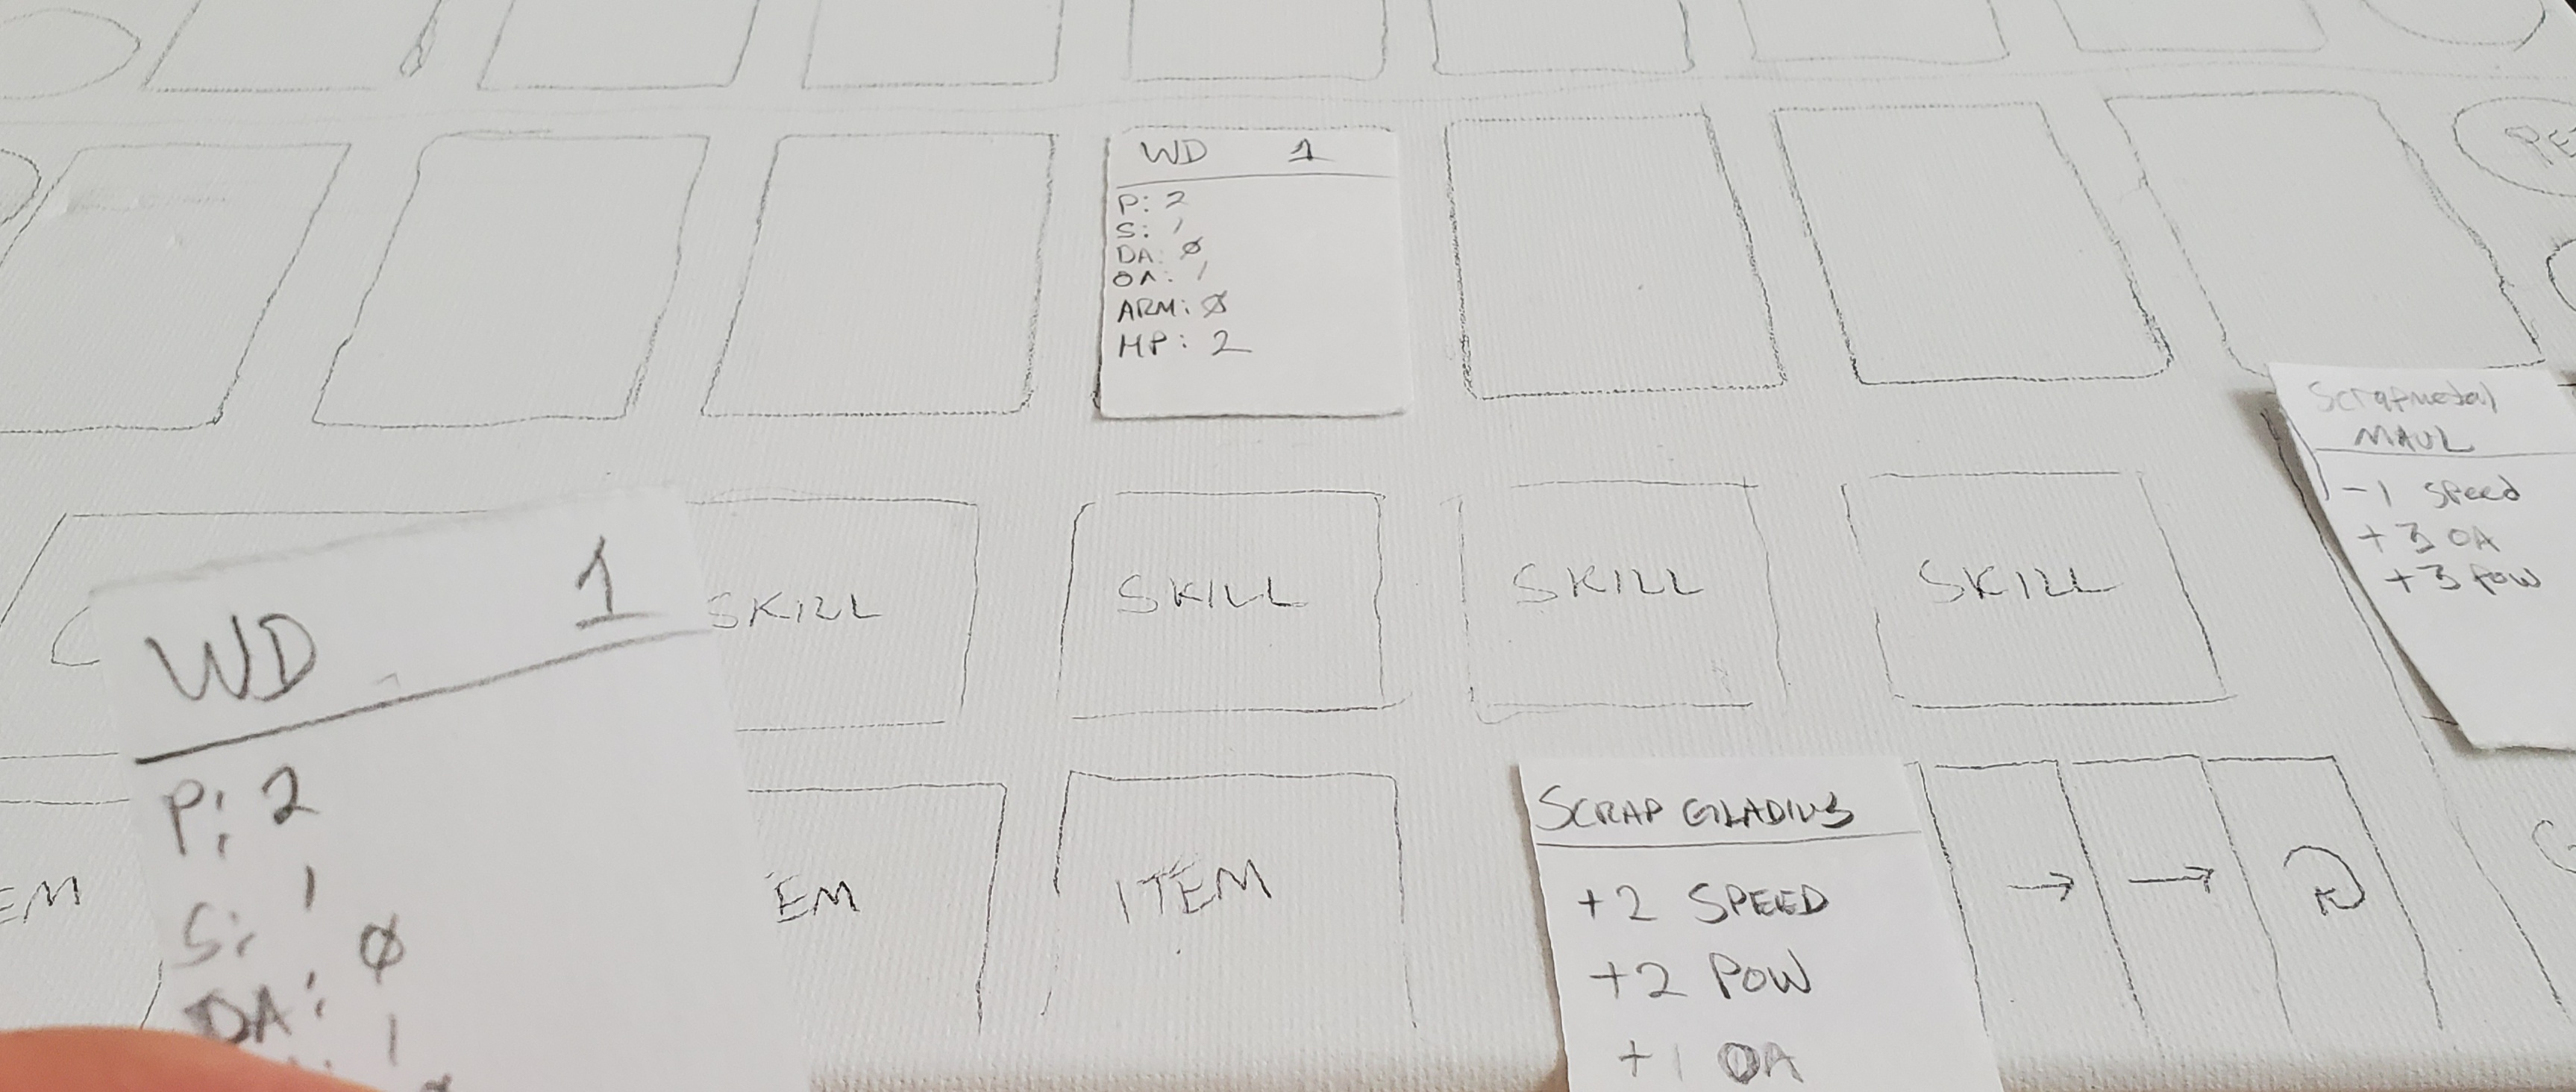
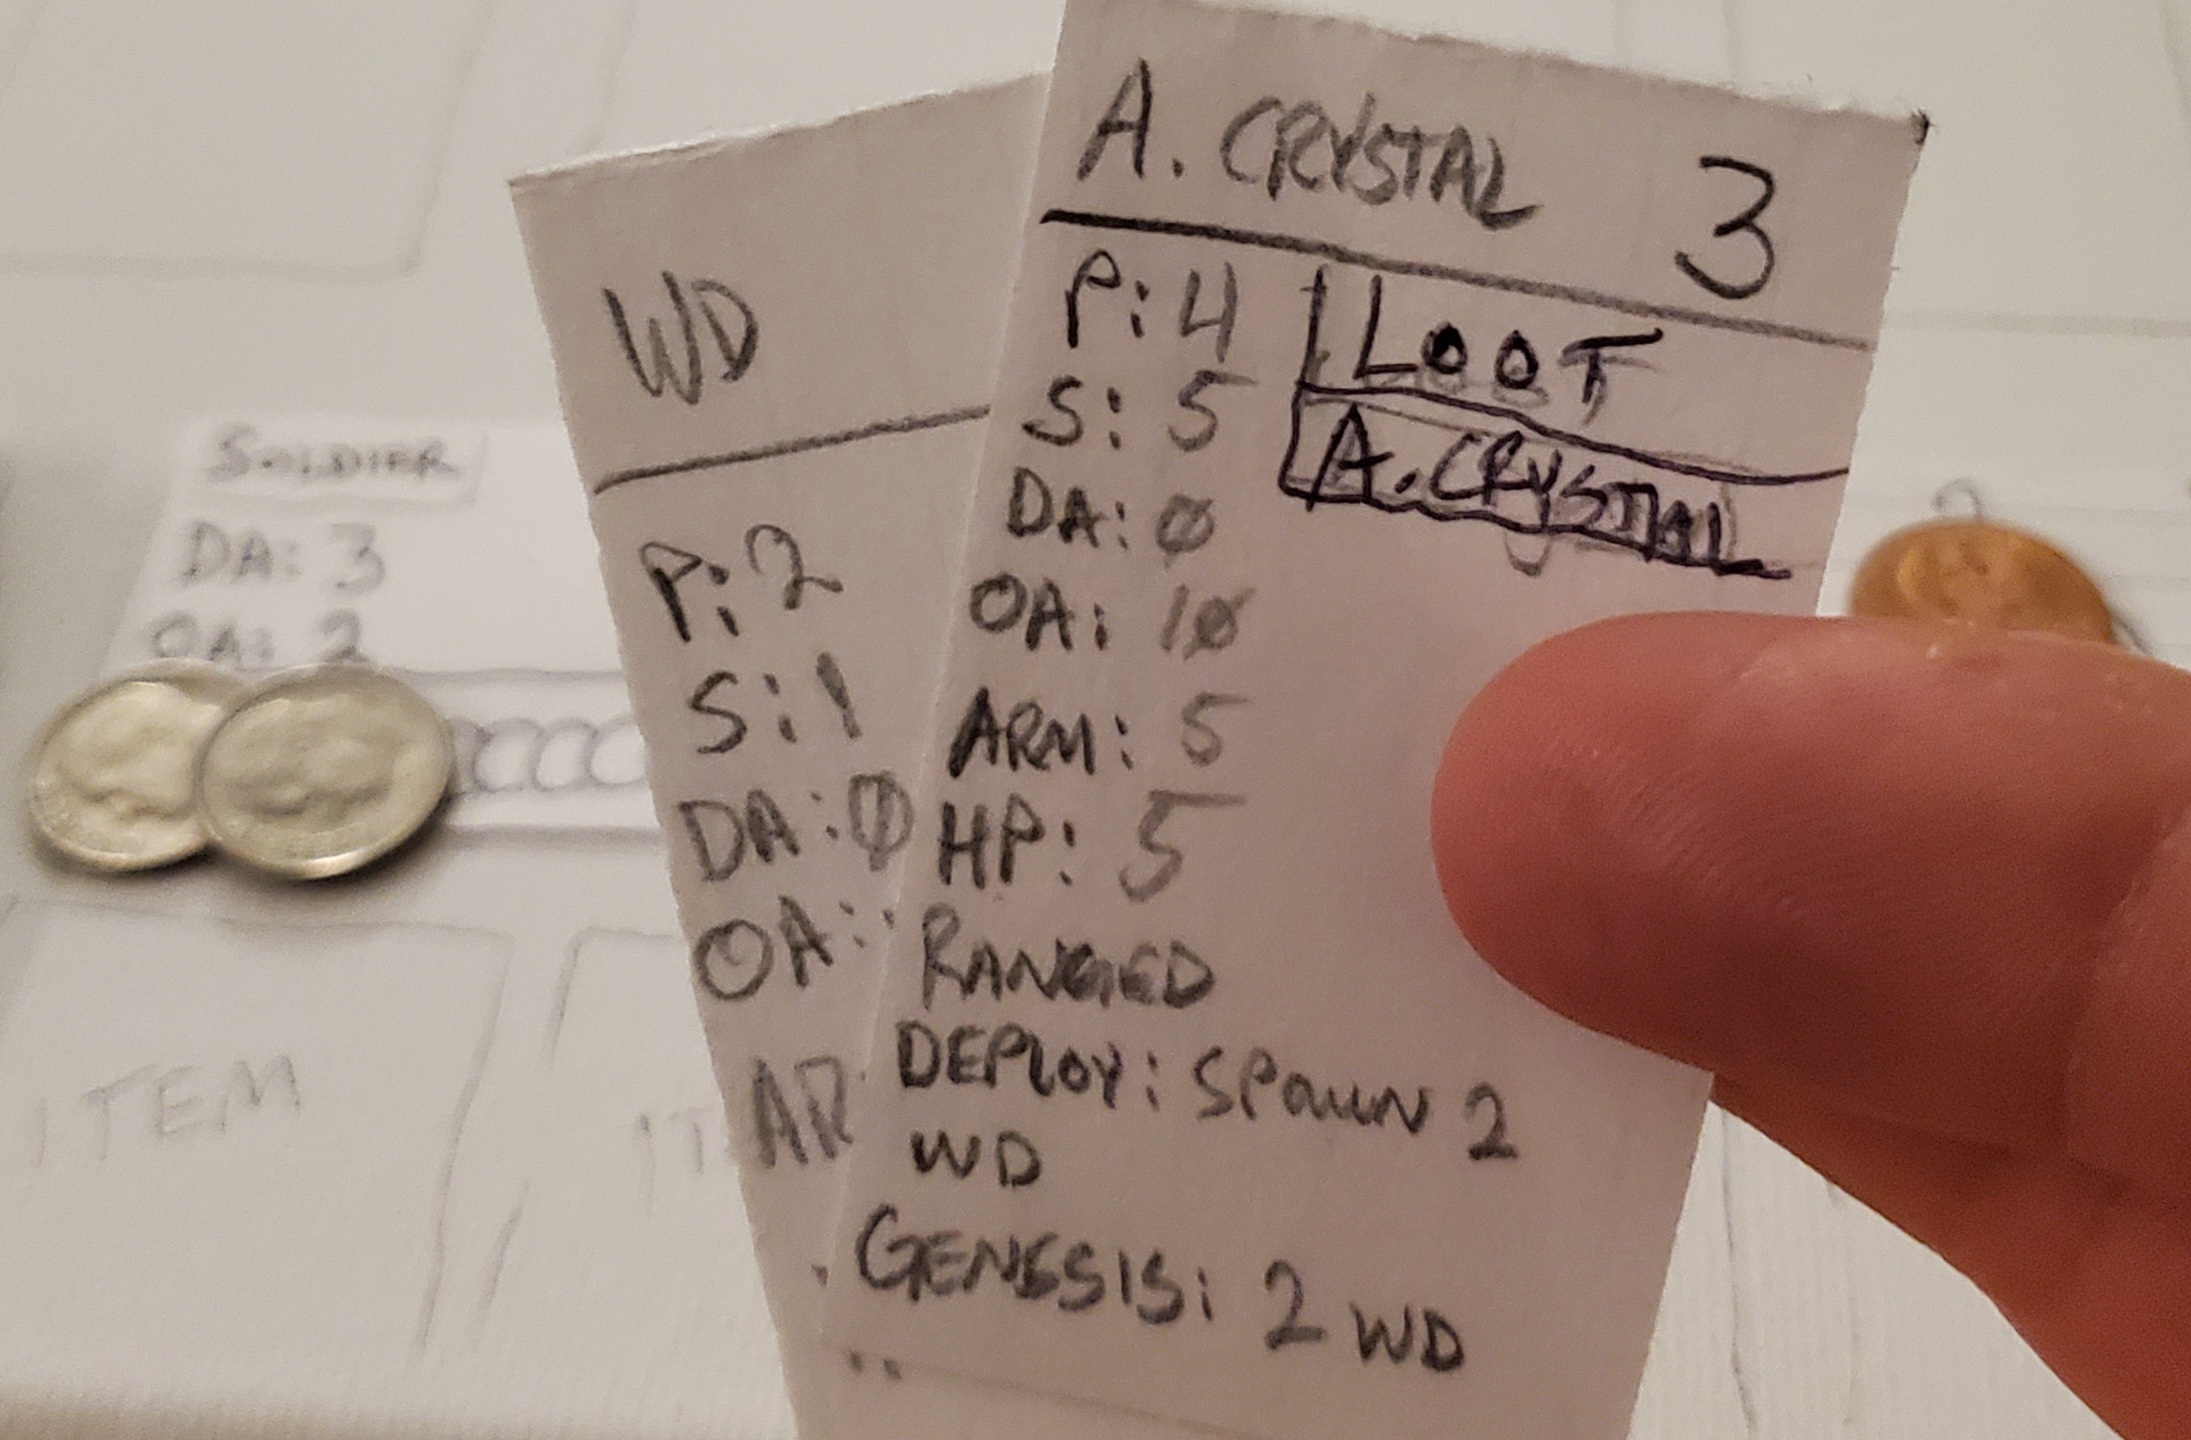
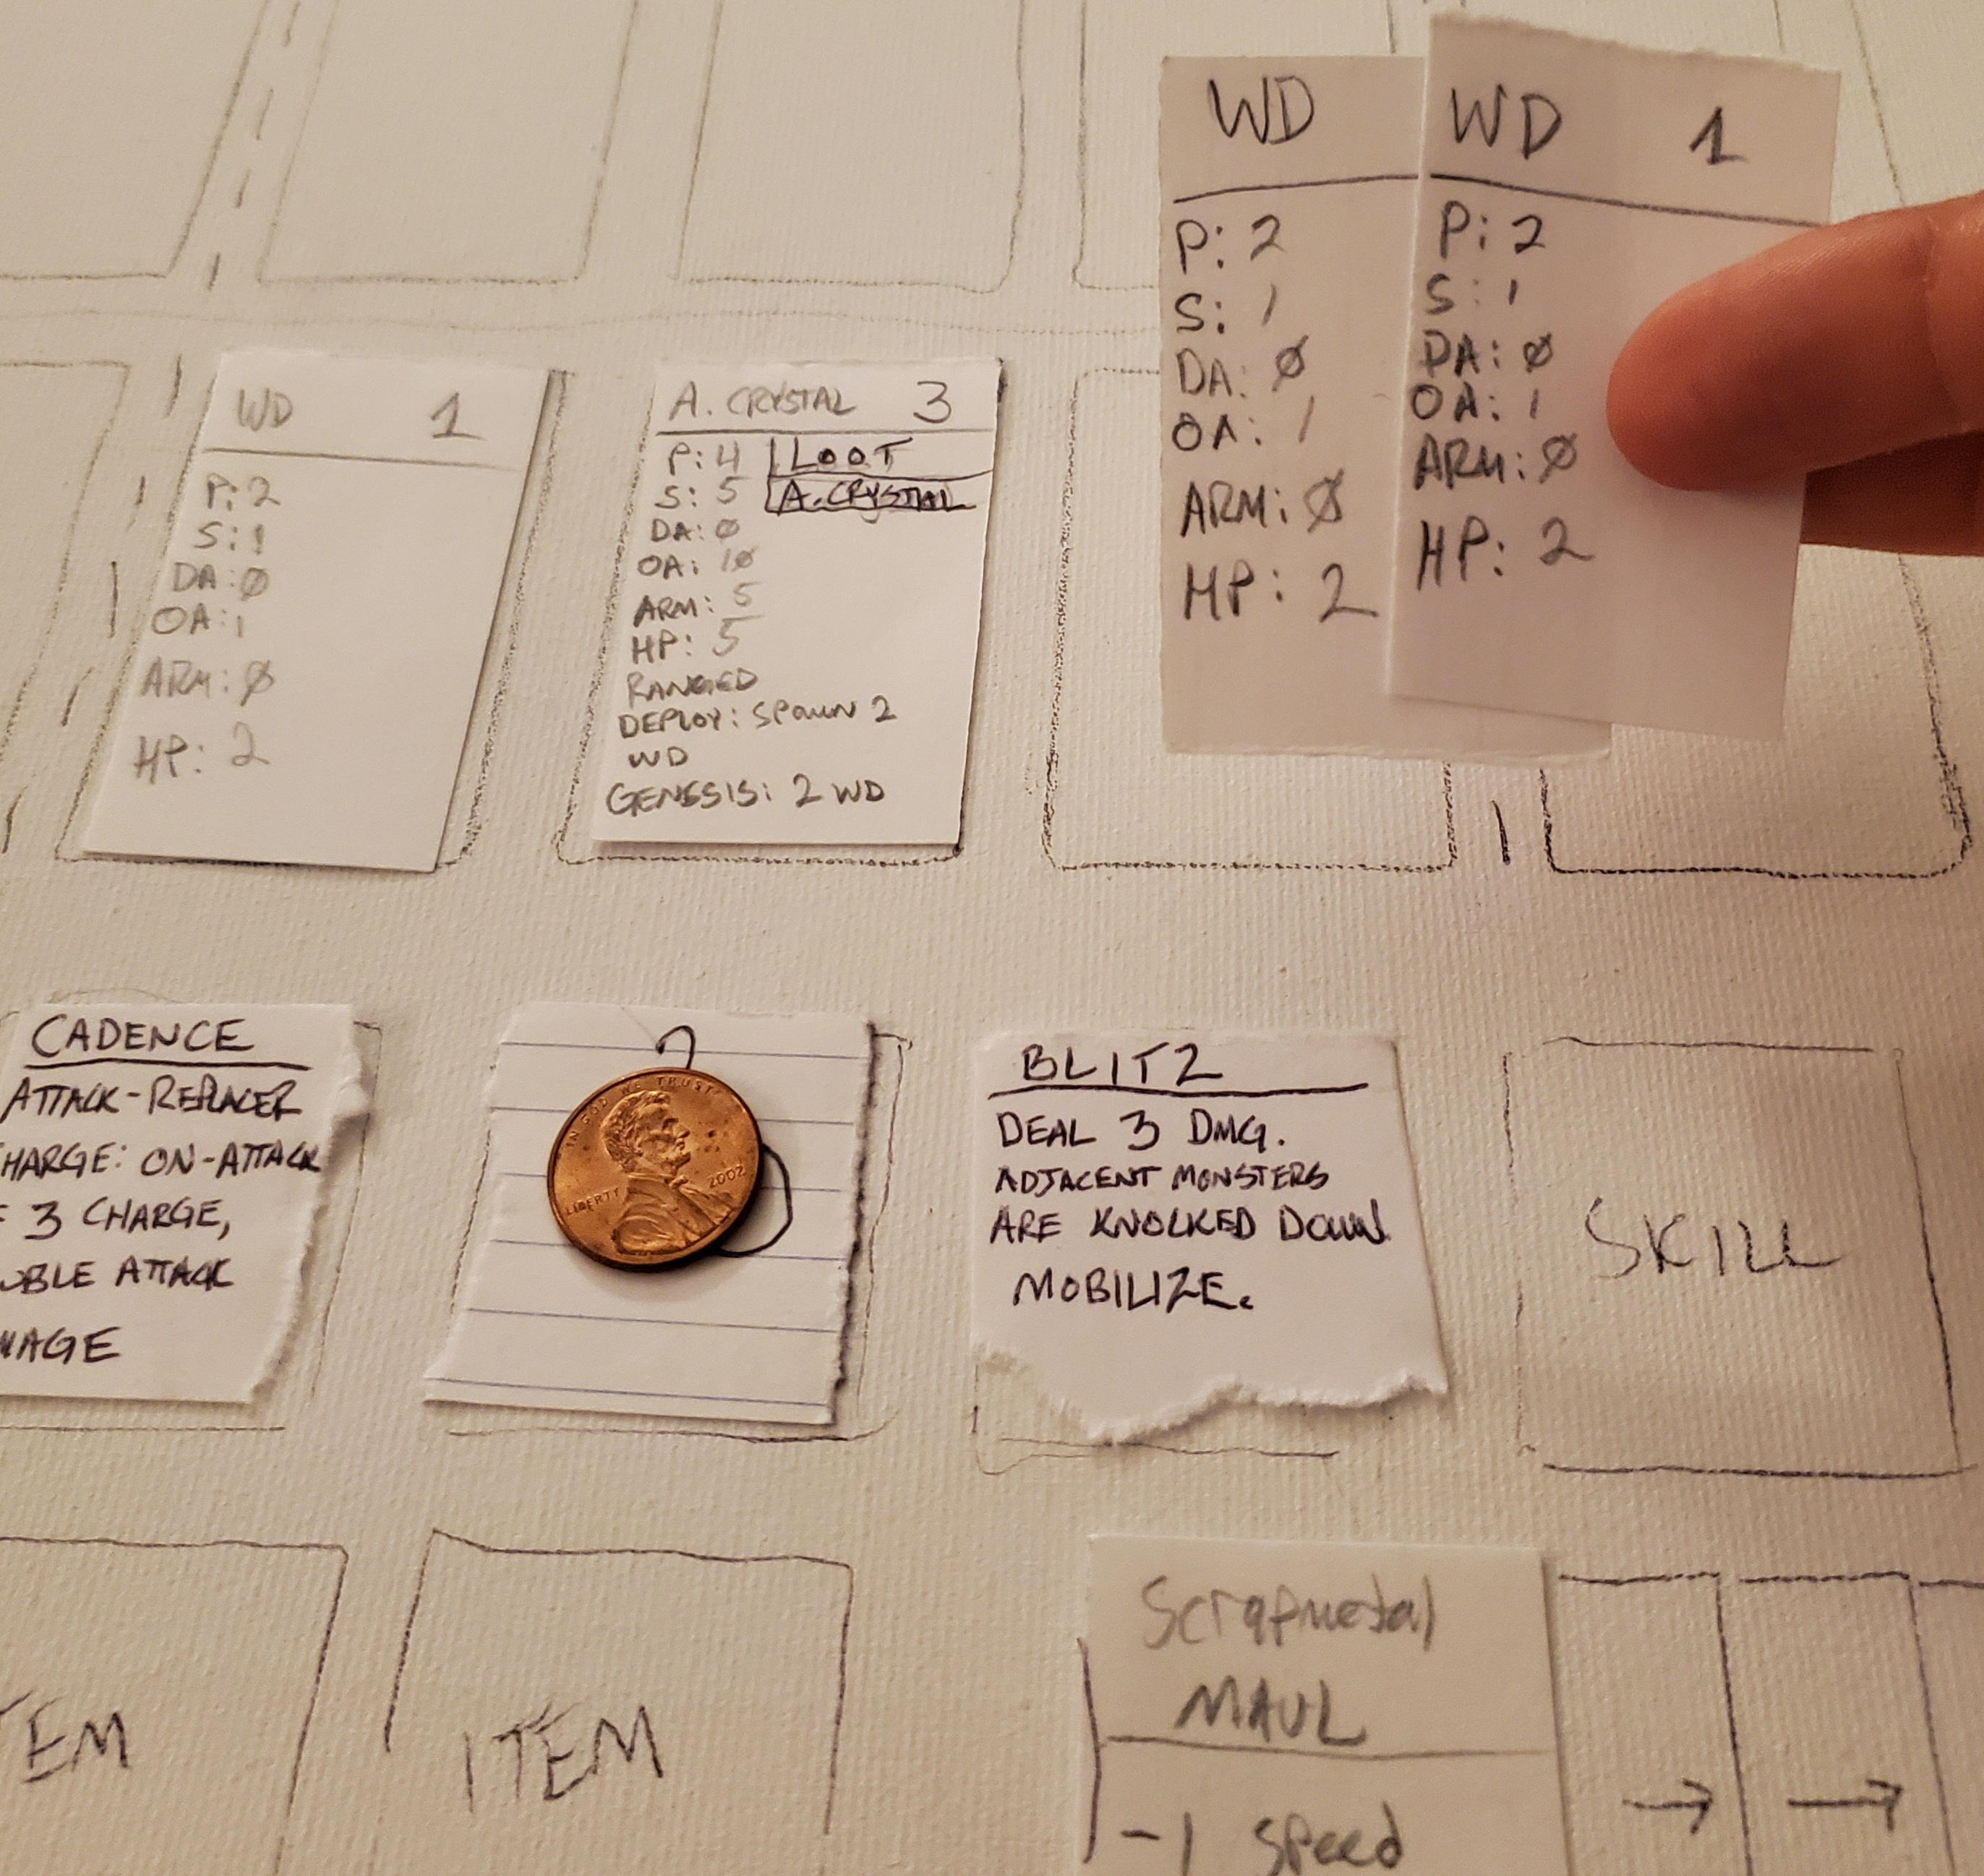
For this basic example, I chose 8 Walking Dead for Monster Cards, then the Scrapmetal Gladius and Plank Shield for my Common Items. As you can see, these are very basic cards but they do provide an essential stat boost- combined, they will give me a total of +2 Speed, +2 Power, +1 OA, +1 DA, and +1 Armor. Nothing to sneeze at in the early game.

STEP 2: SHUFFLE THOSE 10 CARDS TOGETHER AND PLACE THEM IN YOUR DECK SLOT

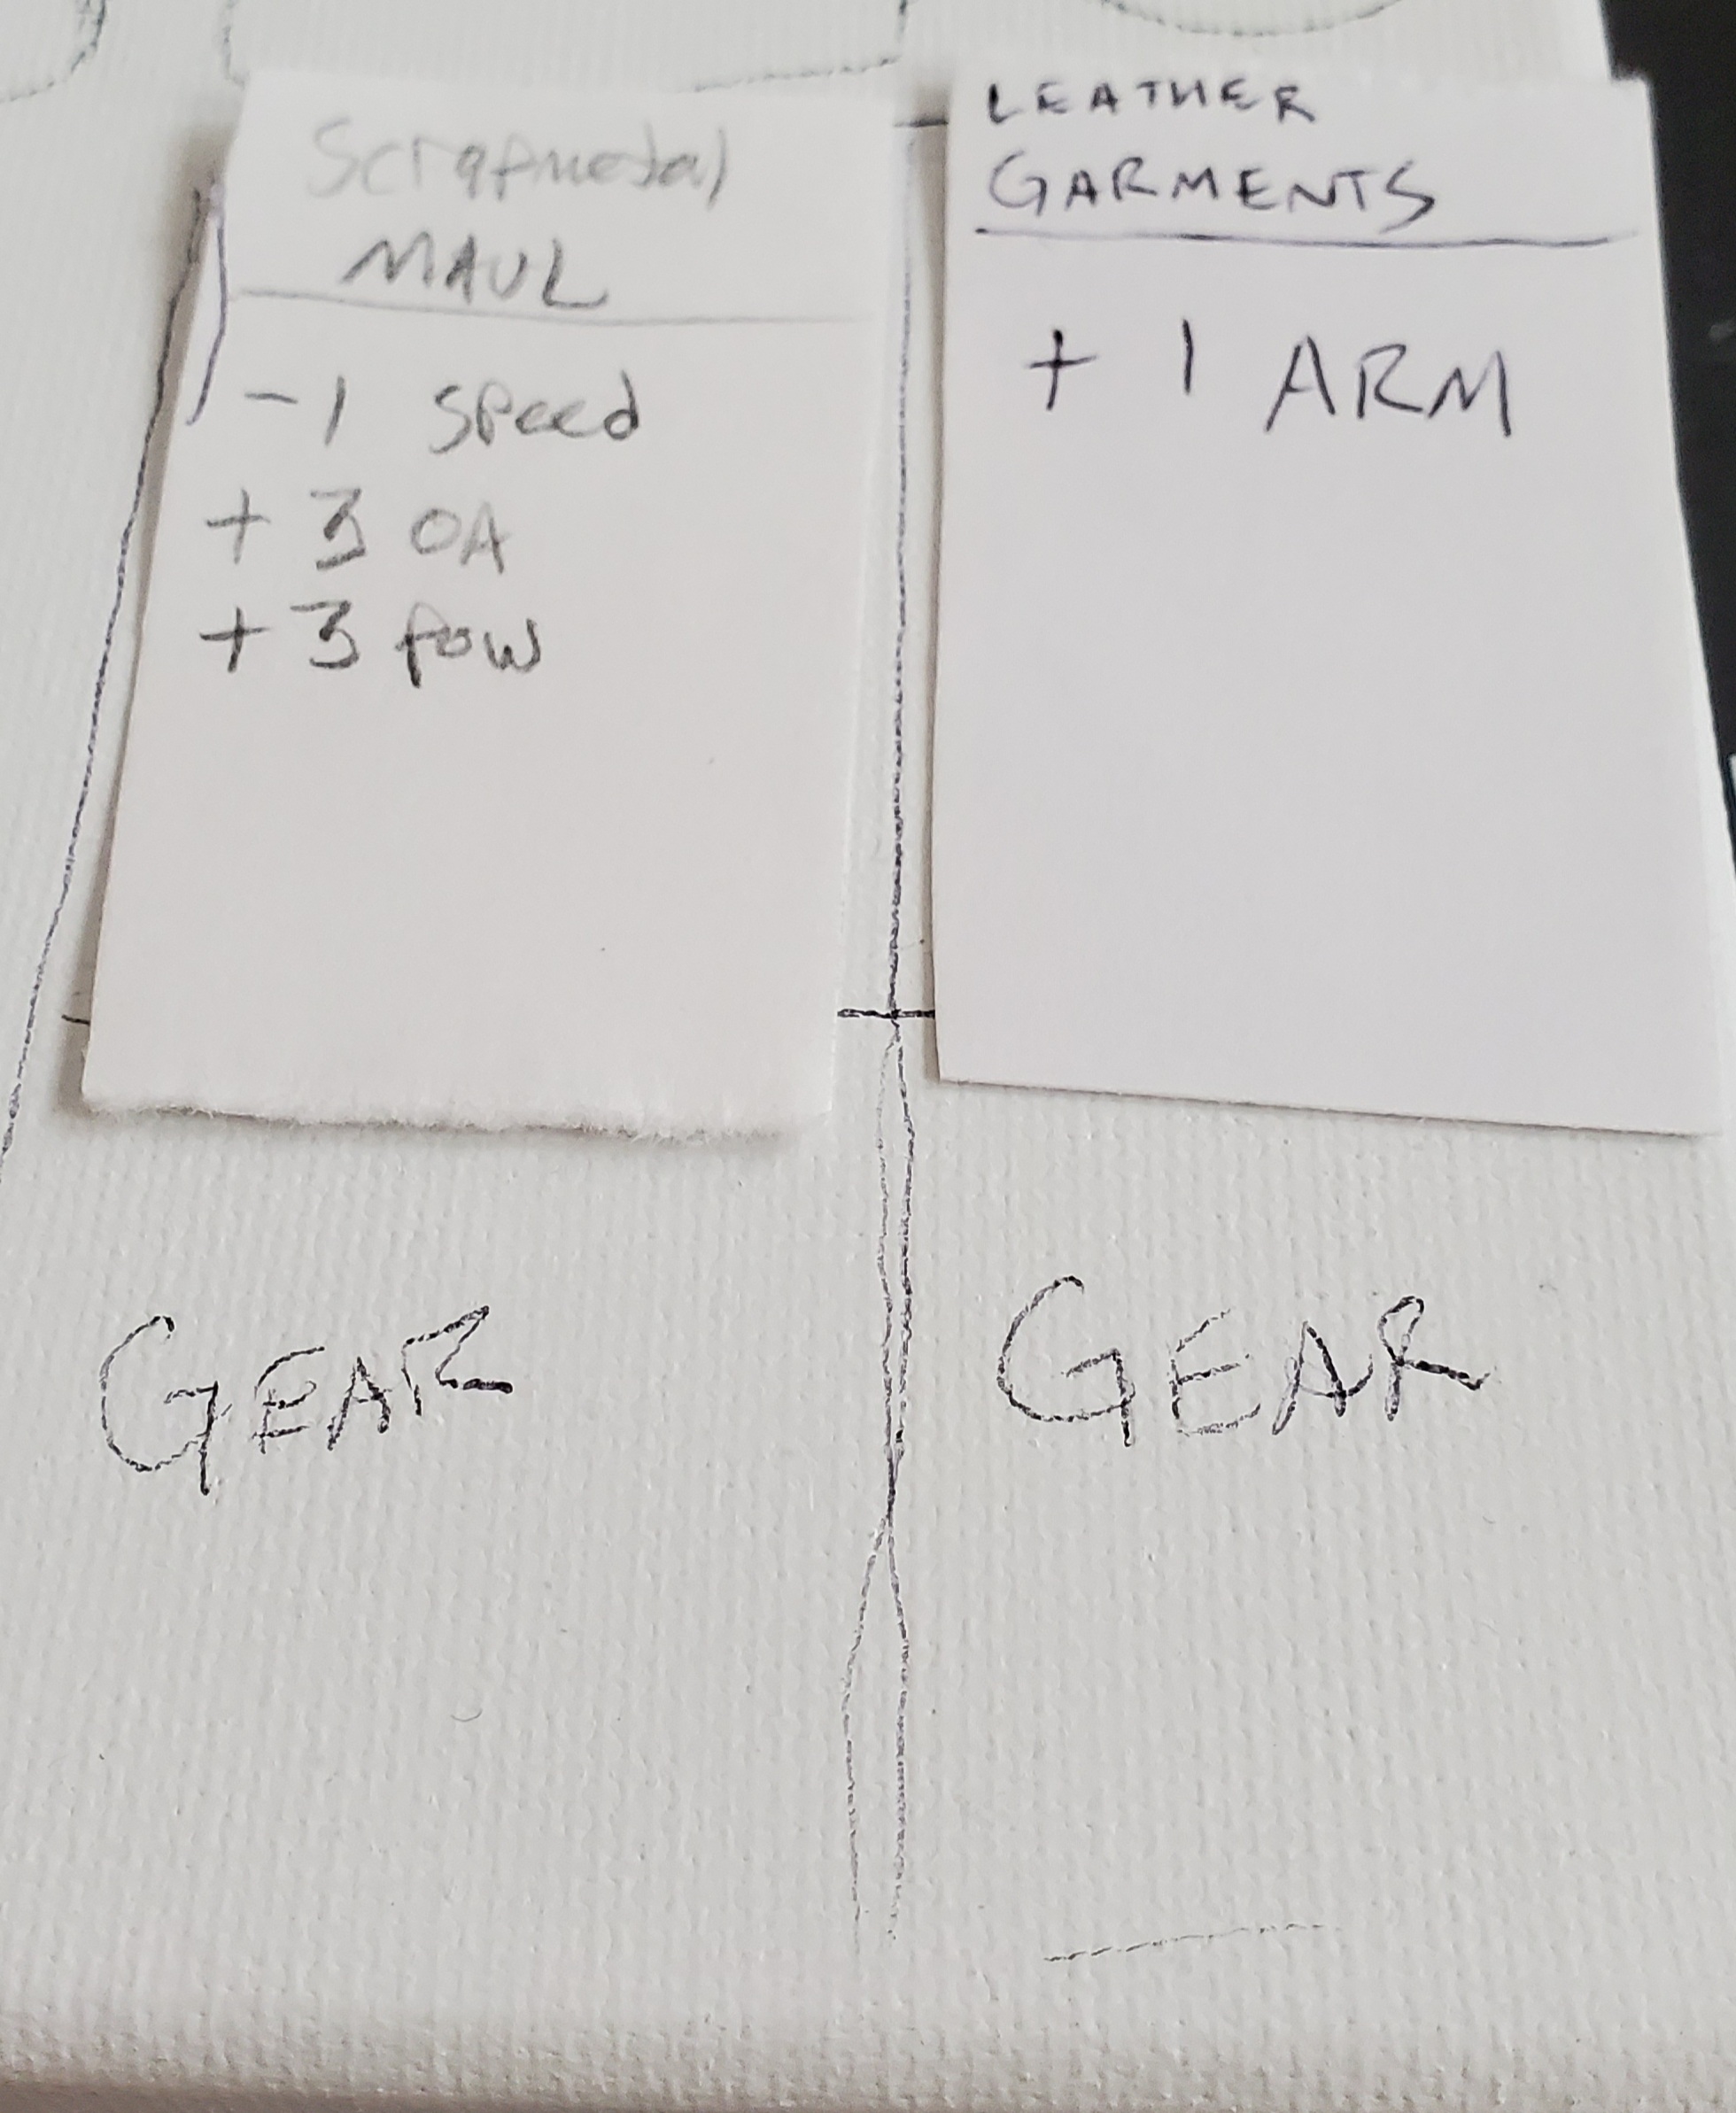
STEP 3: CHOOSE 1 COMMON GEARSET (ARMOR), AND 1 COMMON WEAPON FROM YOUR STASH AND EQUIP THEM.

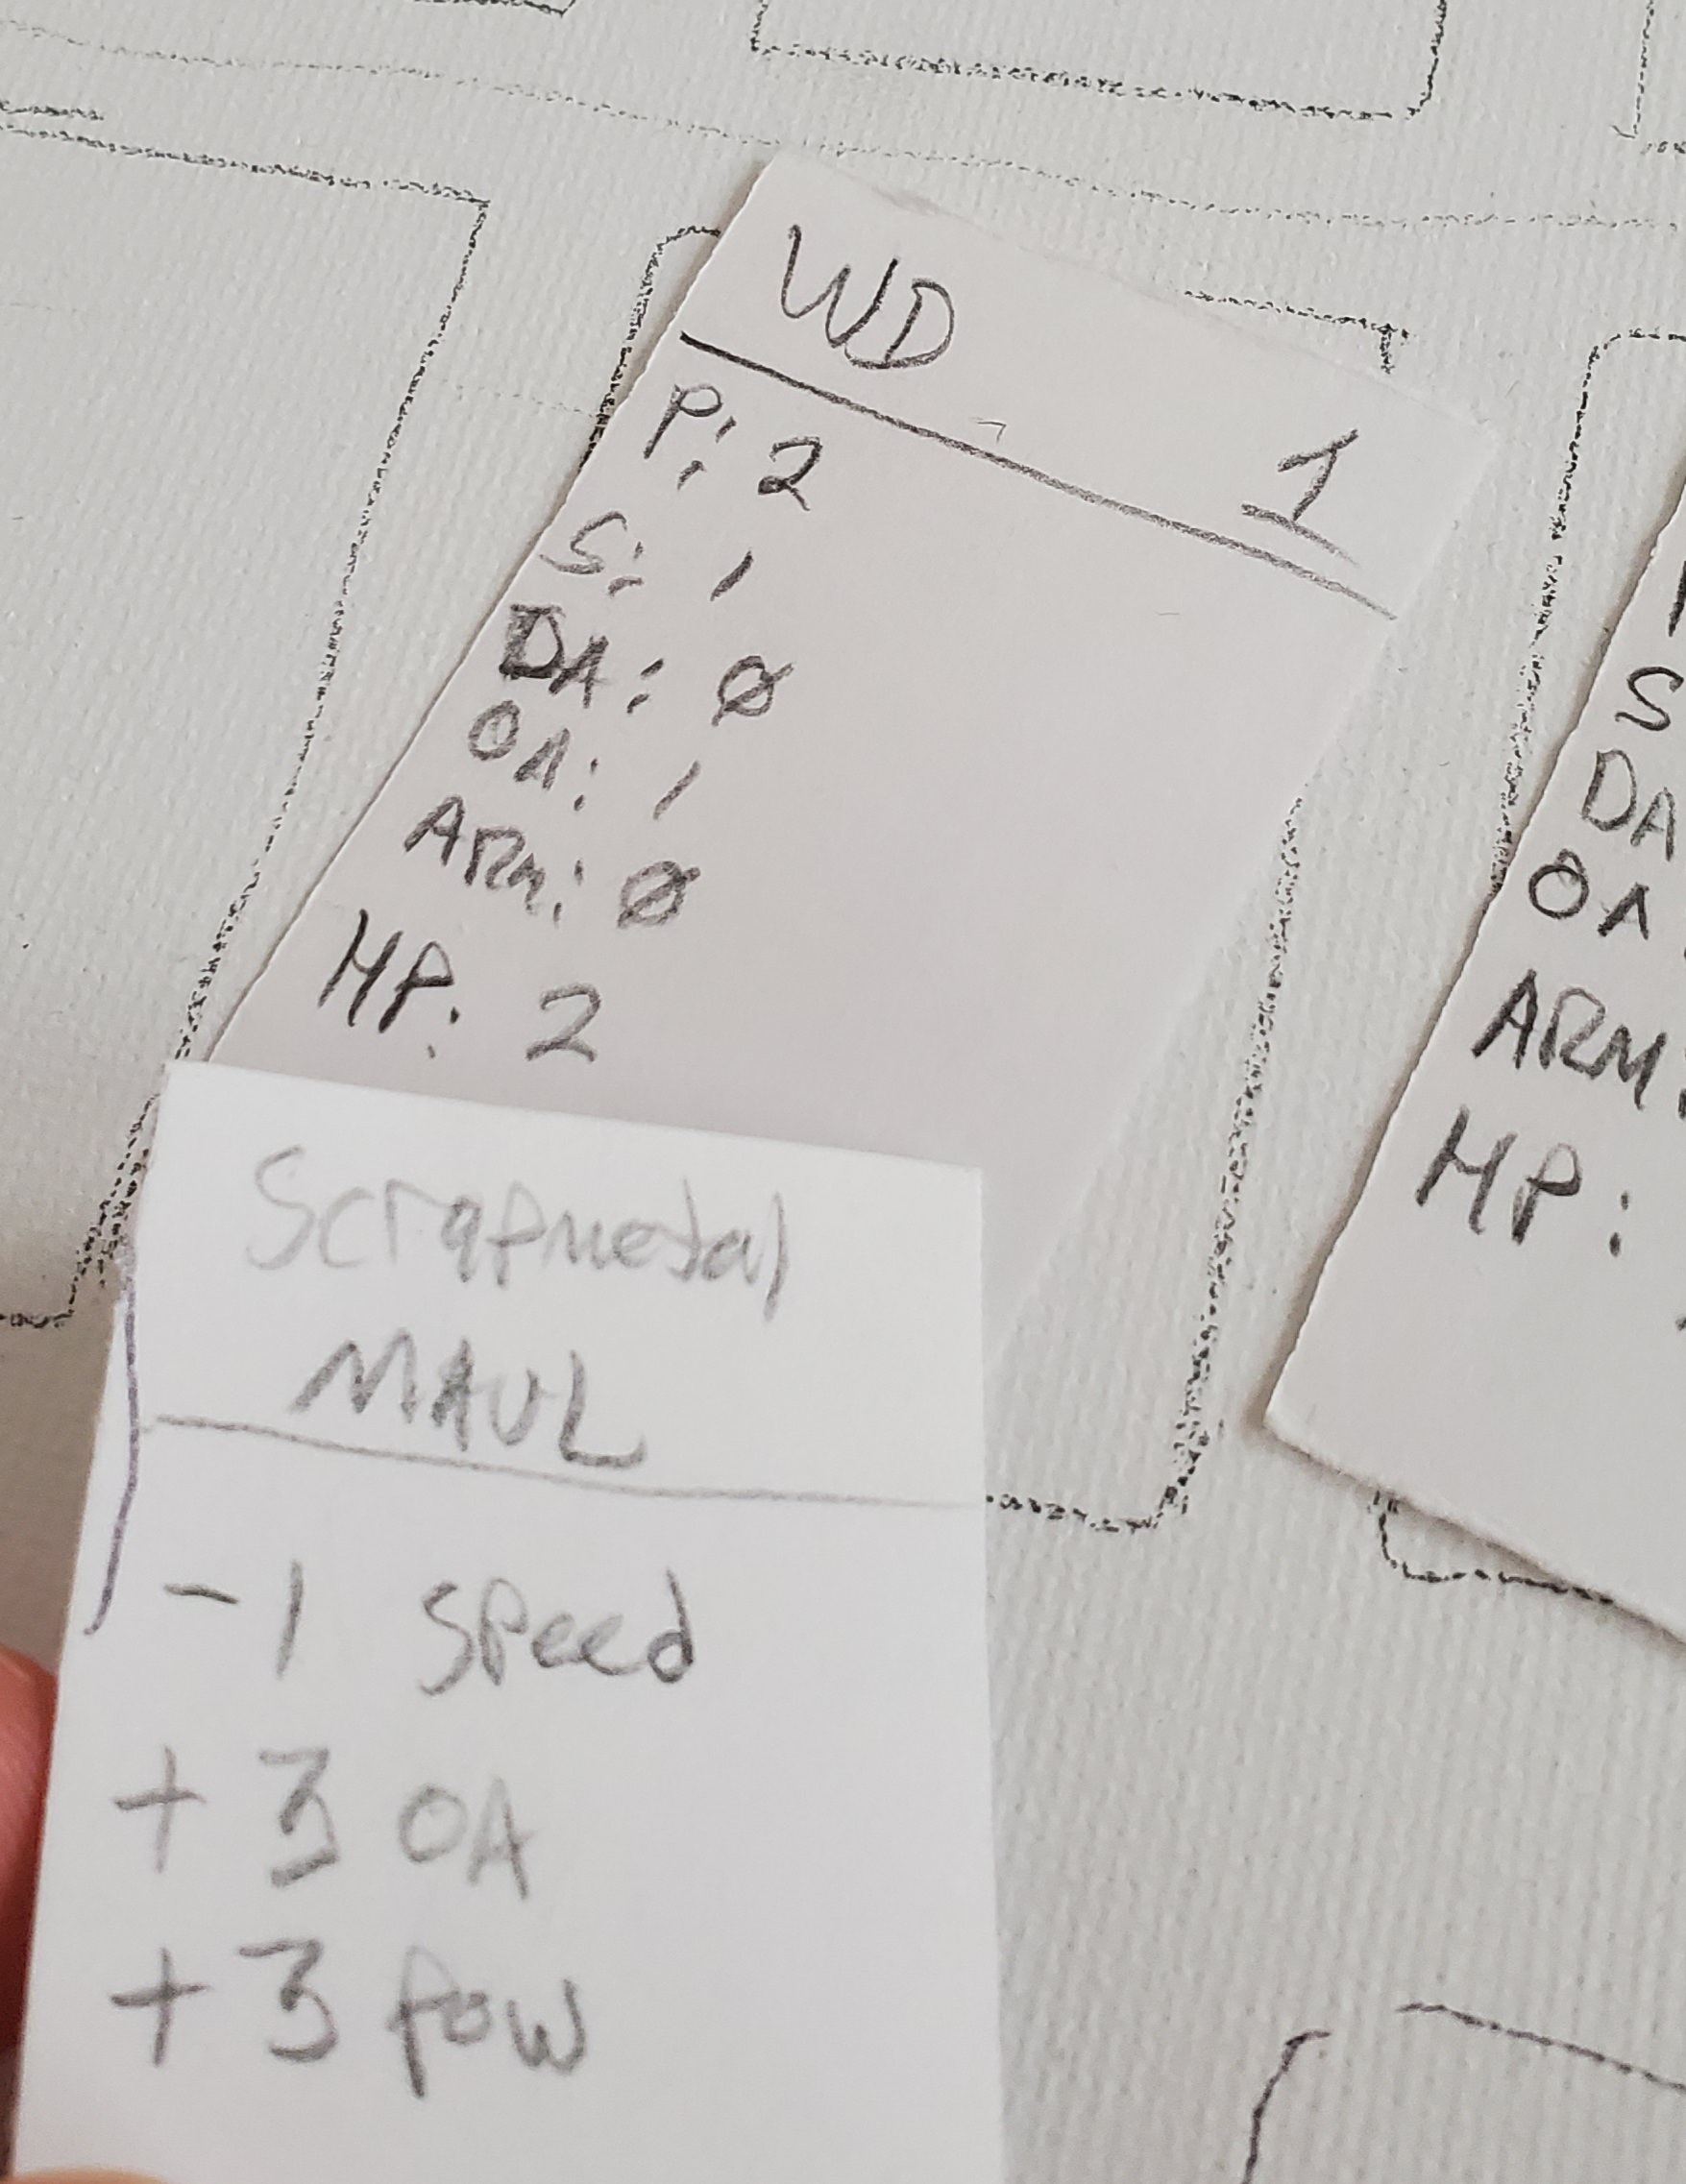
Here I chose a couple basic items, I opted for a little more Power out the gate and so I picked the Scrapmetal Maul which provides a hefty +3 to OA and Power, but comes with a pretty steep tax of -1 Speed, which is fairly crippling in the early game. Players combat stats always begin at 0, and can only be increased by leveling up, and with items and skills. As it is impossible to have a Speed less than 0, however, the Speed debuff on Scrapmetal Maul essentially wont really effect anything, so it makes a nice choice at the start of the match as opposed to later.

STEP 4: BEGIN YOUR FIRST TURN, DRAWING 3 CARDS

The first card I draw is the Scrapmetal Gladius, ironically! Since I already have a weapon equipped I need to put it in my Inventory until I can equip it during the Gear Phase.

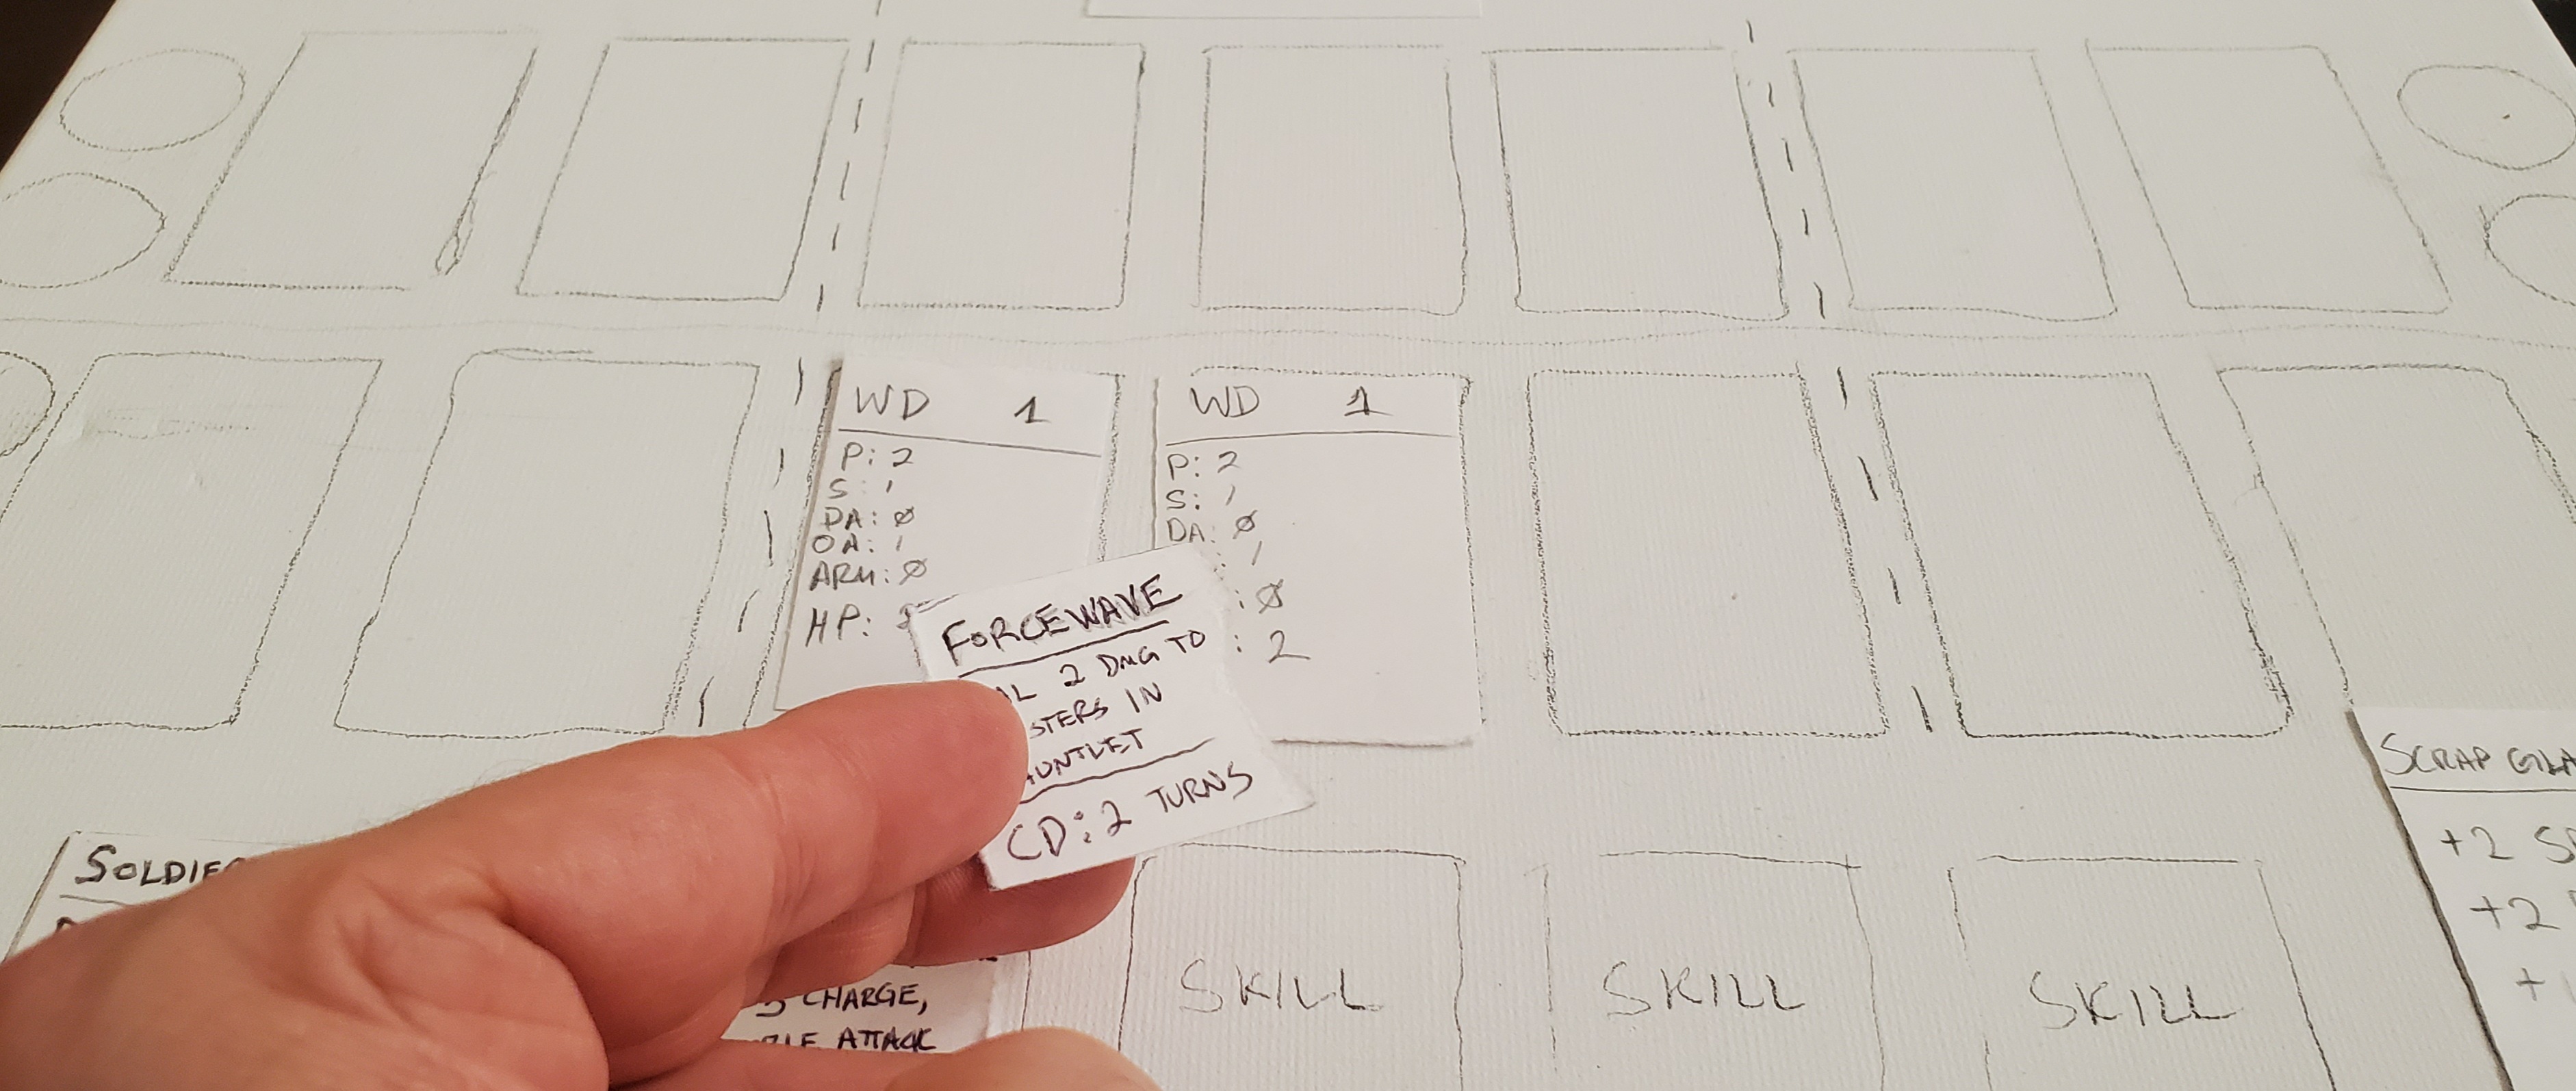
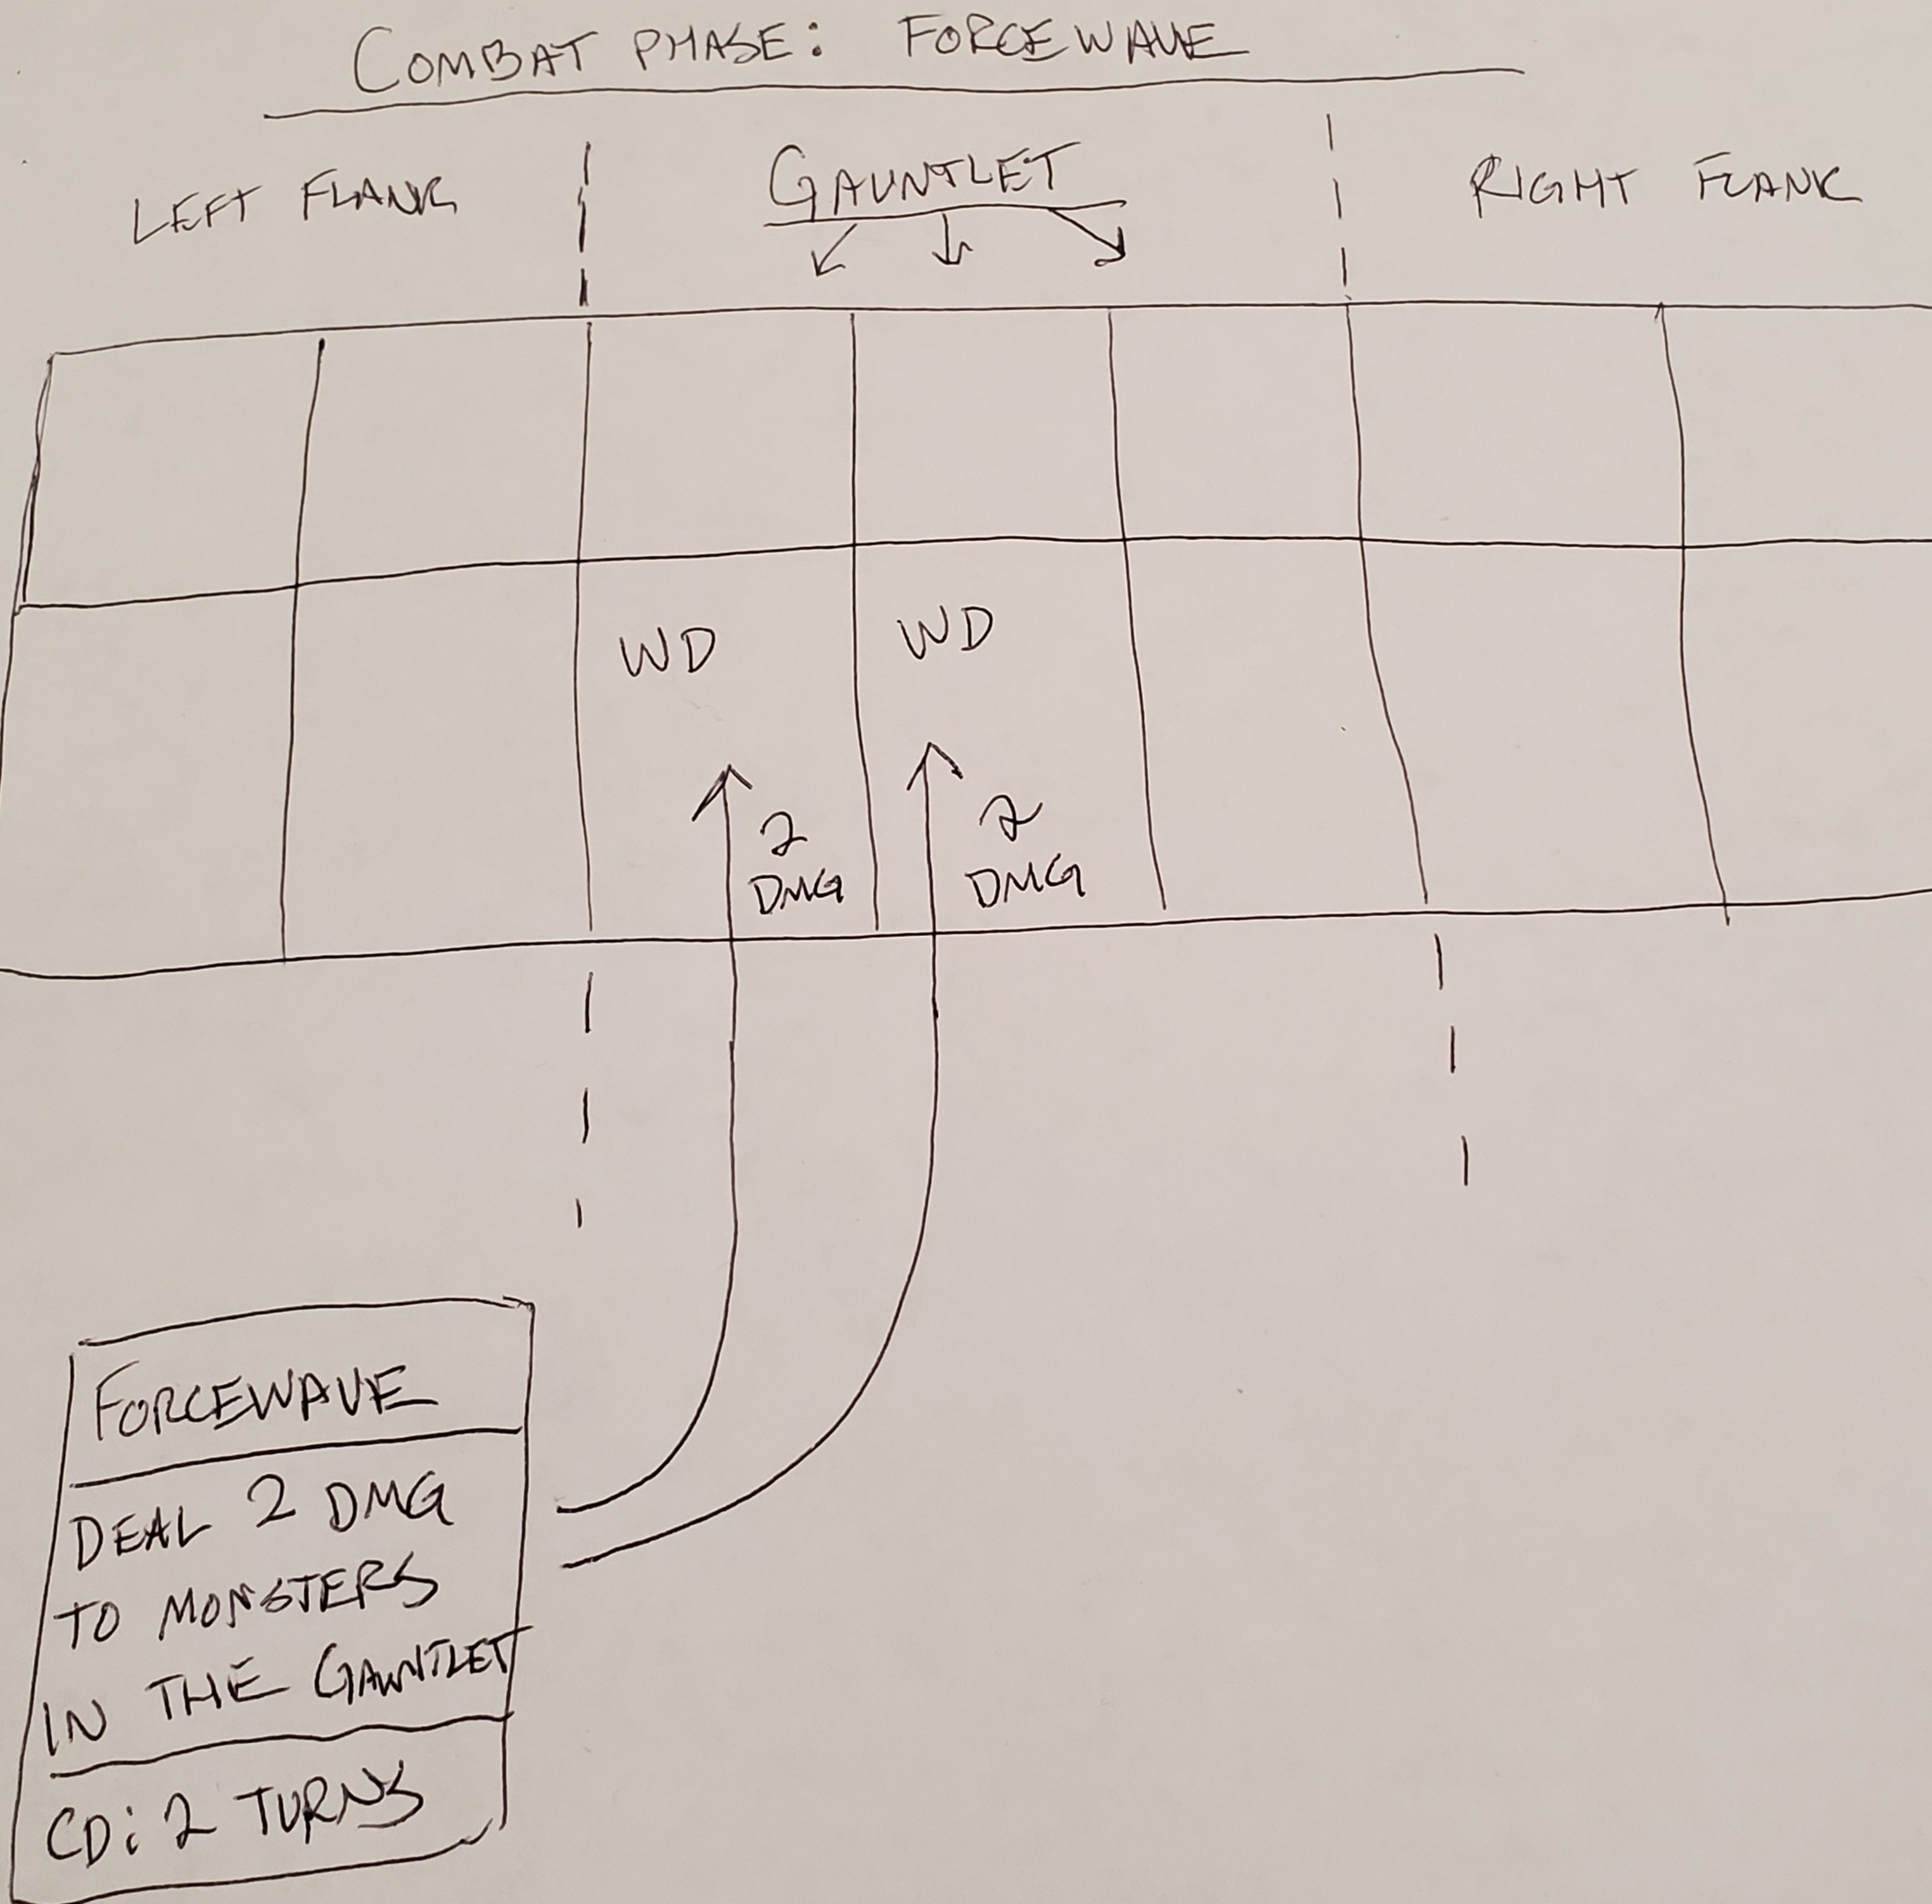
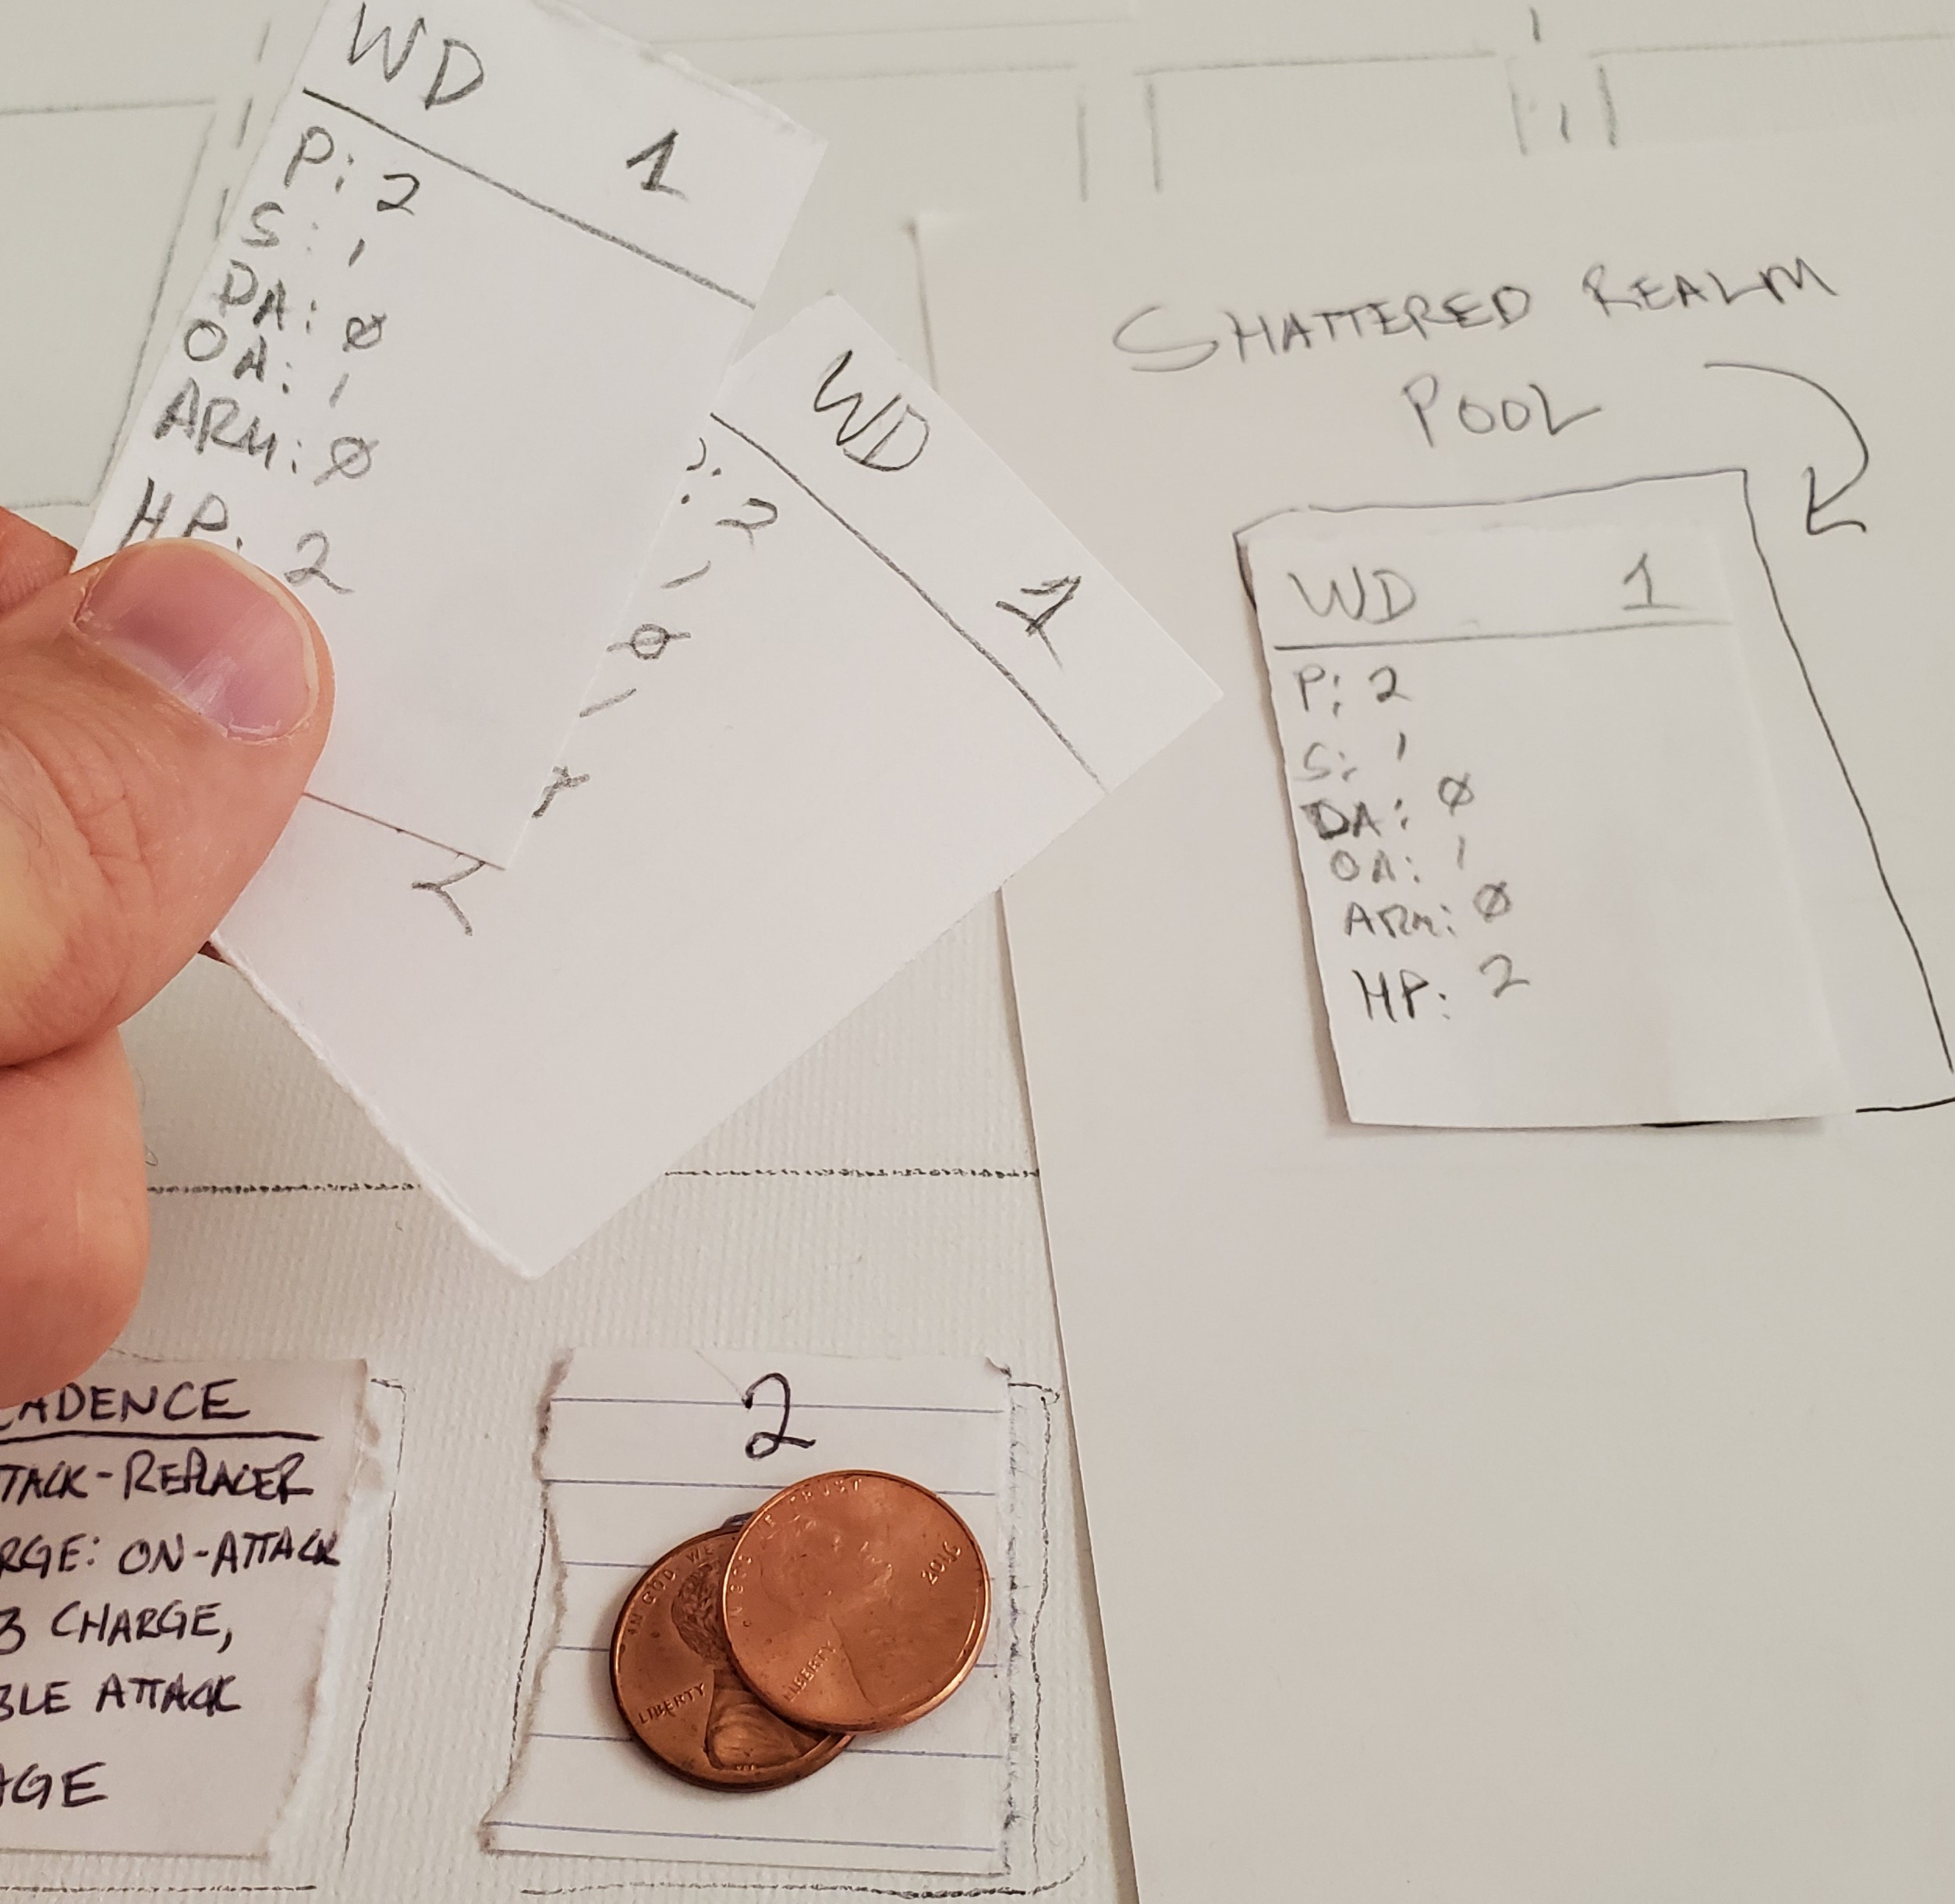
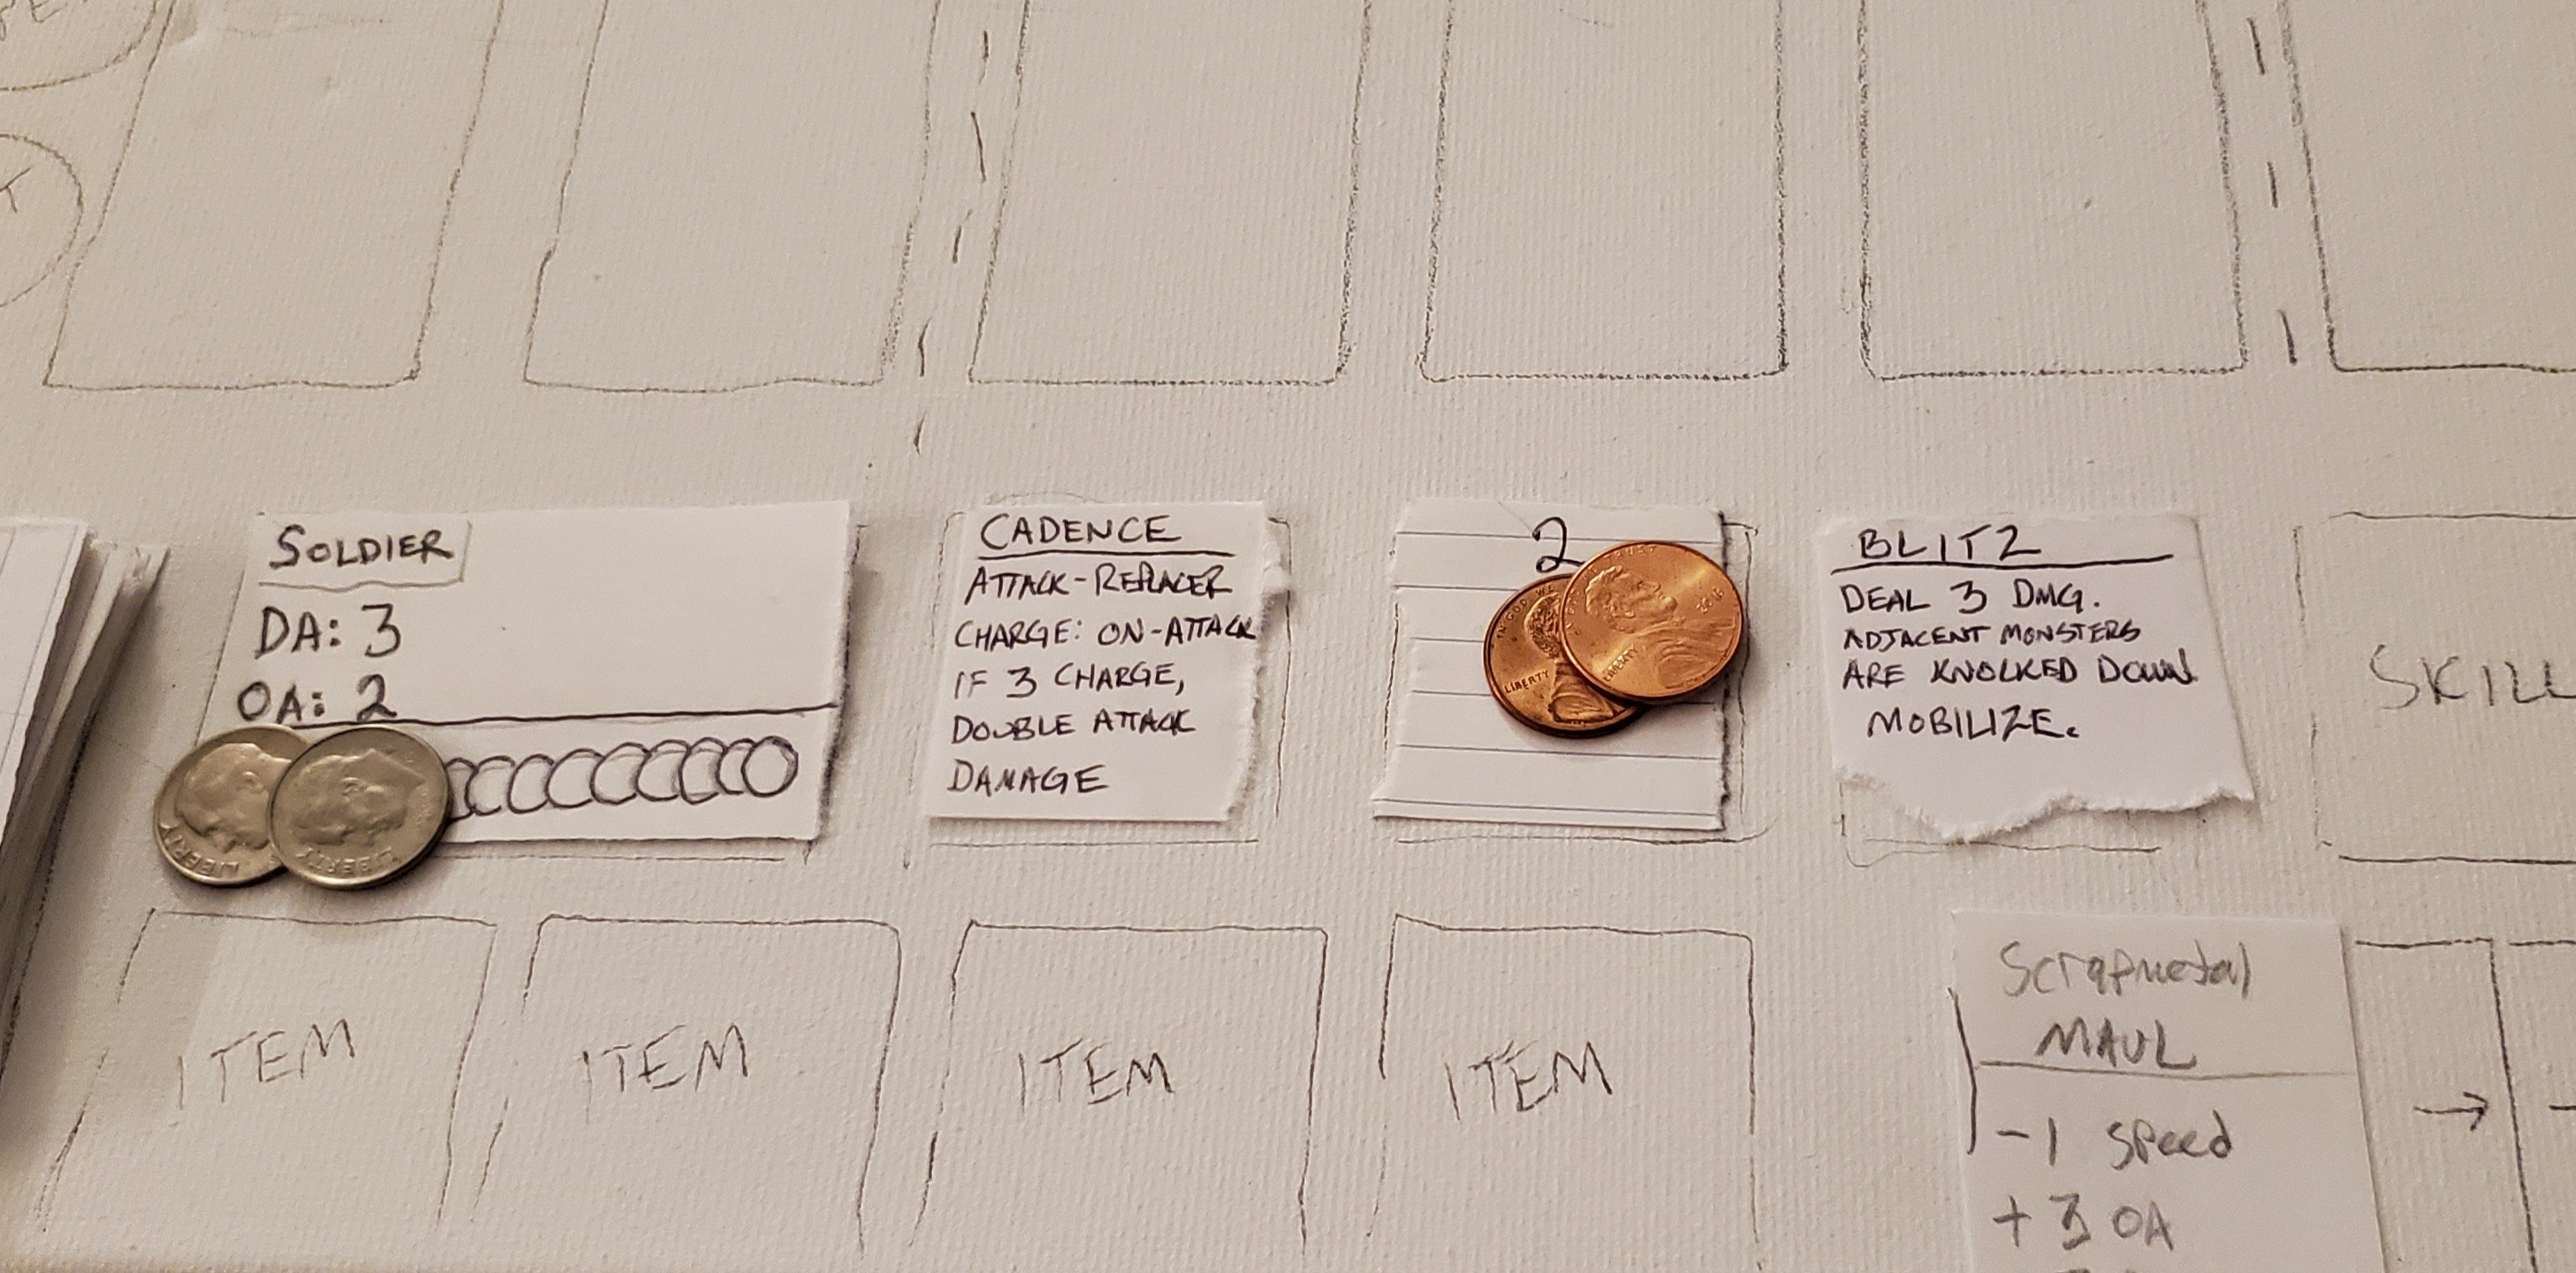
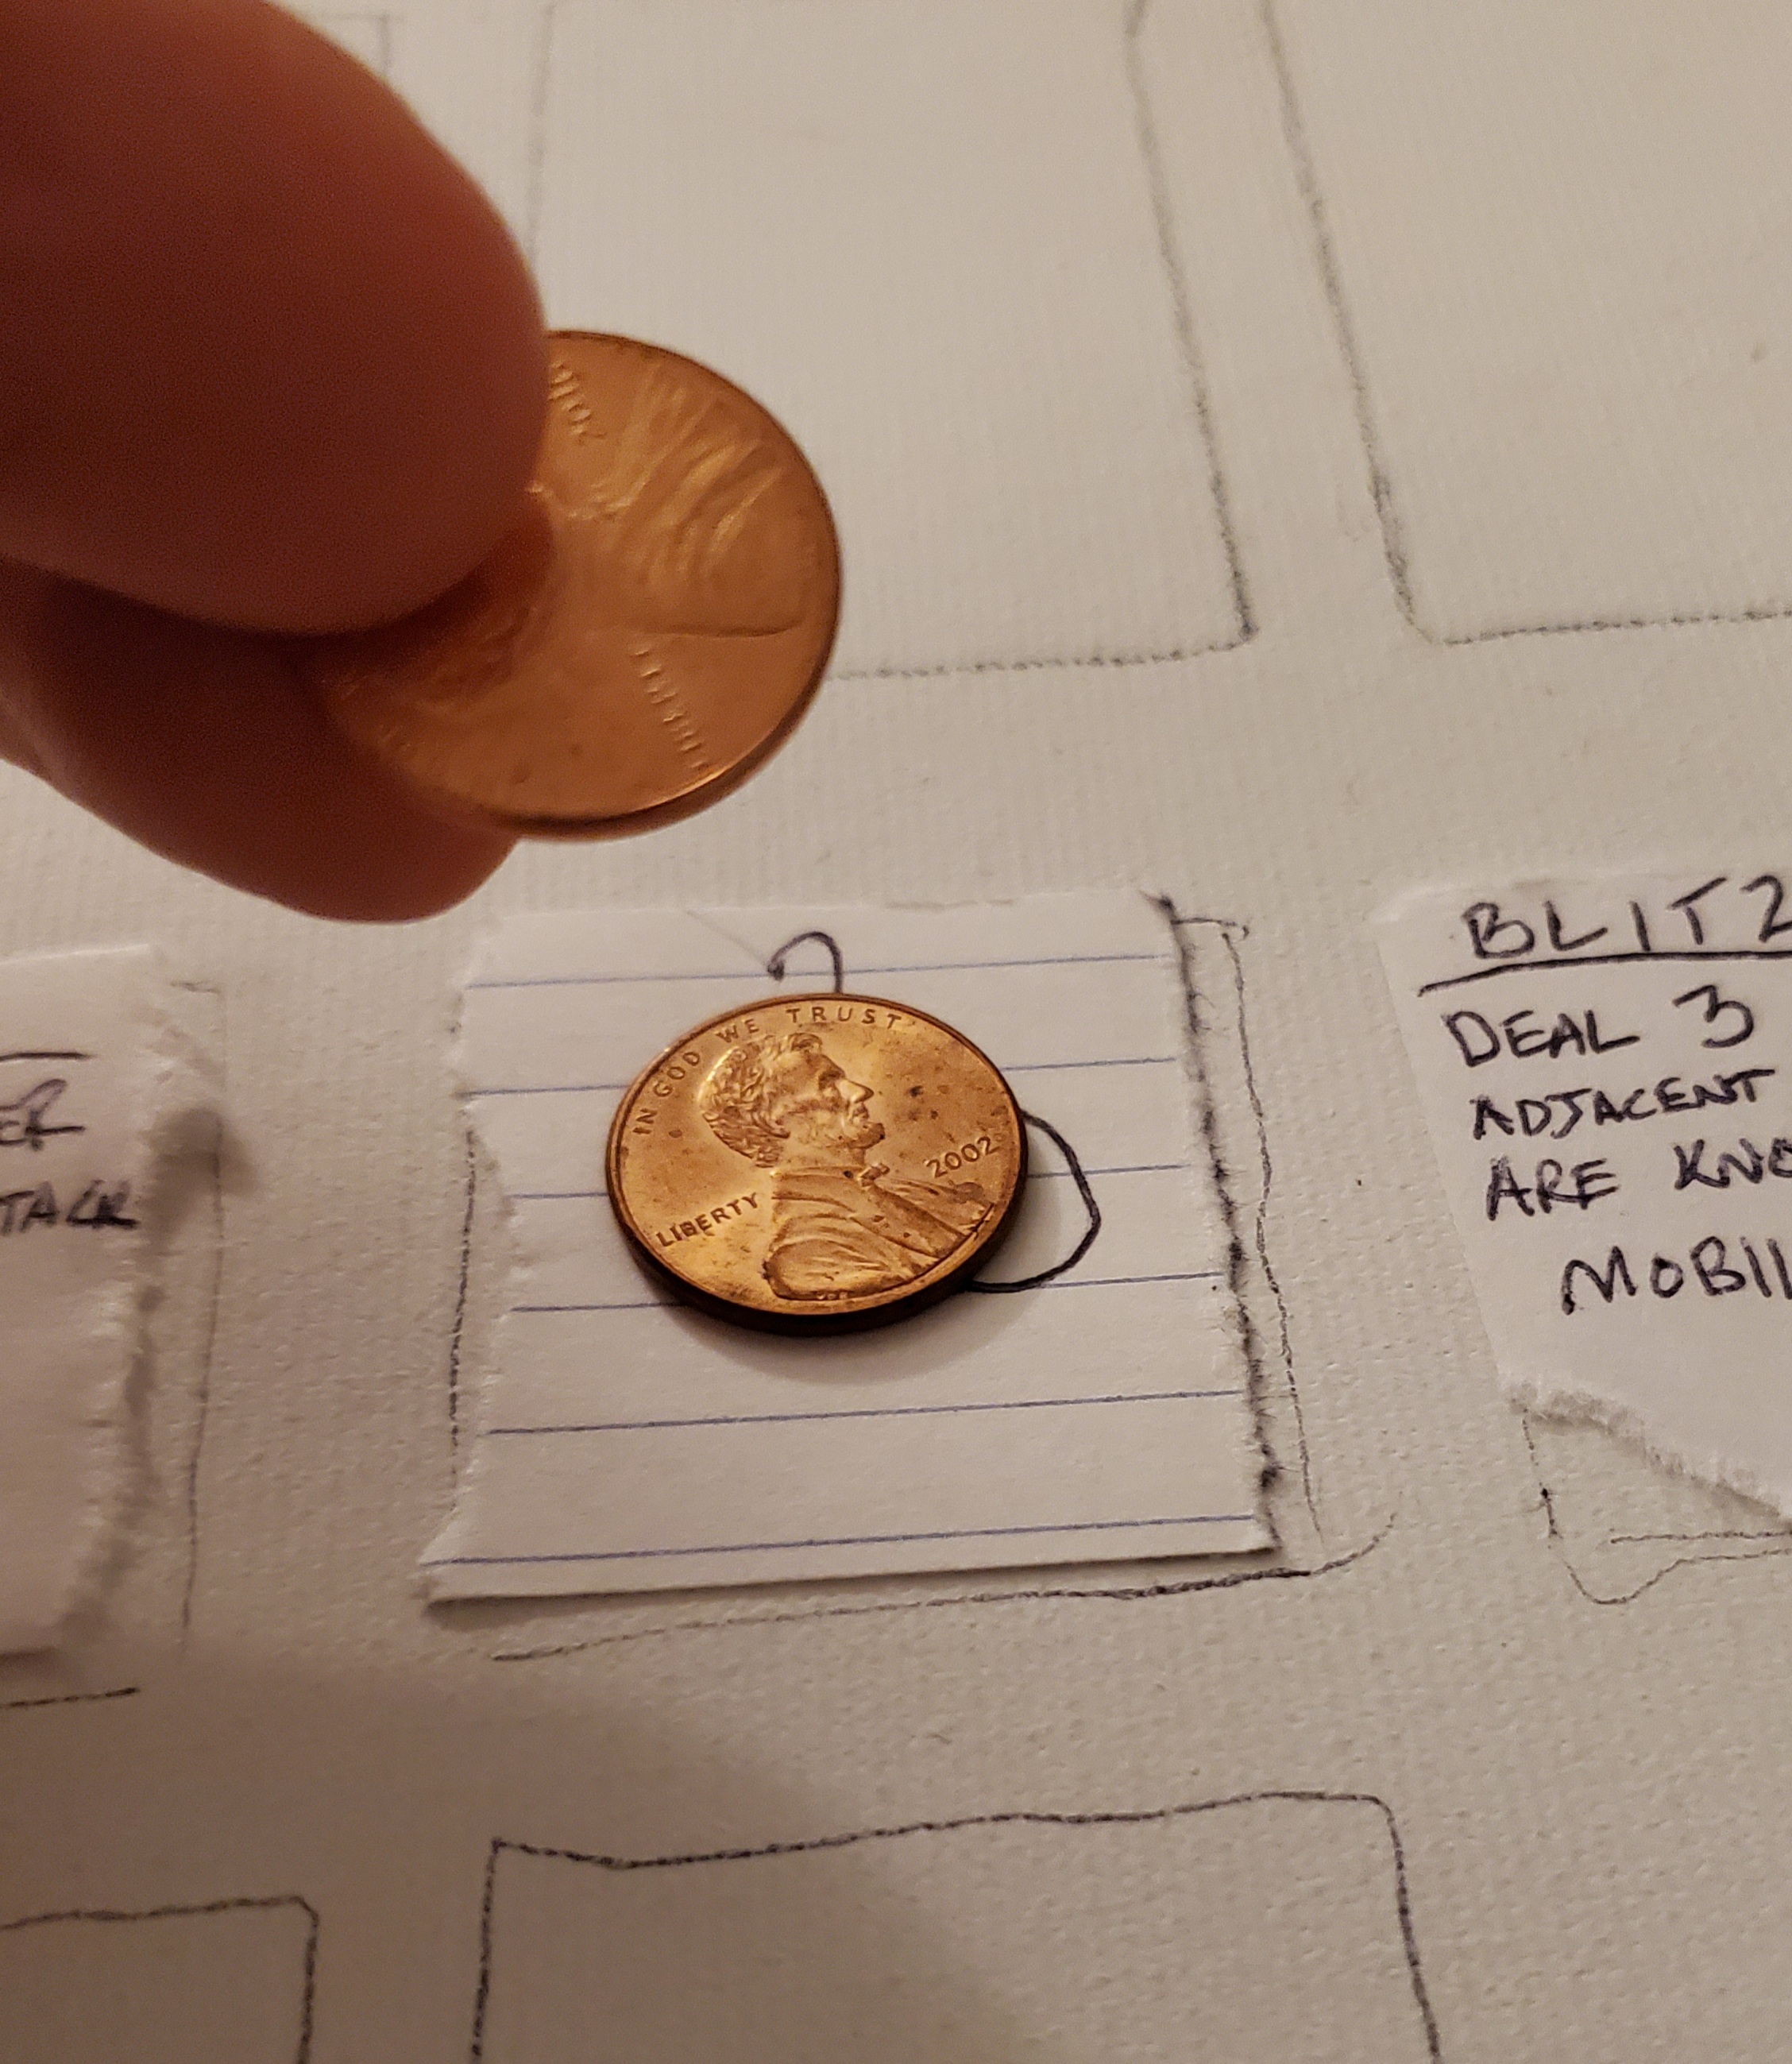
The second card I draw is a Walking Dead Monster Card. When players draw Monster Cards, they are immediately put on the gameboard in an available Character slot of the players choosing. For this match, my intention is to use a Soldier class. Soldier excells at combat in the Gauntlet, which is the center 3 Character slots. Knowing this will be my strategy, I choose to place the Walking Dead in the Gauntlet.

The third card I draw is another Walking Dead, which I also place in the Gauntlet.

STEP 5: COMBAT PHASE

At this time, the game checks the Speed of all Characters. Since my Speed is 0, and the Walking Dead Monsters have a Speed of 1, their actions take priority first. The first Monster that enters the board will act first in Combat if all Monsters on the board have the same Speed.

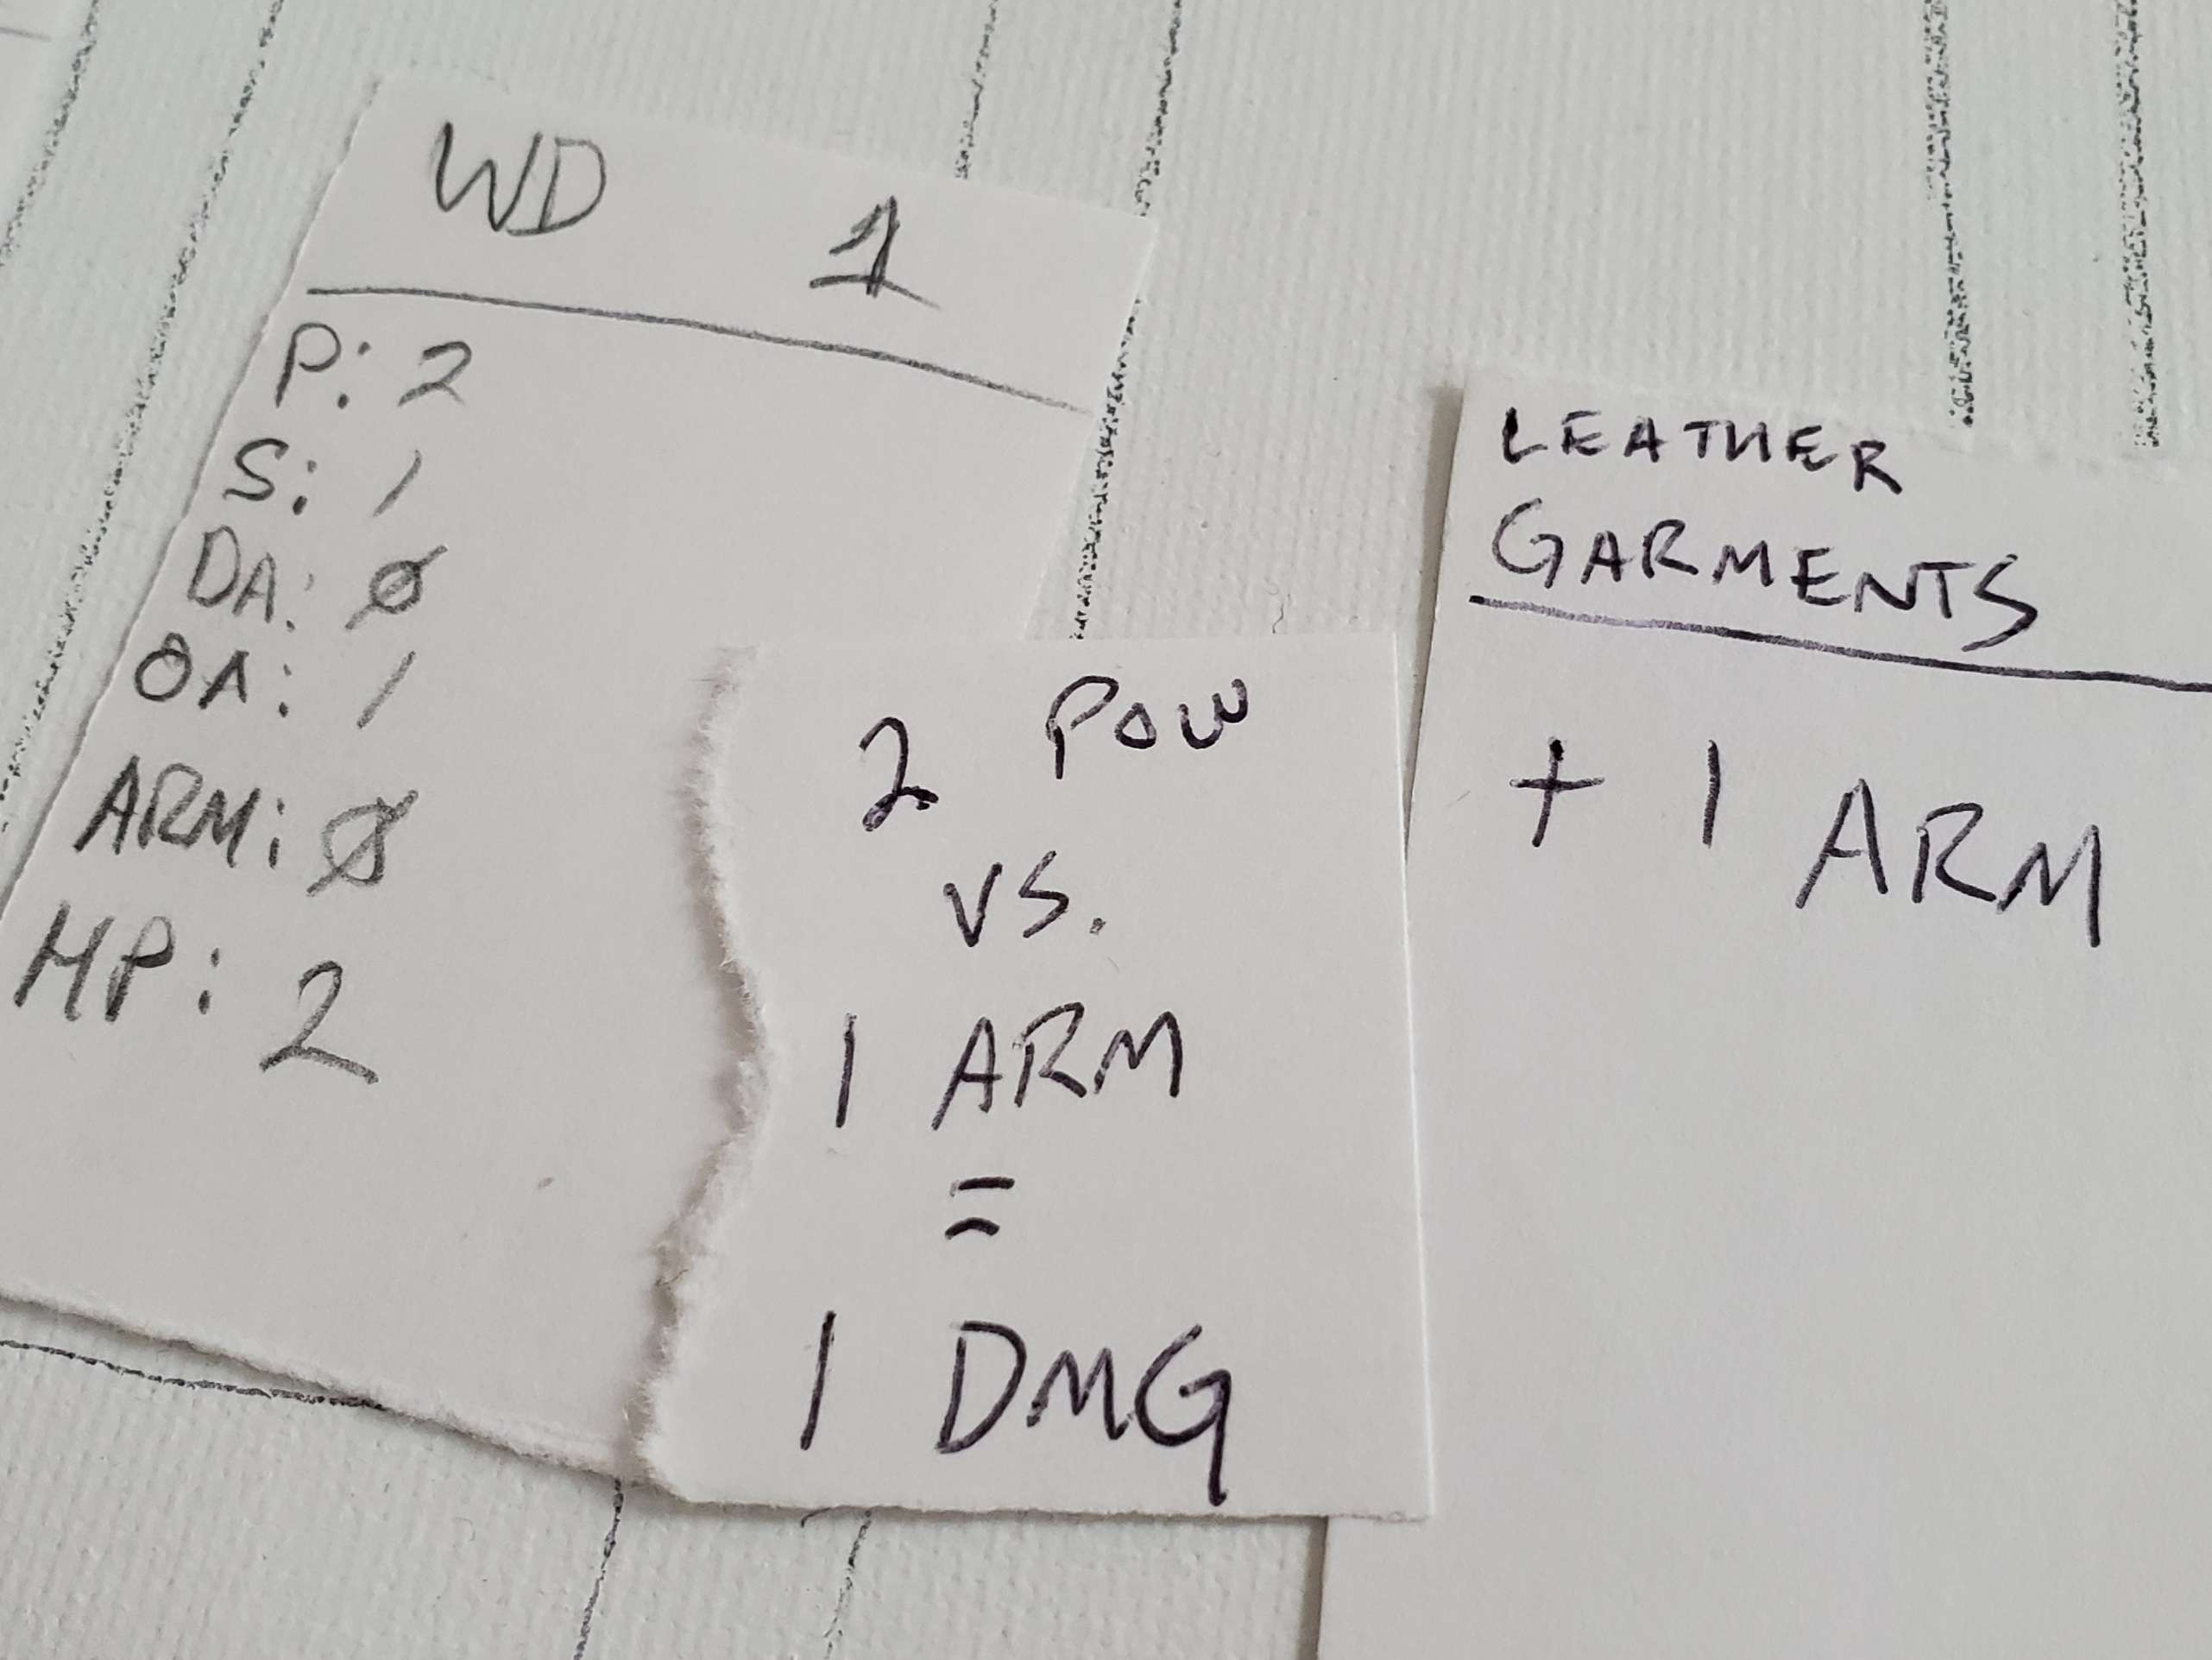
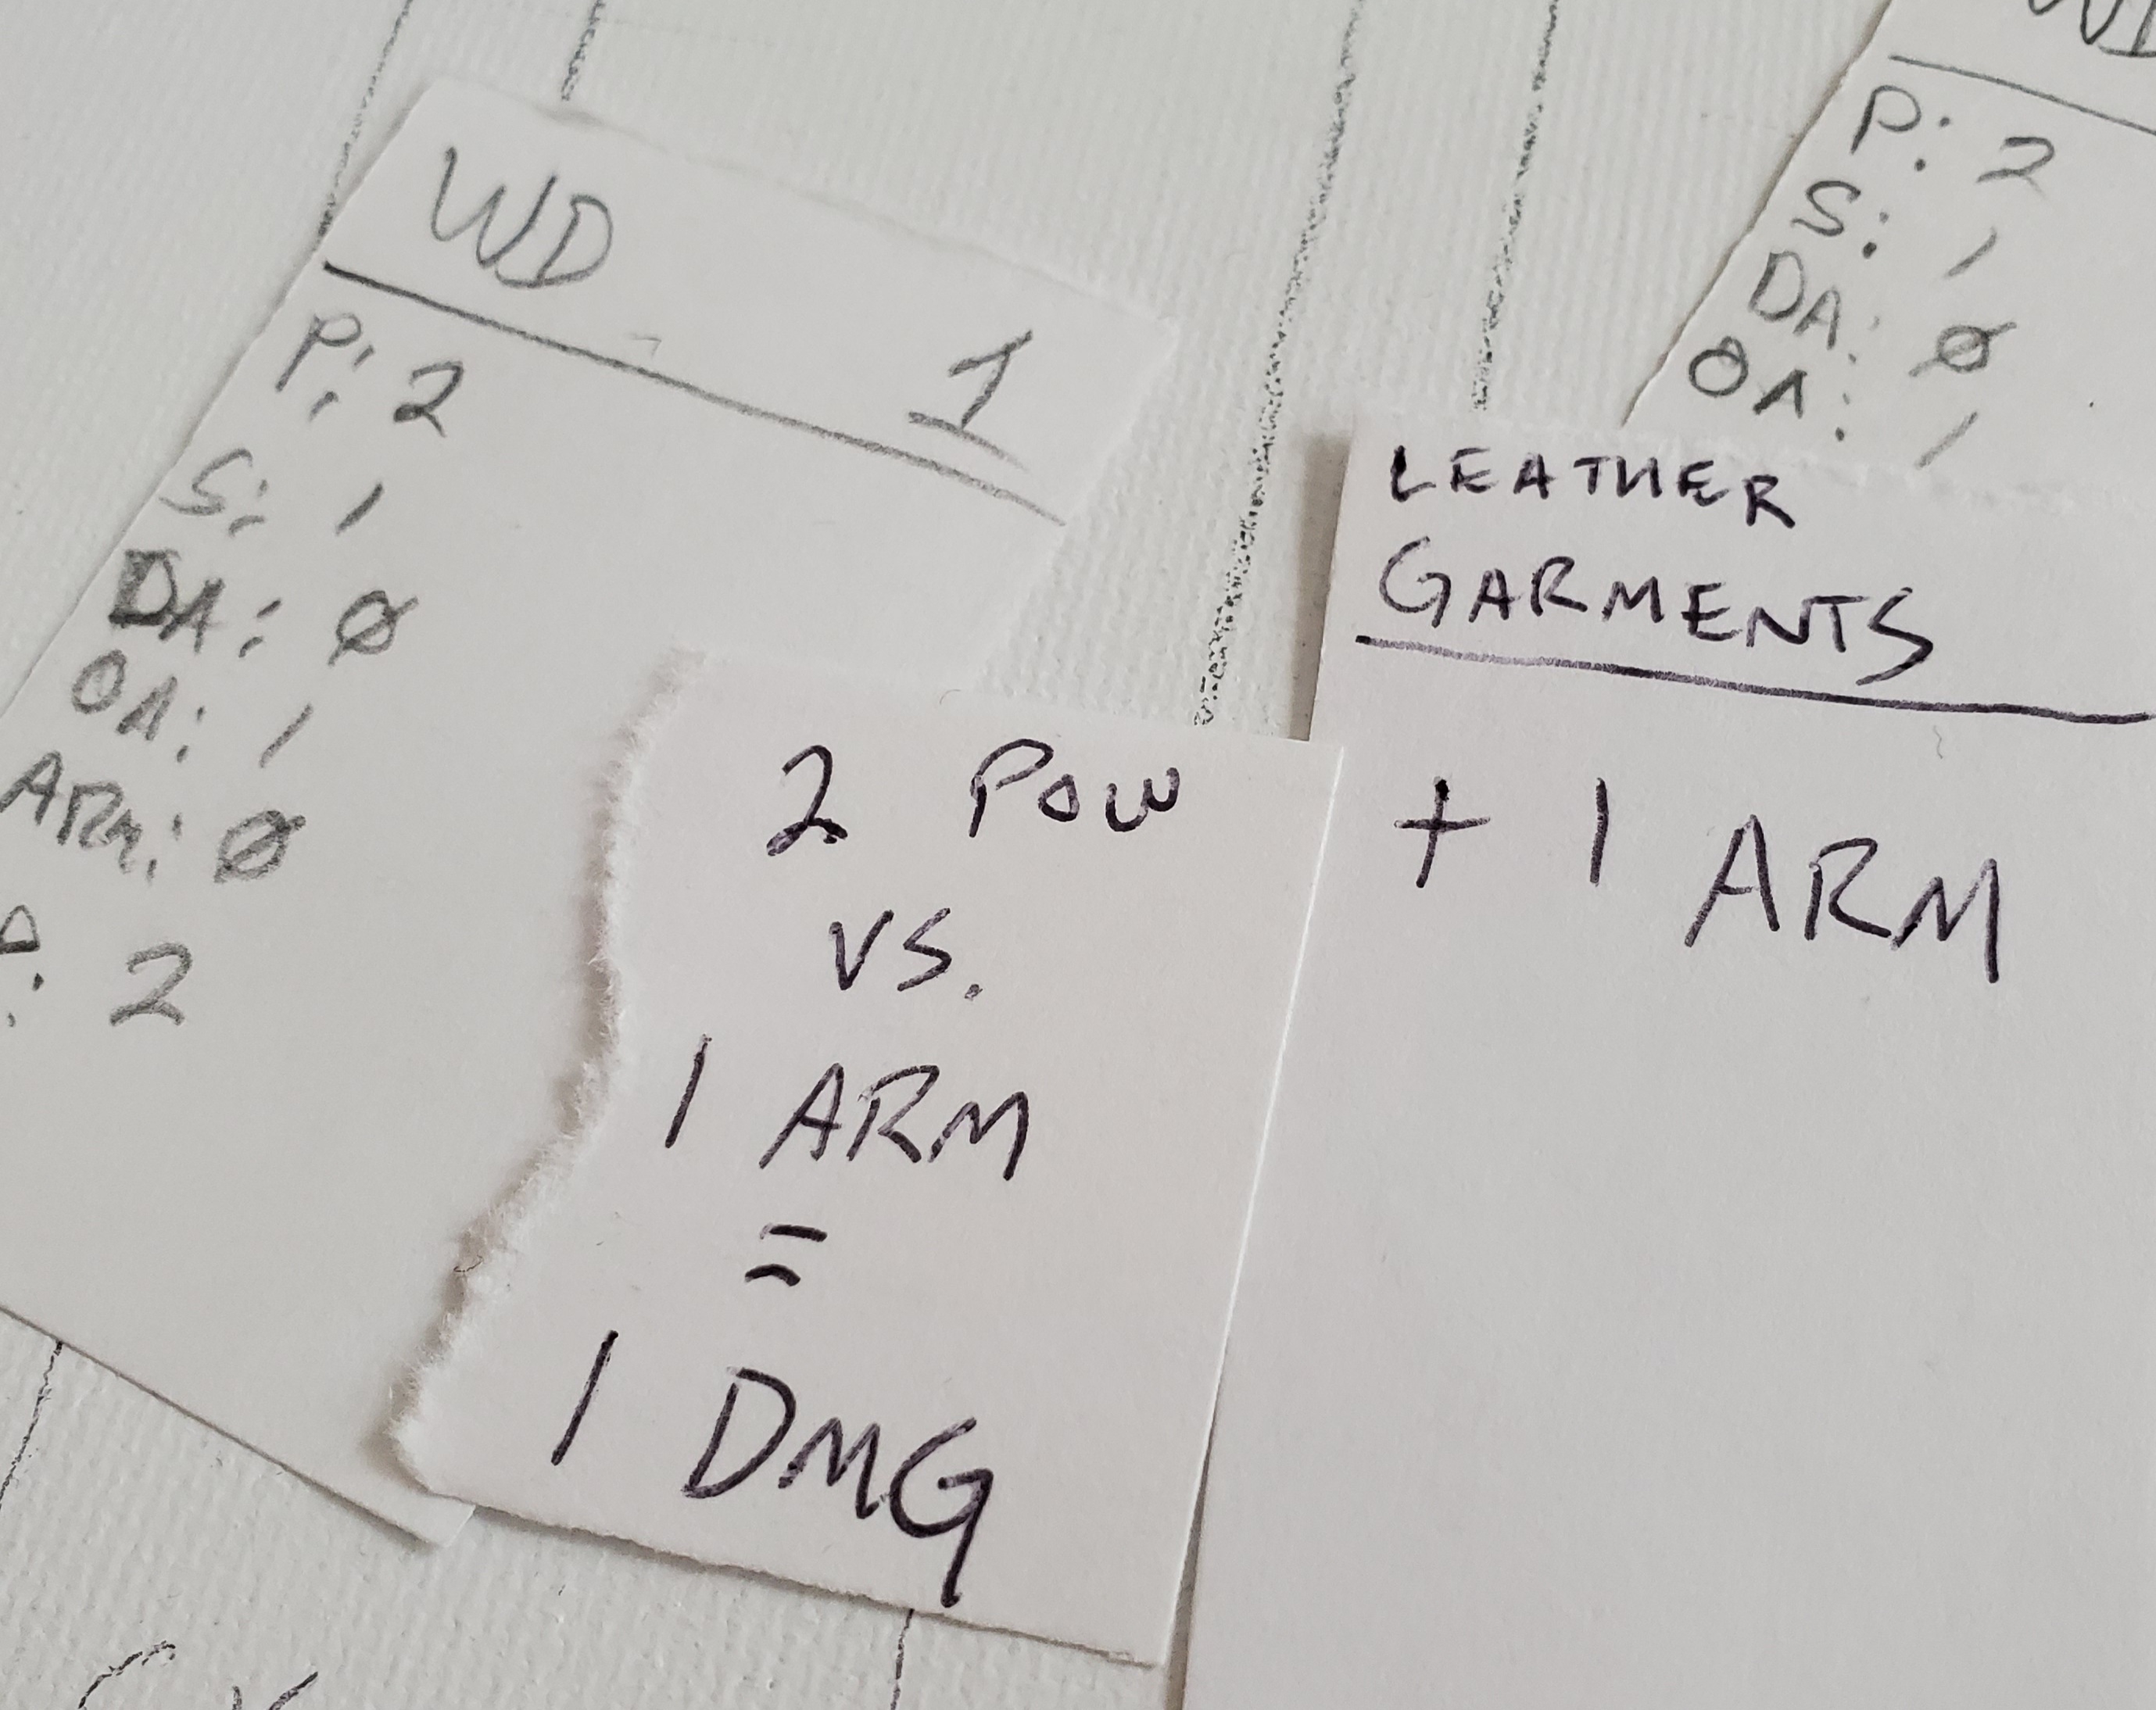
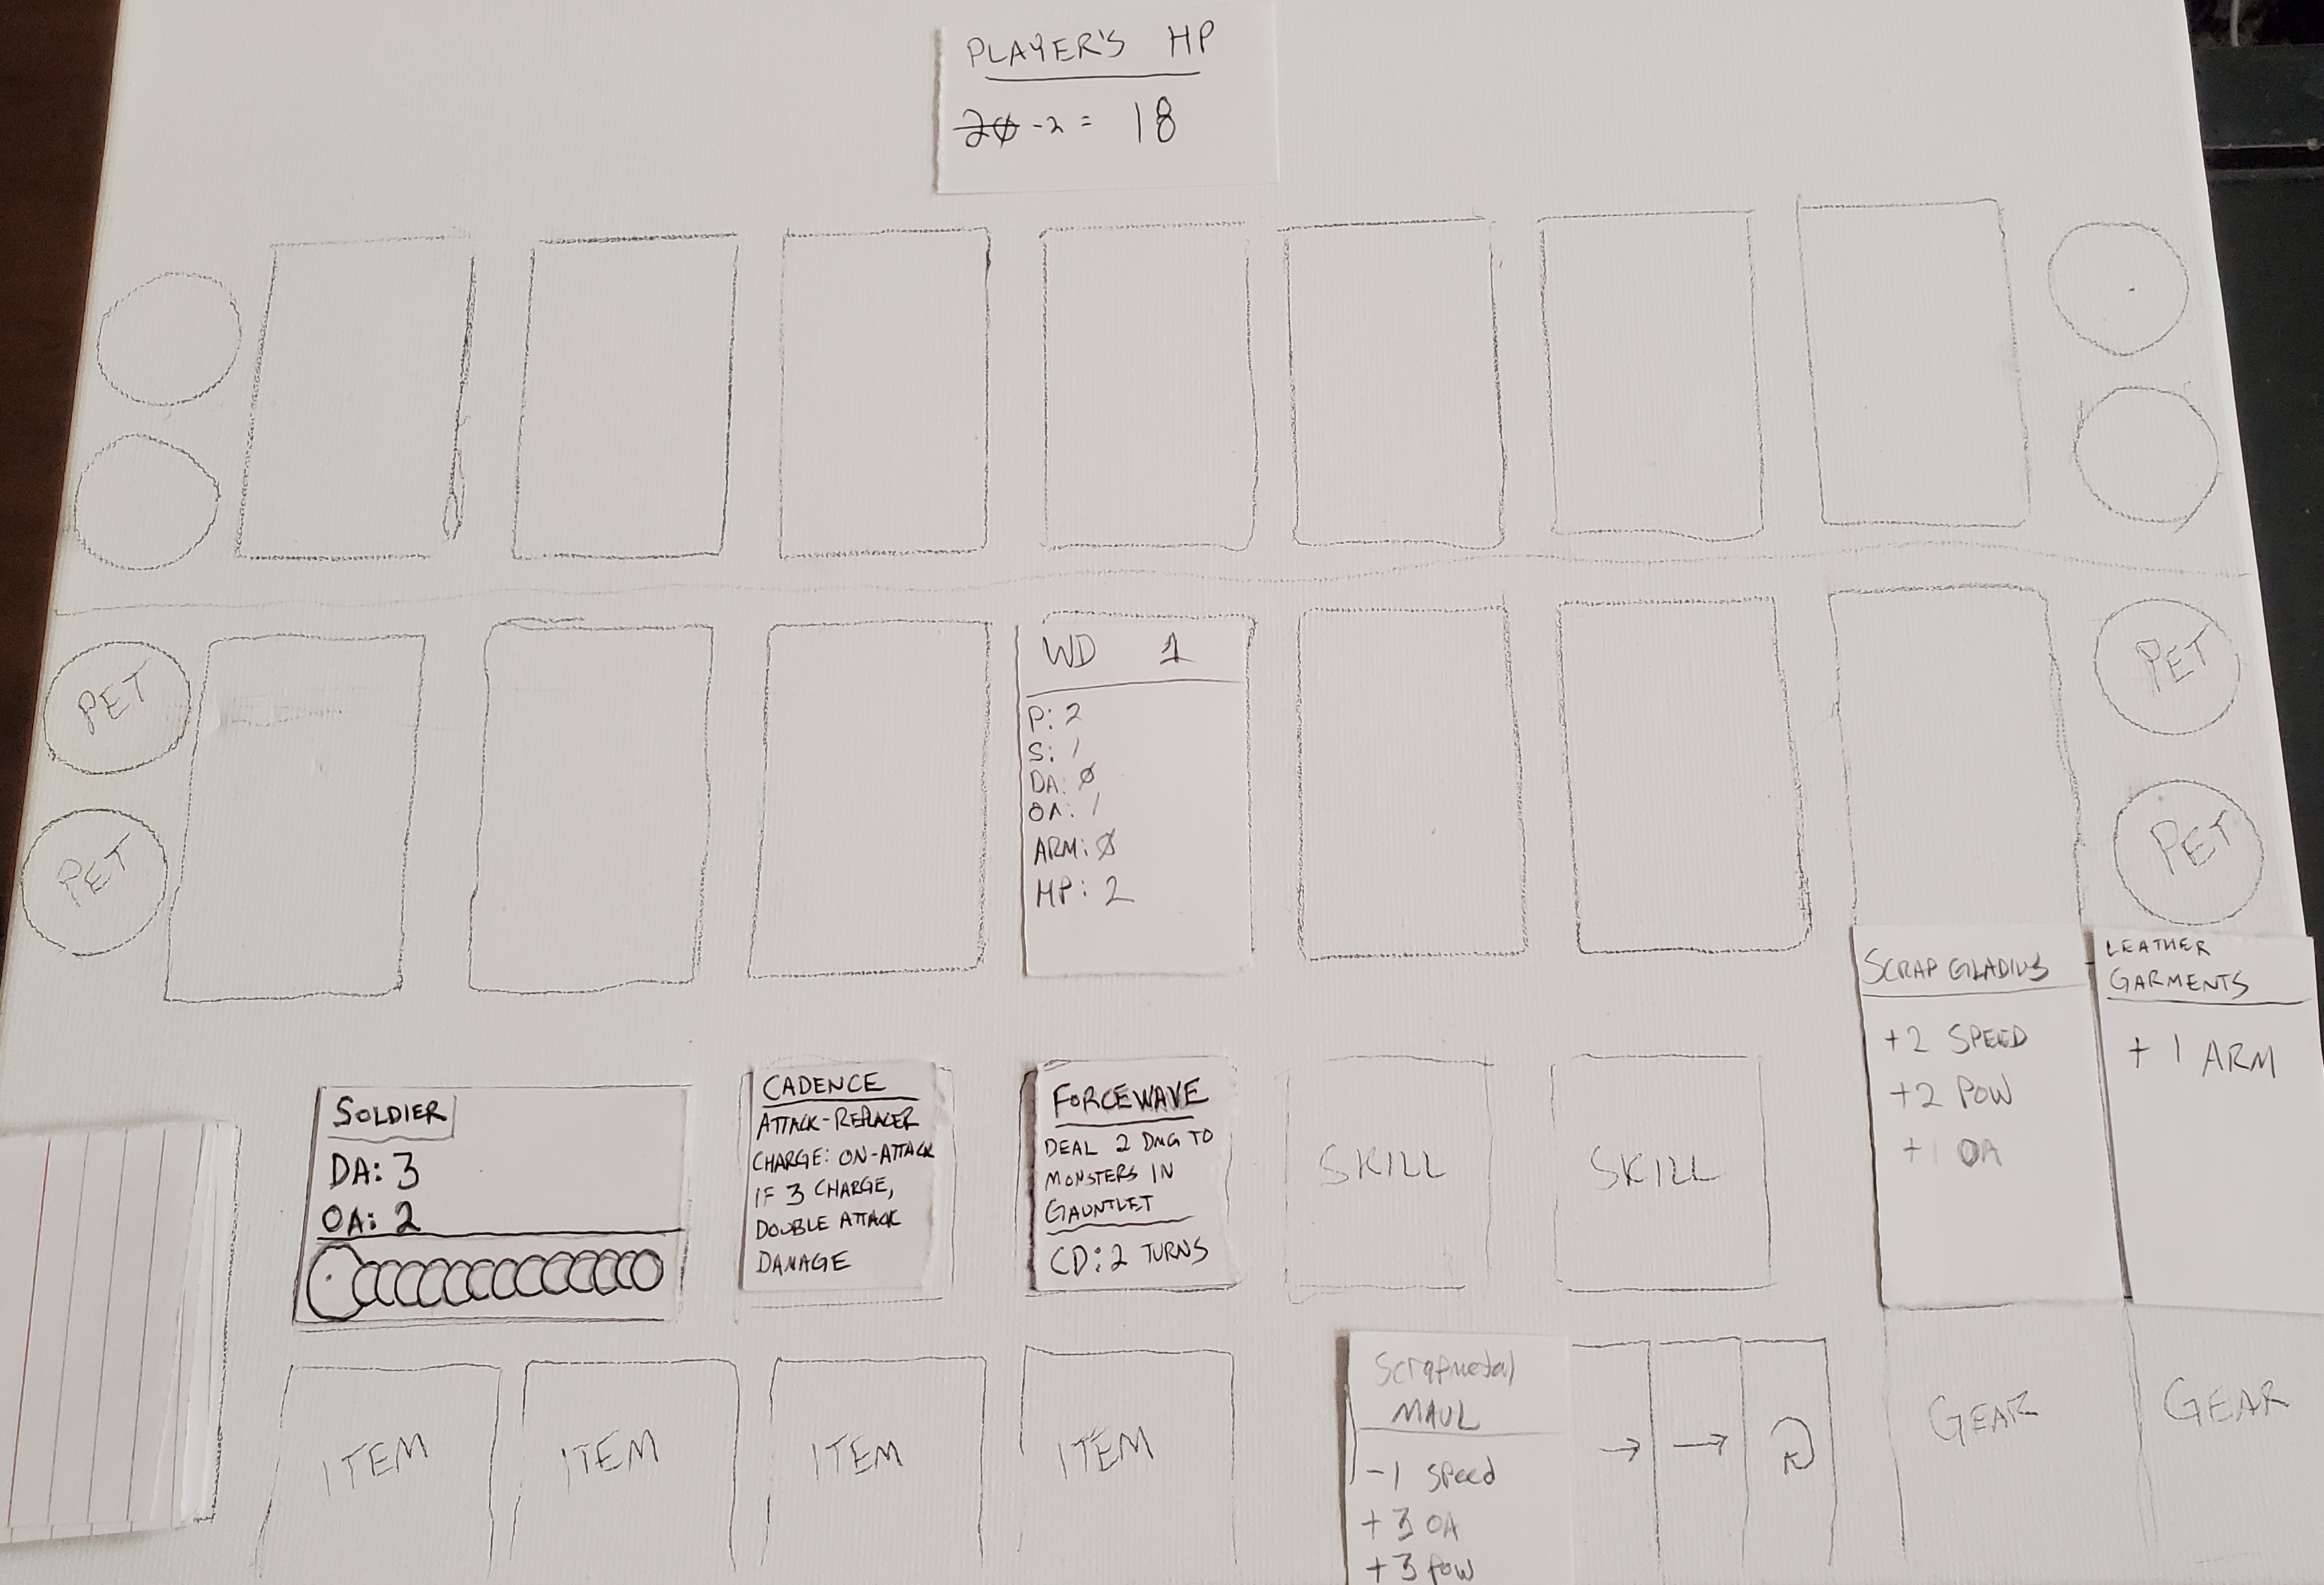
Thanks to my Leather Garments, I have 1 Armor, which causes the 2 Power attack of the Walking Dead to only deal 1 damage to me. Both Walking Dead hit me for 1 damage each, so my total life loss is 2 HP which brings me down to 18 life.

Now its my turn to attack! I swing at the leftmost Walking Dead with my trusty Scrapmetal Maul, dealing 3 damage and killing it on the spot! As Monsters are killed, they are placed aside in a seperate game zone known as the “Shattered Realm Pool”. In the event my deck either runs out of cards, or exceeds the max card limit of 30 cards (this value definitely subject to change), I will enter the Shattered Realm. We’ll discuss that another time, though.

With my attack executed, the turn proceeds to the next Phase.

STEP 6: LEVEL-UP PHASE, PART 1

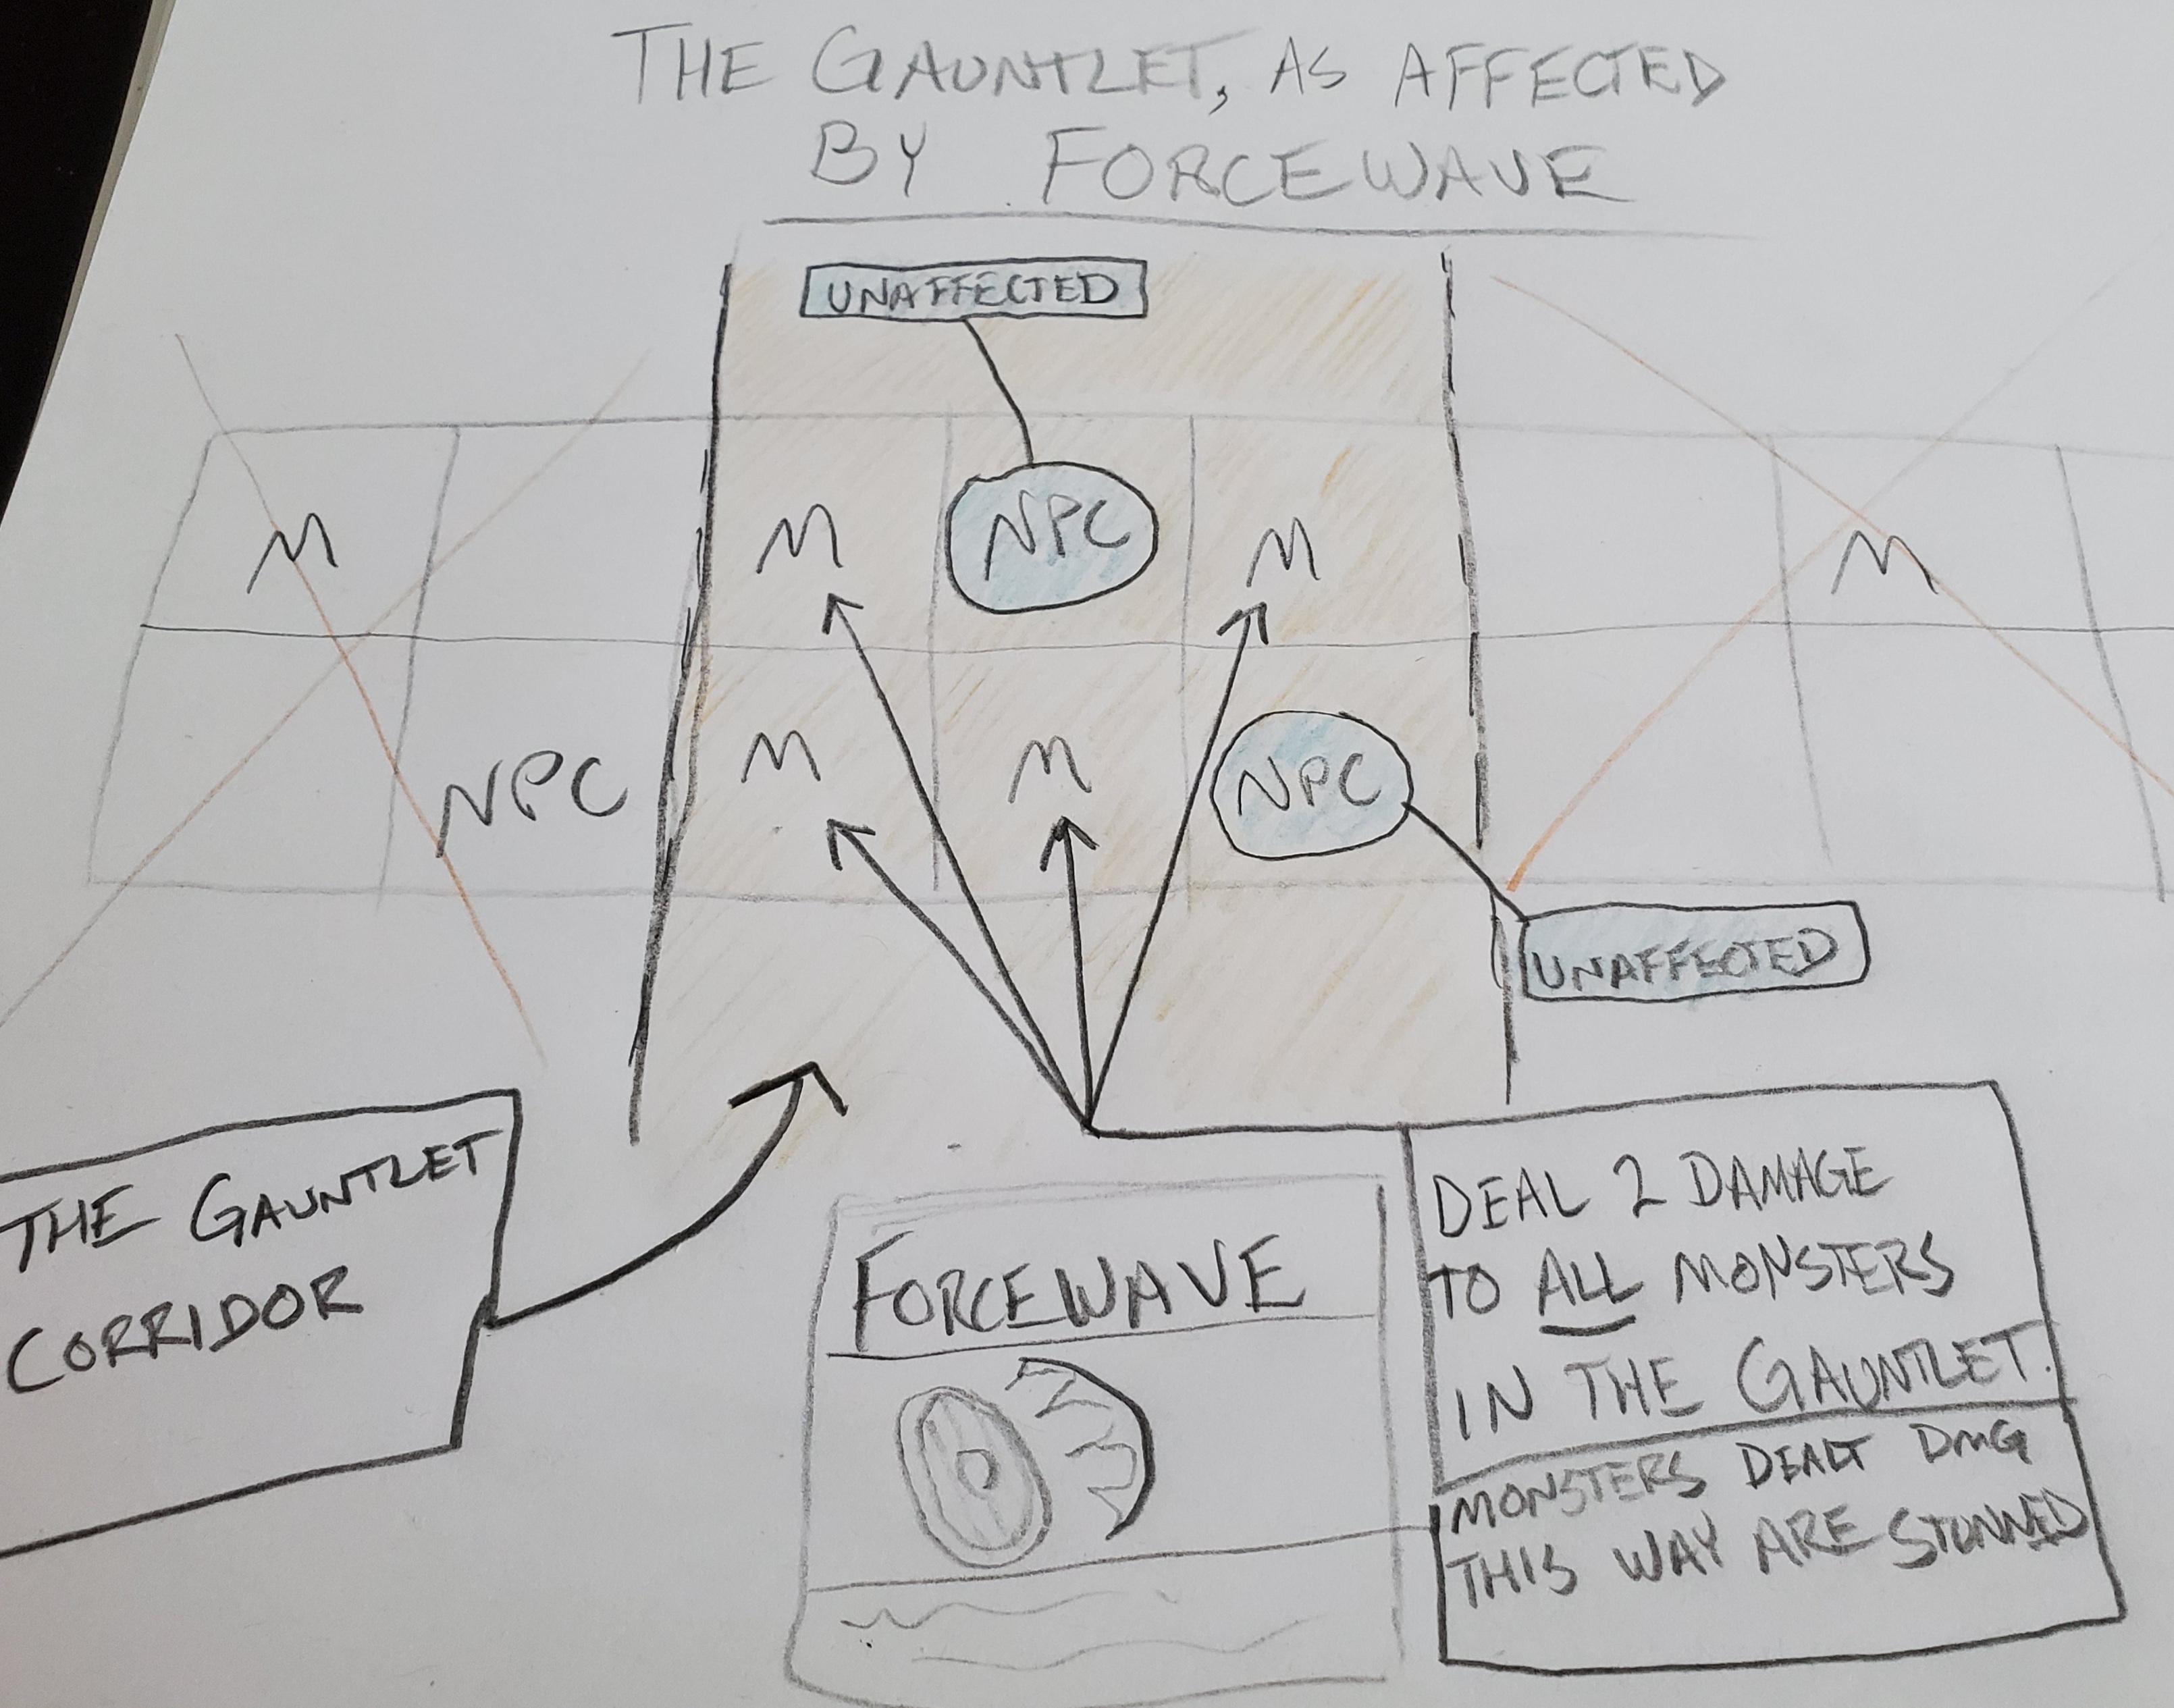
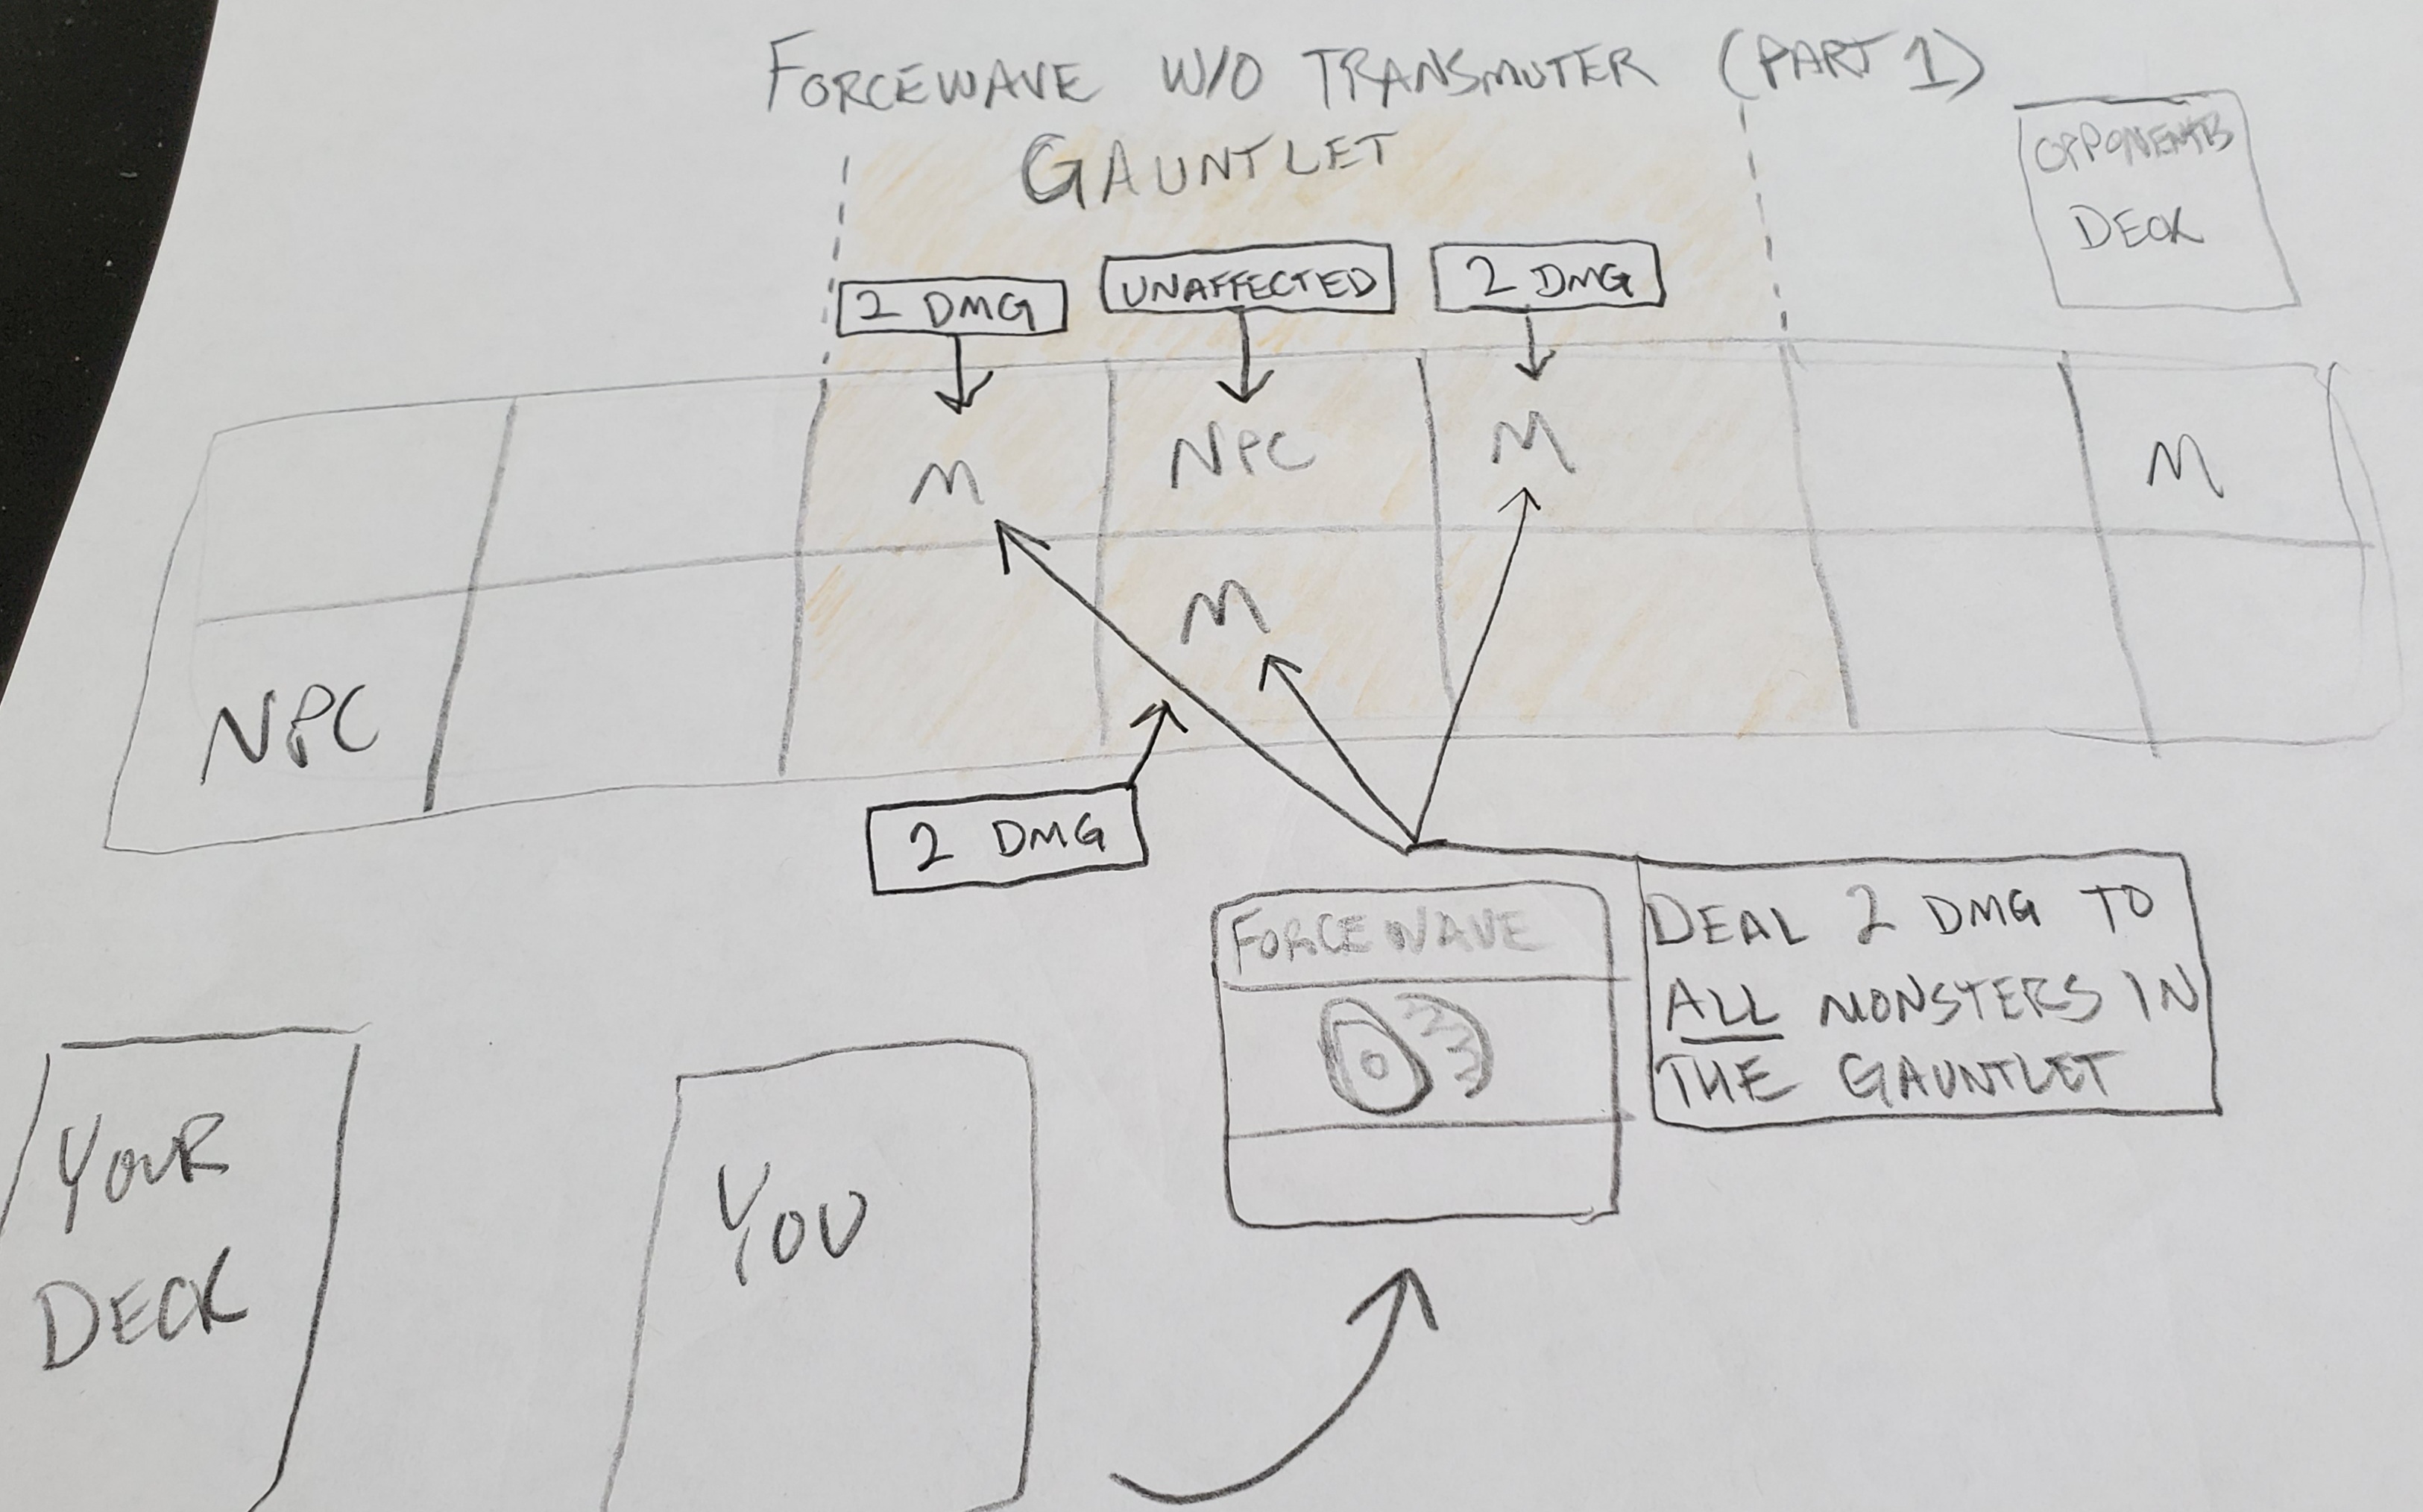
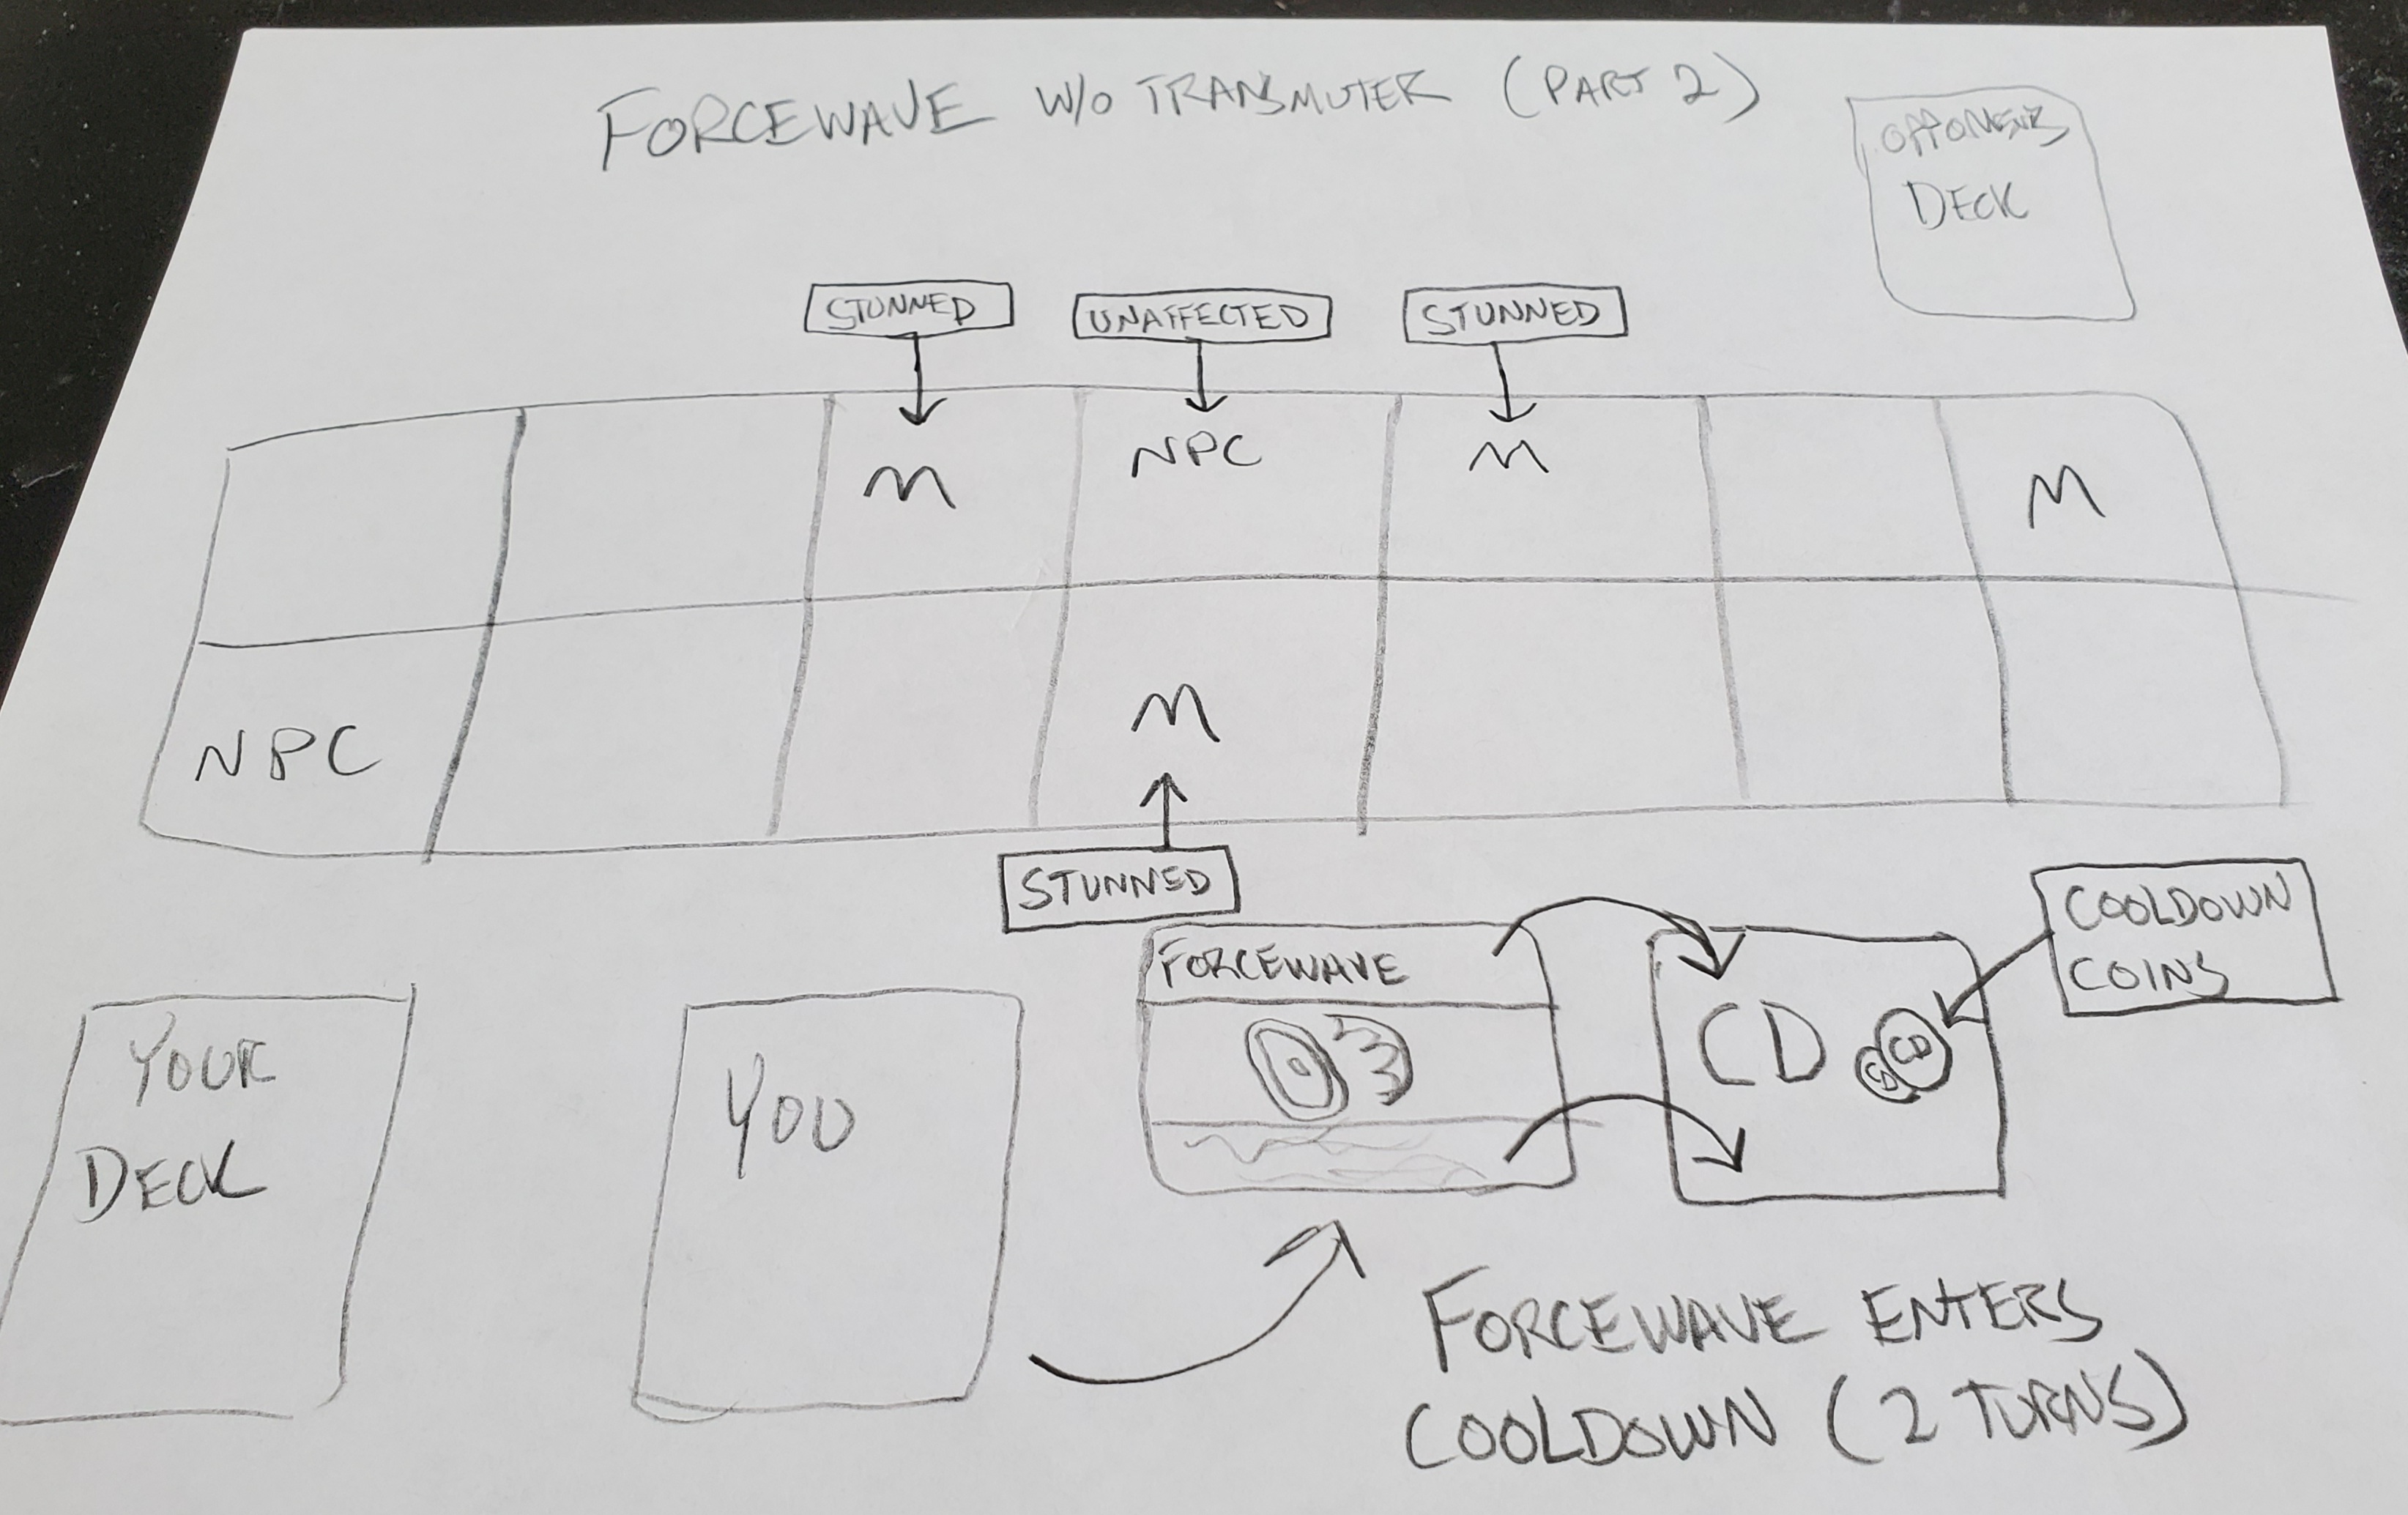
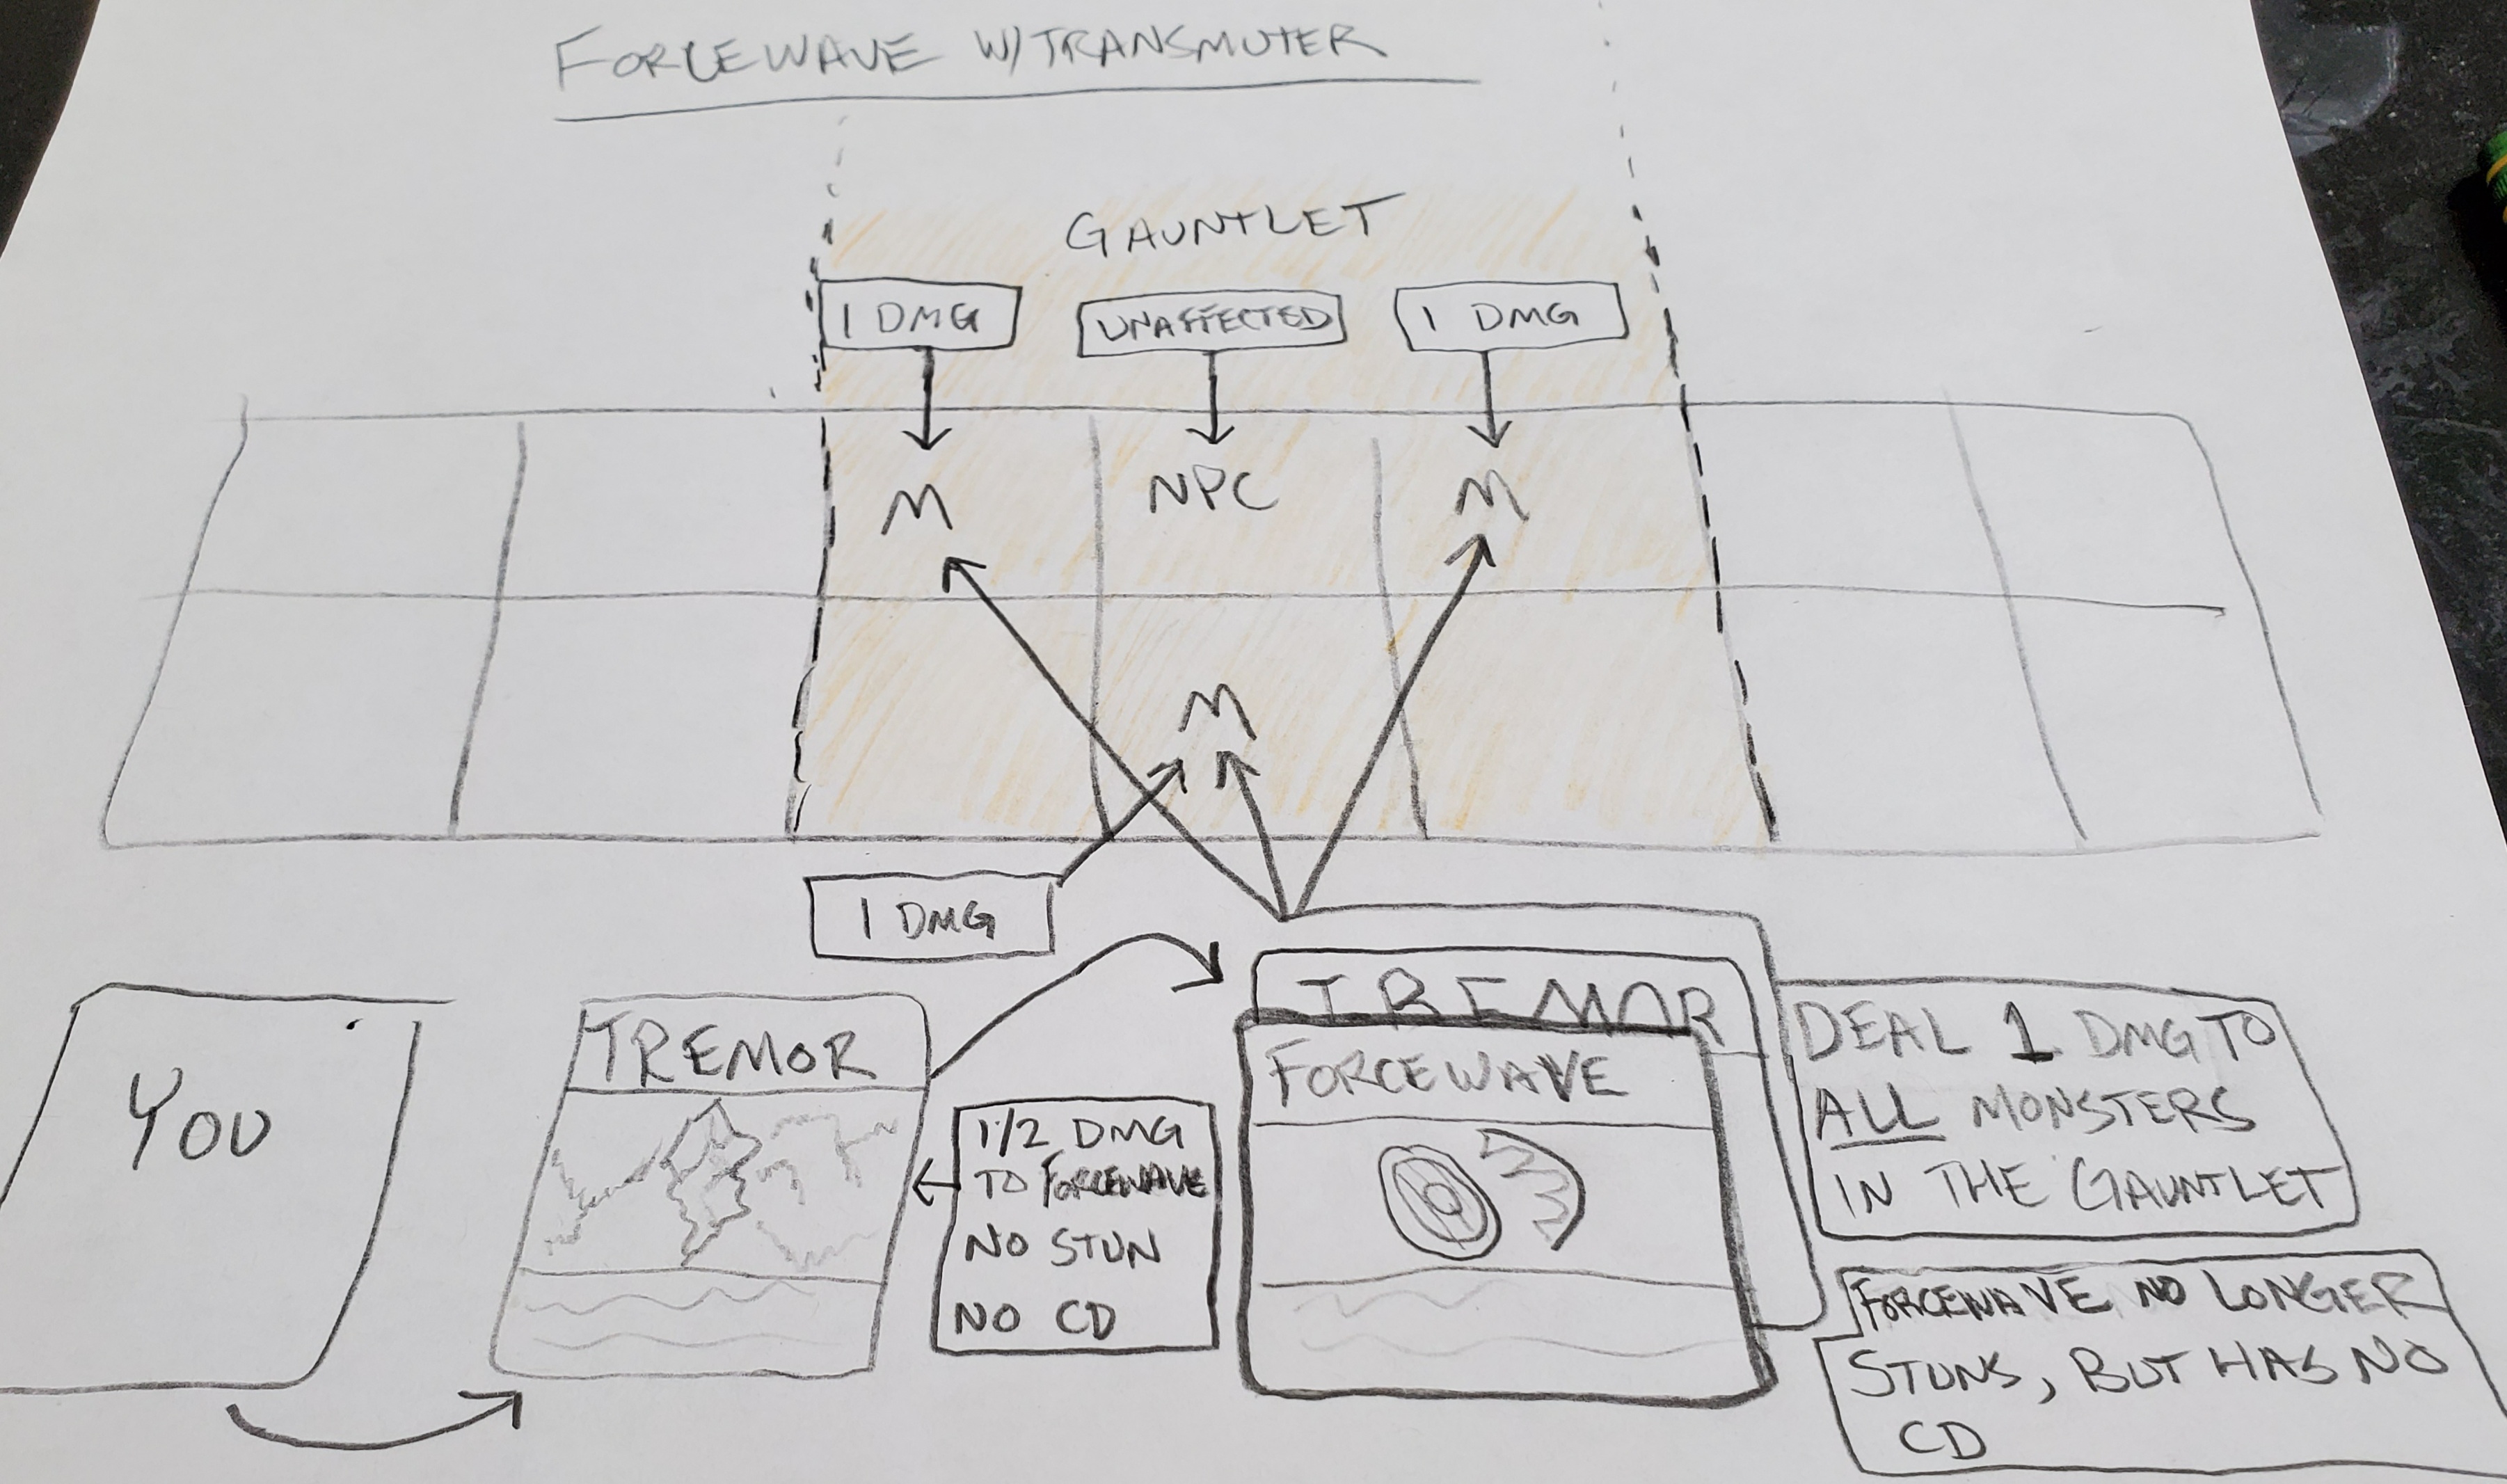
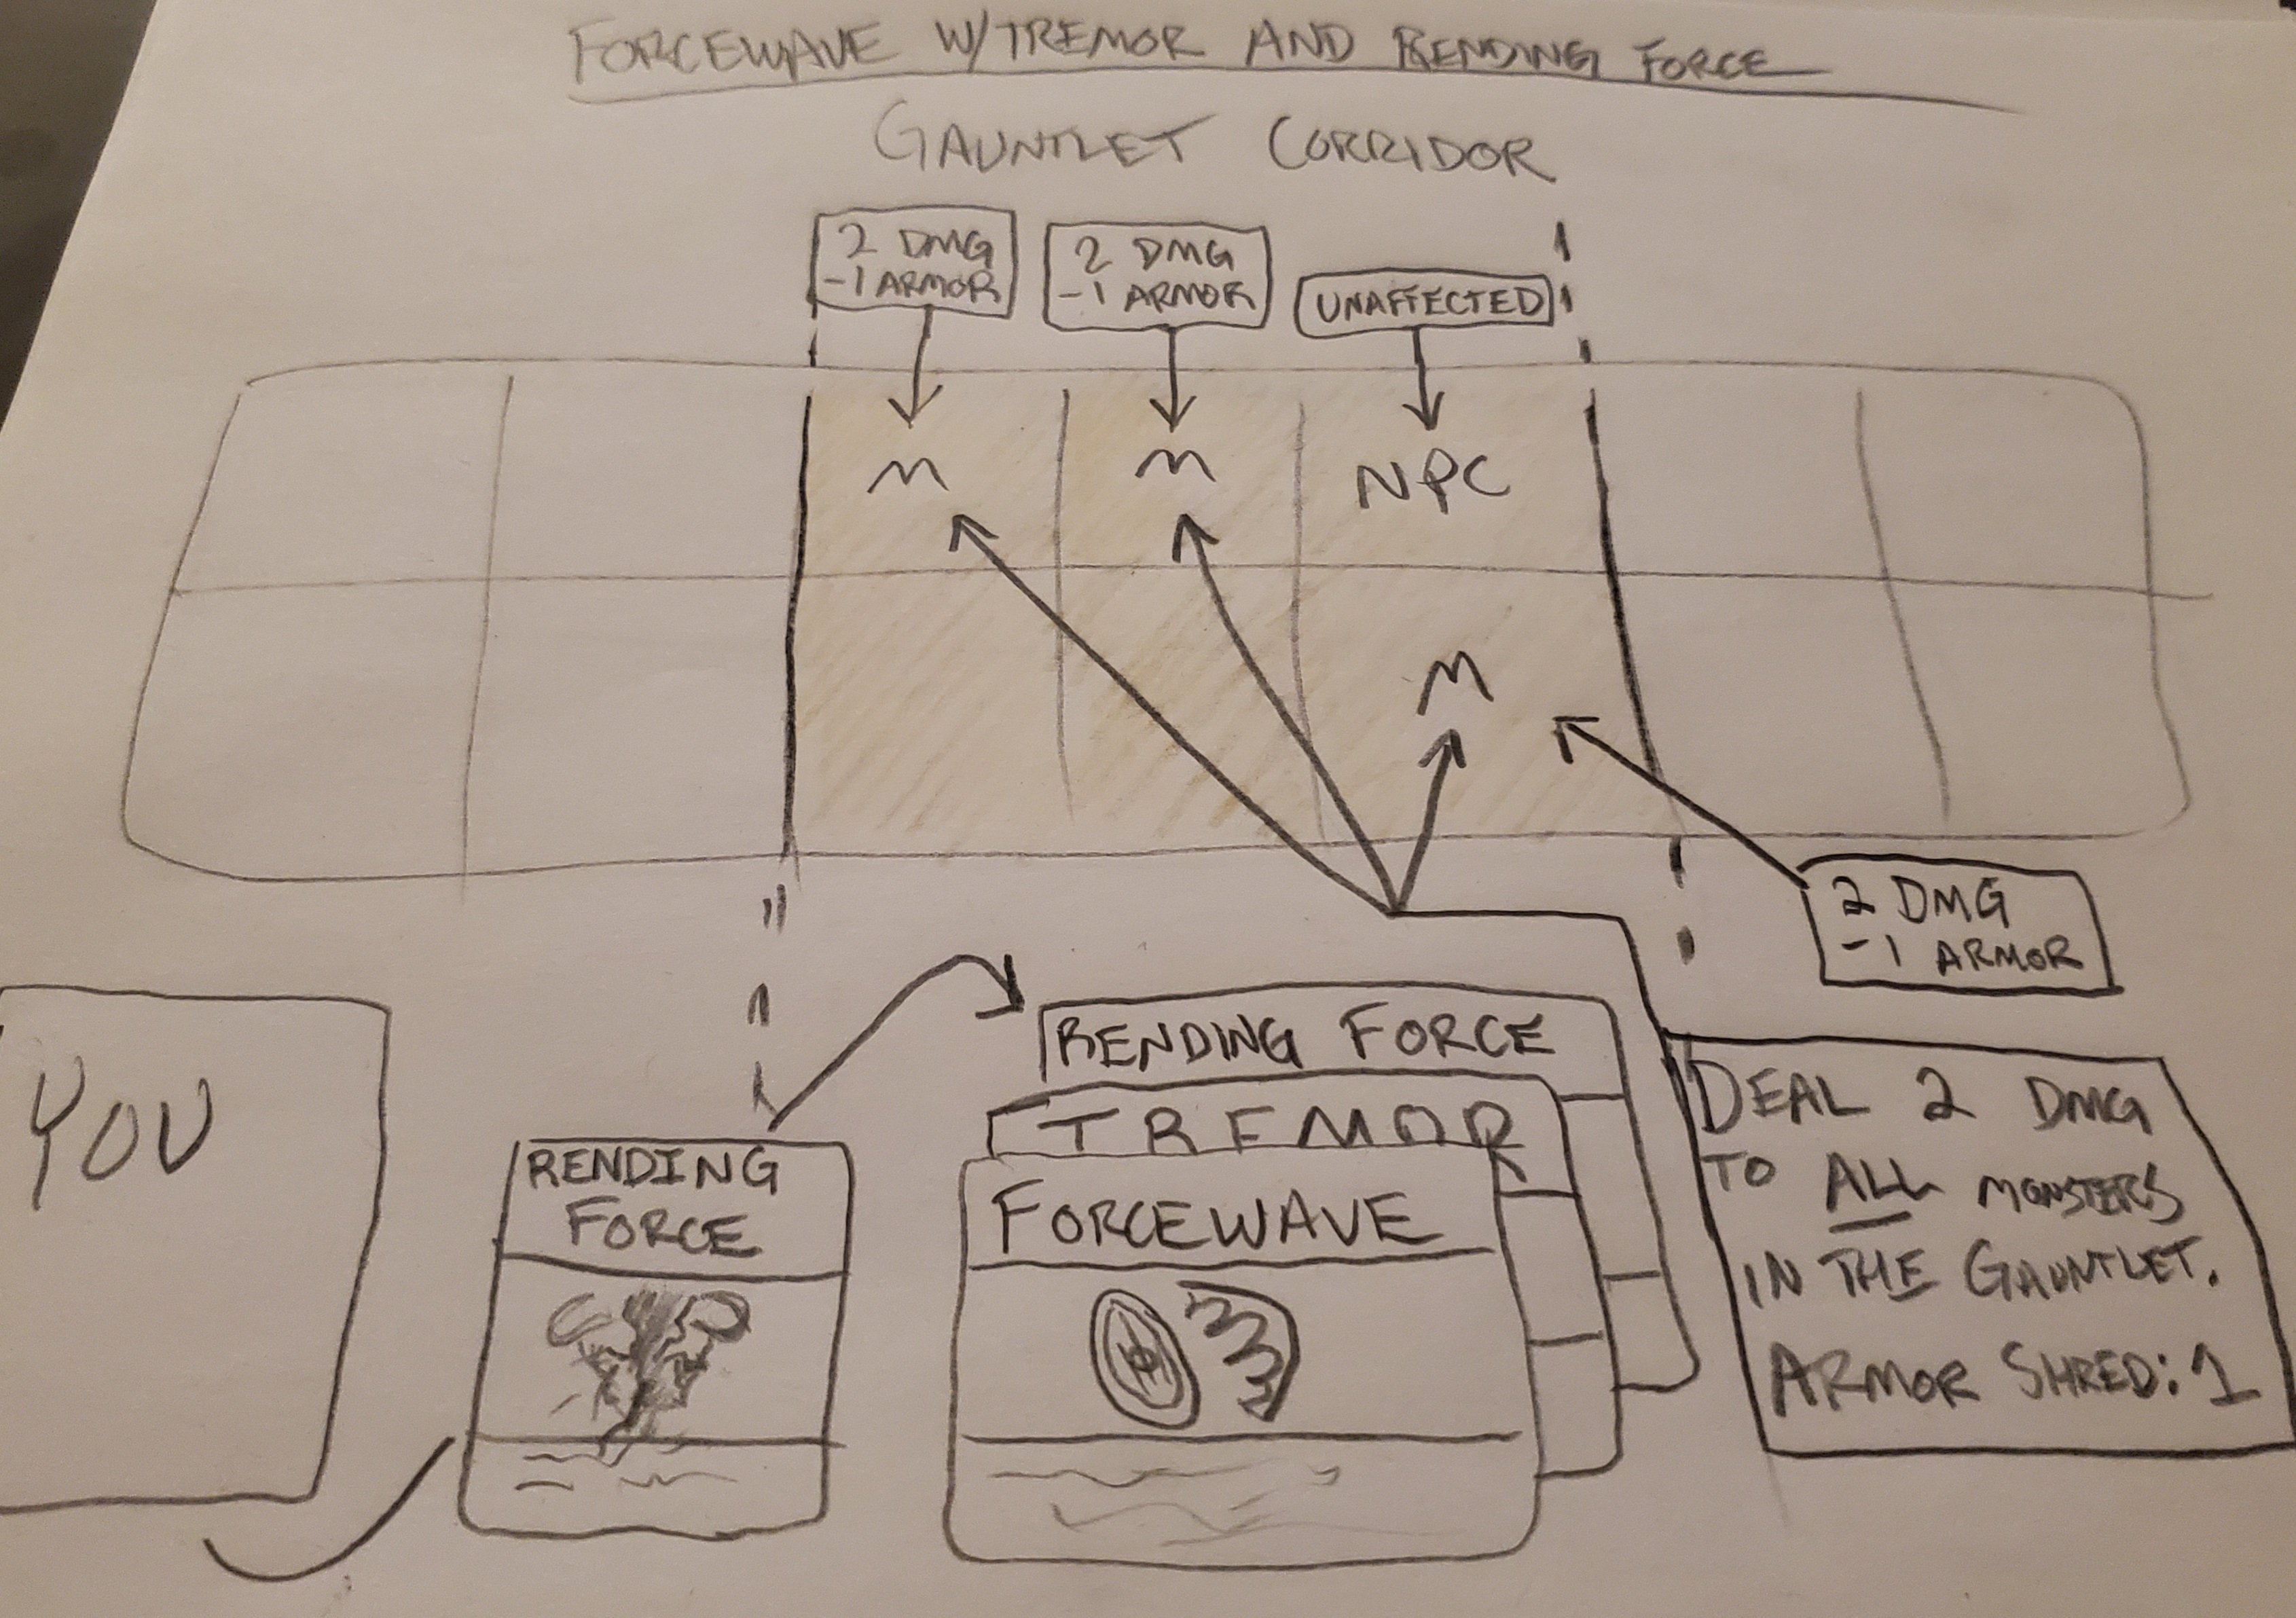
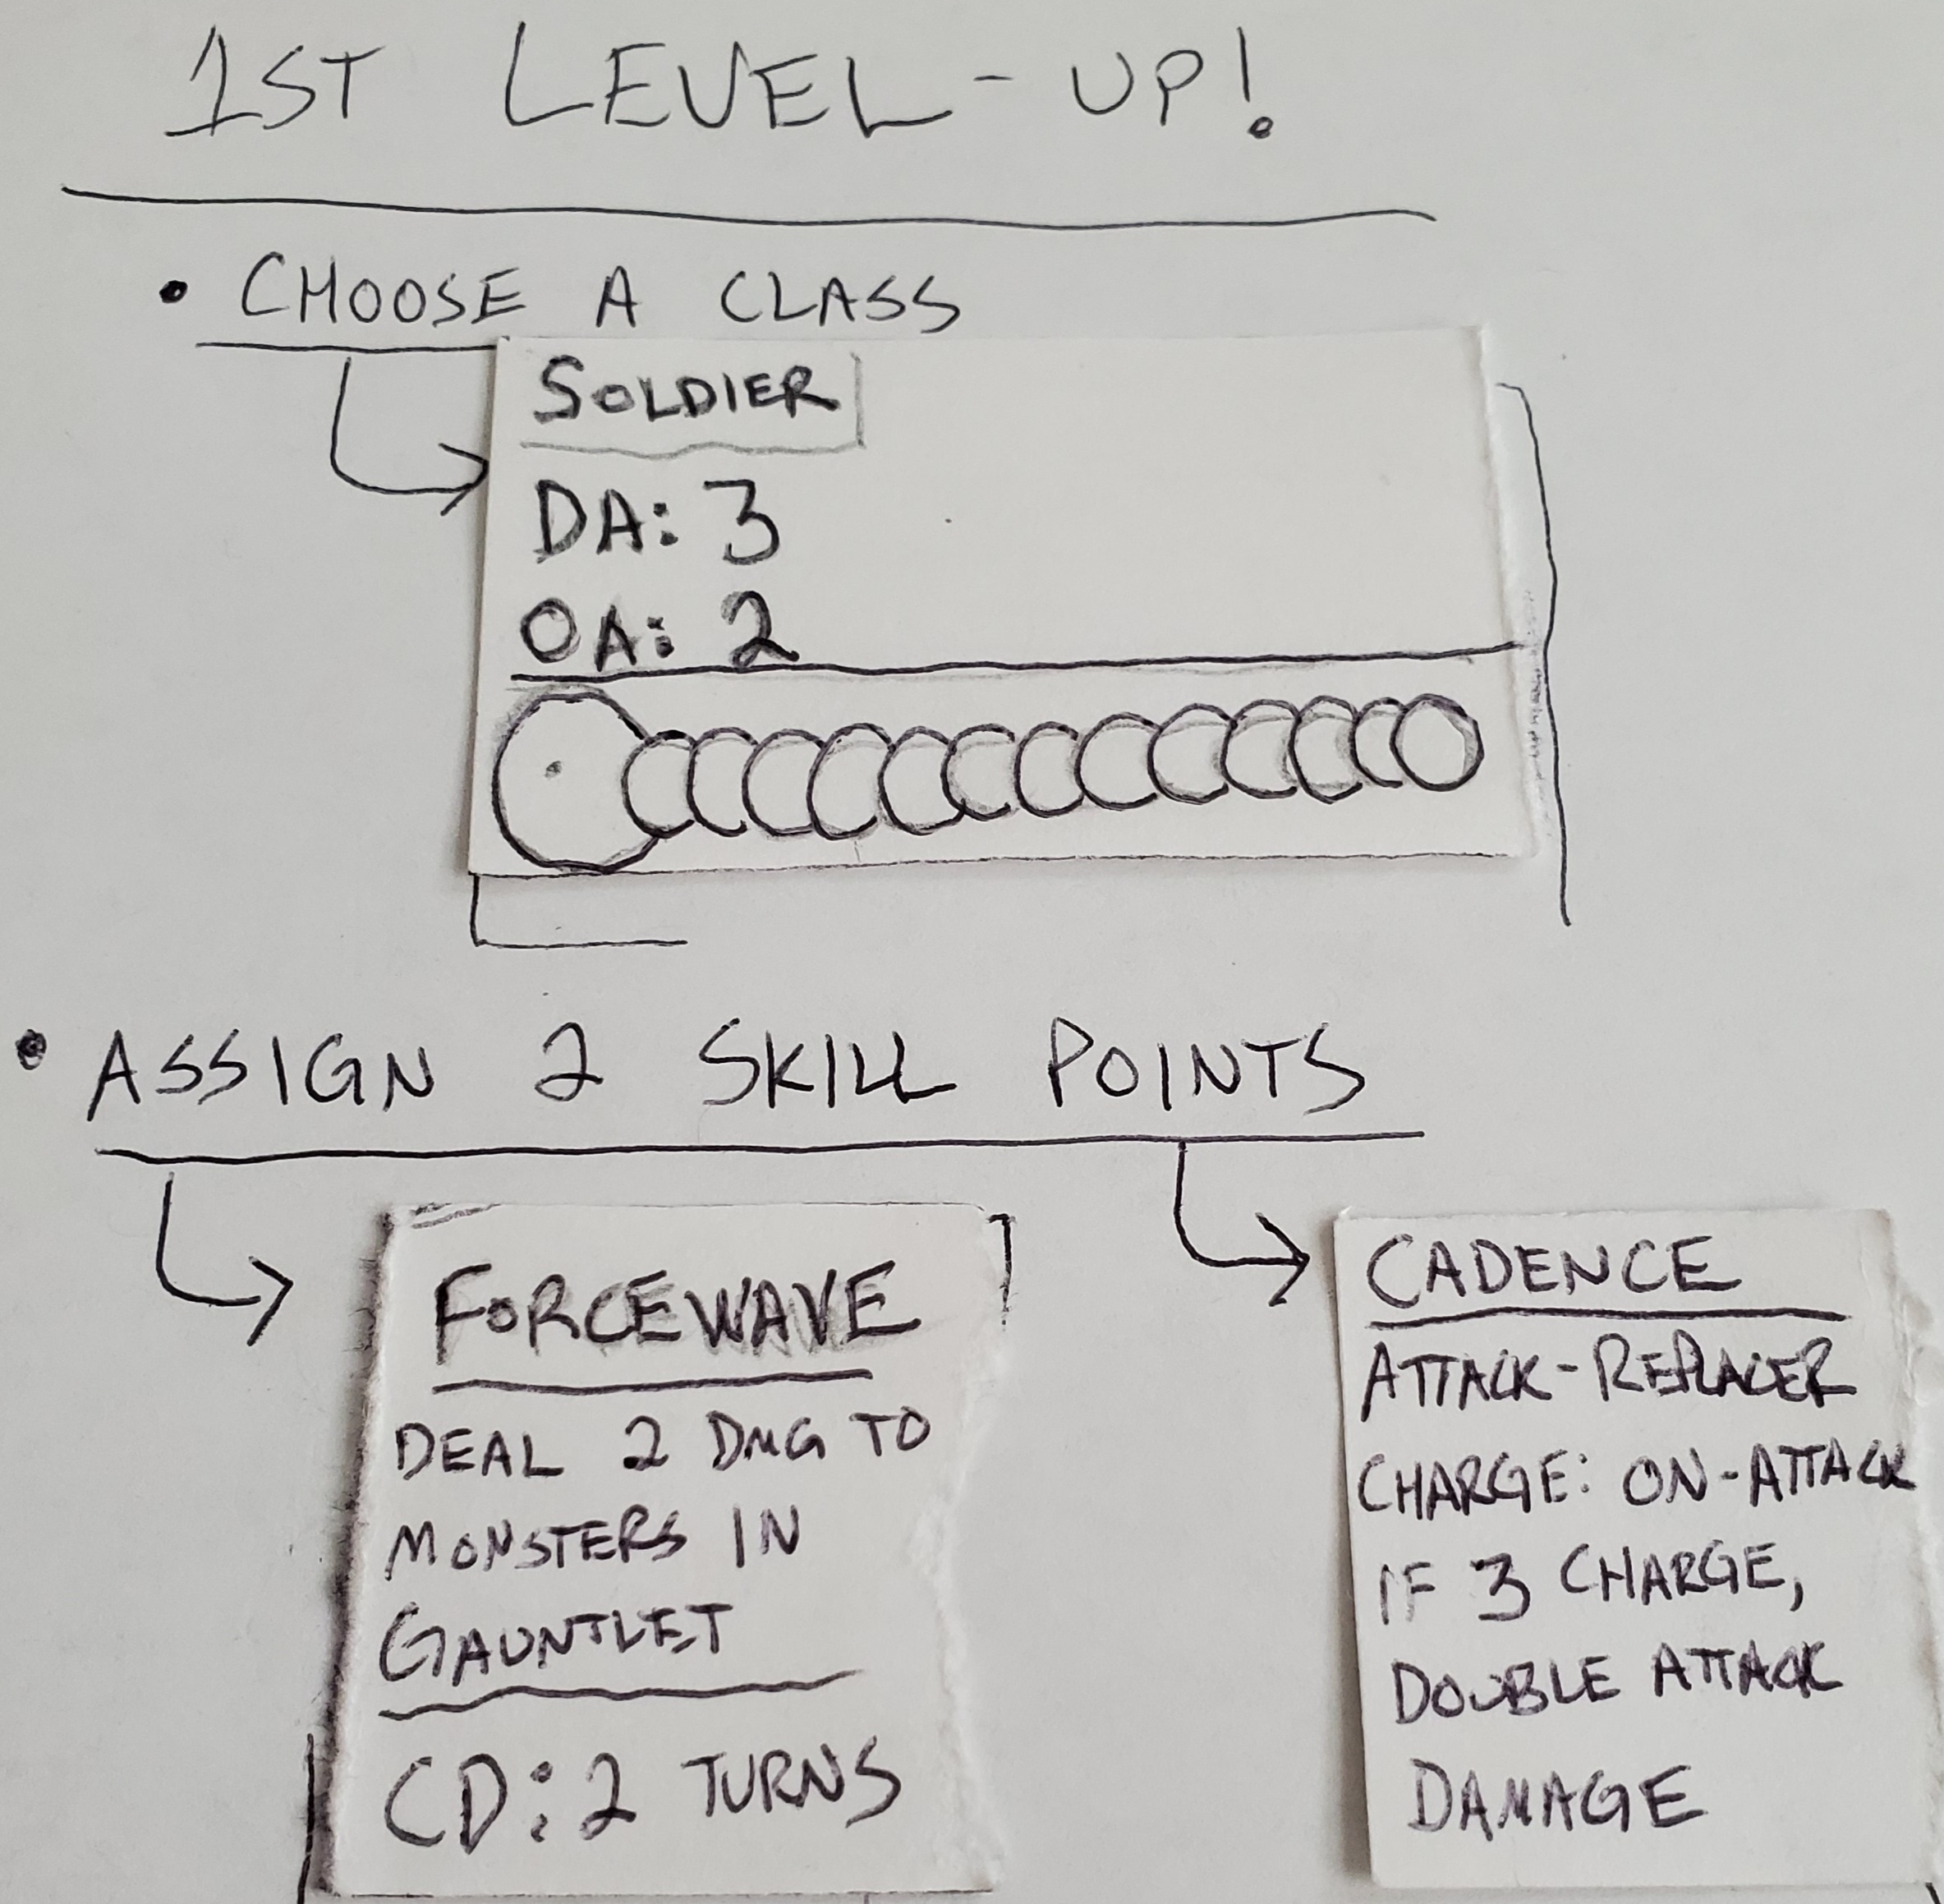
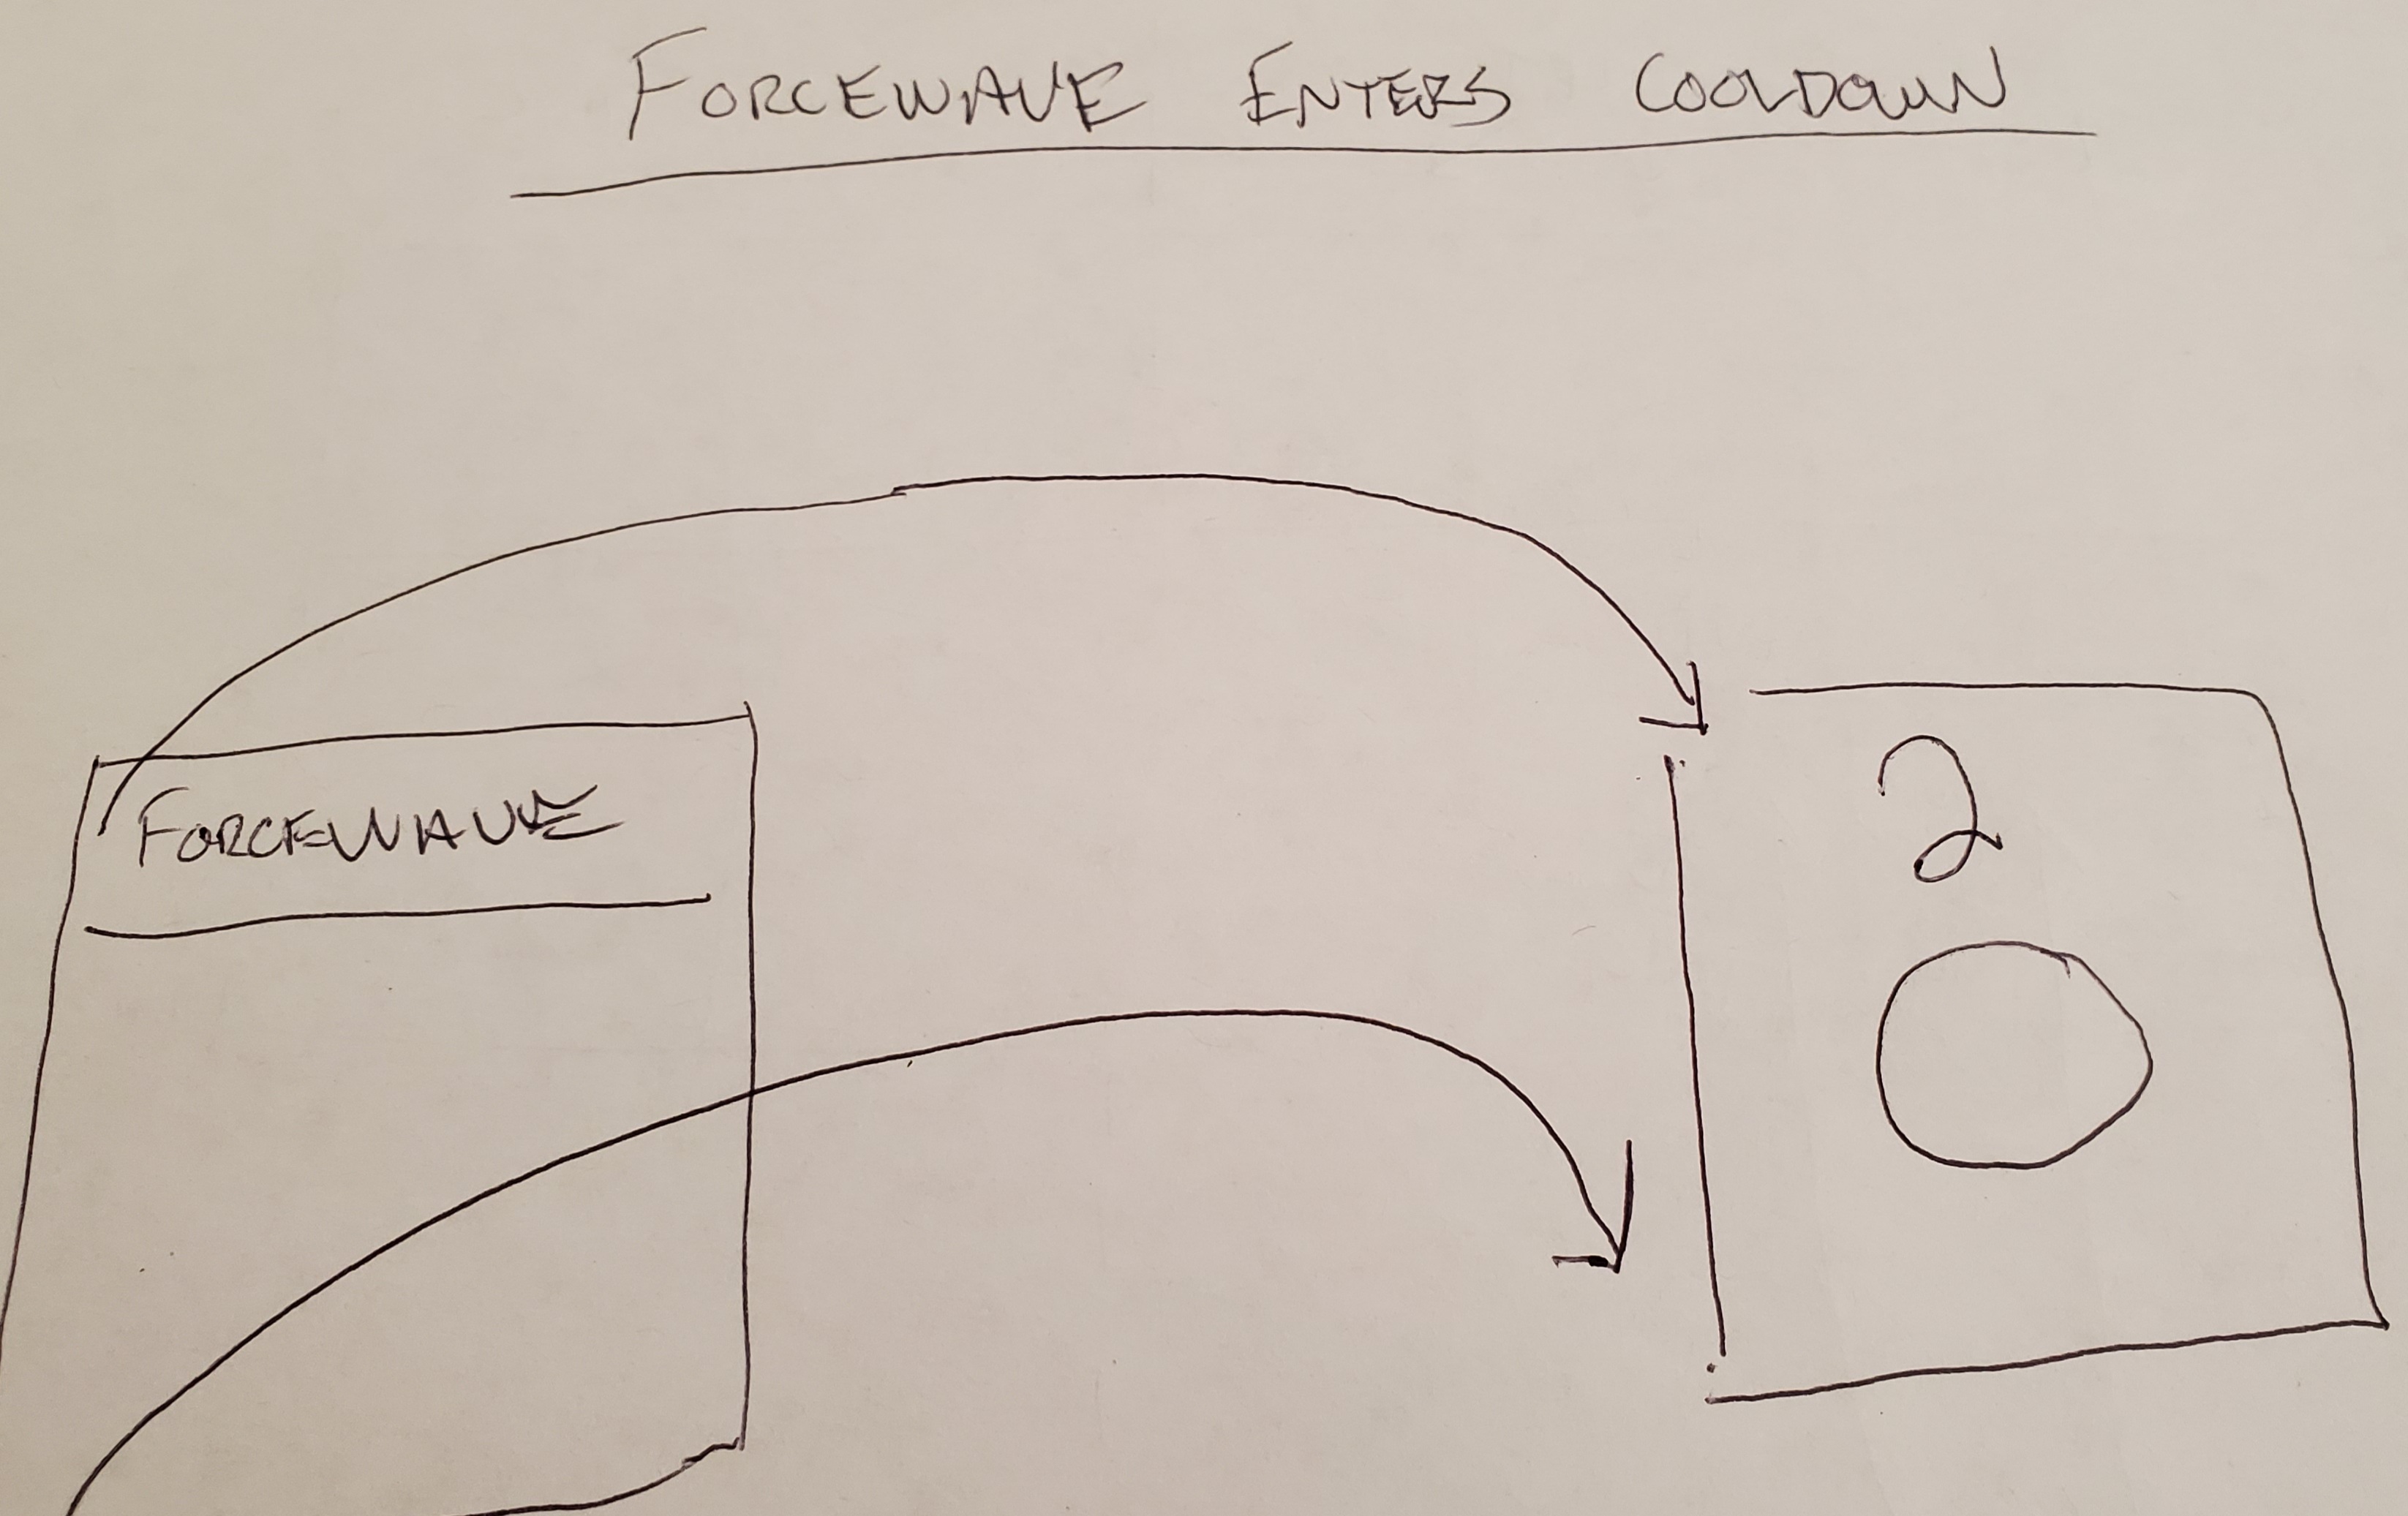
Since 1 level 1 Monster was killed, on turn 1, I level up. On the first level-up, players can choose their Primary Class. I choose Soldier. I then get 2 Skill Points that I can invest in Skill Cards, to unlock them and use them on future turns. I choose Forcewave and Cadence.

As you can see, now that Ive chosen a class, Im gifted with the benefit of a perpetually rising DA and OA boost. Each level gained as a Soldier will increase my DA by 3, and my OA by 2. This is a HUGE stat boost that occurs at each level, and can be tracked using the circles that run along the bottom of the Class card.

LEVEL UP PHASE, PART 2

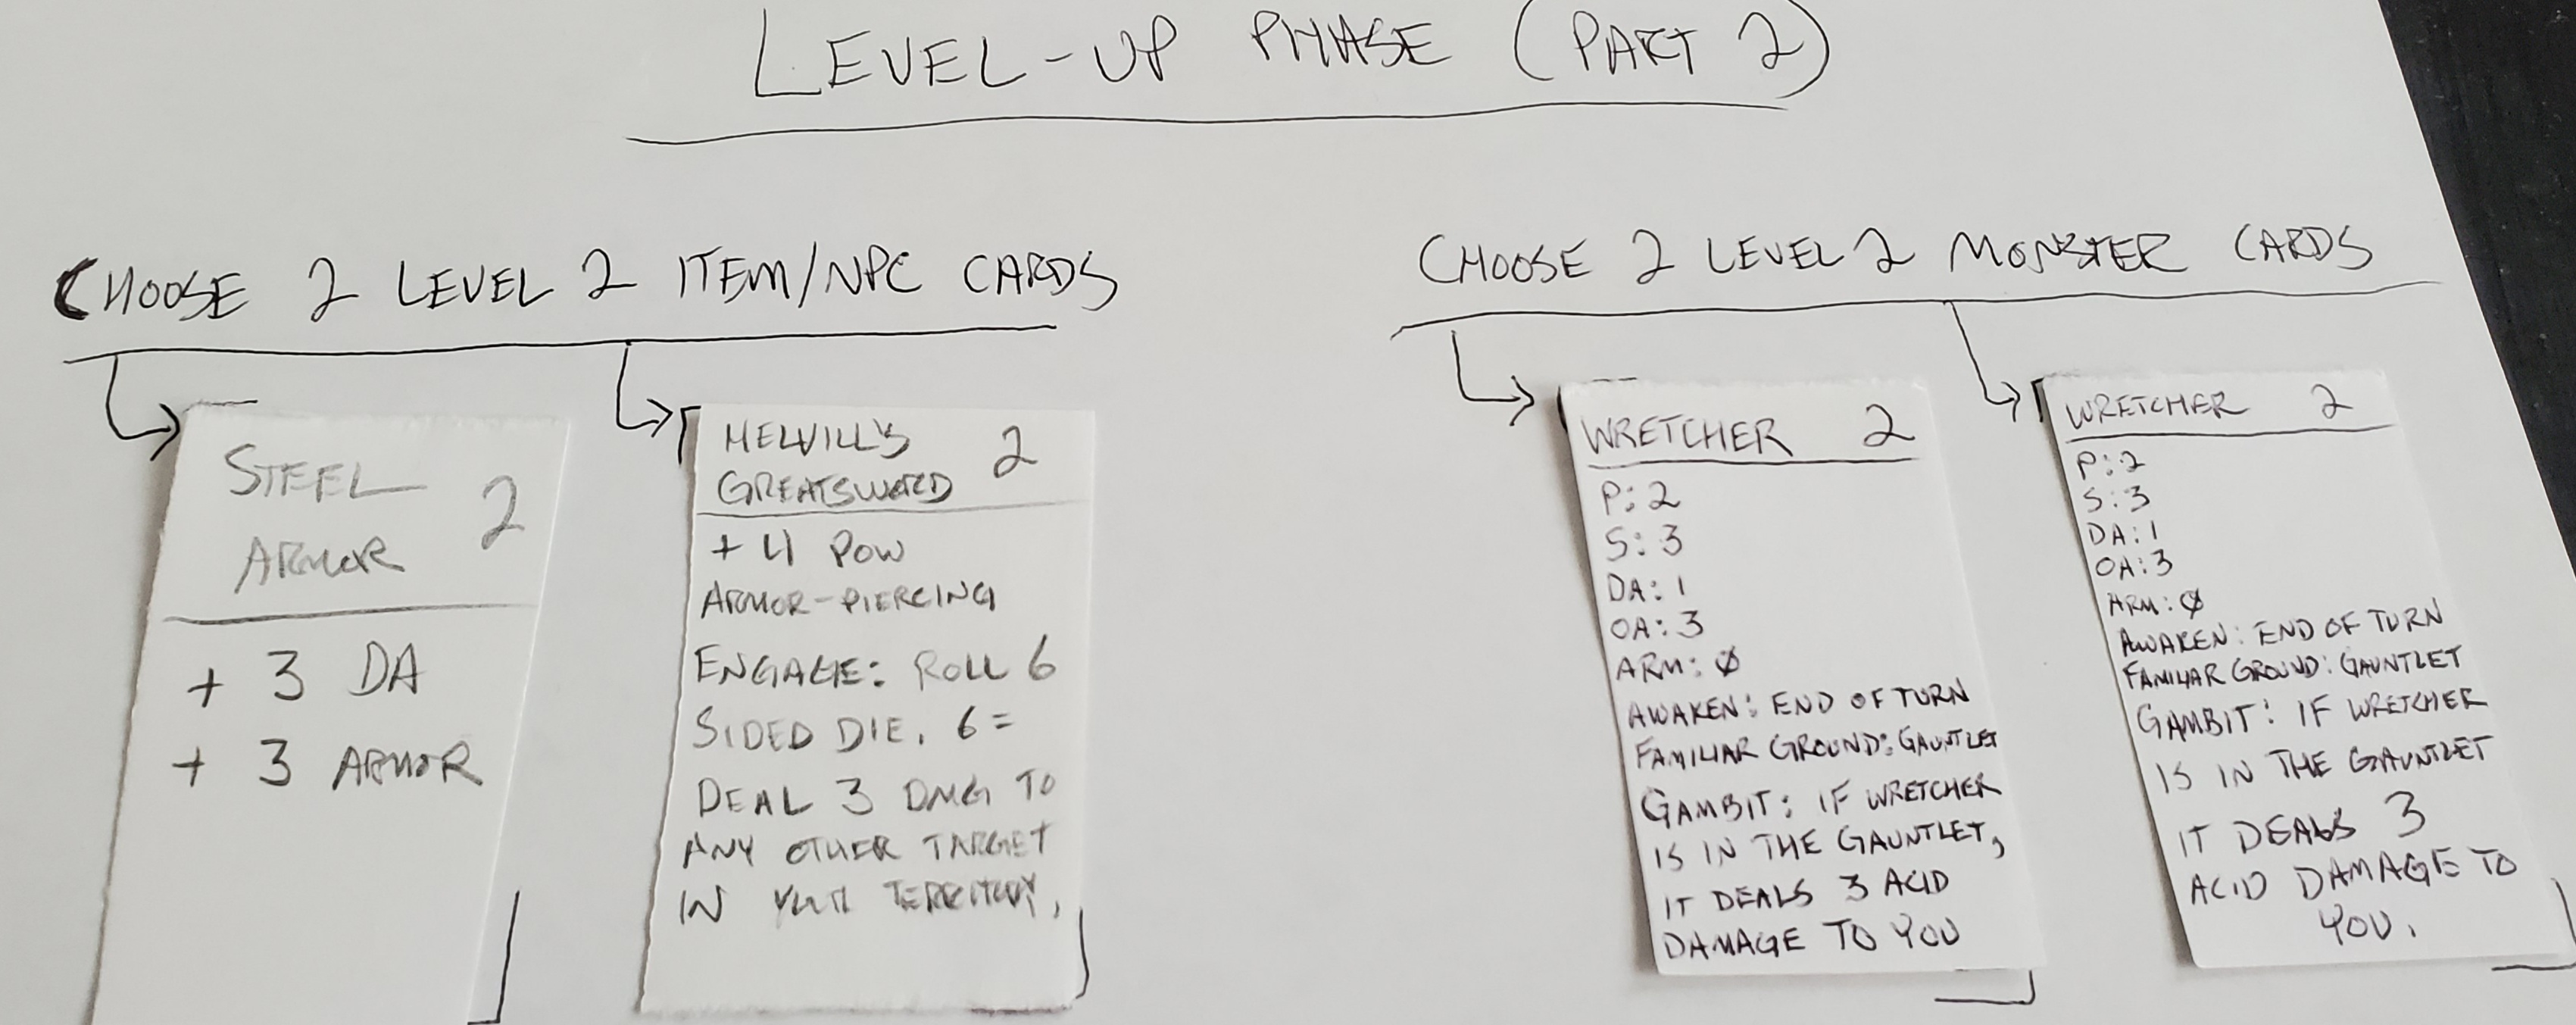
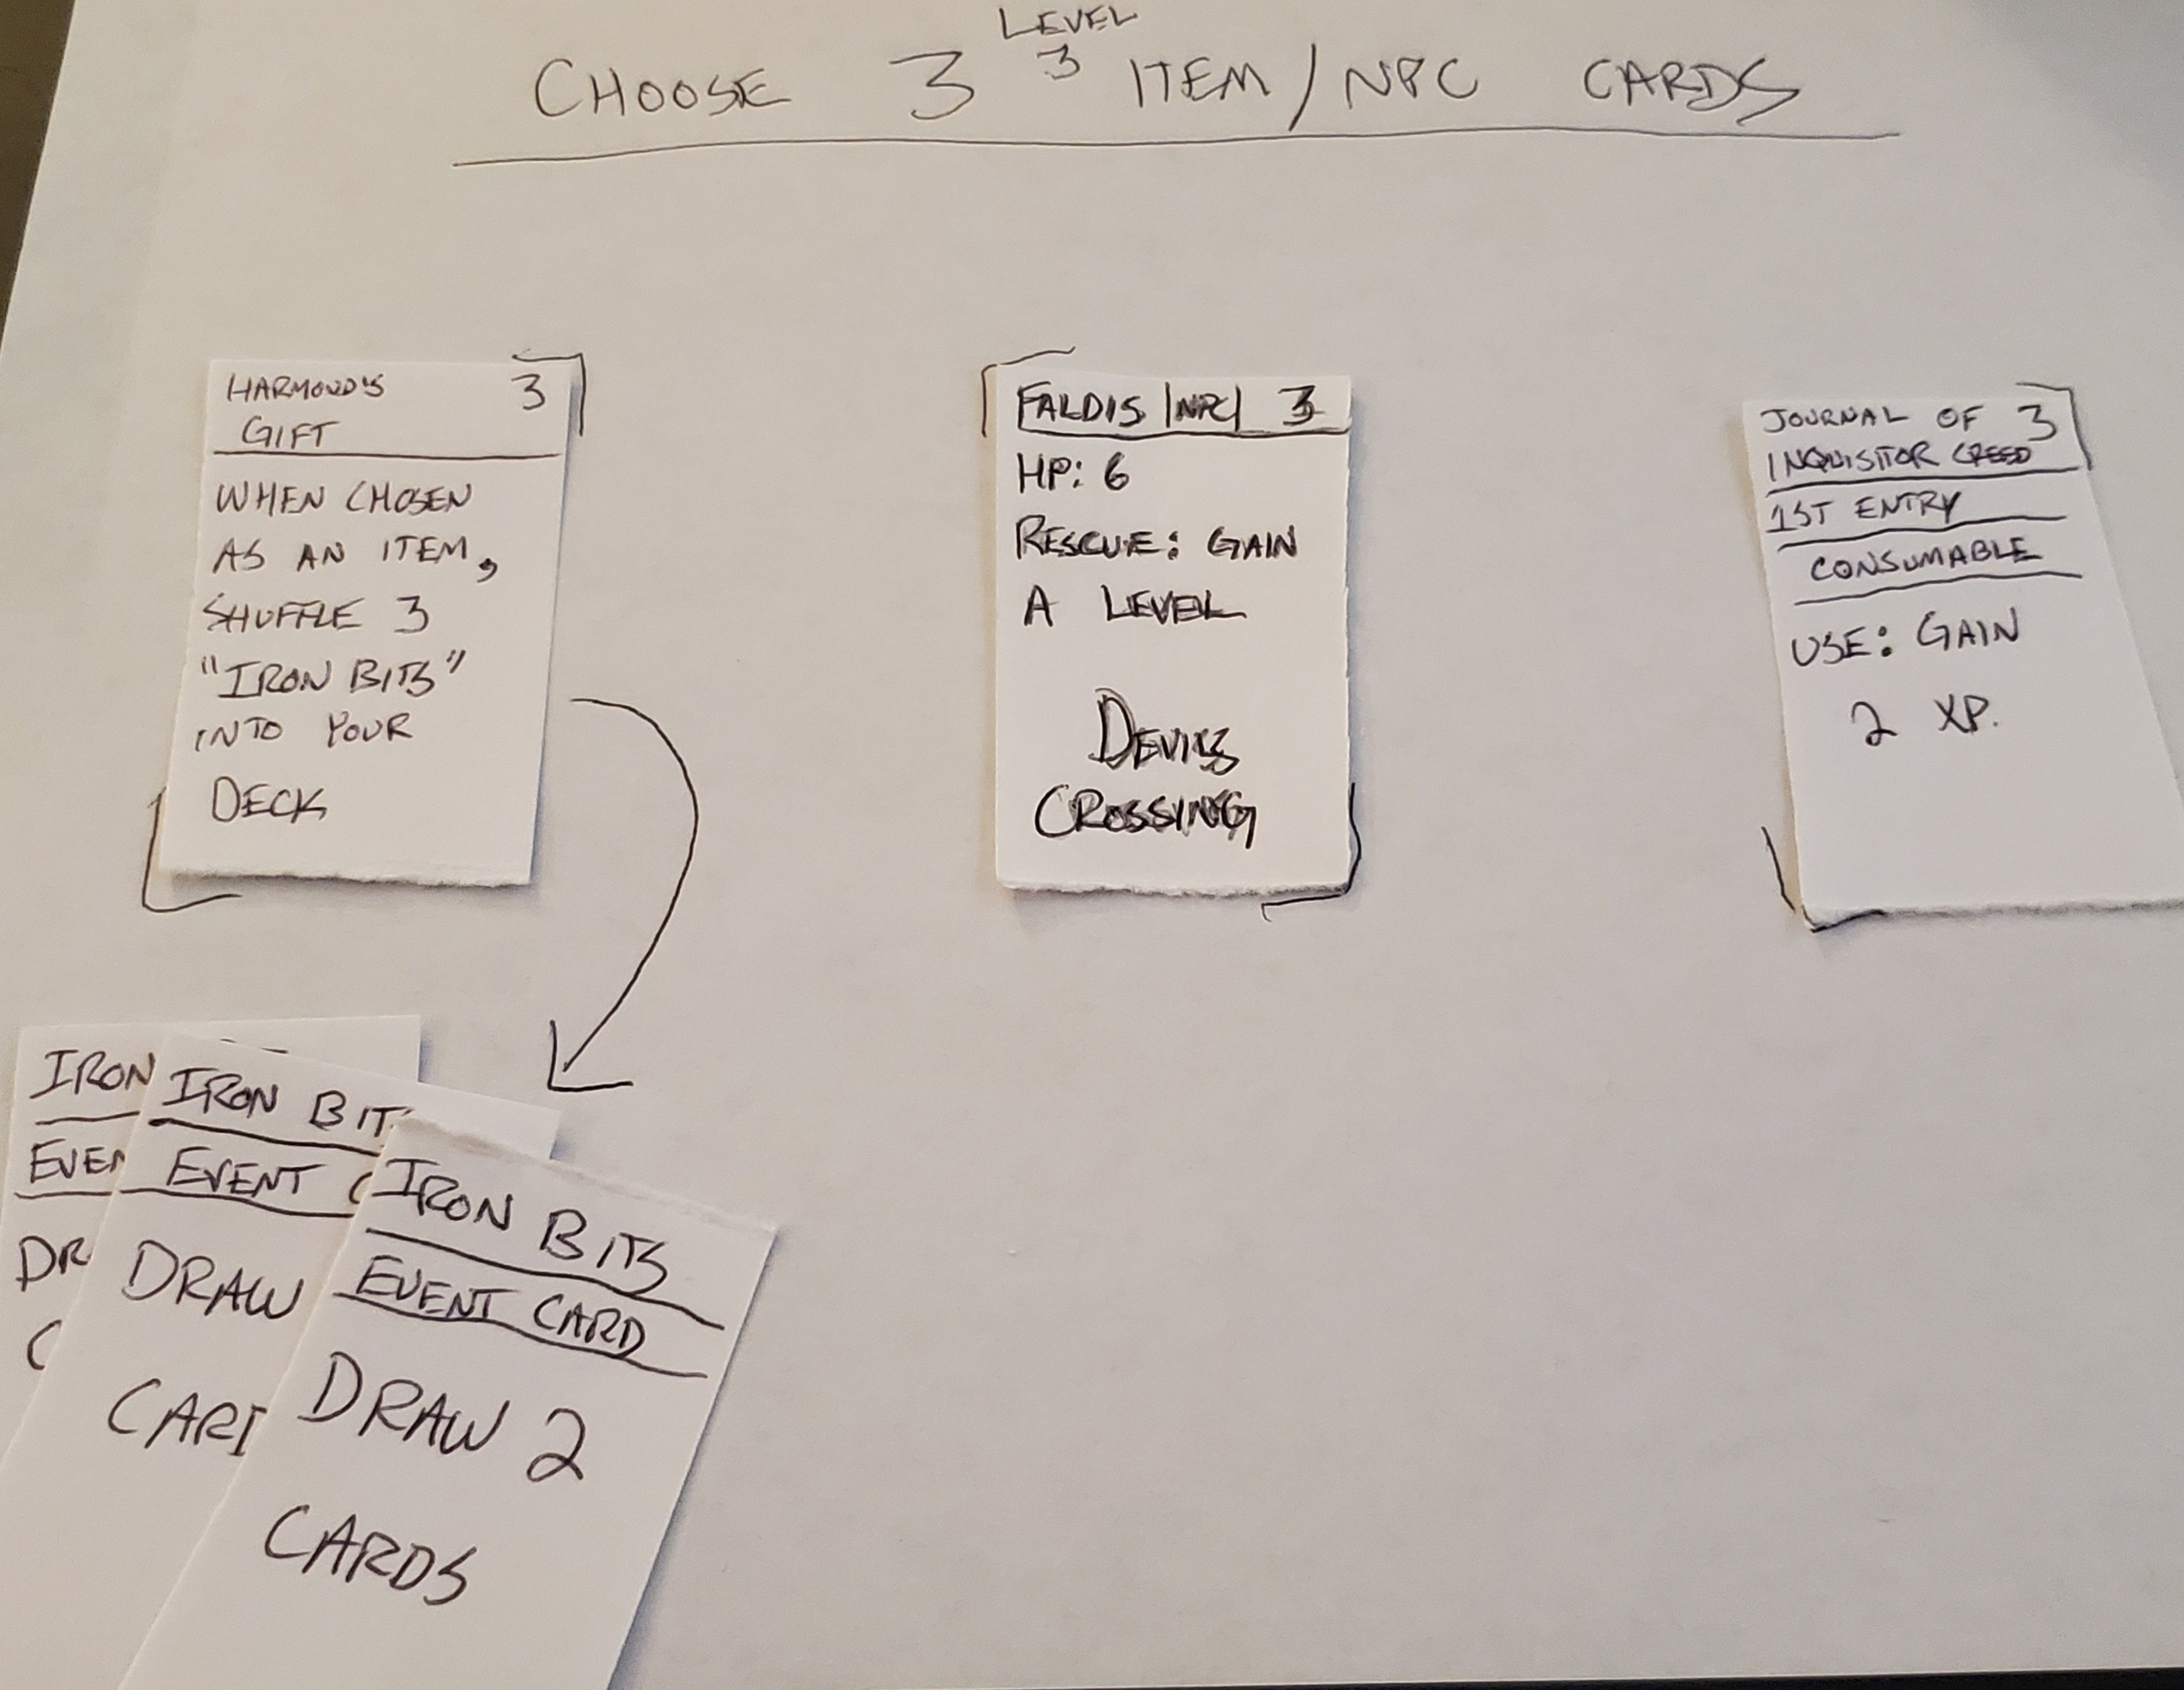
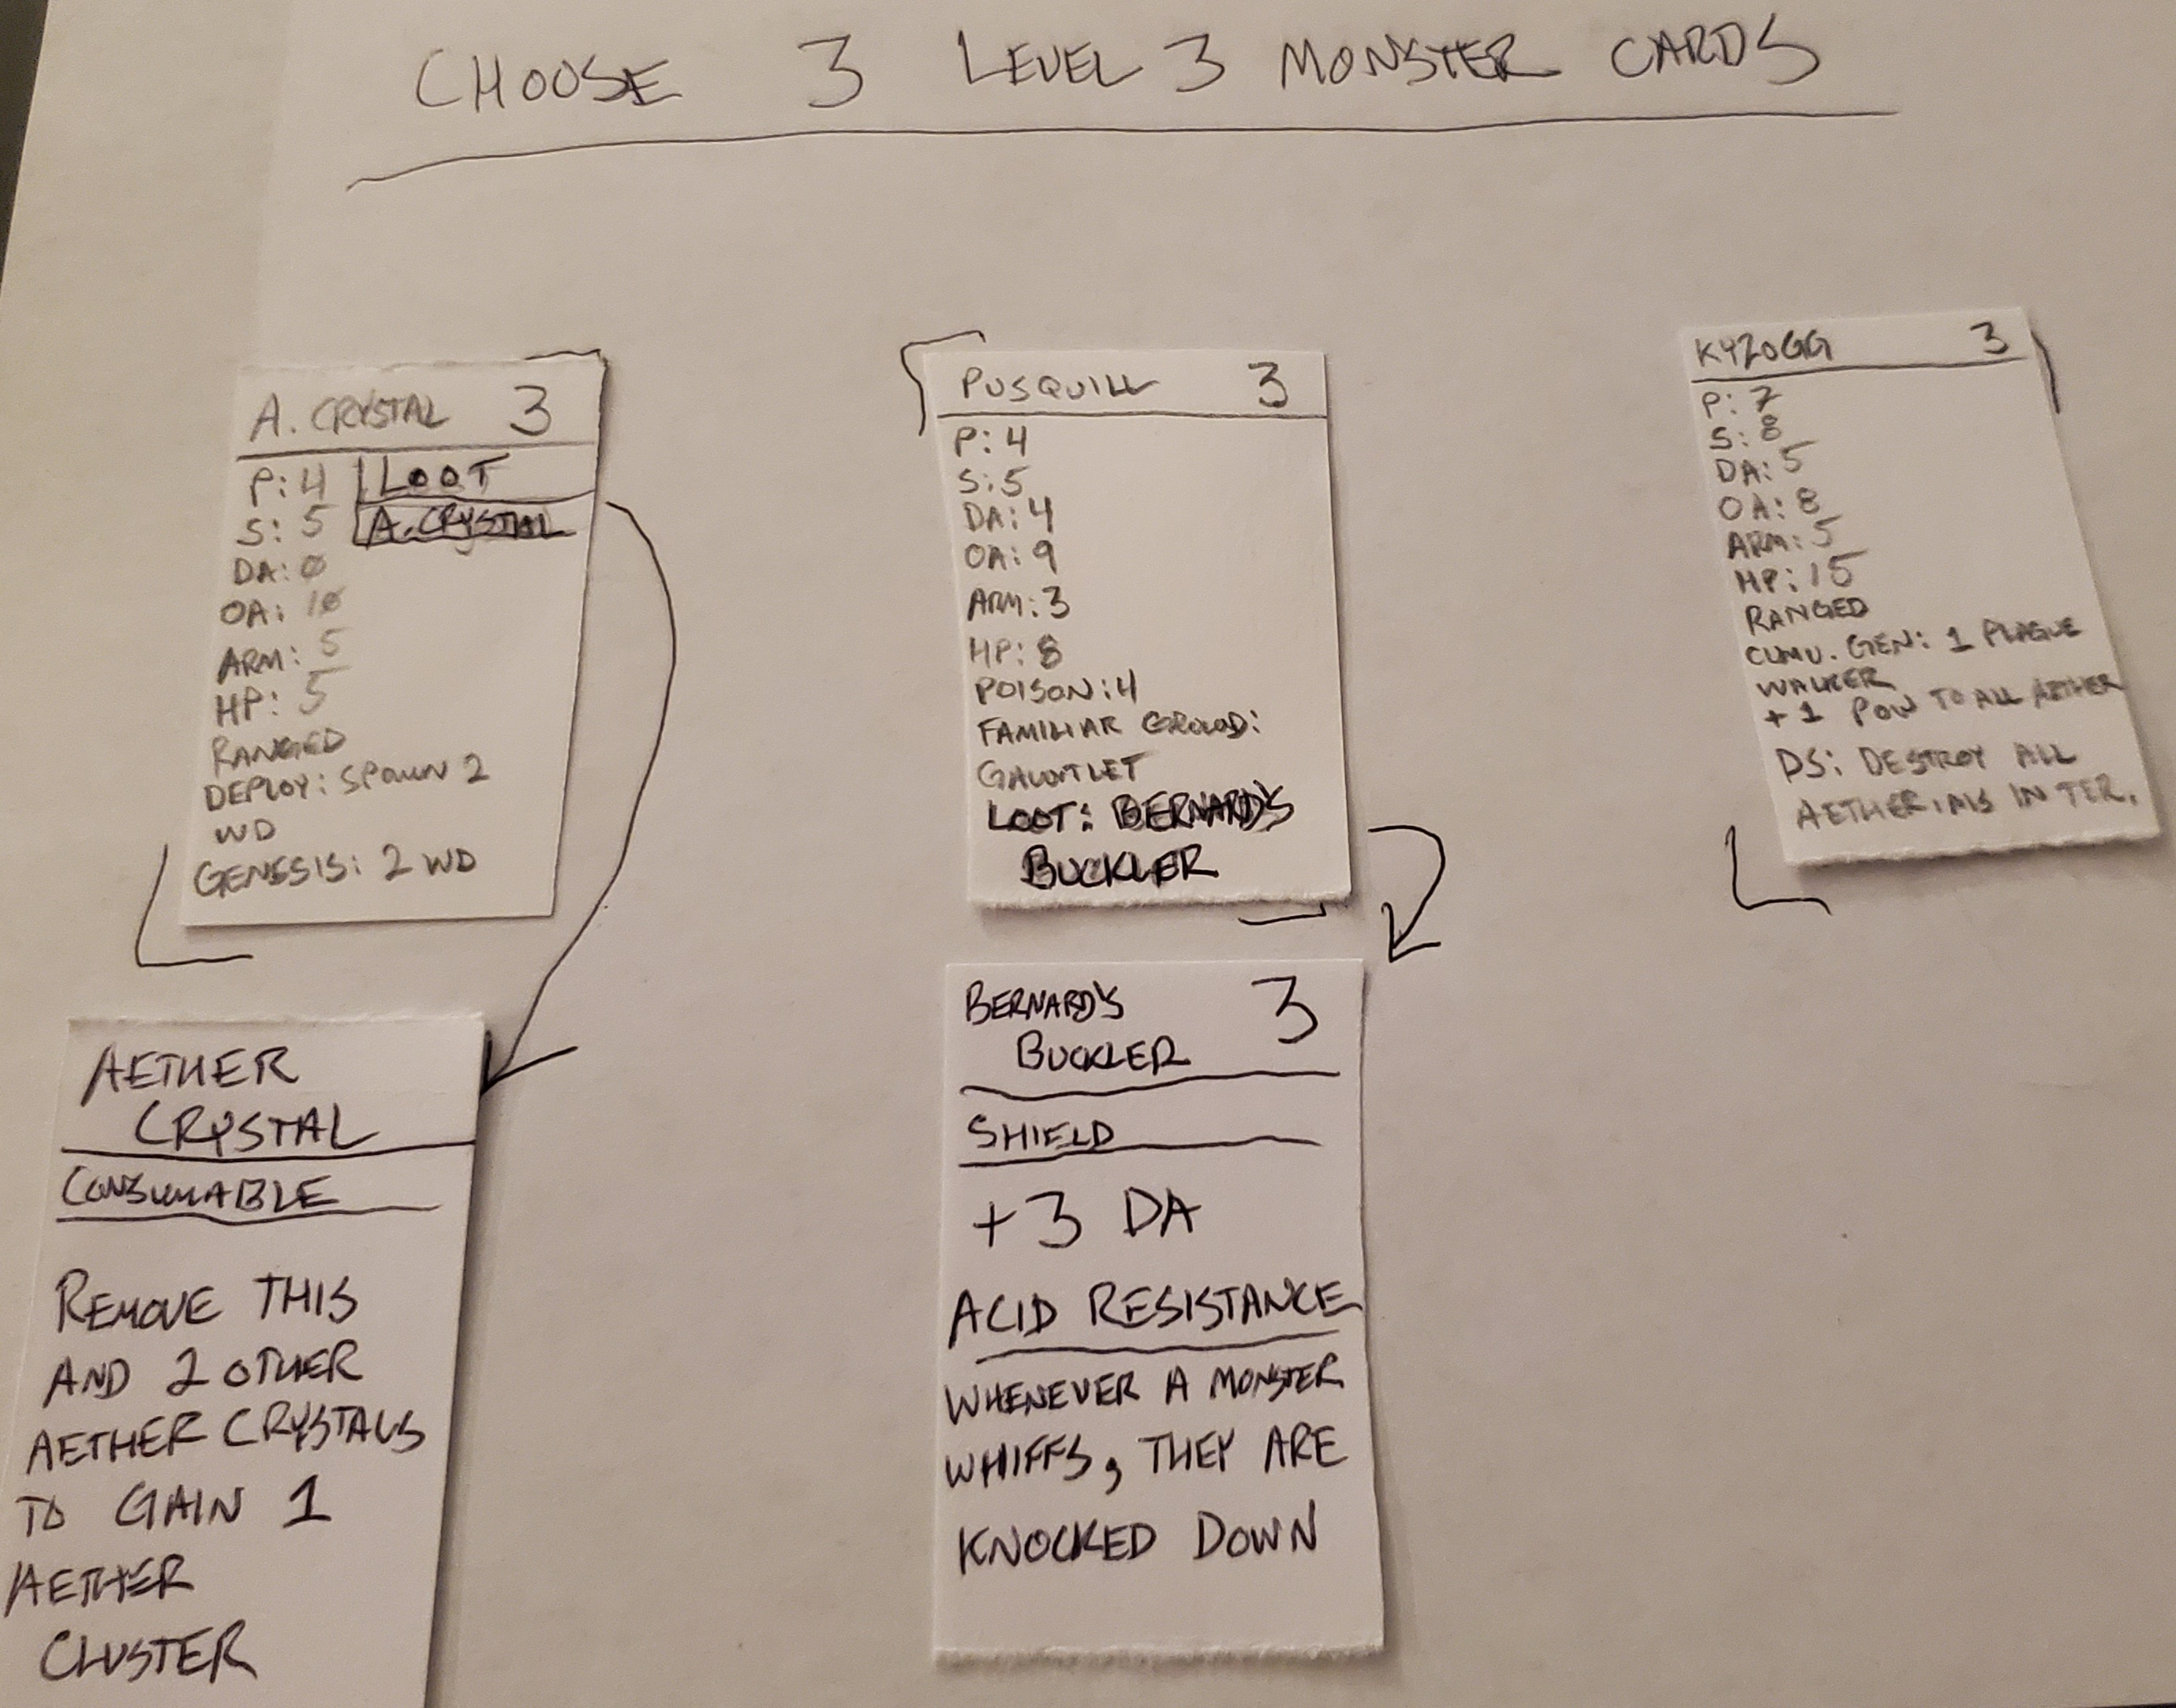
With that out of the way, I can now choose 2 level 2 Item and/or NPC Cards, and 2 level 2 Monster Cards, and shuffle them into my deck. I chose Steel Armor, for even more DA, and a nice fat +3 to Armor. I also chose Helvill’s Greatsword for its huge +4 Power, and Engage ability. For Monsters I chose Wretchers, since their Familiar Ground is the Gauntlet.

Familiar Ground is a Keyword describing the behavior of a character. A character with Familiar Ground will attempt to move into any open slot in the specified area at the beginning of the Constitution Check phase. This essentially means Wretchers are forced to move into the Gauntlet whenever possible, where they are conveniently vulnerable against my Forcewave. With all 4 level 2 cards selected, I shuffled them into my deck, and proceed to the final turn phase.
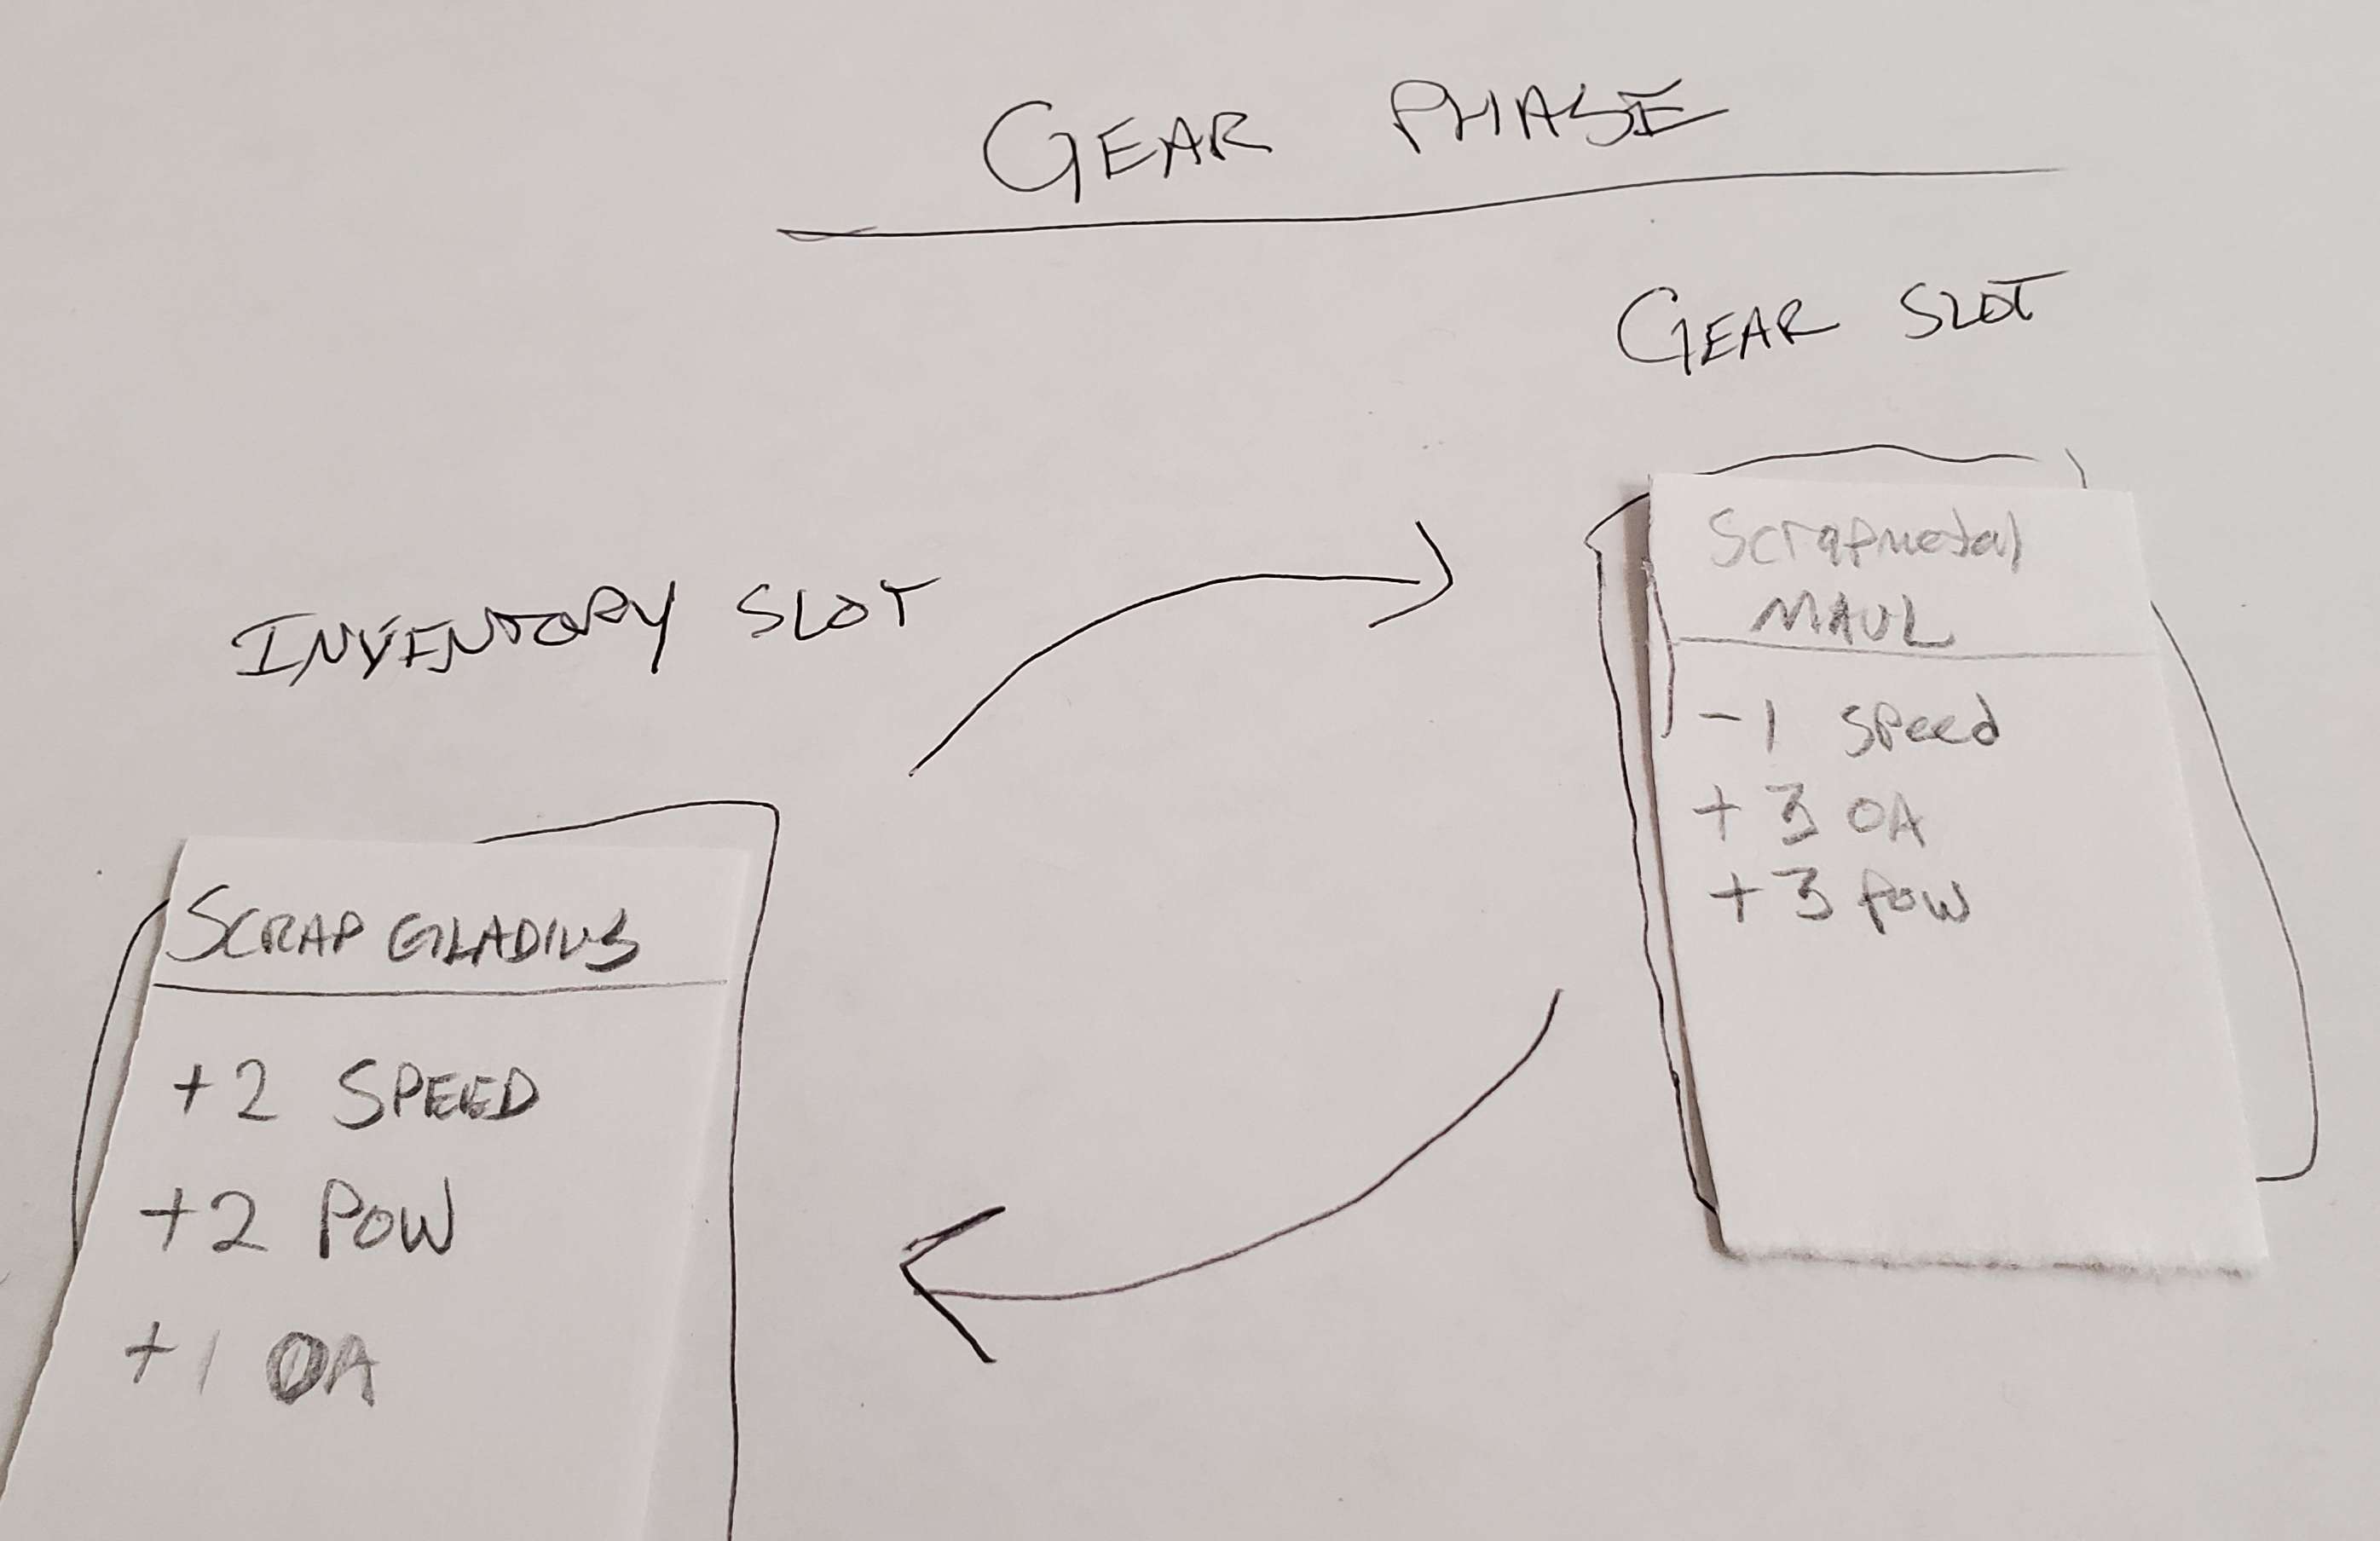
STEP 8: GEAR PHASE

Now is when I can finally replace the Scrapmetal Maul with the Scrapmetal Gladius. Now my Speed rating is 2, and ill be able to strike first before the remaining Walking Dead has a chance to act next turn!

STEP 9: TURN ENDS, NEW TURN BEGINS

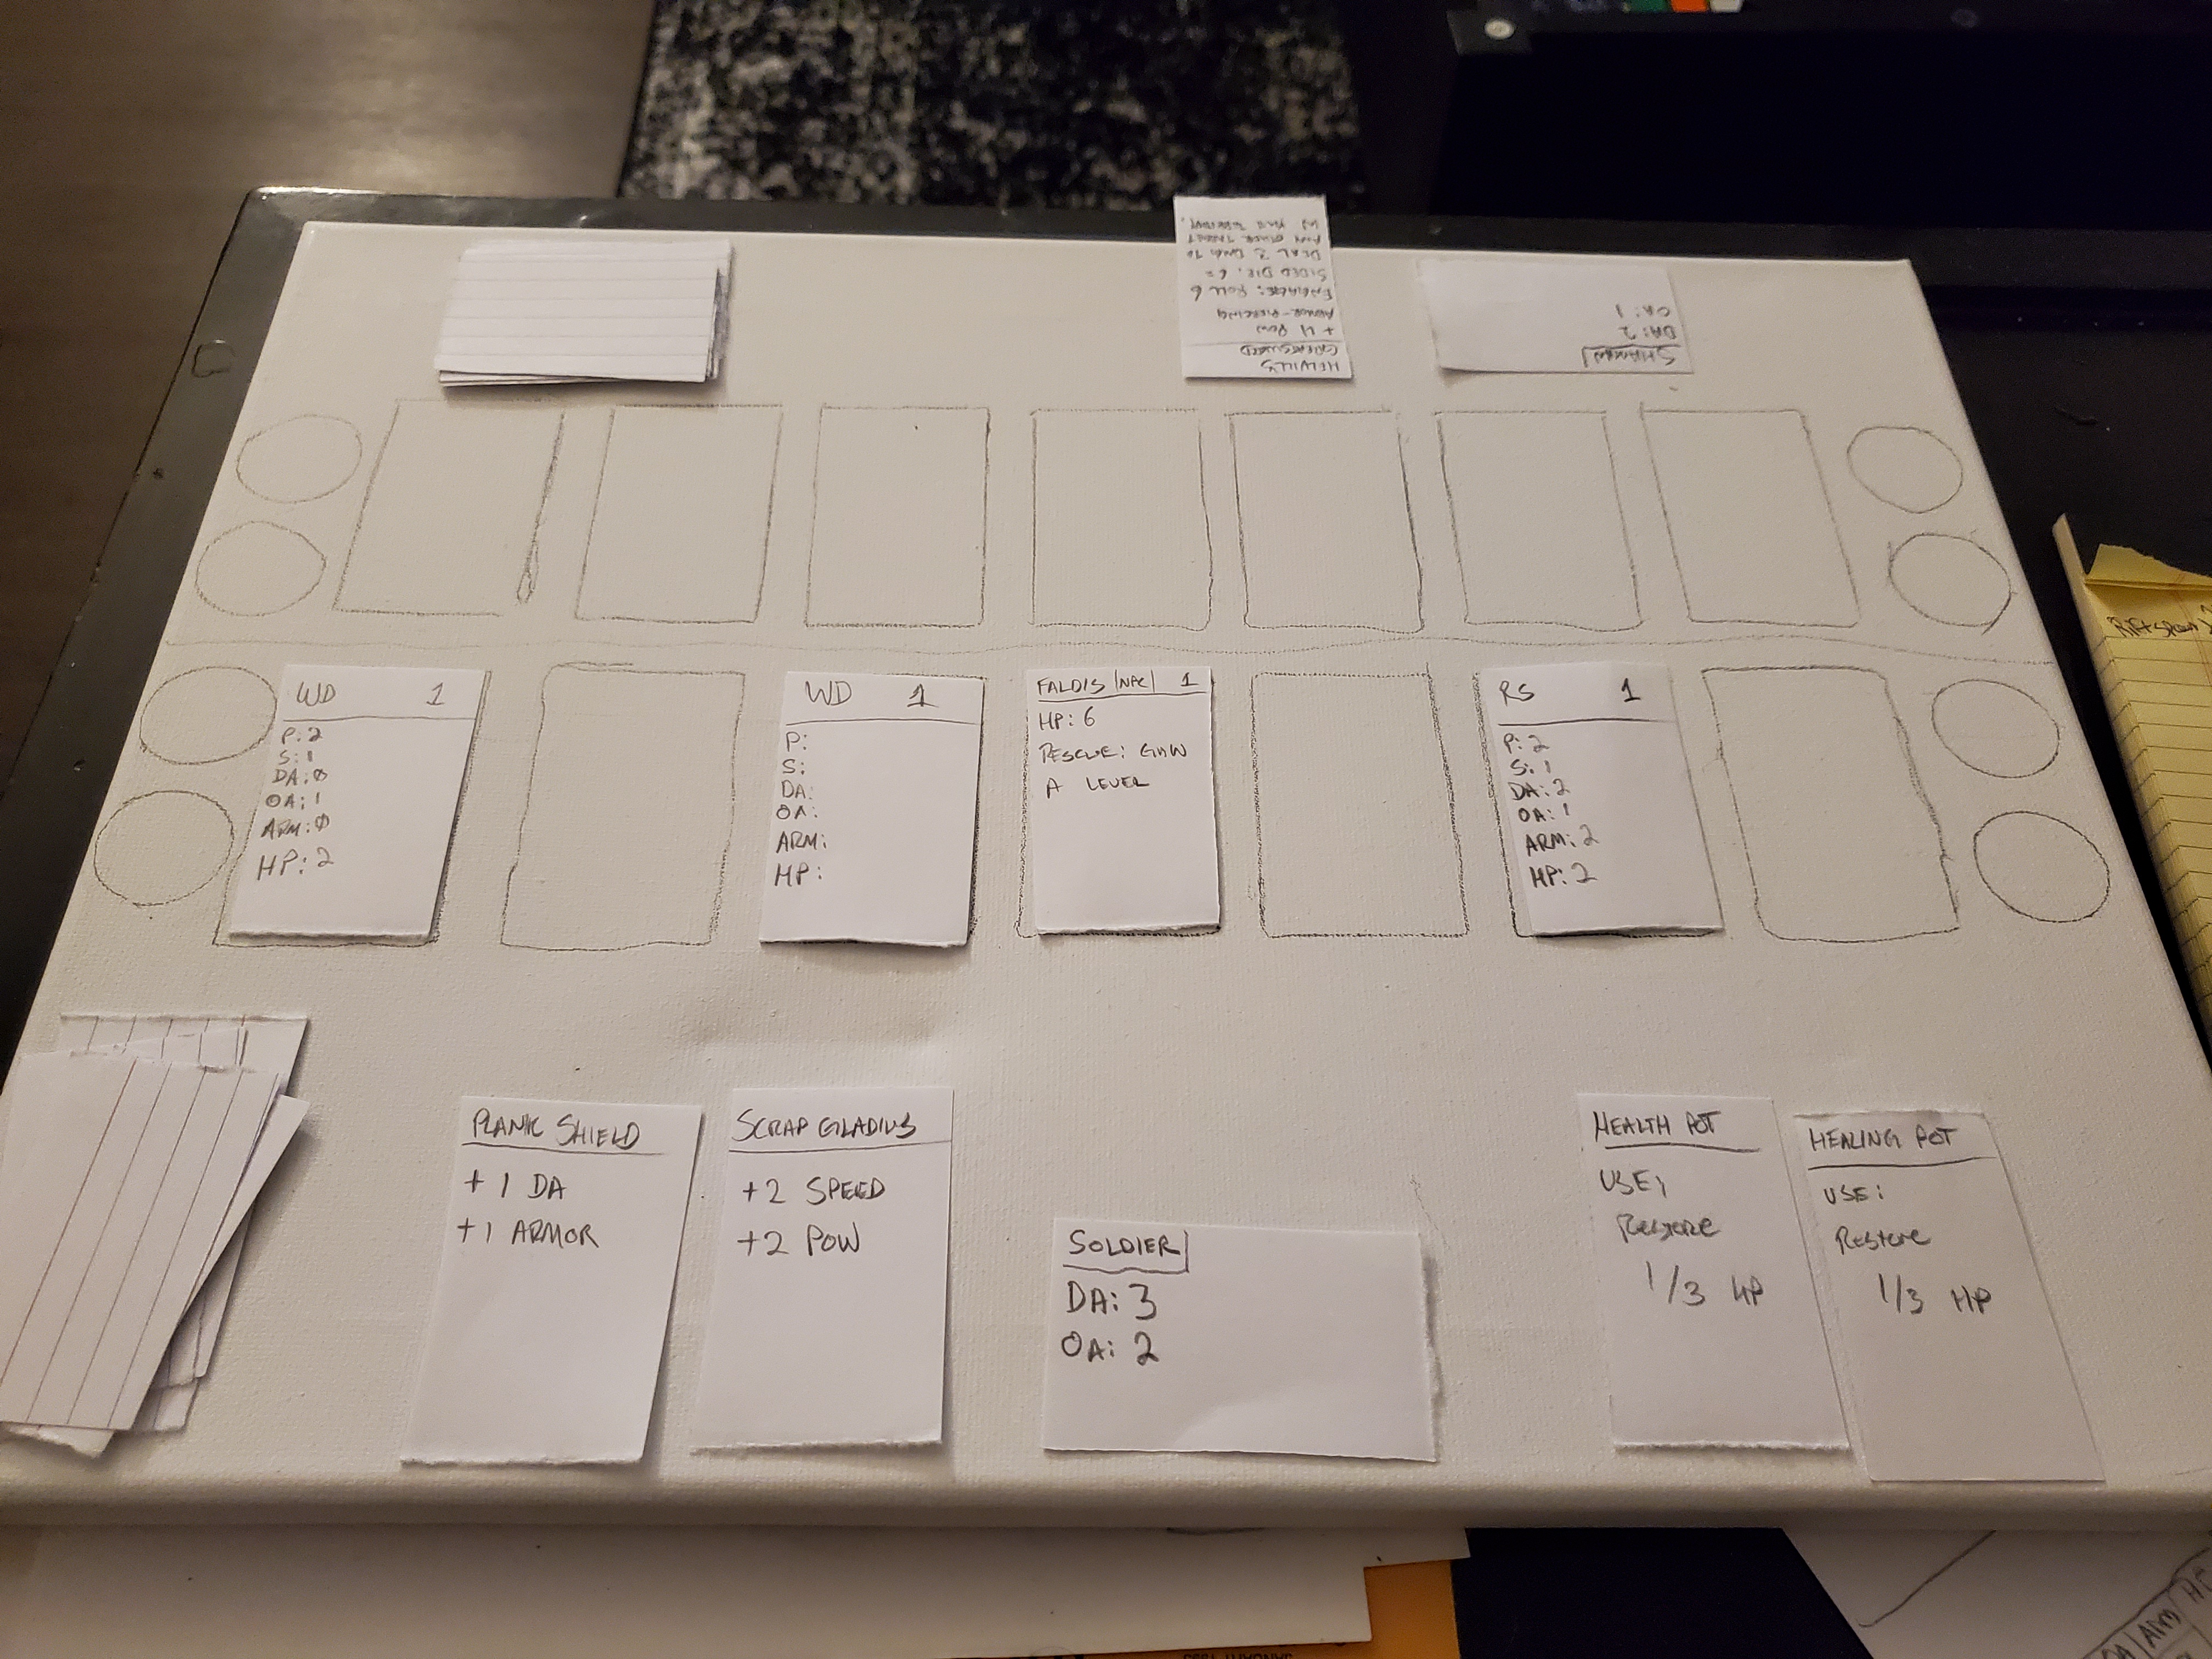
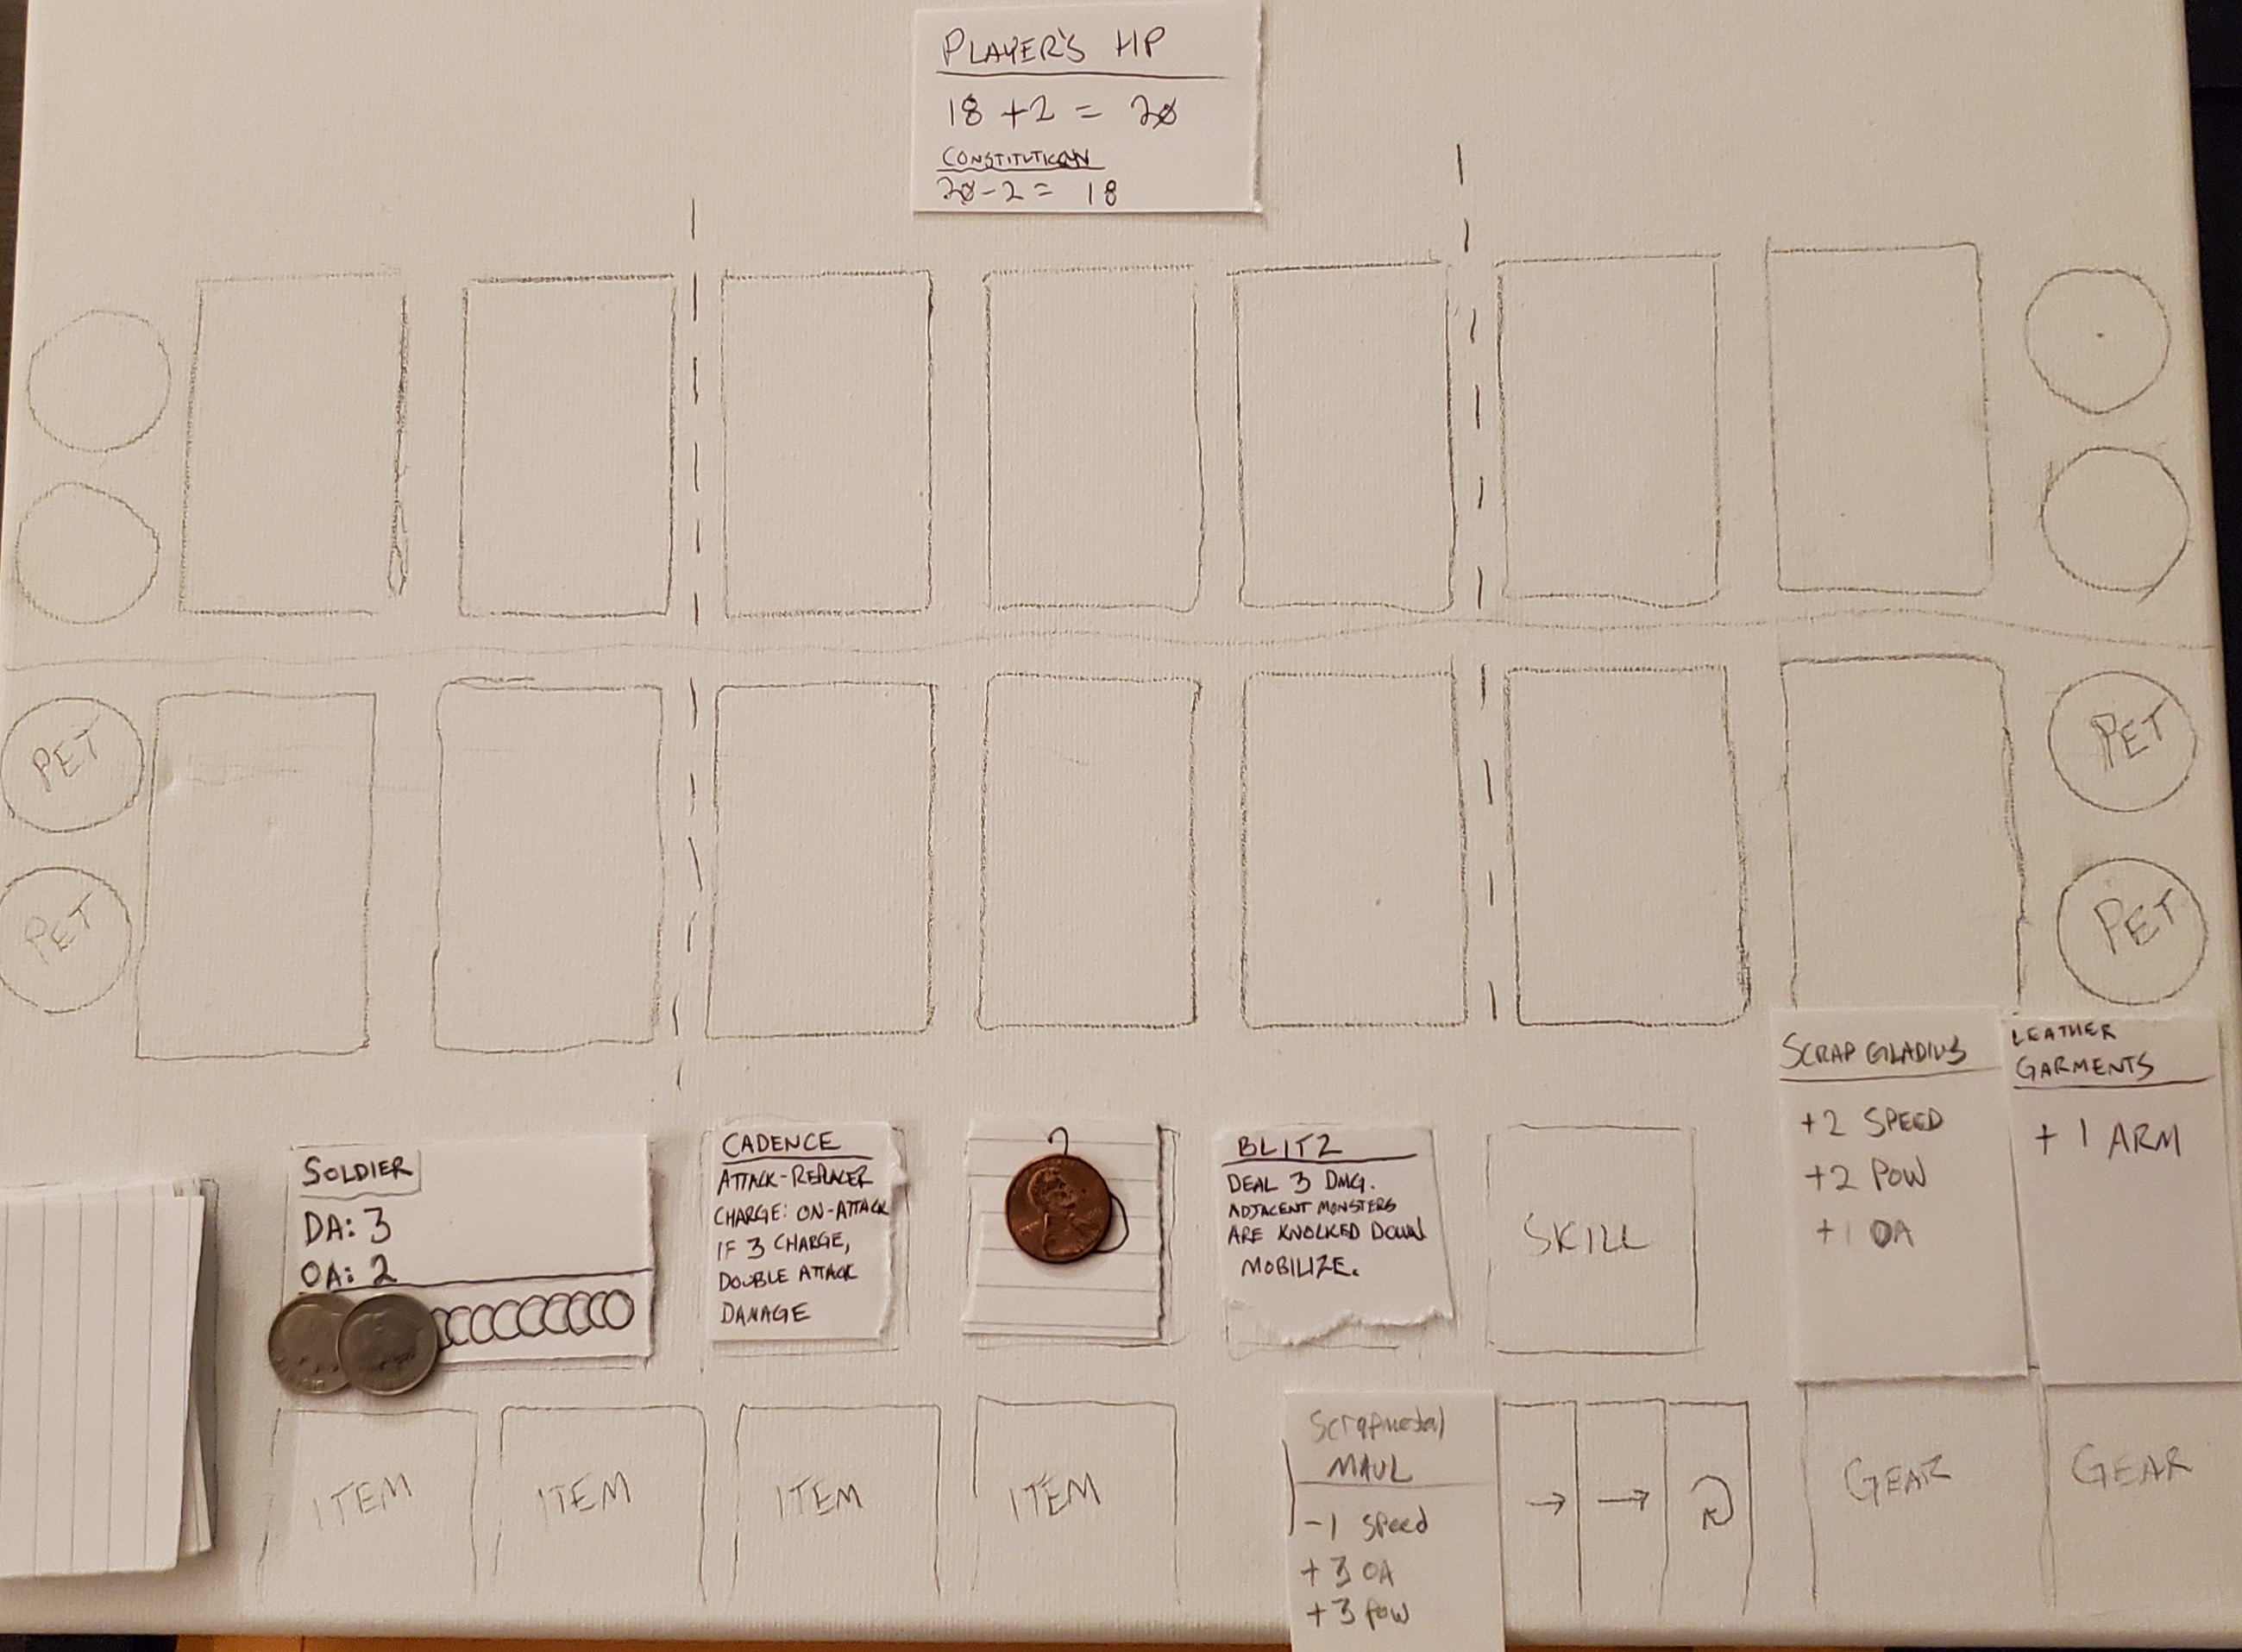
Lets take a look at the board with the final turn phase coming to a close.

As my first turn ends, theres 1 remaining Monster Card on the board, my Scrapmetal Maul is in my Inventory, and as the next turn begins I have Forcewave and Cadence ready for use. My player stats are now;
-Power: 2
-Speed: 2
-DA: 3
-OA: 3
-Armor: 1
-HP: 18

1 Like

TURN 2

TURN 2, STEP 1: CONSTITUTION CHECK PHASE

Since I took damage last turn, I receive no healing during the Constitution Check phase, and the turn progresses to the Draw phase.

TURN 2, STEP 2: DRAW A CARD

I draw another Walking Dead. Its important that I make the most of this turn, as this is turn 2, I will need to gain 2 XP in order to level up. The combined XP total of both Walking Dead is 2 XP, so I need to be able to kill them both this turn. Good thing I chose Forcewave as a skill! I placed the Walking Dead to the left of the one on the board.

TURN 2, STEP 3: COMBAT PHASE

With a Speed of 2, I can act before the Monsters on the board. I choose to use my Forcewave skill. Since the Walking Dead have 0 DA, and are both in the Gauntlet, this is like shooting fish in a barrel. Forcewave deals 2 damage to all Monsters in the Gauntlet, killing both Walking Dead and sending them to the Shattered Realm Pool. It then enters Cooldown (flips face-down). It has a Cooldown of 2 turns, so when it’s flipped face down, I put 2 coins on it to represent its cooldown time. At the start of each turn, Ill remove 1 of these coins, and when the last is removed, Forcewave will flip face-up again. This concludes my Combat Phase.

TURN 2, STEP 4: LEVEL-UP PHASE, PART 1

Because its my 2nd turn, the XP threshold to gain a level is 2 XP- Precisely the amount of XP I gained by killing both Walking Dead. I gain a level. My Soldier mastery goes up, so I now have a total of 6 DA and 4 OA just from my Soldier Class mastery. I get 1 Skill Point, and must select 3 Level 3 Item/NPC Cards and 3 Level 3 Monster Cards.

With my Skill point, I take the Blitz Skill Card. Blitz is a powerful card that can Knock Down enemies, which takes them off the board and sends them to the bottom of my deck. Not only that, Blitz can Mobilize. Mobilize is an incredibly tactical ability that causes Territories to switch. This can be super useful if you need to close distance to get targets in the Rear Territory into striking range in the Immediate Territory. NPCs are unaffected by Mobilize too, so it doubles as a means of protecting your NPCs.

LEVEL-UP PHASE, PART 2

For Item/NPC cards, I choose 3 unique picks. Harmond’s Gift, Faldis (NPC), and Journal of Inquisitor Creed 1st Entry.

Harmond’s Gift is a rare type of Item card which, when chosen as an Item card in the Level-Up Phase, instead shuffles 3 Event Cards into the deck. Event Cards are cards which, when drawn, exhibit various one-time effects on the game and are removed from the game immediately thereafter. In this case, Harmond’s Gift adds 3 “Iron Bits” Event Cards to the deck. Iron Bits, when drawn, will cause me to draw 2 cards, and then be removed from the game.

Faldis is an NPC Card, which has the Rescue Keyword. Rescue is an NPC-specific Keyword which
will reward the player with a bonus if they survive an entire turn cycle from when they enter play. In the case of Faldis, that reward is me gaining a level!

Journal of Inquisitor Creed, 1st Entry, is a Consumable Item card that will grant me 2 XP when used, and will then be removed from the game. A card like this is essential to ensuring you hit your levels each turn, in the event youre unable to hit the XP threshold on a turn.

LEVEL-UP PHASE, PART 3

For Monsters I chose an Aether Crystal, Pusquill, and Kyzogg the Reanimator for the loot and effects they provide (please note that I had designed Kyzogg and Pusquill prior to the MI update and will be redesigning them to provide the MIs as loot).

Note that Aether Crystal and Kyzogg are Ranged Monsters. This means I cant attack them or use Skills on them directly if there are any non-ranged Monsters on the board. Both of these Monsters can also spawn additional Monsters on the board (Genesis and Cumulative Genesis). For more on that, see the Keywords section. With all cards chosen, I shuffle them into my deck and with nothing to do in my Gear Phase, the turn ends and were on to Turn 3!

1 Like

TURN 3

TURN 3, STEP 1: CONSTITUTION CHECK PHASE

At the start of the Constitution Check phase, I remove 1 Cooldown Coin from Forcewave. Then, because I took no damage last turn, I gain 2 HP. This decreases my Constitution by 2 to 18. On my third turn, looking at the board state, I have the below stats;
-Power: 2
-Speed: 2
-DA: 6
-OA: 5
-Armor: 1
-HP: 20

TURN 3, STEP 2: DRAW PHASE

I draw an Iron Bits Event Card, and draw 2.

I draw an Aether Crystal and a Walking Dead, and place them in the Gauntlet.

The Aether Crystal has “Deploy: Spawn 2 Walking Dead”, and thus it creates 2 Walking Dead when it enters play. I place them next to the Aether Crystal. Looking at the board, it appears I wont be able to gain a level this turn. This means I miss out on the chance to get more powerful, and also could potentially make leveling next turn more difficult as well.

Something Ive noticed while developing this game is the similarity between the struggle to level each turn, and the struggle to “curve out” efficiently each turn in Magic: the Gathering. A big part of the game design hinges on the ability to gain a level each turn, so players need to choose the Skills they use and the cards they add to their decks very carefully. Hopefully this helps visualize the general concept of this game. I will continue working on it and posting updates when i can.

1 Like

Dude this is seriously monumental. You are putting work into this mad scientist project! Well done. I wish I knew anything about CCGs but I am trying to follow along and picking up on your rules and ideas.

1 Like

Thanks a lot, man. Please let me know of things that are confusing to you, or anything thats not clear, and I can devote some time to clarifying it with visual references. This Single Player preview was only like 2 turns. I plan to create several of these examples to help visualize all the aspects of the game, like a visual example of how each Keyword functions, etc.

Also many values are subject to change. A great example of this is the Aether Crystal Monster Card, which I had originally designed to have 5 Armor and 5 HP. This is a level 3 Monster. 5 armor and 5 HP on a Monster at level 3 is insane and way too high. 2 armor and 4 HP is more appropriate. Looking at the above example even those values are a bit steep, however other classes are more adept at dealing higher amounts of damage earlier, and in general, so this is to say, theres still so much testing that needs to be done. It does feel like its on the right course though. I would pay money for this as a mobile app or even a digital CCG style game. It plays like a combination of Hearthstone and Ascension, which have both been done digitally.

Upgrading my materials…

2 Likes

seems like a hell of a lot of cards to be out all at once, i think people would be overwhelmed. i would try to cut that number down, maybe 4 monster, 4 gear, 4 skill. combine pets and skill slots. item slots seem unnecessary and i’m not sure how they differ from inventory slots. i would do away with inventory altogether and allow players to hold a certain number of cards. it doesn’t make sense to be able to see someones inventory and part of the fun of card games is not knowing what the other guys got. you could also add in environmental effects and monster skills and buffs/ debuffs.
other then that, looks fun tho, i would buy it!

1 Like

Hey man, thanks a lot for your feedback!

Im currently in the process of converting the primary explanation of the game and its mechanics to the single player experience- both for the reasons you suggested of too many things going on at once, and also to be able to playtest the basic mechanics of the game as its currently designed.

When learning how the game works and plays, its better to see it from the single player version perspective. That way, you can understand the mechanics without a billion things going on right away.

When judging if this game operates using too many cards at once, i look at MTG as the extreme end of too many cards at once. Theres been hundreds of times ive played matches where the total number of cards on the board is over 100, easily. For any new player, thats going to seem excessive. However, to someone who plays it regularly, its not.

I feel the current design for this GD CCG is at a decent place as far as number of cards that can be in play at once, however its certainly not written in stone by any means- just what ive been playing with.

To be honest with you, 7 character slots is actually not a lot to keep track of. Consider also that these 7 slots are broken down into 3 separate zones (left flank, right flank, and gauntlet). This is a very different game than your typical card game, as you noted with no cards held in hand.

Forget the 2 player, PvP mode for a minute and look at it from the perspective of it being a single player experience- similar to a dungeon crawler in a way. From what ive playtested so far its really fun, imagine a combination of the game Ascension, with Hearthstone, and Flesh and Blood. Thats what it feels like. Without hand management, all your cards are on the board which makes managing everything a lot more organized.

Ill have to do an overhaul of the game explanation- Item slots are the game zone designated for holding Item cards (Consumables such as potions, components, and augments). “Inventory slots” is a general term referring to your Inventory, which includes both your Item and your Gear slots.

Gear operates in a somewhat similar fashion in this game as it does in Flesh and Blood, only in this game the stats gear provide are always there affecting you. You do not need to declare gear pieces as part of an attack or defense, as you do in Flesh and Blood. In PvP, it makes sense that youd see your opponents gear at least, perhaps in that mode items can be turned face down, and maybe could have there be Illusion cards that can trick opponents into thinking you have certain gear equipped… thats actually a really fun thought!

Pets are different from Skills, and also wanted to make the distinction between Pets and NPCs since you can actually control Pets more. They have an associated Skill card, which operates slightly different depending on the Pet.

For instance, the Briarthorn’s skill card is considered to be on Cooldown while he is in play. Once he dies, his skill card comes off Cooldown and you can summon him again.

The Hellhound’s skill card, on the other hand, does not enter Cooldown when he is summoned, but rather, only if you activate it in order to cause a manual detonation. To keep Pets within balanced power levels, the general rule for all pets is that you can only summon each pet once per turn. Beyond that, the cooldown time for manually detonating pets like hellhound and blight fiends is greater by default, meaning you cant just spam summon/detonate them.

Im still in the process of designing the Pets mechanics, but here is more on what I have so far in that area;

Each player has 4 Pet Slots (2 Defensive and 2 Aggressive). When a Pet skill is used to summon a Pet, the player has a choice which Pet Slot the Pet is placed in. Players cannot summon a new Pet into a Pet slot thats currently occupied.

Once per turn, a player may switch their Pets positioning from Defensive to Aggressive and vice versa. Each Pet has different abilities and functions based on their positioning, but all Pets suffer the same restrictions based on their Positioning as well.

In Combat, Pets behave in a similar way as NPCs, however there is one major difference- Players may directly control which Monsters are targeted by their Pets attacks or skills. These options are limited by the Pets positioning, however. These limitations are listed below;

-Pets in the Aggresive slot on the Left Flank may only target Monsters in your Left Flank.

-Pets in the Aggresive slot on the Right Flank may only target Monsters in your Right Flank.

-Pets in the Defensive slot on either Flank may only target Monsters in your Gauntlet.

By default, a Pet can only attack or use an ability once each turn, but not both. If a Pet has more than 1 ability, the player can choose which ability is used (if any), so long as that choice is a legal option IE; some pet abilities are also restricted by positioning.

Environmental effects is a bad ass idea, and you can bet ill be exploring that more. Ive considered that heavily, particularly in the single player campaign mode, where each area of the game could have its own unique game board that affects cards differently.

huh well it seems like it works out fine. gl on development.

1 Like

Development isnt likely to go any further than my living room, but if all goes well ill be able to connect all the dots and anyone on these forums could theoretically create their own version, however they want! Thats the beauty of sharing it here.

And if were all super lucky, Crate decides to actually make it yeah yeah i know, probably would never happen but i can dream.

But yeah, as the playtesting continues, it could wind up that you are correct however i dont forsee that being an issue with the things that you mentioned specifically. If anything, balancing the values on cards and the overall game mechanics is where the biggest struggle is.

My main objective is for the game to be a fun experience at every step from the first turn to the end of the match. My aim is to keep the player engaged in fun and unique playstyles, that are well designed and fluid, translating the gameplay of each class into card form so it is intuitive and makes sense.

An example of this would be the Soldier skill, War Cry vs. the Oathkeeper skill, Judgement. Both skills will be capable of pulling monster cards from the flanks into unoccupied slots in the gauntlet. What sets them apart is their after-effects, and by extention the manner in which they might be used.

The War Cry skill focuses on reducing the health and power of Monsters it affects, making them easier prey. It’s Transmuter can be unlocked in order to push monsters in the gauntlet out into the flanks. The skill modifier Break Morale can also be unlocked, which gives War Cry the Disrupt keyword. This means War Cry can be used in reaction to player/monster/npc actions, essentially behaving as though its an Instant spell in MTG. All this makes War Cry an extremely useful tool for battlefield tactics.

Judgement on the other hand is more of a direct combat skill that enhances your ability to not only reposition monsters, but also isolate and weaken them. Judgement has a chance to “Knock Down” Monsters it affects, which means they get knocked off the board and placed on the bottom of their owner’s decks. Monsters that remain have their Speed, and DA reduced, making them vulnerable to follow-up attacks either from you or any NPC(s) you may have in the gauntlet/Pets you may have summoned.

There are pros and cons to both skills that make them useful in different ways. One could argue that Judgement is worse because it knocks down enemies, meaning youll have less targets to destroy which could prevent you from leveling up, essentially a tempo reducer. However, if there are strong enough monsters on the board, you may not want all of them there at once. Judgement leans more on the side of a soft board wipe.

War cry benefits from not clearing the board, but instead maximizing the targets in your gauntlet if desired, but also gives you the choice of using it to clear your gauntlet as well. Either option could be used in defense of your NPCs, to put monsters in range of your NPC/pet attacks/skills, or even to open up your gauntlet so that new monsters drawn could be placed in your line of fire (Soldier specializes at combat in the gauntlet).

Both skills could play really well with the idea of environmental effects, particularly in the campaign mode with changing battlefields, IE; on the Plains of Strife, could have mines randomly distributed across character slots on entry. War cry/Judgement could be used to force Monsters to move into slots with mines in them, dealing substantial damage.

1 Like