
Preface
For a long time, going for the full Valguur set + Sigil of Consumption on Conjurers was always inferior to a more Storm Totem-focused apporoach with Conduit of Whild Whispers, Groble Sky Effigy & Co.
But over the last few patches, the Totem was continually nerfed – whilst the Sigil received a few well-deserved buffs. Now, witness HIS return – The return of the LORD OF ALL 'ZA:

(Source: teespring.com)
All hail the 'Za-Lord!
‘Thunder rumbles in the background, with the deep and somehow oozing overtone of that cheesy goodness which lies within the dark and luscious power of the 'ZA…’
The Build
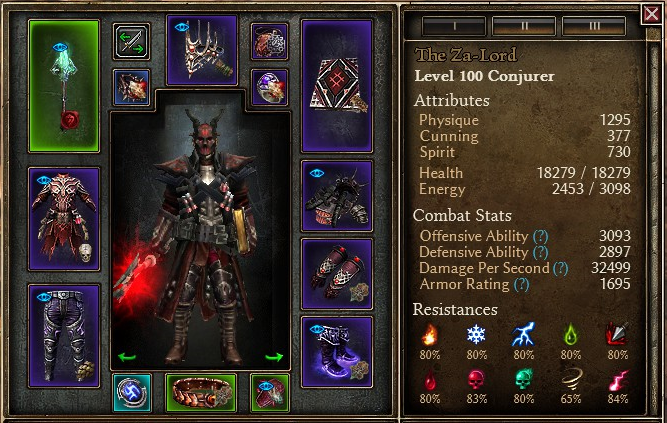
In-Game stats (with all buffs up)
Grimtools
(1) Basic budget setup: https://www.grimtools.com/calc/62aE70b2
(2) My current setup: https://www.grimtools.com/calc/D2p8qd62
(3) BiS’d GDStasher setup: https://www.grimtools.com/calc/pZrD4712
Try to roll for high %CDR on your Offhand/Helm. Craft for slow res or phys/armor.
Check below under “Can I even play this build?” for a guide on how to optimise your own personal build in regards to the MIs you found, as well as even more budget pre-Valguur-setups (under “Levelling Guilde”).
Videos/Cruci & SR Performace
(1) 6:15 run with my personal setup: https://youtu.be/6FGRQf4y2X8 [no audio] – av. clear time ~ 6:25.
(2) 6:34 run with budget setup: https://youtu.be/I1D5C6C1SSY [no audio] – av. clear time ~ 6:40.
SR 76 clear (~12min total, no deaths)

That's so many green items! Can I even play this build?
Yes, you can.
Neither one of the three MIs really needs a specific affix. All we’re after are a few key stats (OA&Aether res/DA) that you can get from a great variety of plain yellow or random green affixes.
Thus, even if you don’t have a single one of the MIs in this build right now, you should be able to get usable ones within 2-3 hours of farming.
Which is actually pretty cool, in my opinion: whilst you will kick ass from the moment you start, you can always still find an upgrade for this build.
This is where you can farm the required items (aside from high Crucible/SR):
- Ascendant Source: this one should be easily attained whilst farming Krieg/doing Theodin runs (+ getting Malmouth Resistance Faction rep is also very easy here). Just kill all the Ascended mages (especially the heroes!) on your way through Crown Hill/Fleshworks. If you just want the Source, farming only Crown Hill should raise your chances even higher.
– Map: https://www.grimtools.com/map/markers/rifts/786
– Kill only heroes, bosses & the occasional ascended wizard (waring: these guys take forever to kill with elemental builds).
-
Rylok Mark: the best spot for farming this medal is the Cinder Wastes C’thonic Rift, especially since – luckily – the
-
Lunal’Valgoth’s Waistguard also drops in the last part of the same area (i.e. The Fringes of Sanity).
– Map: https://www.grimtools.com/map/areas/139
– Kill only heroes & bosses. Start at Malmouth Outskirts Rift.
Ok, I've got a few versions of these MIs. But which ones do I choose?
To cook up your very own version of the Za-Lord, you have to do three things:
-
decide which items with which affixes you need, based on the stat priorities list you will find below.
-
Adjust your Components and
-
Adjust your armor Augments to come as close as you can get to the following benchmarks:a. ~3000 Offensive Ability.b. min. 2800 Defensive Ability.c. all resists at min. 80% – and all elemental + aether resistances at ~30% overcap.
Let the cooking begin!

(famous wizard Harry Dresden in his lab, cookin’ the magic stuff. Source: dresdenfiles.fandom.com)
List of 'ingredients'/affixes & stuff best used on the build (in descending order of importance):
-
Resistances. The most important ones here are Aether & Elemental. You can get them on the prefix of your weapon (e.g. The ‘Interrogators-’ would be awesome) or both Medal & Waistguard (‘Thunderstruck-’ is amazing, ‘Warding-’ very good, but anything like ‘Glacial-’ is enough). Even some Suffixes on your belt/medal can give you these.
-
Offensive Ability. ‘-of Attack’ or ‘of Readiness’ suffixes on anything is pretty much the best & cheapest ways to get this. Many green affixes also have smaller amounts of OA, or even %OA (the ‘Bloodletter’s-’ prefix is pretty great here).Note: if you get Defensive Ability on your gear, you can basically “exchange” it for resistances by switching your armor augments.
-
+to Storm Totem skill. The best source for this is is the weapon, with the ‘Seer’s-’ prefix and ‘-of Torrents’ suffix. Apparently, there is even a Waistguard prefix (‘Elementalist’s-’) with +2 to the skill. ‘Shaman’s-’ prefixes on belt/medal only give +1, so they are nice to have, but should probably be dropped in favor of better Res/OA affixes if available.
-
% Cooldown Reduction. This is one of the best stats for this build, but can only roll on the weapon (‘Interrogator’s-’, ‘Seer’s-’, ‘Magi’s-’ prefix). If you can get one of these without dropping below the abovementioned stat benchmarks regarding OA/Res/DA, get it. It should be worth it.
If all of these affix names confuse/overwhelm you a little (it is a bit much), just look at whatever you find only in terms of our three most important stats: Resistances, OA and DA. That should work out pretty fine by itself already 
Pros/Cons
Pros:
+great AoE
+decent single-target dps (with all Sigil stacked upon same enemy)
+great life leech, thus great survivability
Cons:
-a little restricted in the area it effectively affects, both in terms of damage and in survivability
-a lot of buttons to press
-individual tinkering with different MI setups necessary (might be fun though depending on whether you enjoy a little bit of buildcrafting)
Gameplay Advice
Activate buffs. Keep Blood of Dreeg online at all times.
When in Crucible, jump into the Horde with our Rune skill, place a Sigil, cast Devouring Swarm > Curse of Frailty > Bloody Pox, then both Totems, then Solael’s Flame on tougher targets. Always keep Sigil & Storm Totem on cooldown. Spread Devouring Swarm + Curse of Frailty among enemies in wider radius (the radius of both skills by themselves are fairly small) & recast them on the same enemies roughly every ~5 seconds. I admit I pretty much just spam everything in the abovementioned order ;D
If you remember to do it, you can also cast the leap skill to debuff enemies from time to time; using it as movement skill takes priority, however.
When in SR, cast Sigil first before jumping in, because you might die without the instant life leech.
Don’t kite too much! This is a caster build, true, but the best way to survive is to keep your enemies on your Sigils. Move/Jump to the edge of your Sigil killbox if necessary, and definitely step out of enemy ground effects whenever possible, but don’t run too far unless it is absolutely necessary.
If you watch my Crucible videos, you can actually see me almost die a few times whenever I become too greedy with my positioning (the curse of speedrunning, I guess…).
Gear Choices, Skills, Devotions & Stuff
-
Full Valguur for max Sigil damage. Reaver’s Hunger & Ascendant Source for the same reason. I tried a few different, more Storm Totem focused setups with Conduit of Wild Whispers, Groble Sky Effigy and even Ugdenbog Stormstrife, but they performed either equally or even worse in terms of damage; but always worse in terms of survivability. If you have any suggestions on how to improve this that I haven’t though of yet, please tell me!
-
Lunal’Valgoth’s Waistguard for full Chaos>Vit conversion. Stun res is also nice to have.
-
Tranquil Mind pants for Slow res, aether res, OA & effective DA with +spirit. Could maybe be replaced with something that gives more dmg.
-
Eldritch Pact for Chaos Surge. Fully converted, that skill hits for 344 base flat dmg – four times per second .
-
Supermaxed Wendigo Totem for increased survivability. I also tried to put all excess points into Doom Bolt for a little more single-target dps, but even with full conversion, there is way too little support for it here. Also, it eats mana like a motherf***er.
-
Devotion pathing should be pretty obvious.
Levelling Guide
Since I believe this build to be very levelling/beginner-friendly – it is very sturdy, has good dmg & many important items can be target-farmed (both Monster Infrequents and Legendaries) – I decided to add one of these.
Note: all of the below is based on the assumption that you wish to level up using Sigil of Consumption (SoC) as your main skill. Its main contender for levelling, Primal Strike with Thunderous Strike transmuter, can be used, too; just respec into the endgame build above whenever you feel like it.
In comparison to the latter, SoC has a slower damage buildup, since you need a few seconds to stack up sigils on heores/bosses to achive max dmg, but much higher survivability; and trash mobs still die like flies.
Choose whichever you prefer 
Pre-Valguur-Sigil-Setups
(1) Initial, pure green/faction item setup: https://www.grimtools.com/calc/0V0BrxXN
– For farming the Dark One’s set.
(2) Advanced Dark One’s setup: https://www.grimtools.com/calc/dVbkW3kZ
– This one is pretty good for endgame farming already: with 4buffs/no banners, I was able to do Crucible 150-170 in 9 minutes very reliably. So even with a more relaxed playstyle, doing 2 runs in 24 mins (that’s how long the buffs last) to get 94% of your tributes back should be easily doable.
Levelling Progression: Gear, Skills & Devotions
A) Gear Progression.
-
Take a quick look at malawiglenn’s awesome Cabalist beginner guide for Faction descisions & stats to aim for both in regards to the endgame and – in lower numbers – before then, since they are basically identical to those of this Conjurer. Also look up there which items you can’t ever sell (don’t worry, there aren’t that many) if you want to transition into the Dark One variant of this build later (which I do recommend).
-
Make sure to prioritise energy regeneration on all available gear slots from the very beginning (meaning jewellry, caster chest & helm, as well as offhand). Wear that Slith Primal Ring you get from a quest right after the Wightmire Rift! It’s goood.
-
Check the MI/faction item build posted below and see which of these you can farm – and re-farm if you feel you need an upgrade! – at where & when. The Bonewall Shield, for example, has versions for ~level 23/35/…, Rylok Mark & Ascendant Source for level 40/55/… etc. Farming routes can be found under the “That’s so many green items!”-section.
-
Don’t forget to use Components like Ectoplasm or Polished Emerald if you need more energy/attribute points to equip your gear.
B) Skill Progression.
-
Start with the Shaman Mastery & take Devouring Swarm (10/16); then push Shaman mastery to 5, put 1 point into Mogdrogen’s Pact and save the remaining points until you hit lvl 10.
Note: remember not to spam Swarm too much! The damage doesn’t stack on single targets, and whilst reapplying it multiple times/sec increases the dmg a little, it also eats a ton of mana. Usually it’s best to just hit everybody once & reapply after 3 seconds. -
At level 10, take the Occultist mastery & push the mastery bar to 10. Grab SoC first (12/12), then Curse of Frailty (1/10) & Vulnerability (1/10).
-
Push the Shaman mastery bar all the way to 40. Take Mogdrogen’s Pact & Wendigo Totems – as well as their respective mods – as 1-pointers on your way there. Then max Storm Totem+transmuter.
-
Then max out your Occultist mastery bar. Take Destruction, Blood of Dreeg & mod, Bloody Pox, Wasting and Possession as 1-pointers first, then max 1. Possession; 2. Vulnerability (Curse of Frailty itself only need to be at 4/10); 3. Blood of Dreeg & Aspect of the Guardian.
-
Max out Destruction whenever you find your first Lunal’Valgoth’s Waistguard, since it only then gives us vitality damage (probably between lvl 50-60, somewhere within part 4 of the skill progression).
C)Devotion Progression.
-
Start with Eldritch Crossroeads + Bat; bind it to SoC.
-
Then take, in this order: +Viper +Eel+ Wendigo (bind to Bloody Pox)+Order Crossroads+Panther- Order Crossroads+ Solemn Watcher+Hawk+Scholar’s Light+Oklaine’s Lantern-Scholar’s Light+Rattosh, the Veilwarden (Bind to SoC; rebind Bat to Storm Totem if you have, Devouring Swarm if you don’t)+Jackal+Revenant (Bind to Devouring Swarm)+Chaos Crossroads-Jackal+Dying God (bind to Curse of Frailty)
Credits to
Sir_Spanksalot, Chthon, Superfluff, Weyu & many others whose names I have now forgotten for several GD-generations worth of Vitality caster builds.
Malawiglenn for the amazing work he did with his beginner builds compilation.
X1x1x1x2 for the build guide structure I copied here for the most part.
And, of course, thanks to you for reading!


