Introduction
(this section will repeat between my build overviews; you can skip to Build Concept and Setup if you've read one of my overviews before and are familiar with my rating system and test criteria)Patch 9.8 brought, among other things, major changes to the Shattered Realm. Given that SR is where I do my endgame build testing, with the release of the patch I decided to redo all the testing for all my builds. And since I’d be putting in the time and noting down all my results anyway, I thought I might as well post the builds and their scores publicly for others. Who knows, maybe you’ve been trying to make something similar. Or maybe you’re just morbidly curious and like that tickly feeling in your brainhole when you see someone play something utterly stupid.
Now, what exactly does this testing entail? Each character has to do 10 SR75-80 runs (I used to do 5 runs but I’m expanding it to 10 for this second wave). Every run completed within timer counts as a success. It takes 6 successes (over 50 % success rate) for me to consider a build complete. If a build keeps failing to meet that quota, I keep improving it till it works. Ergo, no build I post here will have a lower score than 6/10, because if it doesn’t have over 50 % success rate, I’m not done improving it and it doesn’t get posted.
Three rules were followed to make the results more representative: 1) no consumables other than healing and energy elixirs can be used; 2) no shrines can be taken; if a build has bad resists, it’ll have to make do with bad resists, Rattosh isn’t gonna be saving its ass; 3) no mutator hunting; if I get shitty mutators, I’ll have to succeed with shitty mutators. Other than that, it doesn’t matter in what manner the runs are completed. If a build takes twice as long to finish a run than others do, that’s perfectly fine as long as it successfully finishes. Doesn’t matter whether the build has to dodge Nemeses in shards like the plague or whether it hunts them for sport, doesn’t matter if it has to kite like crazy or stands its ground with ease, doesn’t matter if it completes the runs deathless or not. Only thing that affects the score is completion within timer. Generally, a weaker build that is slow, fragile, hard to play etc. will end up with a lower score regardless because its shortcomings will affect its reliability across the 10 runs.
Now, one final thing before we get to the build itself. As mentioned in the title, this is a build overview, not a build guide. What’s the difference? Well, a build guide says “this is the way you should build this type of character”. What I’m saying is rather “this is what I did, here’s why I did it this way, here’s how it turned out”. It’s more of a documentary, a post-mortem, rather than an example to be followed. “Wait, that’s just a fancy way of saying you make shit builds,” you might say. No, not exactly. I try to make the build I set out to create as good as I can without deviating from the concept of the build. But the concept of the build might not necessarily be something one should even be doing in the first place ![]() While my build concept and the in-game support will often align to create a reasonably predictable, almost cookie cutter build, just as often I’ll just be doing something abundantly demented for my own reasons. I’ll always endeavour to explain in the Build Concept section why I chose to do a thing a certain way, but I don’t want you to get the impression that what I’m presenting is a thing you should necessarily be doing in the first place. With that out of the way, let’s get to the build itself.
While my build concept and the in-game support will often align to create a reasonably predictable, almost cookie cutter build, just as often I’ll just be doing something abundantly demented for my own reasons. I’ll always endeavour to explain in the Build Concept section why I chose to do a thing a certain way, but I don’t want you to get the impression that what I’m presenting is a thing you should necessarily be doing in the first place. With that out of the way, let’s get to the build itself.
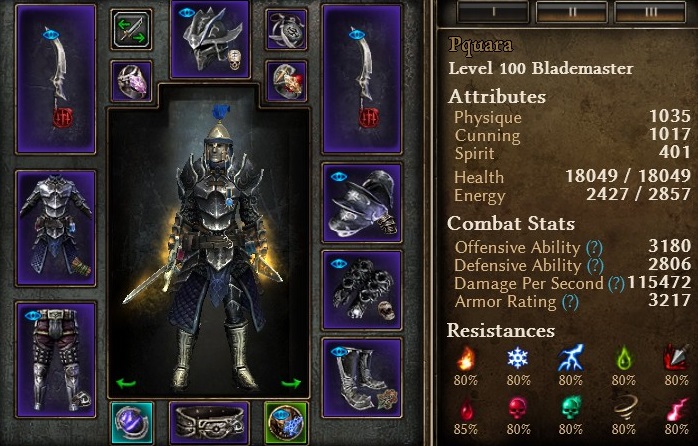
Build Concept and Setup

1.2 UPDATE: A mixed bag, this one. On one hand all the WPS do slightly more %WD and Belgo Shears had their animation speed improved. Unknown Soldier also got a 30 % disrupt res added which helps the build feel more comfy in melee. On the other hand, the Belgo shoulders just lost their phys res, so the build is down 3-5 % on that. The motivation behind that change is unclear to me, as Belgo has never felt like a tanky build to me, in fact it felt pretty volatile and in need of improved survivability, if anything. With the nerf, the build is, surprise surprise, worse. Who could have guessed. Can do SR80-81 but not comfortably, not reliably. It’s kinda fast but so are many builds more reliable than it. It’s probably gonna have to stick with the old 75-80. until the survivability is unnerfed again.
Once I was firmly convinced that GD was a game I was gonna be playing for a long time (which took all of about 20 minutes of gameplay to figure out), I outlined a few general archetypes I wanted to build. I wanted a ranged shooter, a 2h melee barbarian kinda guy, a summoner, a sword and board fighter, a pure mage etc. This right here was to be my dual-wielder. Like with most of my early designs, I started the character with no knowledge of endgame gear and built from the bottom up, starting from class and skill synergies and leaving the gear for later.
As this was back in vanilla GD, there was little decision making to do in this case. I knew I wanted to be a dual-wielding melee fighter, so Nightblade was the clear first choice. The second mastery was similarly simple. There was no Inquisitor at the time to provide pierce synergy, so the only real on-tree synergy for pierce DW melee was Soldier. Unlike my 2H Ranged Pyro however, this just fit perfectly into what gear the game had to offer. I knew from the get go that I had no primary attack to work with. Soldier does offer Cadence but that was already something I had planned for my sword 'n board character and I didn’t want to start repeating core skills in my builds already within the first few characters I make. Well, whaddaya know. The Belgo set fits like a glove. Fills in the primary auto attack slot? Check. Supports DW? Ya betcha. Boosts both Nightblade and Soldier? Yyyyup! It’s almost like I built the character from the top down, i.e. starting with the gear and figuring out the class and skills based on that, but I didn’t. Just one of those happy coincidences ![]()
Given how, well, cookie-cutter the final product wound up being, I guess there isn’t much to say here. It’s a Belgo Blademaster, I didn’t really rediscover America here. So I’ll touch on just a few points.
Firstly, since Belgo DR has recently been a point of discussion (here), I’m sourcing my DR from War Cry and using the Belgo relic for cooldown reduction. With my current setup War Cry has a cooldown of 6.9 seconds (ni.ce). Given the relic’s effect, that means that, if the cooldown of the relic proc and cooldown of War Cry align, we have permanent War Cry uptime. At worst there’s a downtime of under a second. This eliminates the need to farm obnoxious greens like Tyrant’s Derma Claws, and brings another notable benefit: our DR is screen wide. Where Tyrant’s will only affect whatever it is we’re hitting (and we’re VERY melee on this char), we just debuff it all. The guys in melee, the wiggling heroes in the second row trying to get their mitts on us, the mages and shooters in the back, the grandma two blocks over yonder. Everyone. Which comes in quite handy given that otherwise, we don’t really have much defense going for us. Well, if we overlook the solid DA, lots of health, great armor and high resistances…yeah, not a lot of defense at all ![]() What I mean is, there’s no % or flat absorb anywhere to be found, and no circuit breakers other than Ghoul. We just have our War Cry, a thick slab of dodge, which doesn’t work on everything, and melee fumble from Ring of Steel. That and our propensity to fucking murder anything that gets too close. So being able to tell enemies that aren’t in the “you’re about to die” zone that their damage is not currently recognised as valid is pretty key. Another VERY important element of using War Cry is Break Morale. Now, we’re focusing on pierce damage, not phys, so the RR on Break Morale does diddly squat. But, the skill disrupt is super handy. One of the nemeses I find the scaries to fight in melee is Reaper of the Lost, cause he just absolutely hates it when your phys res is in the positive and will do his utmost to remedy that situation. Well, with just one point in Break Morale, you get to tell him to shove that attitude. Break Morale’s skill disruption affects the on-death effect of the Wraiths that Reaper summons. So he summons them, you War Cry, kill them, you take no debuff, and you spank Reaper as he deserves. Delicious.
What I mean is, there’s no % or flat absorb anywhere to be found, and no circuit breakers other than Ghoul. We just have our War Cry, a thick slab of dodge, which doesn’t work on everything, and melee fumble from Ring of Steel. That and our propensity to fucking murder anything that gets too close. So being able to tell enemies that aren’t in the “you’re about to die” zone that their damage is not currently recognised as valid is pretty key. Another VERY important element of using War Cry is Break Morale. Now, we’re focusing on pierce damage, not phys, so the RR on Break Morale does diddly squat. But, the skill disrupt is super handy. One of the nemeses I find the scaries to fight in melee is Reaper of the Lost, cause he just absolutely hates it when your phys res is in the positive and will do his utmost to remedy that situation. Well, with just one point in Break Morale, you get to tell him to shove that attitude. Break Morale’s skill disruption affects the on-death effect of the Wraiths that Reaper summons. So he summons them, you War Cry, kill them, you take no debuff, and you spank Reaper as he deserves. Delicious.
Secondly, the medal. Now, I do love me some RoS and I invested a lot of points in it to show my appreciation. It’s a handy tool for AoE which the build otherwise isn’t particularly overendowed with, plus its stun can repeatedly lock down annoying heroes like Arcanes, especially when followed by a few Belgo Shears procs (which also stun). However, the primary reason I took the medal was not the skill modifier or the Circle of Slaughter points. It was the customisability of resistances. Normally the slot would be occupied by a Direwolf Crest or some such, but with my gear and devo setup I was short on stun res and my acid res wasn’t the best either. This was my way to solve that problem. So while I did avoid having to farm Derma Slicers I did have to dedicate some time to getting a General’s prefix on the medal. Only took about 10 runs so it wasn’t bad at all. And while I could, of course, get such resistances on any medal, the fact that this one also came with a damage bonus on a core AoE skill, % pierce damage natively and extra skill points for CoS netting an extra 4 % melee fumble certainly doesn’t hurt.
I’m just gonna go right out and say it. If it didn’t take roughly 7 hours to do a set of 10 SR75-80 runs, I would redo the runs for this build to do it justice. It’s an absolute TRAVESTY that I only got 8/10. Landing on a 9/10 would have been a shame. For an 8/10 I can only apologize. In my defense, it took a truly extraordinary set of utter bullshit neatly formed into a nice, tall, wobbly tower for me to fail one of the runs. An SR80 chunk so hostile to life I have rarely seen. The nastiest map in the game, with traps on every step, and two of the worst Nemeses piled close to each other amid tornadoes and volcanoes. And I was STILL only about two kills away from salvaging it after the first death. It was so bad I had half a mind to accuse Crate of anti-consumer practices.
The second failed run was emblematic of the build’s pretty much only problem. It’s melee. It’s SO melee. Everything is a pile of minced meat when you get close to it. But there are some enemies that are just an absolute pain to get close to. These are, namely, heroes, generally of the acid variety, that possess a shotgun attack. Grum, Follistad, those sorts of blokes. If you don’t notice them in time you can just charge right into a faceful of poisonous chunks and that’s that. Because the build has no absorb and is decently reliant on dodge and fumble, when you just end up eating one of these hits in full it will just delete you. While the build is powerful it’s sadly not one of the game’s immortals. It can eat a lot of burst damage out of nowhere and it can die, even if it takes a truly hefty pile of unfavourable circumstances for it to happen. Now, the build is such a whirlwind of knife crime that it can usually withstand a death, even at SR80, and recover. But not if you eat the shotgun twice at two different spots. One could argue this is a self inflicted problem. I really should have just taken one point in Shadow Strike and used that as my approach strategy instead of my leap. But oh well, too late for that, I guess.
Now, enough of the apologies and excuses. To sum up: this chick is a menace to society. There is pretty much no single enemy, nemesis, boss, whatever, that the character is scared of seeing. Pick the worst lineup of SR bosses and the build just shrugs and murders it. Other than the possibility of being shotgunned, I’ve only pinpointed exactly two other things that are kinda worrisome across the 10 runs: one is a mild discomfort, the other was a freak occurrence.
Let’s start with the latter. I ran into The Sentinel who seemed to have either spawned with a piece of equipment with retal on it, or spawned with a piece of equipment with both retal AND life leech resistance. That is the only way I can explain the horrifying rate at which is was shredding my own health bar while hitting him. I do recall having a few similarly frightening encounters during levelling on Ultimate, which was partly the reason I took Ulo on the devo tree (to remove reflective, Mirror of Ereoctes etc. from enemies, though it has a plethora of other benefits of course). The build dispenses attacks at such a generous pace that it can quite easily file its arms up to the shoulders into bloody stumps in about 0.5 seconds of attacking a retal enemy. Thankfully when I encountered the problem in SR, all that was needed was to aggro a second boss and use it as a blood bank to leech from. The build, thankfully, has no issues just merrily solving a problem by aggroing another problem. Both bosses were then dispatched with extreme prejudice.
The other problematic enemy, is, funnily enough, the one I usually like seeing a lot on most builds: Zantarin. The build’s short reach means all of his summons need to be eliminated manually unless they spawn right next to you. At the same time the rate at which these enemies then die means that when Zantarin starts outputting some damage, you may not have anything left to leech from cause everything is already scattered in a 2 mile radius. Thankfully between potion, Pneumatic Burst and Blade Barrier the build has enough “oh shit where’s my health” buttons to withstand this mild annoyance with grace.
Other than that I…really don’t know what to say. It, just, it slaps. If we were to dock a point for the fact the build can still get blown up occasionally under very specific circumstances, this should still be an honorary 9/10 build. I mean, if a picture can say more than a thousand words, what does a moving picture do?

