The Brigade is back and needs a few good skelemancers.
(images made using DALL-E)
This is a beginner’s pet Ritualist designed to take you from a lowly recruit with no gear or blueprints to an Ultimate capable build with a small army of 15 permanent ghoulies at your command, plus 2 temporary summons, all without spending an excessive amount of time on farming or crafting. Now updated finally and better than before.
Skeletons are the main offense, doing a mix of physical, fire, vitality and even a bit of pierce damage. All pet physical damage gets converted to aether by a specific item which is available very early in the game: The Warden’s Judgment mace. Combined with the Aetherfire devotion proc, Skeletons can dish out a surprising amount of damage. They are quite squishy at first but with the proper gear and backup from the tank pets Briarthorn and Blightfiend, they will be able to take on the tough mobs in Ultimate difficulty.
It’s been quite a while since I last revisited this, so another full playthrough was required in order to do it justice. To keep it true to the namesake, in this latest run I wanted to showcase what is possible with cheap components and gear so you’re able to get the build up and running as early as possible.
So, let’s jump in and see what’s new.
This time I actually tested two builds. The first is a standard balanced approach suitable for both softcore and hardcore. The second is for those folks that enjoy a more laid back pet playstyle without a lot of skill management. The gear is the same for both, except for slight augment changes between the two. There is gameplay footage of both in the video section.
![]()
![]() Grimtools: The Standard Brigade
Grimtools: The Standard Brigade ![]()
![]()
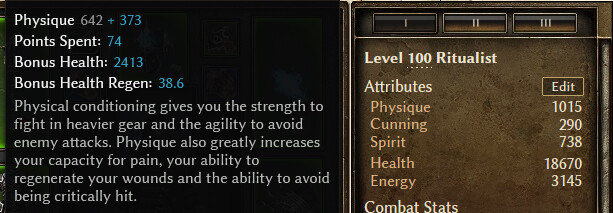
- The biggest change from the original build is transitioning from a Mogdrogen devotion route to Ishtak. Previously, the Mog route was optimal for damage but now with revamped pets and devotions, the Ishtak path is better defensively and competes offensively too. The “Nature’s Guardian” proc adds flat damage and flat resistance reduction to your pet’s attacks while also drawing aggro away from your character. Once assembled, this build can easily obliterate monster totems, nemesis encounters and even carry you well into the Shattered Realm. As you can see from the gear, none of it is particularly special and all very attainable without having to sink hours upon hours into farming for double rare prefixes and affixes.
Credit to @nofika4u for the devotion route from the end-game aether build in this thread.
I’d also like to credit @Paikis for his Let’s Play of the original build (it’s linked in Post #2 of the thread). I used some of his leveling and faction gear choices this time around which were indeed better overall.
![]()
![]() Grimtools: The Minimalist Brigade
Grimtools: The Minimalist Brigade ![]()
![]()
- Have you had a rough day at work? Just want to relax with a drink in one hand while the pets do most of the work for you? This variant has you covered with a modified devo route that sacrifices damage for durability by taking Tree of Life in addition to Ishtak. Less skill procs and less buttons to push means you can easily play from the mouse. Better pet resistance coverage and big health regen make your pets tough as nails for most Main Campaign content. This is perfect for those that just want to lazily farm monster totems and dungeons but also be able to handle nemesis encounters without much trouble.
Skills
Active Summons & Spells
Raise Skeletons: These loyal soldiers are with us from the beginning to the end. You could say they are the backbone of any good brigade. Sorry, I was just trying to be humerous (ok no more dad jokes, I promise). Undead Legion provides more skeletons on the field and reduces casting cooldown. Will of the Crypt provides damage and defensive bonuses.
Blightfiend: An unpleasant ally but a helpful one. The Blightfiend has high health and can generate threat with the Rotting Fumes ability. It also debuffs enemy defensive ability (DA).
Briarthorn: Everyone’s favorite battlefield best friend, the Briarthorn does it all by providing tank support and passive buffs to the whole party through the amazing Emboldening Presence skill.
Conjure Primal Spirit: One of the temporary summons, the Primal Spirit adds significant damage to the fight at the cost of a long cooldown.
Skeletal Servant: A mass of angry bones that’s hard to kill, this undead golem is a granted summon from the Dirge of Arkovia relic. It can debuff enemy damage with its claw attacks.
Eldritch Hound: The other temporary pet summon which becomes available upon completing the Bysmiel’s Bonds devotion. The hound shreds enemy resistances and offensive ability (OA).
Ill Omen: A chilly curse which spreads to other targets, Ill Omen is an excellent debuff spell that reduces enemy damage and causes confusion.
Devouring Swarm: Hurls a cloud of insects that debuffs resistances. Next to aether, vitality is the next highest damage type in this build. Unfortunately there is no way to convert pet vitality damage into aether, so this is useful for reducing that enemy vitality resistance.
Ravenous Earth / Grasping Vines: Powerful skills in their own right, but here only used to trigger devotion skills. Do not put more than one point each into the respective skill lines. Bone Harvest can also be used as a substitute.
Call of the Grave: A temporary buff for your pets’ damage which is a staple skill of any pet Necromancer.
Passive Buffs & Auras
Mogdrogen’s Pact: This skill line is always a feature of both pet and non-pet builds alike, providing an aura that boosts offensive and defensive capabilities.
Primal Bond: Our favored Exclusive Skill, Primal Bond’s damage absorption is critical to keeping the caster alive while also boosting pet’s offensive power.
Spectral Binding / Spectral Wrath: A passive buff that affects the caster, Spectral Binding is useful for the increased health. The secondary node, Spectral Wrath, can further reduce enemy aether resistance, although you have to be hit for it to trigger.
Gear
Since the original post way back in patch 1.1.9.0, Monster Infrequents (MI for short) are more likely to roll pet prefixes and affixes on top of their base stats, for most of the gear listed here. This cuts down on the time it takes to get the loot you need for endgame. Throughout this recent playthrough, I intentionally did not spend a lot of time farming in order to prove the viability of it as a “pick up and go” budget build.
Weapon - Warden’s Judgment
- Drops from the Warden boss at the end of Act 1. This is the heart of the build that converts all pet physical damage into aether. Try and get a 100% conversion roll early. Don’t worry too much about the prefix or suffix until you reach Ultimate.
Off-Hand - Bound Wraith
- Has everything we need and is fairly easy to farm. The best areas to target wraiths:
-Janaxia’s Den
-Barrowholm cellars
-Area south of Barrowholm Rift
-Area northeast of Barrowholm (north of the mine)
-Savage monster totems - Bloodsworn Codex can be used earlier and is a very common drop from Cthonic humans.
Amulet - Death-Watcher Pendant
- Vendor farm this from Benevald’s secret shop in the Blood Grove. This item, along with the belt slot, I used for character stat purposes over pet rolls.
Rings - Bloodsworn Signet
-
Drops from Thall’Nosh, the boss of Darkvale Gate. You’ll want two of these.
-
Wendigo Conjuring Seal Can be bought from the Barrowholm faction vendor after reaching “Honored” status. Level 90 required to equip. Previously at least one of these was required to max out the Raise Skeletons skill but now they aren’t as necessary. Still a useful option though if you want to mix & match with other gear.
Medal - Wendigo Gaze
- The common wendigo enemies that these drop from tend to have a cluttered loot pool but there’s a specific faction quest which makes farming these medals much easier. Advance the Barrowholm faction questline until you receive “The Feast” quest from Scorv Egdenor. This will spawn the wendigo mini-bosses Handarroth, Ollivioth and Yuvolloth around Ugdenbog. You can repeatedly farm them for much better odds at a Wendigo Gaze drop. Look each of them up in the Grimtools Monster Database to see their spawn locations on the map.
Helm - Ascendant Cowl
- Drops from Ascended humans in Malmouth. Another key item to boost our skeleton squad. This is likely going to be the hardest item for you to drop. Best place to target them is the northeastern section of the Candle District. Once you’ve completed the quest to drop the drawbridge, it’s a quick jog to farm this area.
- Spectral Crown drops from Wraith of Sorrows. Can be used until you reach Malmouth later.
Chest - Coven Lifebinder Vestments
Shoulders - Coven Lifebinder Mantle
- Both acquired from Coven faction vendor. There are level 65 and level 90 versions.
Leggings - Bysmiel-Sect Legguards
- These are able to be target farmed from The Guardian of Bysmiel as part of “The Hidden Path” questline. Until you can farm this, just equip whatever good leggings you can find.
Gloves & Boots
- Consider these your flexible pieces. There aren’t any particular target farmed MI’s for these gear slots, so just concentrate on filling them with useful rares with pet affixes that shore up their resists and also give you stat boosts if possible. The affixes “Of the Wild” / “Of the Untamed” / “Of Caged Souls” will be most useful here for pet elemental, vitality and bleed resists.
Belts - Trollheart Waistguard is what I went with on this playthrough because it’s so cheap to craft and always rolls with +1 Shaman skills. I used this slot to shore up my character’s defenses. There are other options below if you want to spend the crafting mats or the time to farm them.
- Bysmiel Lethal Girdle - can be crafted with blueprint from Bysmiel faction.
- Wendigo Tainted Girdle - can be crafted with blueprint from Coven of Ugdenbog faction.
- Chains of Brandis - target farmed in Port of Valbury dungeon.
- Lunal’Valgoth’s Waistguard - target farmed in the Fringes of Sanity (2nd level of Cinder Wastes cthonic rift)
Relic - Dirge of Arkovia is my old favorite that I went with again. Mogdrogen’s Ardor (listed below) is arguably better, but I like having the additional pet from Dirge. Also the relic has been buffed rather nicely, providing %Total Speed to all pets.
Devotions
Note: On both devo routes, taking Fiend early is good as an extra damage proc that can be bound to Blightfiend or Briarthorn. Later on it will get refunded as we need the points to finish the target map.
Standard
- Crossroads blue
- Imp (Raise Skeletons)
- Crossroads red
- Fiend (Blightfiend)
- Behemoth (Mogdrogen’s Pact); refund Crossroads red
- Crossroads purple
- Sheperd’s Crook (Ill Omen); refund Crossroads purple
- Bysmiel’s Bonds
- Crossroads yellow
- Dryad; refund Crossroads yellow
- Panther; refund Crossroads blue
- Staff of Rattosh
- Refund Fiend
- Widow
- Lion
- Stag
- Ishtak
Minimalist
- Crossroads blue
- Imp (Raise Skeletons)
- Crossroads red
- Fiend (Blightfiend)
- Behemoth (Mogdrogen’s Pact); refund Crossroads red
- Crossroads yellow
- Crane
- Panther
- Staff of Ratosh
- Widow
- Ulo
- Hound
- Ishtak
- Tree of Life
- Last point can go where you need it most
A note on taking the Ulo devotion: it’s primary benefit is for the additional pet resists which creates more flexibility with your gear and jewelry pet augments. The Cleansing Waters proc can be useful but the main purpose of this variant is to lazily walk around and blow up monster totems without clicking skills much. So, I bound it to the movement skill so it would level up but otherwise I didn’t worry about it. If you want to make sure it procs more often, bind it to an actual attack spell like Grasping Vines or Bone Harvest and make it part of your rotation.
Leveling
Before we jump into it, I’ll address a couple questions that inevitably come up:
- Is it worth it to play on Veteran?
- Is it worth it to play through Elite?
Short answer: no to both.
Longer answer: You won’t miss anything by skipping either. Veteran difficulty is just there as a more challenging early game for those that want it. It can be toggled on and off so you can try it at your discretion without being locked into the choice. Likewise, Elite is not really necessary anymore. Any quests completed in Ultimate that grant skill or stat points will also reward you with the lower difficulty points as well. Also, many areas in Normal now scale up higher than before, meaning you can return there anytime from Ultimate to more easily farm equipment if you find yourself struggling.
All that said, if you’re still relatively new to GD then Elite can still be a good learning experience. I have a lot of hours (too many ![]() ) in this game and my personal goal with fresh characters is to advance to endgame as efficiently as I can, but that’s not everyone’s goal. Take your time if you want and enjoy the ride! Ok, now on to the journey.
) in this game and my personal goal with fresh characters is to advance to endgame as efficiently as I can, but that’s not everyone’s goal. Take your time if you want and enjoy the ride! Ok, now on to the journey.
Stat Distribution
- Stat distribution can be 2 Physique, 1 Spirit through most of the leveling but later on you may need to min/max with a Tonic of Reshaping. Max Spirit needed will be 724 for the off hand. Max Physique needed can vary but generally you’ll want to dump the majority of your stat points here to boost your DA. No points in Cunning are needed.
- Start with Necromancer, alternating between 2 points in Raise Skeleton and 1 on the skill bar. Once Skeleton is maxed, concentrate on Undead Legion. This will give you 8 maxed skellies. If you are playing on Veteran, be prepared to resummon them often as they have no resistances yet.
- Grab a Karvor’s Conjuring Bone for an early game off hand with pet bonuses.
- Equip a component like Searing Ember as soon as possible and use the Fireblast skill to add some damage to the fight.
- Equip components like Warding Stone, Antivenom Salve and Silk Swatch when you can craft them to boost your resists.
- Leave Direni alive so you can get the key and unlock the Cultist’s Lair. This is a good place to farm an early game Bloodsworn Codex off hand which will come in handy after Act 1.
- Farm a 100% (or close to it) conversion weapon from the Warden. If it’s taking too long, come back later when your pets are stronger for quicker run times.
- After Act 1 is completed, start the Forgotten Gods content but only to complete the initial quest, select a faction and then buy a movement skill rune. You can come back and complete FG content later but it’s not necessary in Normal as all of our target gear is found in the main quest line and the AoM DLC.
- Get to work on your Shaman skill bar, picking up Mogdrogen’s Pact, Oak Skin and Briarthorn. This is where having that early Bloodsworn Codex pays off by providing skill boosts to the pet.
- I’d suggest a Purified Salt component for your off hand. The Aether-Ward aura comes in handy against Cronley, who is pretty tough now (at least on Veteran). He will likely wipe out your pets so you’ll have to kite him and whittle him down with Fireblast while you resummon.
- After Cronley, Fireblast loses its effectiveness so swap to a Wrathstone when available for improved pet damage.
- Make sure and do all the available Rhowari quests to boost their faction rep. You’ll want to purchase a Rhowari Cuirass and Shoulderguard when available for easy pet boosts (Level 35 equip).
- Purchase the Hysteria blueprint from Homestead when available and craft it when you have the mats. The Crab Spirit pet isn’t particularly tough but it does add more damage and occasionally freezes mobs.
- You can also craft a Solar Belt at Level 35 but it’s not critical.
- Moving into Act 4, consider swapping to an Imbued Silver component for Chaos resistance aura.
- Farm a Spectral Crown from the Wraith of Sorrows.
- After unlocking the Blood Grove rift, farm Benevald’s shop for a good Death-Watcher amulet.
- Farm some Bloodsworn Signets from the Darkvale Gate boss.
- Continue leveling up your Shaman skills and skill bar, working towards Primal Bond. Skip putting points into Primal Spirit until you have a Bound Wraith off hand.
- You can purchase Legion Conjuring Seals from the Legion faction vendor which might be better than your current rings (Level 55 equip).
- Proceed to Ashes of Malmouth content after defeating Loghorrean.
- Farm a Bound Wraith, Wendigo Gaze, and Ascendant Cowl.
- Craft a Savage relic. If you didn’t already find it out in the wild, the blueprint can be bought from Malmouth Resistance vendors. The Stormhound pet is a bit sturdier than the Crab.
- Follow the Hidden Path questline to farm Bysmiel-Sect Legguards.
- I went ahead and farmed a Lunal’Valgoth’s Waistguard but it’s not critical
Note: Not too long after hitting 60, I leveled up Death’s Vigil faction rep since it was close to Honored status and bought the pet augments, then made the jump to Ultimate. Again, if you don’t feel comfortable you can continue leveling more in Normal or go to Elite for awhile.
- After level 60 just concentrate on filling out what’s left with your skills. Primal Bond, Mog’s Pact skill line and Emboldening Presence should be the priorities.
- Once you hit Levels 65 and 90 respectively, return to the Coven faction vendor to purchase the chest and shoulder armor upgrades.
- Purchase Sylvarria’s Essence augments at level 90 to max your pet’s poison resists. Poison resist is especially important to keep your skellies alive late in Ultimate difficulty.
- Craft a Dirge of Arkovia relic and a Trollheart belt when you find the blueprints.
- After hitting Level 94, start working on farming max level versions of your gear.
- Level up remaining factions to Revered status so you have access to resistance augments.
- Remember to refund any points for skills that don’t need to be overcapped. Undead Legion only needs 20 points to get max skeleton summons. An additional 2 points will only decrease the cooldown slightly so it’s a waste.
- Remember to finish all your extra skill/attribute quests like Hidden Path
Endgame
So what to do now? Whatever you want! Well, within limits of course. This build’s primary purpose is to have a (mostly) stress-free Ultimate experience on cheap gear so you can start getting the really good stuff and then transition into a true celestial slayer.
Obviously the build represents the bare minimum, so you can easily upgrade with components like Eldritch Mirror or Prismatic Diamond for defense. Mythical Aethereach Gloves are not too rare and a great damage upgrade which will convert your skeleton mage’s fire damage into aether.
Here are a few target pet builds you could shoot for, just as an example:
Previously mentioned, this Pet Necromancer thread by @nofika4u has a few endgame Ritualist specs.
Videos
New: Minimalist Brigade vs totems
(Old) Budget Brigade gameplay - short compilation vs random stuff
Original Build
For reference purposes, I’ve saved the old build here.
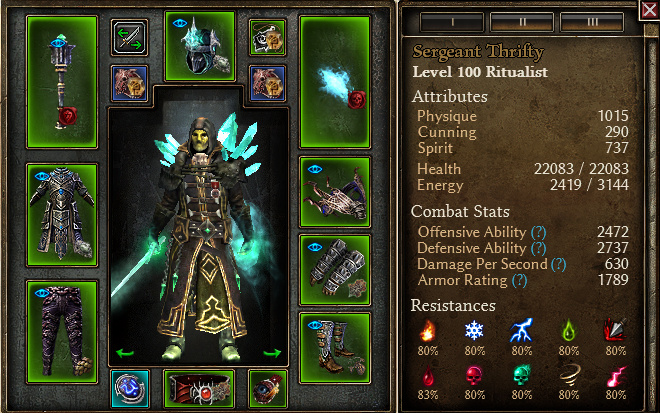
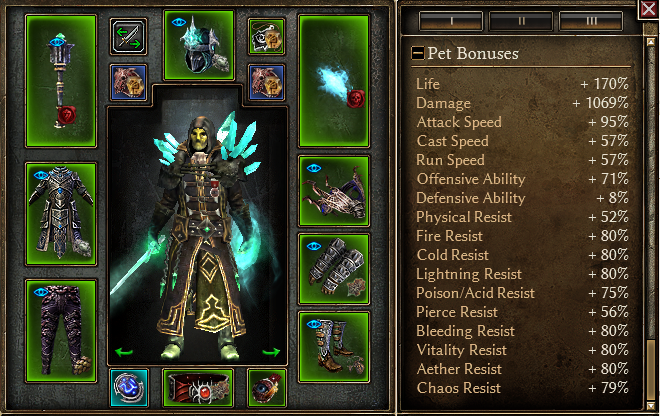
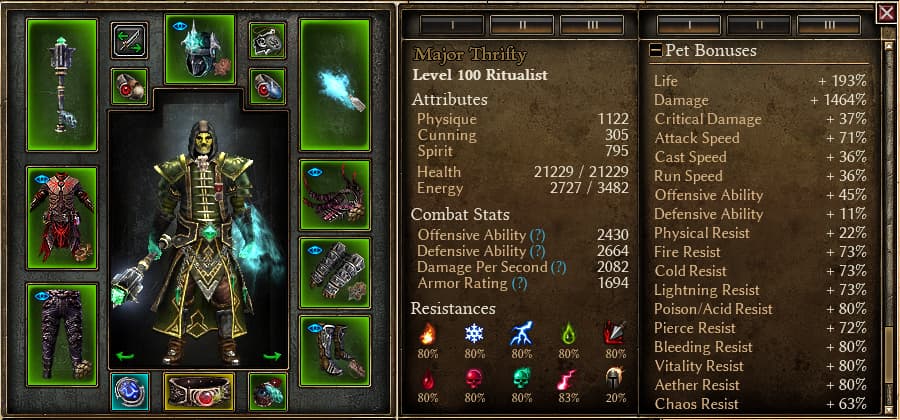
Idle Buffs: Mog’s Pact, Primal Bond, Emboldening Presence & Presence of Might
Build Link: Ritualist, Level 100 (GD 1.1.9.0) - Grim Dawn Build Calculator
Final Thoughts
So, another run comes to a close. There were some new surprises on the journey. Things that had been easier before suddenly had become more challenging (namely, the early game in Veteran). Conversely, once I hit 100 and put the final pieces in place, my army easily crushed everything in the MC with less effort than before, aside from Celestials of course. So I think that this still holds up very well. Aether Pets Ritualist may not be the flashiest or fastest starter builds around but it’s certainly sturdy, reliable and will serve you well on your Grim Dawn journey.
I also want to give a thank you to all those folks out there who’ve recommended the guide over the last few years. ![]()
That’s all for now! Stay frosty out there recruits and I’ll see you all in Asterkarn.



![[1.1.9.8 Playtest] Grim Dawn Defiler Skeletons [SR75-76]](https://img.youtube.com/vi/UZCtHMG7fgg/maxresdefault.jpg)
