Something I still don’t know is what MIs are worth picking up. I’m currently picking the ones that have a lot of text :), assuming those are the more “completes” ones.
If you have time, you can look in this guide!
@artemix - 90% of the answers to your questions can be found in the guides/tutorials section
I didnt even know there was a guides/tutorials section.
Thank you mister Spanker.
I think the problem is the color.
Usually red means “stay away, danger, avoid, etc”.
So I did 
Or is it doom key themed? Here’s where the boss threads go to hang out.
Damn I think Crate needs to rework the forums again. This time with more neon flashing text plz.
Neon green for must read. And neon red for stay away or “I will crush your friends at Devil’s crossing”.
The Rainbow Filter is super handy until you memorise what affixes are good.
The way it colour codes the item stats makes it a lot easier to tell at a glance if it’s got stuff you want on it too.
I don’t mods :p.
I want achievements 
Who told you that you can’t get achievements?
Neither tools nor mods prevents you from gaining achievements in GD.
Mhh… so you can get Steam achievements while using GDstash?. Doesn’t that require to have local savefiles, thus no Steam achievements?.
You absolutely can. 3rd party tools with GD will never prevent you from doing anything. Ever. Crate in no way tracks what you are using. Ever. Nor have they utilized any Steam features to prevent you from using tools or mods regardless of the fact if you decide to play single or multiplayer. You can do as please at any time.
The only stipulation is that as far as MODS are concerned if you play multiplayer and are using MODS anyone else who you want to play with or who wants to join your games must also be using the same exact mods. (please note that THERE IS a difference between 3rd party tools and mods)
3rd party tools do not fall under this restrictions since they operate largely outside the game. GDStash is a tool, not a mod.
GDStash, as far as I know can be used with cloudsaves - but there are restrictions. Read the GD Stash page to learn of them. It works BEST with local saving, which carries no restrictions on usage. And no, using local saves in no way prevents you from doing or achieving anything in GD. In fact, if you use mods and tools (and even if you don’t) I highly recommend that you switch to local saving to prevent any issues from occurring. It is widely agreed that Steam cloudsaving and GD are… not always the best of friends.
Local saving ensures you always have full control over your save files and that you always know where they are, plus you don’t have to ever worry about them being accidentally overwritten or any of the other potential Steam cloud dangers that can occur.
Edit: I haven’t actually read Jaknet’s guide in quite a while I think and I just browsed it and it actually looks pretty darned confusing as written. If you have issues understanding it and you do decide you’d like to switch to local just let me know and I do believe I can drastically simplify the steps for you.
The rainbow filter isn’t actually a mod anyway (as in, you don’t need to launch the mod version). It’s essentially a texture/translation pack.
The new filter can help you sort gear. Also I I will want to keep greens with useful mods. Random green are rarely valuable.
@powbam: That would be most helpful mate. I remember struggling with this.
I wonder if there is a way to use the rainbow mod with the “what MI to keep” guide… so make a more customized filter.
Alright. I went ahead and moved my original local save folder out of the way and I enabled cloudsaving both in GD’s Steam interface setting and in-game in GD’s options and then created a character to fully simulate the process to make sure everything works as it should.
Visual Guide to Move Your Cloud Saves to Local - and Vice Versa
Click ME to jump to the next section on moving local saves back to the cloud. Reading the first section, however, makes it easier to understand the process completely.
How-To: Move Your Cloud Saves to Local
1) When you’re ready to finally be done with cloudsaving just fire the game up as normal and go into your options.
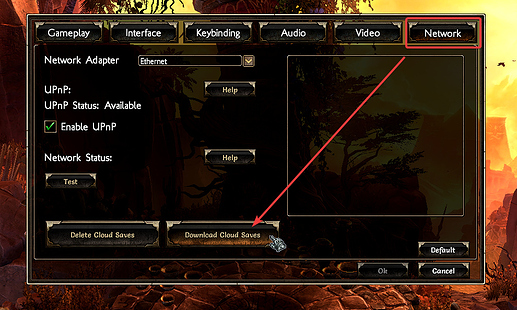
2) Click the Network tab, then click the Download Cloud Saves button, as shown (DO NOTE that the two buttons on this screen - the Download Cloud Saves & the Delete Cloud Saves buttons - are only visible IF the cloudsaving toggle is enabled):
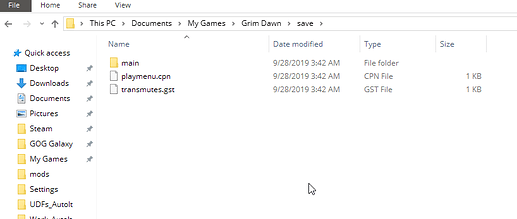
This downloads anything currently in cloudsaving into your local save folder here:
Tab out to verify that your character(s) have indeed been downloaded and moved into the “main” folder in the local saves location. Please, please be aware that IF you for whatever reason already happen to have characters existing in this location AND in the cloud simultaneously AND if any of those characters happen to have the same name, you have just effectively overwritten your local save character with the cloudsaved character of the same name. There is no coming back from that so please be attentive to what you are doing and what you may have done in the past.
If you are unsure of yourself and these steps then please backup/copy the entire local save Grim Dawn folder before beginning any operations you are not fully confident performing yet. Copy it to an out of the way location for insurance just in case you do something wrong/unintentionally.
The local save location for GD is ALWAYS here:
C:\Users\YOUR USERNAME HERE\Documents\My Games\Grim Dawn
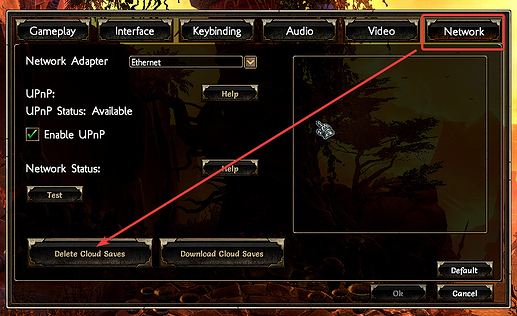
3) Tab back in and if everything looks good and you decide you do not want a copy remaining in the cloud, press the Delete Cloud Saves button in the same screen as shown:
and then…
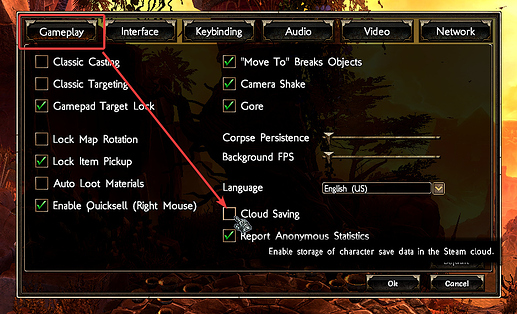
4) Switch to the Gameplay tab and toggle OFF cloudsaving and hit OK:
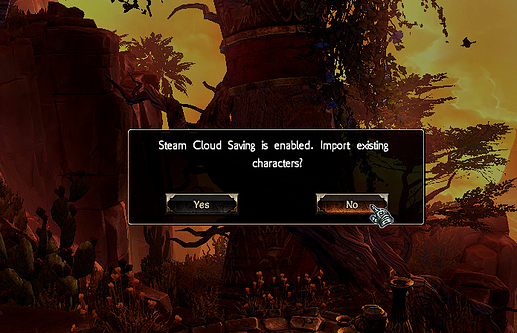
5) If you end up seeing this screen:
Then by all means, tell it NO and then exit the game.
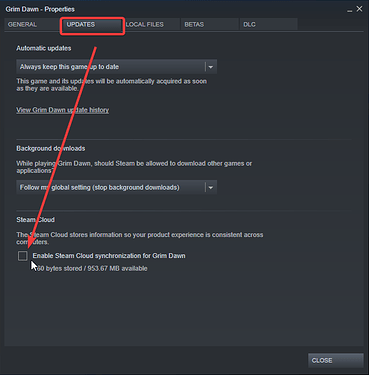
6) Right-click Grim Dawn in your library list and select Properties and then disable cloudsaving synchronization as shown:
You are now rid of cloudsaving. Enjoy.
Click To Return To Top Of Post
How-To: Move Your Local Saves Back To The Cloud
If you ever wish to REVERSE the process it is simple enough. Mostly you just reverse the steps detailed in the first section above.
1) Right-click Grim Dawn in your Steam list> Properties> and then Enable Steam Cloud Synchronization.
2) Fire the game up and then go into the options and toggle cloudsaving back on.
3) RESTART the game and then go back into options to the NETWORK tab. If you previously told cloudsaving to Delete Cloud Saves then cloudsaving is currently EMPTY.
4 To move your local saves back into the cloud press the Delete Cloud Saves button again and then go back to Grim Dawns Main Menu where you will then get this screen:
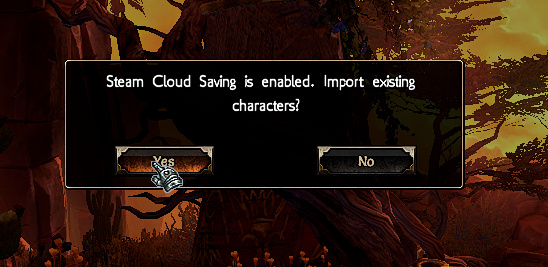
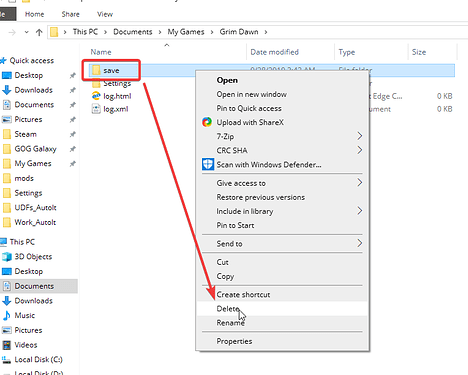
This time tell it YES and your locally saved characters will appear immediately in the game menu (and thus, in the cloud). At this juncture, if you CHOOSE to… you can now safely DELETE your locally saved characters easily by going into the local save location and deleting the “save” folder as shown below:
You have now moved your saves back into the cloud. It is just that simple.
Click To Return To Top Of Post
@medea_fleecestealer: Is there anyway we could merge @powbam’s awesome instructions with jaknet’s?
