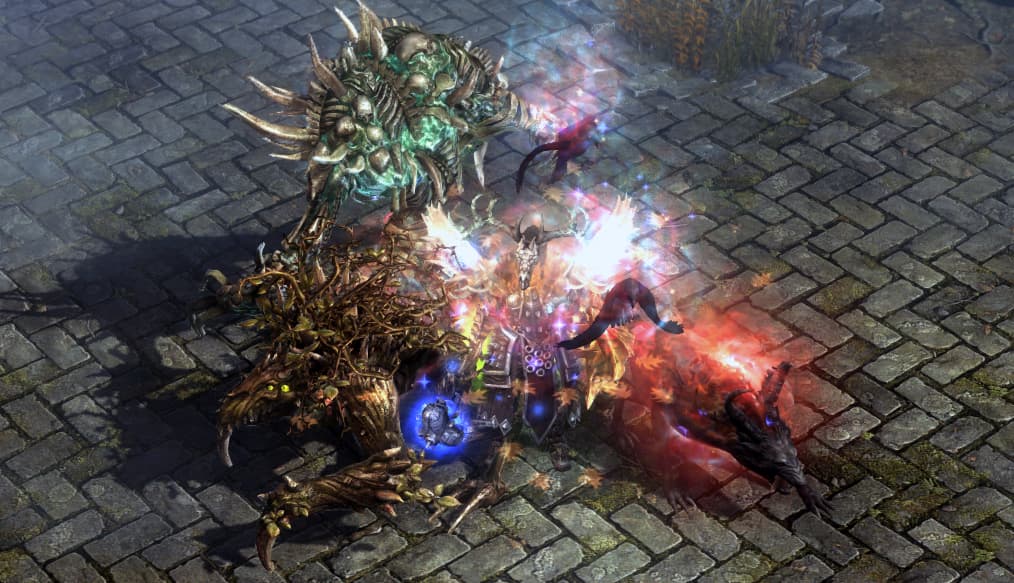
Since the 1.2.1 physical resistance update my old Not a Step Back! builds have lost a lot of their appeal… No longer can they daringly facetank Callagadra. This new facetanking build was created to heroically rescue the noble profession of facetanking as a pet appreciator and restore the honour of the fallen heroes…
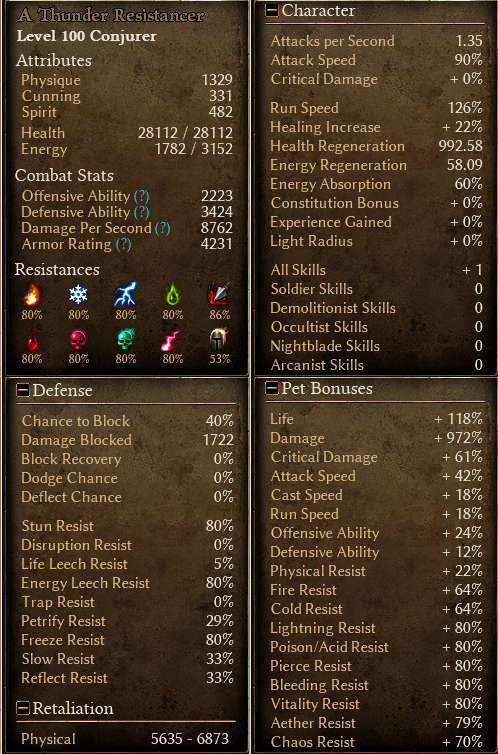
Bysmiel’s Facetanking Conjurer is able to optimize his defenses while still benefiting from large damage bonuses. He is enabled by the Mantle of Mogdrogen, the Voidmancer’s Cord, and of course the Trinkets of Bysmiel which all come together to create an electrifying build that both tanks and dishes out damage like never before. This build is designed for laid-back gameplay where you strut around with a pompous swagger, ignorant of the concept of dying, while your loyal pets rip up enemies all around you. It can facetank every enemy in the game (with a few exceptions) and looks down with pity on those who abuse evade and try and turn the game into a Dark Souls clone of some sort.
-
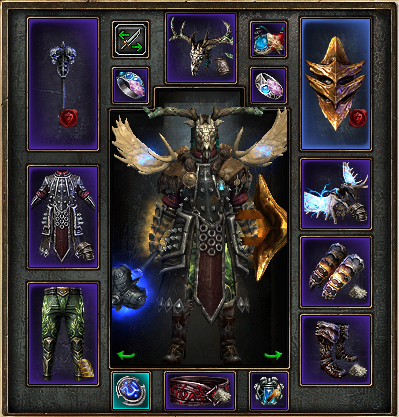
- [Pet] [1.2.1.2] (vid) Bysmiel’s Facetanking Pet Conjurer
- Damage: Pets (Lightning)
- Active Skills: Summon Familiar, Summon Skeletal Servant, Summon Briarthorn, Summon Hellhound, Conjure Primal Spirit, Curse of Frailty, Ravager’s Deathgaze, Wendigo Totem, Wind Devil, Blood of Dreeg, Savagery, (Upon Rylok Wings)
- Passive Skills: Mogdrogen’s Pact, Primal Bond, Bonds of Bysmiel, Azragorian Tactics, Presence of Might (x2)
Celestial Bosses
| Enemy | Time |
|---|---|
| Callagadra | 2:55/2:40 |
| Avatar of Mogdrogen | 5:05/3:35 |
| Ravager of Flesh | 2:25 |
| Loghorrean | 0:45 |
| Master of Flesh | 0:50 |
| Manifestation of Korvaak | 1:00 |
Although the Ravager of Flesh is the easiest to defeat thanks to the use of Soul Shards the other Ravagers can also be defeated. Facetanking them, however, is not possible with this build. You need to dodge the Ravager of Minds’ totems consistently to beat him and you need to move from place to place against the Ravager of Souls since his nine pet ghosts can kill you with their death waves when they expire.
Secret Bosses
| Enemy | Time |
|---|---|
| Clone of John Bourbon | 2:30 |
| Lokarr | 0:35 |
| Crate of Entertainment | 4:20 |
The Crate can be tricky to beat as it kills your pets quite quickly. Facetanking this secret boss is not really an option mostly due to all the crates that it spawns. However, I had problems with the Crate even before the physical resistance update and when I used the Mogdrogen constellation.
Ultra Bosses
| Enemy | Time |
|---|---|
| Mad Queen | 0:10 |
| Ancient of Waters | 0:15 |
| Grand Magus Morgoneth | 0:50 |
Some build posts list these bosses as well. They were so relatively weak that it left me doubting why I even bothered with them.
Miscellaneous
| Activity | Time |
|---|---|
| Spanking Ulgrim | 0:25 |
| Naked Extra 150-170 Crucible (Gladiator) | 15:30/12:40 |
| Shattered Realm (Shard 75/95) | 6:00/10:35 |
Unfortunately, the build does not excel as a gladiator or a shattered explorer. Perhaps the Familiars work best when facing a few enemies at a time – the performance in these challenges, particularly for the naked Crucible, were not impressive. Using the Ishtak constellation the time and experience were overall better. Using all the buffs and the Stonewall Totem make the run much easier and allow you to facetank most of it like you’re supposed to regardless if you go for Ishtak or not. As for the Shattered Realm I found that this build cannot go too far. Using the Ishtak constellation it is possible to beat shard 95 but it is challenging and facetanking many bosses falls off as an option. Moosilauke in particular is very hard to beat in such high shards.
Levelling
When you start the game you may want start with the Occultist and first put some points into your Familiar. It is going to be your beautiful pet you actually put points in. The more points you have in it the more blue balls it launches and with enough blue balls its behavior changes - it begins to move right up to enemies so that it can hit a single enemy with all of its blue balls making it more daring and less removed from big fights. A single point in Mend Flesh can be helpful here to slightly boost your regeneration. Next you may want to put one point into your Hellhound and go for levelling Blood of Dreeg. Blood of Dreeg is amazing for health regeneration, boosting your pets’ offense, and as a second health potion. You may also want to put a point into Curse of Frailty and Vulnerability to kill bosses faster. Once you get more points in Occultist you may may want to level Lightning Strike which will make the Familiar much more deadly.
The skills from the Shaman class are not as vital early on. After you have your key skills from Occultist you may finally select the Shaman class and put some points into Mogdrogen’s Pact to boost your team’s damage and survivability. Later on you could put a point in the Briarthorn. At this point you can distribute your points depending on what you feel you need in the moment. For extra survivability you could go for the passives of Mogdrogen’s Pact. For extra damage you could instead max out Storm Spirit and Hellfire of the Occultist. Eventually you will reach the Wendigo Totem which should allow you to facetank like a complete boss. At last you can max out Primal Bond which should slightly bolster both your own defensive capability and the damage of your pets.
In terms of items a good start would be to take Francis’ Gun from one of the first houses you see after crossing the bridge. Going for ranged early on is a good way to keep you together with your Familiar while it only throws one blue ball and subsequently avoids melee range. Once you are level 5 and you get your hands on either the Searing Ember or the Chilled Steel components use it on your weapon or shield and exploit the powerful abilities you get. This will drain your energy quickly but energy potions are infinite so it’s okay. If you are too annoyed by the energy drain you can use the Ectoplasm components you find to significantly boost your energy regeneration.
Moving forward just keep getting better items that boost your defenses, pets, and your skills. The Fleshwarped Bulwark is a uniquely good shield to look out for which will make you much stronger. It works very well with the Conjurer combo of classes. As you unlock the Hellhound and the Briarthorn you may want to switch to melee using the ability from either the Serrated Shell, the Amber or the Blessed Whetstone components. Alternatively you could exploit the upgraded versions of the fireball or the ice spike with the Enchanted Flint or the Deathchill Bolts components. Overall throughout a large part of the game components will be exceptionally efficient sources of damage for you.
As you are likely playing this because you like pets you may want to seek out items that give you more pets. There are several relics that can give you additional pets. The easiest one to get is Hysteria and later you can craft Savage. Relatively common items that give you more pets are the Blightshard Amulet and the Black Grimoire of Og’Napesh.
Some solid constellations to start off with are the Shephard’s Crook and the Raven for the pet damage and the Dryad for the free healing. The Lotus is also nice if you want to get more energy which you may want if you exploit those energy-heavy component abilities. You may want to take the Arcane Bomb later on but it would mostly be useful against bosses as ordinary enemies would die before it gets the chance to get used. The Dire Bear can serve to boost the damage of your pets significantly but your Familiar can’t really exploit it until it is fully levelled so that it actually flies into melee range.
When it comes to your attributes you would mostly want to put points into Physique. Your pets don’t benefit from your offensive ability or your own physical or magical damage bonuses. The Dryad constellation also makes it easier to use scepters without having too much Spirit.
Notes
It feels like Crate Entertainment really tried to make the game more challenging and it worked. I found that making an effective facetanking build was considerably more challenging now that physical resistance is so hard to get. If you do nothing but focus on physical resistance and get it back up to 80% like it used to be too many other defensive and offensive aspects of the build are sacrificed. After many hours of experimenting and thinking I found that stacking armor is overall better despite you needing very high armor to make up for a lower physical resistance. Armor is a lot more prevalent in constellations and this build in particular capitalized on high armor items which when combined could get me to 4000 armor without even trying.
This, among others, was an issue for other potential builds that I tried. Neither the Ghol’s set nor the Beastcaller’s set could provide with as much armor. To add insult to injury they also featured less physical resistance. No matter how hard I tried it really seemed impossible to recreate a facetanking build using either the Ghol’s or the Beastcaller’s set. I did manage to coble together a usable Ghol’s build but it doesn’t perform as well as this one. Undoubtedly a somewhat tanky build that survives by consistently evading sunders is something that these sets can do but that was never the point of my builds. I also tried builds featuring two handed items such as the Nightbringer to benefit from the free physical resistance in Shaman’s Might of the Bear and the Kraken constellation. Perhaps this has more potential but I gave up the struggle to optimize the build as tanking Mogdrogen without a shield proved to be exceedingly challenging. Furthermore, my damage was not very impressive at all.
The lightning build works as it capitalizes on the synergy of the available items. The Trinkets of Bysmiel focus on the lightning-based Familiar while keeping all the armor slots free. The Mantle of Mogdrogen and the Voidmancer’s cord are both fully committed to lightning damage which works well with having two Familiars. A large chunk of the damage comes from Lightning Bolts which make up for the build’s lack of attack speed on pets. Familiars can also exploit the Maul ability of the Dire Bear to a very large extent – there are two of them constantly electrocuting enemies and they never die.
An aspect of the build that could change is the weapon; although having two Wendigo Totem is key to your survival in certain situations it can be just as good to go with one Wendigo Totem so long as your Familiar’s Mend Wounds is maxed out. This ability has been considerably buffed and is now almost as good as the Wendigo Totem (especially since you have two Familiars). With more testing it is clear to me that unless you have all the 26 points in Mend Flesh, which you can’t get with this build, it does not heal you all too well. You rely mostly on the passive heal and its increased duration on a high level as the Familiar’s don’t have good timing. Furthermore, this build uses them for damage. If they becoming focused on healing they don’t attack as much which lowers your damage output. A great alternate weapon would be a green Bonescythe which also gives you better totems but can also boost your offense with its prefixes and suffixes.
I experimented with other relics and the Heart of the Mountain amulet. The yeti really feels underwhelming and getting the second Familiar from Bysmiel’s Iris is a lot more impactful. On the other hand the Skeleton Servant is much stronger and boosts the build’s DPS significantly when compared to picking Mogdrogen’s Ardor. The bugs from Primal Instinct die so fast that they simply cannot deal damage against any of the tougher bosses.
Ishtak
Originally I posted the build using the Obelisk of Menhir constellation. However, after more testing I have found that going for the classic Ishtak with his Nature’s Guardians is a better choice. I presumed the inbuilt taunt of Nature’s Guardians would be a thorn in my side when it comes to facetanking but it doesn’t appear to work the way I imagined. Against Callagadra, while you facetank, your pets do not really get stomped by her and she mostly keeps her focus on you; even when she does get taunted your pets can survive for a long time and your Familiars never really die as they heal themselves. You can also still survive despite the loss in armor due to the gains in health and the fact that your totems heal you based on the size of your health pool.
The original build using the Obelisk of Menhir
Although my time against Callagadra using Ishtak was the same as using the Obelisk of Menhir its performance in the Crucible was much better. I managed it in around twelve minutes and only really had to run for my life on the very last wave. The weaker enemies of the Crucible really do get impacted by the taunt and the extra offensive ability makes your Familiars a lot more deadly. Overall, I now prefer Ishtak as it helps you survive in those very tough scenarios in the Crucible and the Shattered Realm while boosting your damage.
Vitality Build
After a lot of experimenting and countless fail-build attempts I have managed to forge something as good as the Bysmiel’s build if not better. It’s not as creative as I liked and is very similar to this build except it uses vitality damage. It can kill Mogdrogen in under three minutes and can facetank Callagadra without much issues. It scores much better in the Crucible and can do a naked extra run in just under nine minutes. Most of the damage comes from the Hellhound but the Familiar deals almost as much damage while the Briarthorn is nothing more than a buff-bot.
Facetanking vitality pet build featuring Necrolord’s Shroud and Dying God
I have updated my older Beastcaller build recently but now it seems that this variant is better when it comes to vitality damage. A downside though is that it is more spell-intensive and even sees most of its pets be secluded to the secondary spell bar due to a lack of space. The vitality build is also wholly dependent on the totems for healing. The Bysmiel’s build on the other hand has the potential to switch over to becoming reliant on Mend Flesh healing instead; if the Soulbearer losses the second totem modifier in an update the Bysmiel’s build may still stand strong. After more testing it appears that the Familiars heal very inconsistently and foolishly; they don’t heal on time sabotaging your defense and waste too much time casting heals sabotaging your offense. The damage drop off is very noticeable.
Video of the vitality build Crucible run
After more testing I tried out using green alternatives with the perfect prefixes and suffixes. It definitely helps the build and can also help Bysmiel’s build at least when it comes to the weapon slot. Using these green items I managed to get my Crucible run time to just under eight minutes. I also tried using Mend Flesh combined with a Fiendblood Spellblade but the results were bad. Even with 26 points in Mend Flesh it doesn’t perform well. The Familiar becomes bugged and stuck. In this passive state your damage falls of greatly as the Familiar doesn’t attack. The Wendigo Totem remains as the greatest healing source at least when it comes to pet builds.
