Introduction
The Beginner build guides Compendium (for AoM + FG expansions) has currently six ranged builds listed, three of them are dual wield gunners. This is a rather underwhelming number. And as non of them is a Warlord and uses physical damage, it is time for another budget build. The build uses two guns and physical damage Cadence as main attack - a direct target build would be [1.1.9.0 - 1.1.9.3] Physical Penetration - Dual Deathdealer Physical Warlord | SR85 | Crucible ~4:30 (or was at the time the character was started)
The character was started almost one year ago (1.1.9.5), as some changes to ranged builds were announced for 1.1.9.6, the levelling paused until the patch went online - the concept was however not really affected so no change to the build was necessary. Level 100 was reached in 1.1.9.6. The unwillingness to farm the necessary gear for the final build caused a second long pause, and 1.1.9.7 was released before there was enough motivation to finish the character. As neither 1.1.9.6 or 1.1.9.7 strongly affected the build, the entire levelling phase should still be valid.
For the other budget / beginners builds check Beginner build guides Compendium (for AoM + FG expansions). There are are quite some different playstyles available for Warlords.
Going Ranged with Two Guns - with Cadence!?
Budget ranged physical Warlord has quite some alternatives, it is rather easy to build a two-handed ranged weapon Cadence shooter (Warlord, Level 100 (GD 1.1.9.6) - Grim Dawn Build Calculator), or a dual wield Sandspitter gunner using Righteous Fervor (Warlord, Level 100 (GD 1.1.9.6) - Grim Dawn Build Calculator / Warlord, Level 100 (GD 1.1.9.7) - Grim Dawn Build Calculator). However, the intended target build was a dual wield gunner with high passthrough percentage and, in 1.1.9.5, the Sandspitter gun has not reached its final form and had a rather harsh damage penalty for Righteous Fervor. From both one handed ranged physical damage Monster Infrequents, the Ugdenbog Repeater looked in 1.1.9.5 more promising, it has an attack speed bonus and the higher flat damage compared to Sandspitter (ignoring its damage over time).
For ranged builds, passthrough is one option to increase the damage output. If enemies can be lined up, a passthrough shot can hit all enemies in the line and inflict (massive) damage. In 1.1.9.5 the options for passthrough were still limited. Smite had native passthrough, Sandspitters provided passthrough to Righteous Fervor but have gotten a rather massive damage penalty. Another option was and is Cadence with its gained passthrough through Fighting Form. Dual wield Cadence has also the advantage that the percentage of Cadence hits is higher compared to using only one weapon (see [1.1.9.0] Beginner's Forgotten Blademaster). More than 41.5 of all attacks are Cadence strike with passthrough. (Note: While I did not tested it proberly, I think that in a multi target dummy test I could even observe a Cadence strike triggering another Cadence strike)
The passthrough probability of an attack states the probability to pass an enemy and not if the entire shoot has passthrough or not. This means, if a shoot has 100% passthrough, all enemies will be pierced. Lower values imply an check for each enemy in the line, e.g. having a value of 70% means a check for the first enemy in the line, in 70% of all cases the shoot will passthrough. The same happens for the second enemy in the line, and in 49% (70% x 70%) a third enemy is reached. This means each value below 100% will extremely fast reduced the number of expected target to be hit. Having the example passthrough probability of 70% means that a possible tenth target in the line will only be reached in around 4% of all cases (70%^9). So having 100% passthrough is clearly desirable. With patch 1.1.9.8, Fighting Form increases the passthrough of each Cadence up to 100% at level 8. Note: Before 1.1.9.8, already 4 points in Fighting Form were enough to have 100% passthrough (see More on passthrough [How it behaves]). As this behaviour was considered to be a bug which could be fixed, nevertheless 12 points were invested into Fighting Form here (now - obvious 8 are enough).
In total, with Cadence, Zolhan’s Technique, Smite and Volley, more than 80% of all shots of the character will have some degree of passthrough. This means that enemies should be lined up. If this is possible the damage output is great, if this is not possible, the damage will be notable lower. The damage itself is however more than enough for most (not endgame) content. However, the character is a bit squishy and dies in harder content rather easy. Early in the levelling phase, it is the opposite and the character feels rather sturdy and can also use distance as weapon.
The build is currently not damage optimized. Given the high offensive ability, using Divine Mandate (with its critical damage bonus) would increase the damage compared to the used Oleron’s Rage. Only calculating the direct increase because of the critical damage, the damage would increase by around 5.6% fighting an enemy with a defensive ability (DA) of 2000, 3.4% against an enemy with a DA of 2500. Only against enemies with a DA of well above 3000 using Oleron’s Rage would increase the damage. This already factors in the slightly lower damage because of the lower skill level reached in Divine Mandate. Not factored in is the slightly earlier expected proc of Assassin’s Blade because of the higher OA using Oleron’s Rage and the increased amount of damage passing armor in case of a critical hit with Divine Mandate bonus. At least I can say that Oleron’s Rage also provides movement speed and the character is therefore not slow like a snail (not that this could not be fixed with other means …)
Offensive Ability, Defensive Ability, Probability to Hit, Critical Damage
The following shall only provide some basic information about the relationship between offensive ability, defensive ability and critical damage and the effective damage. If you want to discuss the topic, play with specific numbers, see the probability to hit formula, etc. check 🧮 Critical Hit / Resistance Calculators - DPS multipliers
In Grim Dawn, different stats can be raised to increase the effective damage. It can be more flat damage, increased %damage (e.g. +100% Physical Damage), higher % Weapon damage or more enemy resist reduction. Within a group, most are additive, between the different groups, it is often multiplicative. It is one part of the puzzle to get a good character to find a good (budget builds) or ideal (endgame builds) combination of all this stats. But hitting an enemy is important, as a miss will automatically reduce the damage to zero. Also, the multiplicative damage bonus from critical hits can be a great damage boost. The effect of the latter is even more pronounced if damage over time is a relevant damage aspect. However, how much more OA is sensible (given the increased costs to raise the value) and when investing in other stats is more sensible, is a relevant question while creating a build. Like stated before, this build is for the average campaign enemy not damage optimized, as using Divine Mandate with its critical damage bonus would increase the damage.
First, the probability to hit (PTH) depends on your OA and the enemy DA. The following chart compares the PTH (y-axis) of a build with a specific OA (x-axis) against the enemy DA (line). The dotted horizontal lines mark the critcal damage breakpoints, the dashed horizontal line a PTH of 100 (means - ignoring Fumble etc - every strike hits)

It is clearly visible that the PTH increases more or less linear with increased OA. The point where a build hits always (PTH >= 100), depends on the enemy DA. For an enemy with a DA of 2000, an OA of around 2300 is needed, for an enemy with a DA of 3000 an OA of around 3350 is required. For most enemies, an OA of slightly above 2800 is enough, only if certain nemesis or celestials shall be fought, a higher value makes sense (considering the PTH). Of course, another question is the chance for a critical hit. This is important for the damage bonus, but also certain procs which require a critical hit (here i.p. Assassin’s Blade). The image below follows the same scheme as the one above, only the y-axis now shows the probability for a critical hit (chance to crit - CTC).
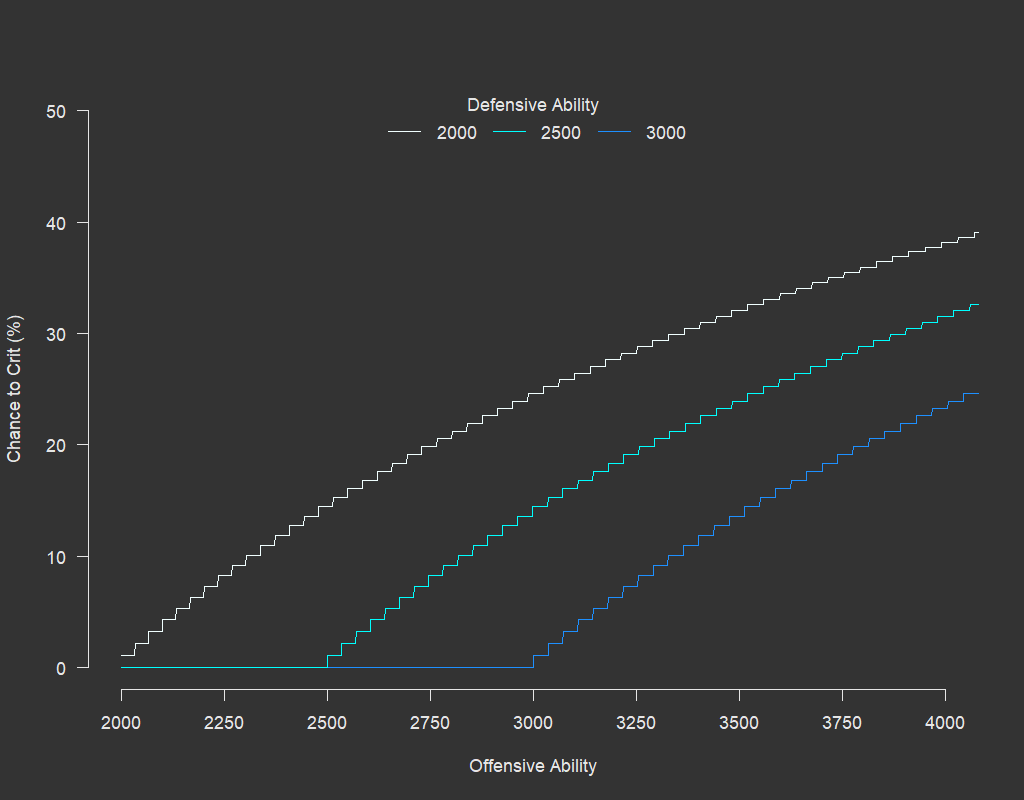
It is visible that the OA must reach at least the value of the enemy DA to be able to crit (land a critical hit). The increase of the probability decreases with higher OA, or in other words: If an enemy has an DA of 2000, the absolute increase of the probability for a critical hit if the OA in increased from 2000 to 2500 is higher compared to an OA increase of 2500 to 3000. Each additional percentage point will cost more OA. If the OA is 4000, the probability for a critical hit against an enemy with DA 2000 is almost 40%. Note that the invers of the probabilty is equal to the number of expected hits needed (average number of hits between two critical hits) for a critical hit. Ideally, a damage over time (DoT) centric build with high critical damage modifier would like to have an expected value lower than the number of attacks per second times the DoT duration, so that almost always DoT’s with the critical damage modifier is inflicted.
If only flat damage is considered (and armor is ignored), the PTH can be used to calculate the effective damage factoring in the critical damage modifier. Below are two images showing the damage curve, the first images shows the damage increase for a build with no critical damage modifier, the second image a build with a critical damage modifier of 60%. If the PTH is below 100, not every attack will hit - even a low OA penalty is possible. However, at least 60% of all attacks will always hit.
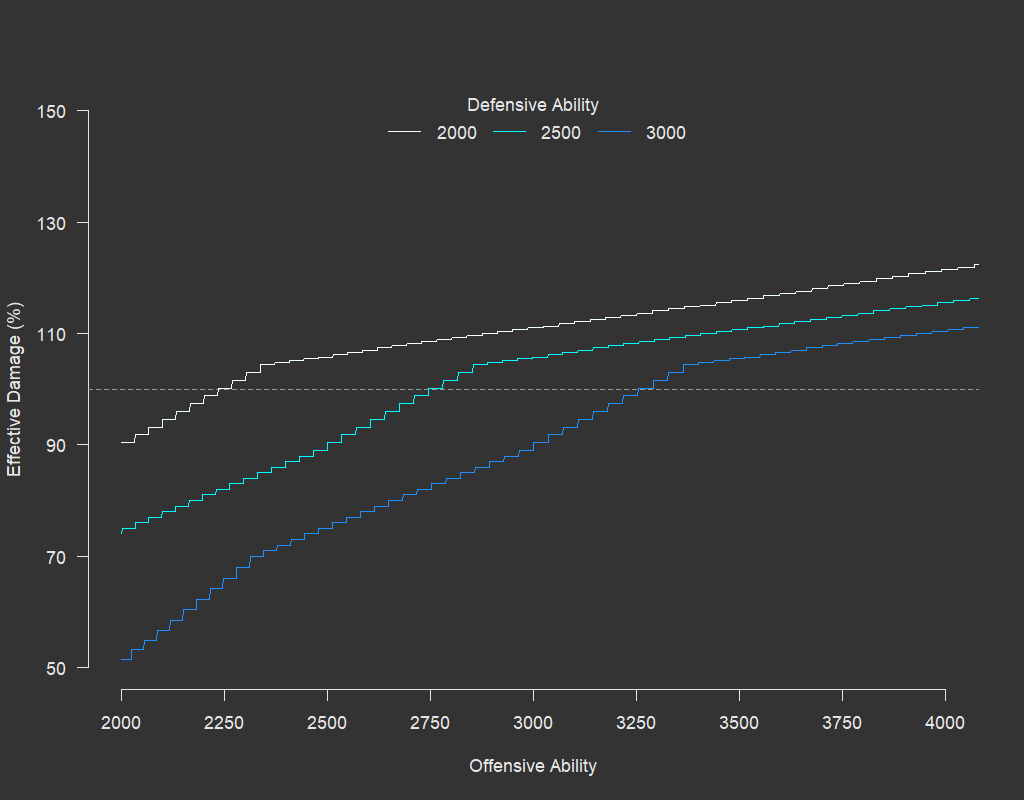
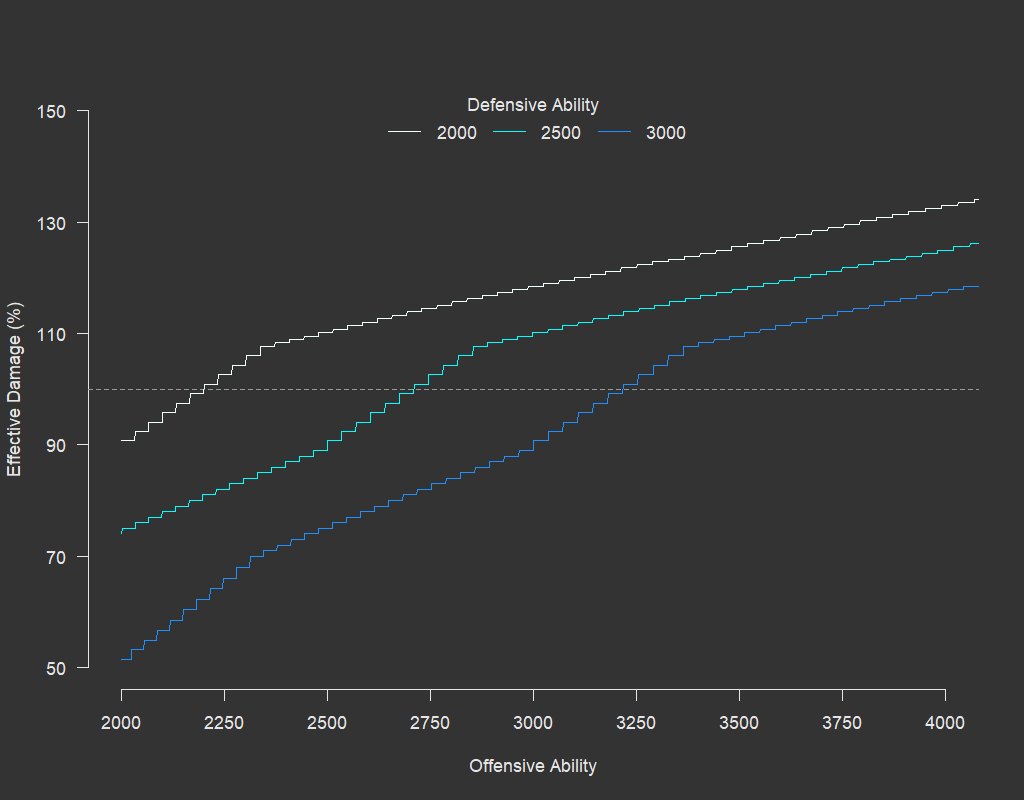
It is visible that the initial increase is rather strong - each point of additional OA increases the damage. After an OA of around 700 less than the enemy DA (OA = DA - 700), the increase of damage slows down (only visible for the enemy DA = 3000 line), the next break point in the line is OA equal DA, where the damage increases stronger with increased OA. This is more pronounced with higher critical damage modifier. This break point is equal to the point when critical hits can be expected. The last break point is with an OA of around 300 above the enemy DA. The increase of damage with increased OA clearly flattens and becomes linear. However, the increase is still more pronounced for builds with higher critical damage modifier. The slope of the curve after the point depends on the critical damage modifier. For a critical damage modifier of 0% approx. an increase of the OA by 1500 is needed for 10% additional damage after this point, the required OA value for 10% damage increase and a critical damage modifier of 30% is approx 1000, of the critical damage modifier is 60%, approx 750 more OA is needed, and if the critical damage modifier is 100%, approx 500 more OA is needed.
Now coming back to the final build and the question of Divine Mandate or Oleron’s Rage. The image below shows the effective damage as shown before for the two relevant critical damage modifier. The image is limited to the relevant area - so x and y axis are not identical to the images before. The solid lines are for the build with Oleron’s Rage, the dashed line for the build with Divine Mandate. The lower %physical damage because of the lower skill rank of Divine mandate is already factored in. The vertical lines at 3367 (dashed - Divine Mandate) and 3781 (solid - Oleron’s Rage) represend the OA of the build.
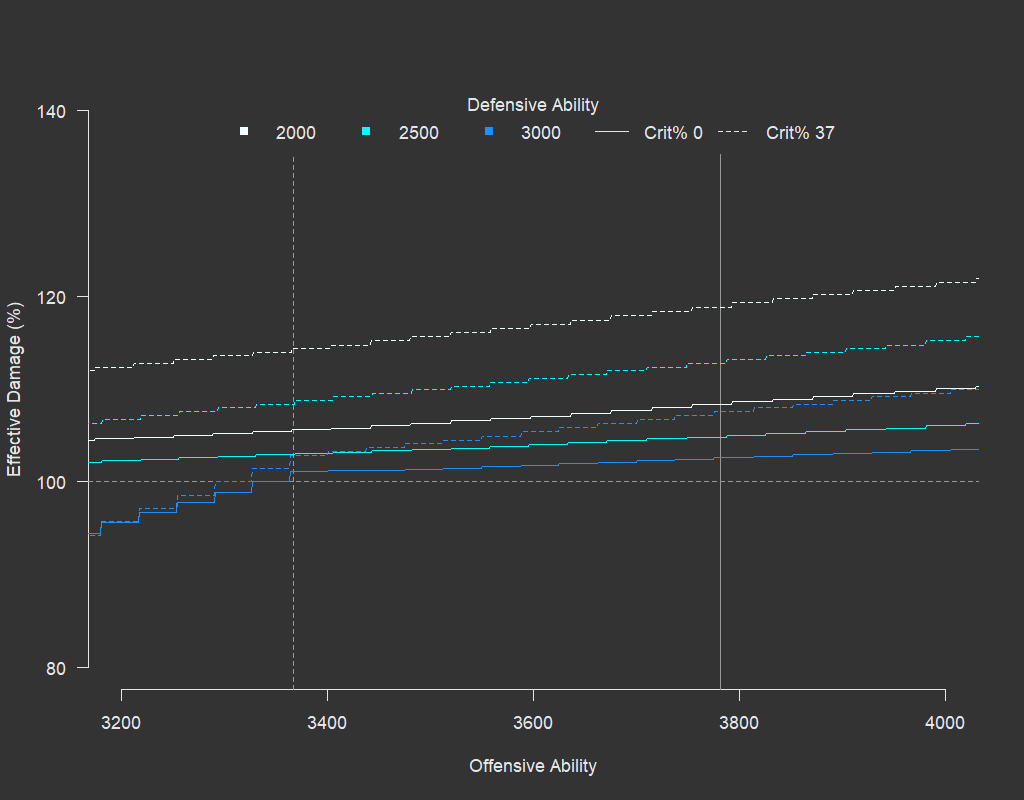
To compare the damage, the intersection of the effective damage lines and the vertical lines marking the build OA and damage curve must be compared. It is clearly visible that for an enemy DA of 2000 or 2500, the intersection between the dashed lines is above the intersection of the solid lines, only for an enemy with an DA of 3000, both intersection are almost at the same level.
Summerizing: Each point of OA increases the PTH, however, the effective damage gain becomes lower - while still being mostly linear even after the last break point. The absolute damage increase depends on the critical hit modifier. So the question if the OA shall be increased depends on the costs associated with the increase. If 10% more damage can be gained elsewhere cheaper, an lower OA might be acceptable. Keep however in mind that other build characteristics also influence this calculation - damage over time has slightly different rules, and some builds need critical hits to proc important skill / procs, aspects that were not incoperated in the simplified damage comparision / effective damage calculation above.
Self Found?
Only self-found equipment and self-found crafting materials were used while levelling. Also, no mandates were transferred, writs were bought as soon as possible. However, all necessary blueprints were already found with earlier characters. The character was started in 1.1.9.5, made a pause between level 40-50 as 1.1.9.6 was announced, played to level 100 in 1.1.9.6 and finished in 1.1.9.7.
Current Character
Grimtools of the current character.
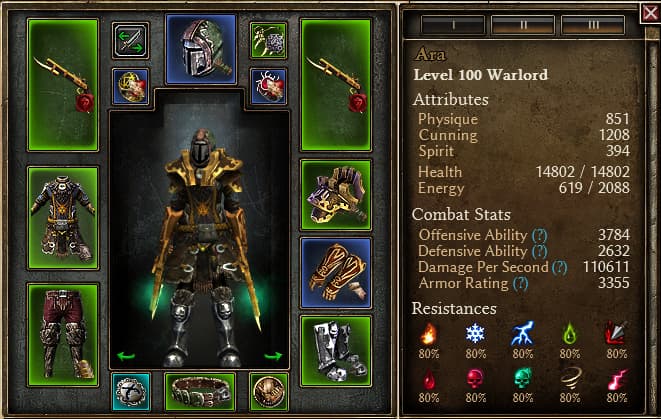
[Cadence, all permanent buffs and Deadly Momentum]
A naked character (means no affixes) with the same gear, components and adjusted augments has capped resistance, so each affix without parasitic damage conversion will improve the build.
Most challenge dungeons were finished in Ultimate relatively painless (Aether Cluster was used while fighting against Morgoneth). Shard 50 was tested for the additional skill points (no death, within time), stress test was a 65/66 run (7 deaths - 3 of them against the Master of Flesh, out of time). So while possible, SR 65/66 does not seem to be the best farming range for the character. For each of the Shattered Realm tests a waystone was used. The following nemesis were slain in Ultimate: Benn’Jahr, Valdaran, Kubacabra, Grava’Thul and Kaisan. After the SR 65/66 experience, no other endgame challenge was tested.
Levelling / Skills
The build starts as Soldier with a ranged Cadence / cooldown Forcewave focus. Francis gun is a not so bad starter weapon for this purpose, a shield is needed for cooldown Forcewave. However, check regular both vendors - especially early in the game, the guns/shield sold there can be better than random drops. The first 2 point are invested in the Soldier mastery bar, 1 point into Forcewave. This is repeated until the Soldier mastery bar has reached level 5. The next three levels ups see 2 points invested in Forcewave and 1 point in Cadence. Afterwards the Soldier mastery bar is raised to 10, invest one point in Shield Training. Forcewave should now have reached level 8. The last level up before reaching level 10 is again 2 points in Forcewave and 1 point in Cadence. Forcewave is the large damage dealer in this phase, Cadence is used for filler attacks. After reaching level 10, the Oathkeeper mastery is started. Invest 1 point in the Oahtkeeper mastery bar and start maxing Safeguard for the additional flat damage, % damage and the armor. After Safeguard is maxed, bring the Soldier mastery bar to 40 - the next target is Deadly Momentum. Gearwise, farm a reasonable Milton's Casque from Milton Hart, try to get a acceptable Shambler's Heart for the Forcewave bonus and farm a Gutworm's Mark (needed 3 runs for the first one). The moment the Soldier mastery bar has reached level 40, max Deadly Momentum. Reduce Cadence to 1 and take the remaining points needed to max Deadly Momentum from Forcewave. Raise now the Oathkeeper mastery bar to 25 (target is Rebuke). The idea behind most steps in this phase of the levelling is to max the flat damage (Deadly Momentum, Safeguard - Rebuke). After killing Warden Krieg, move to the Forgotten Gods area and come back with a movement rune of your preference - farm a bit reputation if necessary.After you have reached the necessary reputation, craft a Gunslinger’s Talisman to be able to wear two guns. In my case, this happened at level 31. The moment you start using a second gun, remove all points from Safeguard, Forcewave and Shield Training. Use the points to bring the Oathkeeper mastery bar to 25, invest 1 point in Presence of Virtue and max Rebuke. One point was already invested now in Military Condition because of gear bonuses. After Rebuke is maxed, invest one point each in Smite, Zohlan’s Technique and Markovian’s Advantage and bring Fighting Form to 12/12 (try to keep it at 12/12 with normal gear bonuses) [with patch 1.1.9.8 - 8 points in Fighting Form are enough, invest the free 4 points in Zolhan and/or Smite for more passthrough]. As soon as possible craft Restless Remains for the Attack damage converted to health, also craft a Devil’s Belt for the +1 to Soldier. God gear options in this phase are Fleshwarped Pauldrons (Cadence bonus) and because of the drop frequency also Fleshwarped Casque. Use Chipped Claws and Severed Claws (well, missed this upgrade again while levelling) as components for the guns - use the provided skills - they are not bad. After you have farmed a reasonable Mogara’s Fang amulet, invest 1 point in Veterancy, Decorated Soldier, Scars of Battle and Fighting Spirit (and if not done before: also Military Condition). Max now the Soldier mastery bar. The following level ups are used to start Oleron’s Rage, Field Command and Squad Tactics, invest one point in each skill per level up. After you have reached level 6 in all three skills, only max Oleron’s Rage.
The next target is to bring the Oathkeeper mastery bar to level 50 and max Field Command and Squad Tactics. The exact distribution is not that important. In my case, I only invest some additional point into Field Command and Squad Tactics before maxing the Oathkeeper mastery and only maxed Field Command and Squad Tactics after the mastery bar has reached level 50. Skillwise, the Oathkeeper mastery bar is maxed to be able to have Guardians of Empyrion (1/12) and Celestial Presence (12/12). After reaching the region, farm two reasonable Ugdenbog Repeater (finally some guns without parasitic armor piercing) and - if you find a good belt - replace your crafted belt with an Ugdenbog Gridle. Check at level 65, if the faction gear (i.p Coven chest armor) is not an improvement. Change the components in your weapons to Oleron’s Blood if possible.
Now finally, the main damage skill will be maxed, also max Cadence, followed by maxing Zolhan’s Technique, Smite and finally Decorated Soldier. Invest one point in Haven and Resilence each. From now on, the remaing points are free and can be invested following your preferences. In my case, I raised Presence of Virtue to 9/12 (without gear), Haven to 5/6 (without gear) and one point in the first and last node of Vire’s Might (to have a second movement skill). At level 90, get the final faction gear - after reaching the Coven area in Ultimate, farm the final guns. Amulet, medal and pants can be farmed earlier. However, be ready to invest some time to get really good gear in all slots - for the final gear more than 10 hours of farming were needed.
Factionwise, the character sided with Order of Death’s Vigil - however, this decision is not really important. Barrowholm was kept friendly to be able to fight Ravager. All three cults are needed in the end at max level, so select the one you prefer while keeping this goal in mind. In Ultimate, select the one you prefer (e.g. because of the movement rune from the quest).
Patch Update:
1.1.9.8: The passthrough bug has been fixed - now 8 points in Fighting Form are necessary to get 100% passthrough. Invest the free 4 points instead in Zohlan’s Advantage or Smite. However, as it is imho not a major change, but more a slight buff, no change to the build here wa smade.
Character Snapshots
level 10: Warlord, Level 10 (GD 1.1.9.7) - Grim Dawn Build Calculator
level 20: Warlord, Level 20 (GD 1.1.9.7) - Grim Dawn Build Calculator
level 30: Warlord, Level 30 (GD 1.1.9.7) - Grim Dawn Build Calculator
level 31: Warlord, Level 31 (GD 1.1.9.7) - Grim Dawn Build Calculator (going dual wield)
level 40: Warlord, Level 40 (GD 1.1.9.7) - Grim Dawn Build Calculator
level 50: Warlord, Level 50 (GD 1.1.9.7) - Grim Dawn Build Calculator
level 60: Warlord, Level 60 (GD 1.1.9.7) - Grim Dawn Build Calculator
level 70: Warlord, Level 70 (GD 1.1.9.7) - Grim Dawn Build Calculator
level 80: Warlord, Level 80 (GD 1.1.9.7) - Grim Dawn Build Calculator
level 90: Warlord, Level 90 (GD 1.1.9.7) - Grim Dawn Build Calculator
level 100: Warlord, Level 100 (GD 1.1.9.7) - Grim Dawn Build Calculator (reaching level 100 - used for finishing the main campaign)
level 100: Warlord, Level 100 (GD 1.1.9.7) - Grim Dawn Build Calculator (current status)
- savegame folder:
_Ara.zip (1.1 MB)
Devotions
- Crossroads green
- Fox
- remove Crossroad green
- Crossroads red
- Jackal
- remove Crossroad red
- Crossroad yellow
- Assassin’s Blade
- remove Crossroad yellow
- Hydra
- Viper
- Empty Throne
- Stag
- Chariot of Death
- Lizard
- Solemn Watcher
- Dire Bear
- remove Lizard
- remove Fox
- Revenant
- Crossroad red
- remove Jackal
- Hammer
- Azrakaa, the Eternal Sand (without head and proc)
The devotion setup is build around Assassin’s Blade, Hydra, Empty Throne, Chariot of Death, Solemn Watcher, Revenant, and Azrakaa. These key devotions are also taken in this order. Other devotions are used to get the necessary affinities while providing some bonuses for the build. Quite some devotions are only used temporarily to have the necessary affinities for another devotion and are removed after this devotion substains itself. Revenant is used for the flat resist reduction as it does not require to be hit (and the value is slightly higher than Scales of Ulcama)
Assassin’s Blade is here for the physical resist reduction. Works rather well with the high OA (and critical hit probability). Hydra is a good ranged build devotion (Attack damage converted to health (Adcth), attack speed, damage), Empty Throne and Chariot of Death provide resistances (including crowd control resistances), Solemn Watcher to increase the defense, Revenant for the flat resist reduction (and Adcth). Azrakaa, the Eternal Sand increases the damage.
Assassin’s Mark (Assassin’s Blade) is bound to Cadence, Maul (Dire Bear) to Zolhan’s Technique, Raise the Death (Revenant) to Smite, Wayward Soul (Chariot of Death) to Field Command (an alternative would be Resilence - to get the proc with healing in situations when it really matters).
see Grimtools
Gear
This build uses specific Monster Infrequent items. However, there is - beside a Relic which enables ranged dual wield - no real core item. The blueprint for the first version of the Relic ([url = https://www.grimtools.com/db/items/1474]Gunslinger's Talisman[/url]) is available from Devil's Crossing faction vendor.If the proposed gear is used, quite some farming runs will be necessary to get really good gear for each slot. In some cases, it is important to farm suitable version more than once. However, while levelling, acceptable ones will be good enough, as they must be exchanged later by higher level versions.
Guaranteed Epic / Legendary Drops
head: Fettan Mask - +1 to all skills, guaranteed drop from Urn Cluster
Epic Drops
gloves: Mythical Turin’s Grips - physical damage gloves, attack speed, bonus damage, +3 to Markovian’s Advantage (cheap alternative: Elite Rhowari Grips - generic attack speed faction gloves)
Monster Infrequents:
weapon: Ugdenbog Repeater - physical damage gun, highest base damage, attack speed, bonus to Field Command, can be farmed in Ugdenbog
amulet: Mogara’s Fangs - +1 to all skills in Soldier, can be farmed from Mogara, the Prime Matriarch
medal: Gutworm’s Mark - +3 to Deadly Momentum, can be farmed from Gutworm, the Maneater
pants: Solael-Sect Legguard - Adcth, resistances, can be farmed from Guardian of Solael
girdle: Ugdenbog Gridle - +1 to all skills in Soldier, can be replaced with Wendigo Warder Girdle
Faction Gear:
chest: Coven Combatant’s Chestguard - +3 to Deadly Momentum
shoulder: Malmouth Vanguard Pauldrons - +3 to Cadence, Blitz and Smite
ring 1: Coven Storm Seal - faction physical damage rings, with bonus to DA, attack speed and +2 to Field Command / Presence of Virtue
ring 2: Bysmiel Vile Seal - faction physical damage rings, with attack speed, +3 to Smite and +3 to Markovian’s Advantage
boots: Elite Legion Greaves - physical resistance faction boots, can be replaces by better random drop or craft
Relic:
Gunslinger’s Talisman - enables ranged dual wield, Devil’s Crossing faction blueprint
Marauder’s Talisman - enables ranged dual wield, blueprint available from e.g. Hyram
What Else / What Now
Go Farming. A potential endgame build is [1.1.9.0 - 1.1.9.3] Physical Penetration - Dual Deathdealer Physical Warlord | SR85 | Crucible ~4:30
And as Warlord is a relative versatile class, respecing to one of the other concepts like retaliation Warlord, Shield melee Warlord, EoR Warlord, Shield Caster etc is always possible. See Build Compendium X (Forgotten Gods) - #9 by Stupid_Dragon for the most current builds.