Picture with all permanent buffs + Ulzaad’s Decree active
Introduction
It came to my attention that many beginner players are interested in Blademaster. It is a powerful class with several strong endgame options, the only entry-level difficulty is it requires some game mechanics knowledge specific for pierce damage.
Despite the plentitude of endgame builds most of them only make sense because of endgame gear support. This is true for both high end and budget endgame setups. I can make about four distinct budget blademaster setups, but only one you can level with - a pierce dual wield Cadence build presented in this guide.
The playstyle is that of a durable duelist. It excels in fights against a limited number of opponents while dealing with big, thinly spread crowds isn’t exactly it’s forte. At no point in the game it would have a screen-wide AoE clear. To help in dealing with crowds Blade Spirits are usually used in high end builds, but budget setup has neither skillpoints nor conversions needed.
Mechanics of Pierce Cadence
The core mechanic of the build is the conversion of physical damage of Cadence skill into piercing damage. This kind of conversion is different from any other damage conversions because it’s done via armor piercing of the weapon. To put it in simple words, in Grim Dawn edged weapons like swords and axes inflict a percentage of their physical damage as piercing damage, and that percentage is called Armor Piercing in-game and is shown under weapon’s base damage.
What can be easily misunderstood is that Armor Piercing doesn’t affect just base damage of the weapon, it affects all applied flat physical damage portions that come from gear, devotions or buffs (like Deadly Momentum). Moreover, Armor Piercing applies even to damage of various skills and procs, as long as they do at least some weapon damage.
What it means for Blademaster in practice is all physical damage we’ll be doing is going to be partially converted to piercing damage.
Now, the question is how high your armor piercing needs to be. The answer is as high as possible. Ideally you want all physical damage to be converted into piercing damage, because due to how physical damage works a build that is part physical part piece is just a bad pierce build.
Few exceptions aside armor piercing stat found on gear would actually be pretty low - between 10% and 40% for generic swords and up to 50% for some dedicated pierce damage swords, including Dermapteran Slicer
Thankfully there’s a special stat called “Increased Armor Piercing by X%”. This bonus is very rare, but builds that use swords enjoy a 100% piercing increase from Blades of Nadaan constellation. The bonus is multiplicative, so a 50% armor piercing sword will effectively turn into 100%.
Bottomline, when you play a DW melee piercing build you normally get Blades of Nadaan, don’t know any exceptions. A 50% armor piercing sword with Blades of Nadaan will fully convert physical damage of Cadence and most procs to piercing damage. This is a bare minimum you need to know.
Now, that’s not all there is when it comes to pierce Cadence, it’s more complicated than that. The skill has funny interactions with weapon pool system procs (commonly abbreviated as WPS). Blademaster has a whooping 6 WPS skills - Markovian’s Advantage, Zolhan’s Technique, Belgothian’s Shears, Amarasta’s Quick Cut, Whirling Death and Execution. Some entry-level insight into WPS can be found here:
Turbo-charge your auto-attacks with default attack replacers and WPS
Now if you’ve already familiar with content found in that thread then all you need is this fact briefing:
- When you dual-wield your singular normal attack can be either done with main hand, off hand or both.
- Cadence follows the same routine, but despite the tooltip it always hits with one hand. If you roll a both-hand attack on Cadence discharge then only one hit will actually be the Cadence hit, the second one will be a somewhat normal attack. For clarity I would call it a both-hand Cadence followup.
- When discharge happens on both-hand attack the Cadence discharge will always be applied to main hand.
- Normal attacks in-between a discharge will generate one Cadence charge, doesn't matter if they hit with one hand or both. When a both-hand Cadence discharge happens a followup attack will generate a charge. This is part of the reason why DW Cadence is best Cadence.
- WPS proc alters the animation of normal attacks. If WPS proc hits with both hands then it doesn't matter if the normal attack was supposed to be one-handed or not. Stacking a 100% WPS chance with all WPS doing damage with both hands means effectively eliminating one-handed normal attacks , which is ofcourse a big damage boost.
- WPS hitting with both attacks do not generate an extra Cadence charge.
- A Cadence discharge follows the normal attack routine even with 100% WPS stacked for normal attacks, it can still be either a one-handed discharge or both-handed like a WPS-less attack. WPS can't proc on Cadence discharge but they can proc on both-hand Cadence followup, even if it has an animation of normal attack. Special properties like AQC's triple attack ofcourse do not carry over.
On paper all WPS procs should increase your DPS, in practice WPS procs animation takes longer than normal attack, which can lead to situations where getting a weaker WPS isn’t worth it because it delays better WPS, e.g. Cadence discharge or Execution.
Congratz, now you know it all.
Devotions

This is a rather unique setup I cooked up myself. Unique because it uses Revenant for flat resistance reduction and other good stats. High end blademasters tend to use Mythical Grasp of the Unchained Might as a source of flat resistance reduction (only one needed since they don’t stack), so usually they focus more on getting as much %pierce damage from devotions as they can, like Azraaka + Unknown Soldier + Assasin setups that are not possible if one has to pick a flat resistance reduction devotion.
Suggested path:
- Crossroads (purple)
- Harpy
- Owl
- Blades of Nadaan
- Panther
- Assasin
- Eel
- Ulzaad
- Remove Owl
- Assasin's Blade
- Crossroads (red)
- Mantis
- Remove Harpy
- Remove Crossroads (purple)
- Azraaka
- Ghoul
- Jackal
- Remove Crossroads (red)
- Revenant
On Assasin’s Blade proc (called Assasin’s Mark). It is best to bind it to Cadence, but then you’d have to rebind Azrakaa’s proc (Shifting Sands) to something else, and there aren’t many good options for that, except maybe Blade Spirit which you’d get fairly late. So at start leave Shifting Sands bound to Cadence and bind Assasin’s Mark to anything else (I had it bound on Amarasta’s Quick Cut) so that it at least gets experience. The reason for that is you won’t really need Assasin’s Mark until later in the game, while Shifting Sands provide good crowd clear.
Levelling
The build was proven back in May 2019 by levelling a test character on hardcore from scratch, which was managed on 2nd attempt.
The levelling up to 50 was redone in January 2021 as part of the general build overhaul up to new standards. Test character was brought to 50 on hardcore playing from scratch as well. Level 65 and onwards character snapshots were retroactively changed so that they were consistent with new devotion path.
The preferred progression is start on Normal / Veteran, make a detour to Forgotten Gods campaign up till you have chosen one of the Three cults to get a mobility rune, then complete vanilla campaign, then do AoM campaign up to Coven of Ugdenbog to unlock the faction. After that switch to Elite and do a full playthrough there. If you max out reputation with key factions before 90 then you can switch to Ultimate to get a few easy levels and then come back to gear up.
The choice between Normal and Veteran is purely for bragging rights. The difficulty of Veteran doesn’t really pays out since all you get is a measly 10% extra experience. If it gets too difficult on Veteran feel free to switch to normal. Admittingly this is not the easiest build to start Veteran with, unless you go the cheesy Forcewave route.
Your faction decisions don’t really matter. I recommend to be friends with Outcast and Barrowholm, because while the build doesn’t really use anything from these factions I can’t be really vouching for every Blademaster build you might decide to switch later. Out of three Cults I recommend to start with Solael, because Solael cult has early access to Rush mobility rune, which I currently consider the best one. On higher difficulties it doesn’t really matter which cult you get, I prefer Dreeg because I find it’s quest to be the easiest.
Stat Distribution: you need barely enough Spirit to satisfy requiremenets for Jewelry and the rest of points goes into Physique and Cunning in roughly equal proportion (my goal was to have 1k Physique and 1k Cunning by level 100 :)). Early on you’ll be putting more into physique because ideally you should be wearing a level-appropriate heavy armor, and you’ll need much physique for that. While levelling always keep at least 5 stat points free for adjustments.
Levels 1-20
Your main skill during early levelling will be Amarasta’s Blade Burst, and honestly levelling is better done with a rifle instead of dual-wielding right out of the gate. This is especially true for Veteran difficulty, but even on normal there are such non-obvious benefits as not having to walk up to every single zombie to kill it and shoot it instead, hence saving time. The levelling order below is adapted for both DW Melee and rifle methods, so you can switch to DW Melee anytime you want.
Amarasta’s Blade Burst should be put instead of your basic attack on left mouse button.
You might need to buy a few energy potions early on since Amarasta’s Blade Burst is quite energy hungry. Later the problem would fix itself.
Unfortunately that levelling method can’t do early totems on veteran (before level 15). Well, technically it can, but the time taken makes it not worth it. Effortless early totems is a caster build feat, while the ranged ABB levelling feels somewhat similar to a caster it’s not up there in power and utility.
| Level | |
|---|---|
| 2 | 1 point into Nightblade bar, 1 point into Amarasta’s Blade Burst, 1 point into Dual Blades |
| 3 - 9 | 2 points into Nightblade bar, 1 point into Amarasta’s Blade Burst |
| Kasparov Quest | Phantasmal Armor |
| 10 - 13 | 3 points into Lethal Assault |
| 14 | 1 point into Pneumatic Burst, 1 point into Breath of Belgothian, 1 point into Nightblade bar |
| 15 | 3 points into Nightblade bar |
| 16 | 1 point into Nightblade bar, 2 points into Ring of Steel |
| 17 | 3 points into Nightblade bar |
| 18 | 2 points into Nightblade bar, 1 point into Ring of Frost |
| 19 | 3 points into Ring of Steel |
| 20 | 3 points into Ring of Steel |
Once you rescue a Blacksmith craft yourself a couple of Wardstones for amulet and medal. Not only it’s a huge elemental resistance boost but it also provides much needed movement speed. I’d say acquiring Wardstones is the earliest point where it’s feasible to switch to dual wielding.
By level 20 you should be switching to dual wielding because you’d want to use two Coldstones. The activeable buff they provide stacks so it’s very worth it to have two of them. They are crafted at Blacksmith, if you’re lacking Chilled Steel needed to craft them then Blacksmith also can craft Chilled Steel out of other components.
Last but not least craft yourself a couple of Scaled Hides. It is VERY important for a melee character to have both high armor and high armor absorption, otherwise a mob of trash enemies would become even more dangerous than a boss.
If your pierce resistance is low then crafting a Resilient Plating or Silk Swatch is also nice.
By level 20 my character looked like that:
Beginner’s Forgotten Blademaster, level 20 Snapshot
Levels 21-35
So the build is firmly DW Melee now, therefore some DW specific investments would make sense. First of all put one point into Belgothian’s Shears, Amarasta’s Quick Cut and Whirling Death. Individually they are nothing, but together they are a 36% chance to do a special attack with some AoE, at very little skill point investment to boot.
Then, pump Dual Blades to maximum. There’s a lot of things where you can invest, but my policy is damage comes first. The faster you kill the less damage you take.
| Level | |
|---|---|
| 21 | 1 point into Belgothian’s Shears, 1 point into Amarasta’s Quick Cut, 1 point into Whirling Death |
| 22-26 | 3 points into Dual Blades |
Another improvement I can recommend doing is putting point out of Amarasta’s Blade Burst, leaving only 1 point there to activate Lethal Assault. It was a bread and butter skill for a few early levels but now Ring of Steel is serving most of your AoE damage needs. In time you’ll put points out of it too, but not before the build gets more strength.
Where to put points after that is up to personal taste, as well as extremely situative. For example, when facing undead enemies (especially heroes and bosses) Night’s Chill will do a great job boosting your damage output. You can also throw a few more points into Pneumatic Burst for better heals if you want.
Other than that, start building up Soldier mastery bar. Thing is, up to this point we’ve been overinvesting in skills (which is a necessary measure though), so your health is very likely to be behind the recommended 100 hp per level. Soldier mastery bar investment will allow you to catch up. Put one point into Markovian’s Advantage and Zolhan’s Technique once it becomes available.
Gear-wise a few new components become available. If you’ve managed to get Mark of Traveler then put it into your boots. You’d be surprised, but movement speed is very much a necessary stat for melee builds to work. Ancient Armor Plate is another great component for melee builds specifically.
During mid 20’s try to get some Spectral weapons, hopefully one Spectral Battle Axe and one Spectral Longsword. The Battle Axe is amazing, but you need at least one sword to benefit from Blades of Nadaan constellation, which you’d already reach by this point.
If you find a blueprint for Guile relic then use it, otherwise buy a blueprint for Bladesworn Talisman from Devil’s Crossing and use that instead.
Level 35 is when you get access to some decent freebies, check Devil’s Crossing quartermaster for Devil’s Cuirass and Devil’s Shoulderguard as well as Devil’s Cord blueprint. Also check the Rover quartermaster for Rhowari Grips and Rhowari Greaves. If you’ve reached Homestead already then you can get yourself a pair of Dermapteran Slicers, at this point you want anything with attack speed. Last but not least visit the extra location south of Homestead to get either Mogara’s Fangs or Bloodbriar’s Thorn.
Levels 36-50
Before level 20 the build was mostly cold damage. In 20-35 range it was a mix of cold and pierce damage. The goal of this level range is to continue the transition towards the pierce damage build while ditching cold parts.
What you should be doing is pushing Soldier mastery bar to 40 to get access to Deadly Momentum. Once you do, take all points away from Lethal Assault and Amarasta’s Blade Burst and get 1 point into Cadence and 12/12 Deadly Momentum instead.
After that push Soldier to 50 and get Oleron’s Rage. The reason why it’s a priority is by now you’d hopefully get an Assasin proc, so you need all OA in the world to make it reliable.
Levels 51-65
At this point the core of the build is set, and all that’s left is picking up various buffs and passives. I highly recommend putting points into Field Command and Pneumatic Burst because they provide the biggest bang for point investment. Field Command offers defensive benefits as well as OA, while points in Pneumatic Burst will boost your attack speed and OA again, as well as improve your survivability via bigger timed heals. Yes, you’v read it right - the ability to expect when you’ll receive heavy damage and use Pneumatic Burst right after that is part of any Nightblade’s proactive defense.
Perhaps the most interesting feature of that level range is you’re getting access to level 65 faction gear. Hopefully you’ll have at least Respected with Coven of Ugdenbog once you reach that level so you can buy Coven Combatant Chestguard, Coven Combatant Spaulders and optionally Coven Defender Casque.
Levels 66-75
You should be getting War Cry at this level, then try to push Nightblade mastery to 40. Well, actually the long goal is to push Nightblade to 50 because we need Blade Spirits to optimize our devotion bindings, but it can wait. It doesn’t matter much if your bindings during levelling are efficient or not, what matters is that they are bound at least to something so that procs level up along with you. The only really important thing is to have Assasin’s Mark on Cadence and have enough OA to activate it. The rest you can experiment with.
At level 70 go get new higher level Dermapteran Slicers, if you haven’t done it in a while. Also get a Mogara’s Fangs amulet if you still haven’t.
At level 75 you can make a run for Fettan Mask on Elite, which is found at the entrance of Maw of Enaht. It’s a decent piece due to +1 to all skills.
My character looked like that at 76:
Beginner’s Forgotten Blademaster, level 76 Snapshot
Levels 76-90
From level 75 onwards work on picking up the leftovers - Shadow Dance, Military Conditioning, Anatomy of Murder, Scars of Battle.
This level range is more or less a maraphon to max out reputation with all factions of interest (mostly Coven of Ugdenbog, Malmouth Resistance, The Black Legion and all Cults, others can be somewhat ignored) and hit 90 to capitalize on that.
I also recommend farming up Ugdenbloom at this level range on Elite, because otherwise you’ll have to do it on Ultimate, which would be more difficult with unoptimized character.
Once you’re 90 you should get:
- Elite Coven Combatant Chestguard from Coven Quartermaster
- Elite Coven Combatant Spaulders from Coven Quartermaster
- Malmouth Blade Seal from Malmouth Resistance Quartermaster, two copies.
- Hammerfall Powder from Malmouth Resistance Quartermaster, jewelry augments.
- Solael's Voracity from Malmouth Resistance Quartermaster, jewelry augments.
- Craft Malmouth Bladed Girdle, blueprint can be bought from Malmouth Resistance Quartermaster.
- Optionally Coven Mark of Blades from Coven Quartermaster.
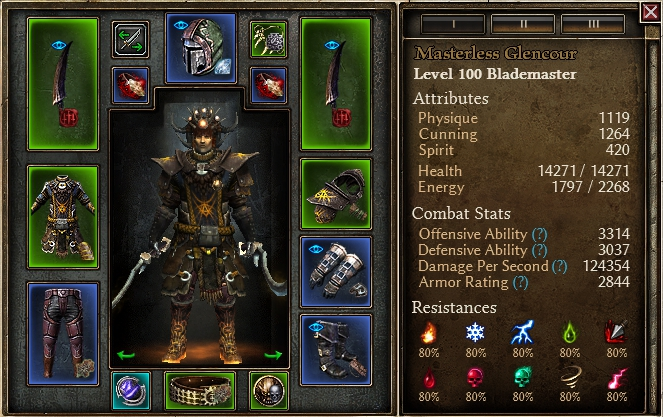
My build at level 90:
Forgotten Blademaster, level 90
Levels 91-100
Farming time.
There are two MIs crucial for this build which affixes you’d want to improve. The first one is Mogara’s Fang you already know, the second is Gutworm’s Mark. It doesn’t have to be some fantasy double rare, but it’s still better be something decent, preferably with %pierce damage affixes.
The Mogara run has a chance of spawning an Ancient Savage Totem, which you can farm as well with a slight detour to make runs more productive. That way you’ll hopefully get all the advanced component blueprints you’d need for the final setup, like Seal of Annihilation, Living Armor, Sacred Plating, Spellscorched Plating, Ugdenbog Leather, Prismatic Diamond, and others less relevant too.
Once you’re level 94 make a run for Fettan Mask on Ultimate.
Skill-wise use the last 10 levels to push Nightblade to 10, so you had your hands free to min-maxing the skillpoints from that point onwards.
Endgame Skill Min-Maxing
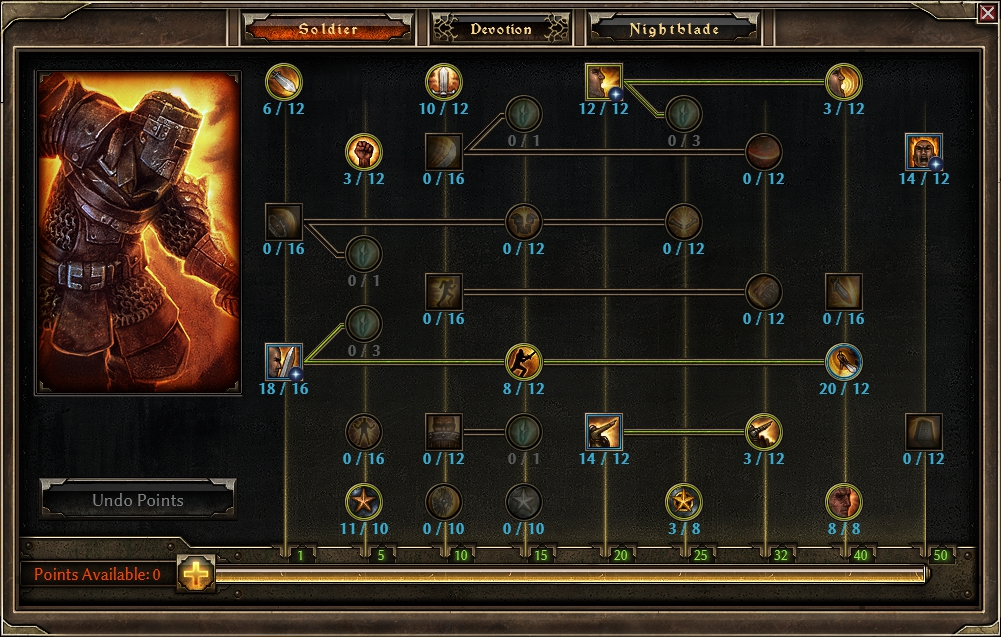
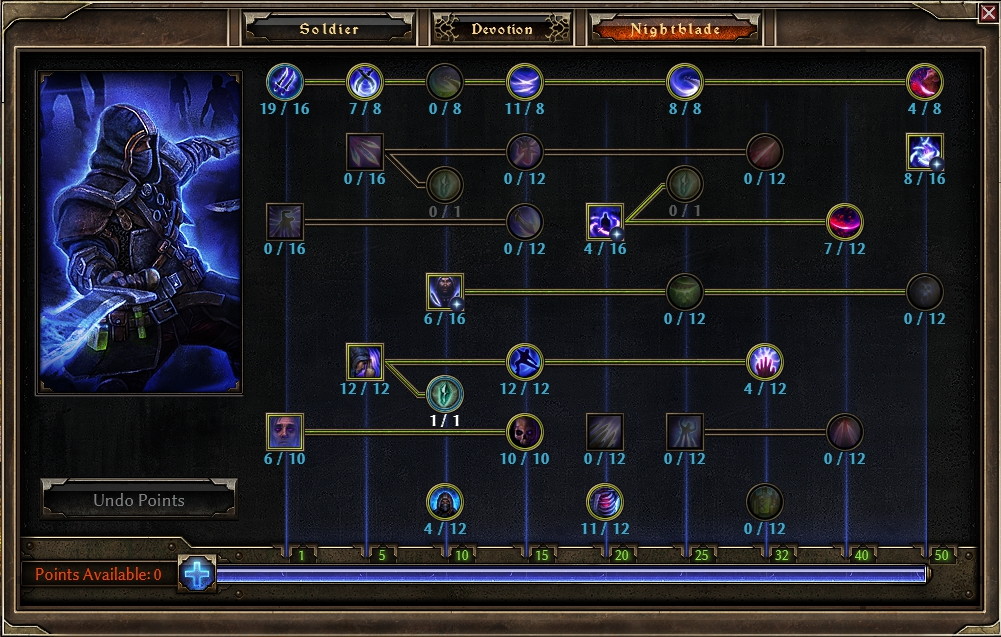
This section is for determining skill priorities in the general case. Early game the Levelling section below takes priority, later in the game whenever you don’t know which skills you should improve you come back here. Terminology:
- Max - means that you should put the maximum possible number of skillpoints into it and try to push it high up with gear.
- Keep at X - means that it's best if skill level stays at certain number. Since skill level can fluctuate based on gear you should adjust your skillpoint investment to keep the given number.
- Onepoint - means that it deserves one skillpoint investment either to enable something or because you'll be letting +skills from gear push it high up.
Cadence - max, main attack skill
Fighting Form - onepoint, it’s useful for extra targets but there really is no spare skillpoints to put there.
Deadly Momentum - max, one of the most important damage sources of the build
Dual Blades - max, one of the most important damage sources of the build as well as an epic chunk of %physical resistance.
Belgothian’s Shears - onepoint, let +skills do the trick.
Amarasta’s Quick Cut - onepoint, let +skills do the trick.
Whirling Death - onepoint, let +skills do the trick.
Execution - onepoint, let +skills do the trick.
Markovian’s Advantage - onepoint, let +skills do the trick.
Zolhan’s Technique - onepoint, let +skills do the trick.
Note on all WPS skills: the first point yields the biggest value, but investment in WPS isn’t entirely unreasonable, albeit which WPS are worth it and which aren’t is up to debate. For example Execution is a strongest WPS in the game, while Amarasta’s Quick Cut is considered to be the weakest.
Oleron’s Rage - max, it’s very important for any pierce build to have high OA to activate Assasin’s Mark reliably. At least keep at 12, going over the soft cap is worth it though, but you need it at even number because that’s when you get an extra % of OA.
Veil of Shadow - onepoint. It’s a good debuff and most high end builds actually keep it at 10 because the AoE of Night’s Chill depends on it. Personally I find 6/10 enough for builds that are almost strictly melee, especially since this setup is point-starved.
Night’s Chill - at least keep at 10, but with a few spare points it’s usually the first candidate to max.
War Cry - at least keep at 12/12, but overall it’s best skill of a kind in the game due to it’s very generous scaling past the softcap. Any point above 12 is worth it, but I wouldn’t go out of my way to pump it if I’m starved for skillpoints.
Break Morale - one point for skill disruption, helps vs some enemies.
Pneumatic Burst - keep at 12/12, going over that isn’t worth it because it’s scaling is pretty poor.
Breath of Belgothian - onepoint for every dual-wield Nightblade build.
Shadow Dance - keep at 12/12, going over that is ok if you have spare points, but you’re only interested in even numbers because they bump dodge and projectile evasion by a percent.
Elemental Awakening - onepoint for some freebie elemental resistance.
Field Command - keep at 12/12 at least, but honestly I prefer maxing it because it’s scaling is decent. Best to keep at even number for extra percent of armor in that case.
Squad Tactics - onepoint, decent passive and many builders like it, but as build is pretty skillpoint starved and can easily find attackspeed elsewhere I don’t find it necessary to overinvest here.
Ring of Steel - onepoint for stun and to enable Circle of Slaughter.
Circle of Slaughter - onepoint for fumble effect and let +skills do the rest.
Military Conditioning - great passive, best kept at 11/10 because of how it scales.
Anatomy of Murder - another great passive, typically kept at 11/12.
Blade Spirit - onepoint as a devotion activator skill.
Shadow Strike - onepoint for mobility.
Nidalla’s Justifiable Ends - onepoint to shave off some cooldown from Shadow Strike.
Phantasmal Armor - onepoint for some freebie CC resists.
Decorated Soldier - onepoint for some freebie slow resistance.
Scars of Battle - usually kept at 8/8 but 6/8 is fine too.
Fighting Spirit - onepoint for some OA.
Endgame Items & Farming
Weapons - Dermapteran Slicer (GT Link)
- Drops from dermapterans - a common enemy inhabiting west of Homestead
- There are level 20, 32, 52, 70, 84 and 94 versions of this item.
- You want at least a Puncturing / Superior of Alacrity one. If there's an advanced pierce damage prefix instead of Puncturing / Superior - very good!
- Fantasy version would be something like Heart-Piercing Dermapteran Slicer of the Slayer or Sinister Dermapteran Slicer of the Slayer.
Chest - Elite Coven Combatant Chestguard (GT Link)
- Coven of Ugdenbog faction item, bought from Coven Quartermaster
- Restart the game until you get above average stats
Shoulders - Elite Coven Combatant Spaulders (GT Link)
- Coven of Ugdenbog faction item, bought from Coven Quartermaster
- Restart the game until you get above average stats
Head- Fettan Mask (GT Link)
- Can be found near the entrance to Maw of Enaht.
- There are three versions that drop on each difficulty respectfully. You need a level 94 Fettan Mask that drops on Ultimate.
Belt - Malmouth Bladed Girdle (GT Link)
- Craftable, blueprint can be bought from Malmouth Resistance Quartermaster.
- Can only get either prefix or suffix.
Pants - Mythical Bladeguard Leggins (GT Link)
- Random drop, quite common. Best bet is farm totems.
- Alternatively Kubacabra's Chausses, the +3 to Deadly Momentum makes them highly prized for this build. Drops from Kubacabra, the beast faction Nemesis.
- Alternatively Solael-Sect Legguards, a build can always use extra lifesteal, even if affixes you get are fairly modest.
Gloves - Mythical Bladedancer’s Handguards (GT Link)
- Random drop, quite common. Best bet is farm totems.
- Chosen for combination of %pierce, physical resistance, attack speed and skill bonuses. Attack speed bonus is meager so you'll have to compensate elsewhere. I did it by using one Dread Skull in medal.
- Alternatively Plagueguard Grips with attack speed affix, craftable item with blueprint being a random drop. Preferred over random green item because of built-in physical resistance.
Boots - Mythical Final March (GT Link)
- Random drop, quite common. Best bet is farm totems.
- Chosen for slow resistance and physical resistance.
- Alternatively Stoneplate Greaves, craftable item with blueprint being a random drop. Preferred over random green item because of built-in physical resistance.
Rings - Malmouth Blade Seal (GT Link)
- Malmouth Resistance faction item, bought from Malmouth Quartermaster
- Restart the game until you get one with 4% Offensive Ability
Amulet - Mogara’s Fangs (GT Link)
- Drops from Mogara the Prime Matriarch, a manticore boss in Pine Barrens
- Level 32 is the minimum required level for this amulet. There are level 32, 52, 70, 84 and 94 versions.
- Since pierce builds usually get less %damage from gear aim for affixes that have bonus %pierce damage
Medal - Gutworm’s Mark (GT Link)
- Drops from Gutworm the Maneater - a boss found in the unmarked cave in Burrwitch Outskirts
- There are level 18, 32, 52, 70, 84 and 94 versions.
- Since pierce builds usually get less %damage from gear aim for affixes that have bonus %pierce damage
Relic - Belgothian’s Carnage (GT Link)
- Craftable, blueprint is a random drop. Best bet is to farm totems.
- The preferred completion bonus is +1 to Nidalla's Justifiable Ends and Night's Chill, or alternatively +1 to Shadow Dance and Circle of Slaughter is give or tare just as good. The rest is worse.
Video
SoT run. Forgot to turn off non-MI greens so ended up derping a lot for loot. Quite a few minor mistakes as well.
The damage output is pretty insane. The tooltip may look uninspiring compared to some of my other budget setups like Primal Strike Warder or Blade Arc DK, but it doesn’t take extra damage from WPS skills and DW-specific Cadence mechanics into account, so you can multiply the number by 1.5 at the very least. The build consistently downs the ultimate dummy in 29 seconds, while the Warder linked above would have taken about 35 seconds if he wasn’t running out of energy near the end of the test.
For high end builds I recommend visiting the Compendium. Specifically I can recommend:
DW Pierce Cadence by @banana_peel as the direct upgrade over my build.
American Dream by @banana_peel as the alternative budget setup
Beginner’s Pierce PB Spite Blademaster by @supertolik as another alternative budget setup, this time Spite-based.
I’d also like to credit @Superfluff for consulting me briefly back in 2019, providing useful insights into how Cadence interacts with WPS procs. Thank you!

 Thank you for your work.
