Introduction
Part five of my levelling with a shield guides. This time, it is a Warder (Soldier + Shaman) with a strong health regeneration focus. The reason for this specific build was more or less that I always wanted to find a sensible usage for this shield (Fleshwarped Bulwark), and I would say, the result is now acceptable. To add a bit more flavor, the build also uses Blade Arc as main attack instead of Cadence like my other Soldiers + something S&B guides.
There are already three other guides for Warders, two two handed weapon guides ([1.1.8.1] Voldrakia : budget Two-Handed Cadence Warder from scratch (SR65+), [1.1.9.0] Beginner's Lightning Warder) and one pet guide ([1.1.9.1] Beginner's Hybrid Pet Warder - The Mogdrogen Cleaver - Blue Set - SR75). So, this is the fourth guide for this class.
For endgame Warders (you will currently not see a physical S&B melee build there) see Build Compendium X (Forgotten Gods) - #34 by Stupid_Dragon, for other budget / beginners builds check Beginner build guides Compendium (for AoM + FG expansions). There is no direct upgrade to this build, but relatively recent potential target builds could be (physical two handed melee) [1.1.9.7] 2H Melee Physical Primal Strike Warder - SR 85 / Ravager of Minds, or with a stronger health regeneration focus [1.1.9.1] [HC] Avenger Warder, Facetank all superbosses, SR90+, 8k average HP regen, physical 2h Savagery.
A Shielded Life - Part 5
Physical S&B Warder has a rather special spot for me in Grim Dawn. While certainly not the best class, it was a S&B Warder that kept me playing the game after completely misspecifying my first character (DW Blademaster) and getting frustrated. While the Warder build also collapsed at the end of the base game campaign in Elite (almost no damage), the build was also close to immortal. However, these are events of the past, and while the Blademaster has reached level 100 long ago, the S&B Warder is still unfinished. So, it is time to honor my build from the past and make a S&B Warder guide.
Another reason for the build was the desire to find a build using Fleshwarped Bulwark which regularly drops while levelling. With its bonuses to Mogdrogen’s Pact and Blood of Dreeg, Warder and Witchblade would be natural candidate classes. And as I already levelled a Witchblade, Warder was the class to go. As my previous Soldier + something S&B builds utilize Cadence and quite some Monster Infrequents items have bonuses to Blade Arc, it was also time for making a S&B Blade Arc guide. The flat damage bonuses Mogara’s Fangs to Mogdrogen’s Pact was grateful accepted.
The presented build is not damage orientated, it does not even uses all S&B Blade Arc Monster Infrequents. Levelling a Warlord, would allow a much more damage orientated S&B Blade Arc build. Also, Warder provides only limited physical resist reduction, therefore the damage decreased even further against stronger enemies. However, health regeneration is a rather strong defensive ability, as it is passive healing and sustain. And a S&B Warder can reach - even as budget build - a rather acceptable level. The presented build however also does not focus too strong on health regeneration and tries to somehow still keep the balance between damage and health regeneration. Even with these limitation, Blade Arc was a rather usable levelling skill and fun to play.
The character uses relatively little (= none) faction gear at the end. Monster Infrequents provide valuable bonuses to Blade Arc (Mogara’s Fangs, Sandclaw Slicer, Balthazar’s Crest) and other relevant skills (Gollus’ Ring) and are therefore needed for this build. Epic gear is either used for its bonuses (recently buffed Mythical Baldir’s Armor used together with the mantle for the set bonus), or because it dropped and provides sensible bonuses (Mythical Turin’s Grips and Mythical Dreadnought Footpads). This means that the final character cannot be standardized very well and the strength at the end depends on the RNG god or the own farming endurance. As the final build however can be rather sturdy, it is imho worth the trouble.
A Bit About Physical Damage and Armor
Physical damage is a special type of damage - as slightly different rules apply to it. First, physical damage is affected by physical resistance (negatively and positively), second, the remaining physical damage has to pass the armor. This applies to each source of physical damage independently (so, if you use three Steelbloom Powder, you have three source of 12 physical damage, each). While the player can increase its armor absorption to 100%, enemies always only have 70% armor absorption. So, at least 30% of the damage remaining after the physical resistance check will pass. Note: Internal Trauma is only affected by physical resistance.This means for player characters that either armor or physical resistance can be increased to have the same level of protection against physical damage. A character with 2000 armor and 60% physical resistance has the same protection like a character with 5000 armor and no physical resistance. In the first case, out of 5000 damage, only 40% remain after the physical resistance check, means 2000 remain for the armor check, in the second case, the complete 5000 remain after the physical resistance check and comes to the armor check. In both case, 100% (assuming 100% armor absorption) of the incoming damage would be absorbed, and no damage would hit the character. The former setup (2000 armor and 60% physical resistance) obviously would be better because of the additional reduction of internal trauma damage. Regarding armor absorption, this also applies that reaching a value close to 100% is more important for characters with high armor but low physical resistance. Assuming 92% armor absorption in the above case, the first character would be hit by 160 damage, the second by 400.
The “each source of physical damage must pass armor independently” rule makes calculating the effective damage of a build rather difficult. And the effective damage strongly depends on the physical resistance and armor of enemies. And as both values tend to increase for bosses, nemesis, and superbosses - the damage of a character decreases accordingly. This build for example is rather strongly affected by this. It is also obvious that if two builds have the same amount of flat physical damage and the exact same amount of damage per second, the build who inflicts the damage with less hits (means: lower number of hits per second) has always equal or more effective damage than the other build. That said, higher attack speed can and is often still more important (e.g. because of sustain - more regular life leech).
In the following some numbers are presented. However, as there are quite some different combination, only some examples will be discussed. However, if you so far have not known the reason for “+ XX% physical damage” is important, you should nevertheless know the reason afterwards. So some basics:
1. If you have weapon damage, the damage (all general source of flat damage and weapon specific flat damage) is multiplied by your %weapon damage on the skill. In case of auto attackers and WPS, both values are multiplied.
2. The flat damage on skills and the damage after 1. is multiplied by your sum of  +XX% physical damage (including cunning bonus).
3. The damage is further modified by total damage modifier (e.g. the negative value of Markovian's Defense).
4. Apply other damage aspects, e.g. reduced damage skills, critical hits, or low OA penalty. All of them are multiplicative
Steps 1. - 4. are done for each damage component (flat damage, skill damage, etc.) separately. The values calculated that way represent your outgoing damage. So, e.g. you have 12 flat physical damage, use Blade Arc with 189% weapon damage, and your character has +2500% physical damage, the 12 flat physical damage result in 121.8926 ~ 590 outgoing damage (case A1). If the hit was a critical hit with 60% critical damage bonus (50% from Laceration, 10% from the build), the outgoing damage would be at least 5901.7 = 1003 (A2). For a weapon with at average 132 weapon damage, it would be in a non critical hit situation 1321.8926 ~ 6486 (B1), and if it is a critical hit, it would be at least 64861.7 ~ 11026 (B2).
However, this is not the damage actual hitting the enemy. We will consider three different enemies (all numbers slightly simplified), the first with 1000 armor and 2% physical resistance (E1, Briarthorn Terror), the second with 2000 armor and 27% physical resistance (E2, Loghorrean, third phase), and the third with 3000 armor and 87% physical resistance (E3, Ravager). Our character has either 0% physical physical resist reduction (C1), 32% resist physical reduction (C2), and 73% physical physical resist reduction (C3). Also, Maul with its armor reduction (-35%) could either not be not active (M1) or be active (M2). Now to calculate the effective damage, the following steps are necessary:
1. Perform the physical resistance check - increase or decrease the damage accordingly
2. Adjust the armor if necessary
3. Perform the armor check, damage above the armor value (threshold) will pass completely, all damage below will be affected by the armor and its armor absorption (for enemies, it is always 70%)
4. Apply other damage reductions (percentage or flat) - will be ignored here
In case A1.E1.C1.M1 this would result in the following effective damage:
1. No physical resist reduction, but 2% physical resistance, that means 98% of the damage will remain: 590*0.98 ~ 578
2. Maul is not active, 1000 armor remain
3. 578 is completely below 1000, so the complete damage is affected by the amor absorption (30% will go through): 578*0.3 ~ 173. Or in other words, 173 out of the 590 damage outgoing remain and actual hit, which is less than 30%
In case of A2.E2.C3.M2
1. 73% physical resist reduction vs 27% physical resistance, means -46% physical resistance and therefore a damage increase, or in numbers 1003*1.46 ~ 1464
2. As Maul is active, the armor of 2000 is reduced by 35%, means 2000*0.65 = 1300 armor remains.
3. The armor check now has a part of the damage above the armor threshold and below the threshold. The effective damage therefore is (1464-1300 = 164) + (1300*0.3 = 390) = 554, or ~55% of the outgoing damage.
And now to all scenarios:
damage scenario A1
   combination effective damage percentage of outgoing in %
1  A1.C1.E1.M1           173.46                        29.4
2  A1.C1.E1.M2           173.46                        29.4
3  A1.C1.E2.M1           129.21                        21.9
4  A1.C1.E2.M2           129.21                        21.9
5  A1.C1.E3.M1            23.01                         3.9
6  A1.C1.E3.M2            23.01                         3.9
7  A1.C2.E1.M1           230.10                        39.0
8  A1.C2.E1.M2           312.00                        52.9
9  A1.C2.E2.M1           185.85                        31.5
10 A1.C2.E2.M2           185.85                        31.5
11 A1.C2.E3.M1            79.65                        13.5
12 A1.C2.E3.M2            79.65                        13.5
13 A1.C3.E1.M1           308.90                        52.4
14 A1.C3.E1.M2           553.90                        93.9
15 A1.C3.E2.M1           258.42                        43.8
16 A1.C3.E2.M2           258.42                        43.8
17 A1.C3.E3.M1           152.22                        25.8
18 A1.C3.E3.M2           152.22                        25.8
damage scenario A2
   combination effective damage percentage of outgoing in %
19 A2.C1.E1.M1          294.882                        29.4
20 A2.C1.E1.M2          527.940                        52.6
21 A2.C1.E2.M1          219.657                        21.9
22 A2.C1.E2.M2          219.657                        21.9
23 A2.C1.E3.M1           39.117                         3.9
24 A2.C1.E3.M2           39.117                         3.9
25 A2.C2.E1.M1          603.900                        60.2
26 A2.C2.E1.M2          848.900                        84.6
27 A2.C2.E2.M1          315.945                        31.5
28 A2.C2.E2.M2          315.945                        31.5
29 A2.C2.E3.M1          135.405                        13.5
30 A2.C2.E3.M2          135.405                        13.5
31 A2.C3.E1.M1         1015.130                       101.2
32 A2.C3.E1.M2         1260.130                       125.6
33 A2.C3.E2.M1          439.314                        43.8
34 A2.C3.E2.M2          554.380                        55.3
35 A2.C3.E3.M1          258.774                        25.8
36 A2.C3.E3.M2          258.774                        25.8
damage scenario B1
   combination effective damage percentage of outgoing in %
37 B1.C1.E1.M1         5656.280                        87.2
38 B1.C1.E1.M2         5901.280                        91.0
39 B1.C1.E2.M1         3334.780                        51.4
40 B1.C1.E2.M2         3824.780                        59.0
41 B1.C1.E3.M1          252.954                         3.9
42 B1.C1.E3.M2          252.954                         3.9
43 B1.C2.E1.M1         7731.800                       119.2
44 B1.C2.E1.M2         7976.800                       123.0
45 B1.C2.E2.M1         5410.300                        83.4
46 B1.C2.E2.M2         5900.300                        91.0
47 B1.C2.E3.M1          875.610                        13.5
48 B1.C2.E3.M2         1553.700                        24.0
49 B1.C3.E1.M1        10391.060                       160.2
50 B1.C3.E1.M2        10636.060                       164.0
51 B1.C3.E2.M1         8069.560                       124.4
52 B1.C3.E2.M2         8559.560                       132.0
53 B1.C3.E3.M1         3477.960                        53.6
54 B1.C3.E3.M2         4212.960                        65.0
damage scenario B2
   combination effective damage percentage of outgoing in %
55 B2.C1.E1.M1        10105.480                        91.7
56 B2.C1.E1.M2        10350.480                        93.9
57 B2.C1.E2.M1         6648.980                        60.3
58 B2.C1.E2.M2         7138.980                        64.7
59 B2.C1.E3.M1          430.014                         3.9
60 B2.C1.E3.M2          430.014                         3.9
61 B2.C2.E1.M1        13633.800                       123.7
62 B2.C2.E1.M2        13878.800                       125.9
63 B2.C2.E2.M1        10177.300                        92.3
64 B2.C2.E2.M2        10667.300                        96.7
65 B2.C2.E3.M1         2861.700                        26.0
66 B2.C2.E3.M2         3596.700                        32.6
67 B2.C3.E1.M1        18154.460                       164.7
68 B2.C3.E1.M2        18399.460                       166.9
69 B2.C3.E2.M1        14697.960                       133.3
70 B2.C3.E2.M2        15187.960                       137.7
71 B2.C3.E3.M1         7382.360                        67.0
72 B2.C3.E3.M2         8117.360                        73.6
The values show that the effective damage can be well above the outgoing damage, but can be reduced to almost nothing if the own resist reduction is much lower than the physical resistance. Then even large amount of outgoing damage can be reduced to values which are completely affected by the armor (and 0.13 * 0.3 = 3.9%). In case of low flat damage (A1), it is here never possible to inflict 100% of the outgoing damage, in each scenario the effective damage is lower. This is the reason why lower amounts of flat damage are considered to be of less worth than larger amounts. And as +xx% physical damage and physical resist reduction increase the damage before the amor check happens, both are rather important - even if in most cases small amounts of flat damage cannot be increases enough to reach a value above the armor threshold (when it counts, means bosses / nemesis). Maul and its armor reduction can bring something, but for Maul to work, the damage must be close enough to the armor threshold, so that either some part of the damage is then above the threshold or a relevant part of the damage is affected by the lowered threshold. In some cases here the increase is notable, in some other rather neglectable. The importance of Maul is however a bit exaggerated here, as only relatively low physical resist reduction values are considered.
But what does this mean for the build presented here. The following source of flat damage are available (not sure about values which are displayed together, e.g. the additional flat on the Sandclaw Slicer and the flat from Earthbound | and of course, I could have also missed one or more sources):
1. Components, augments: 12, 12, 12, 13, 13
2. Amulet: 15, 20,
3. Weapon: 25, 37, 132
4. Gloves: 16
5. Relic: 15
6. Menhir's Bulwark: 144
7. Mogdrogen's Pact: 25, 32, 101
8. Devotions: 8
9. Blade Arc flat: 60, 80, 132, 178
The outgoing physical damage per hit is ~42756 (does not perfectly fit to the in game value, but the dimension is right). Considering the same scenarios as before, this means:
damage build
   combination effective damage percentage of outgoing in %
1     C1.E1.M1        29616.785                        69.3
2     C1.E1.M2        32716.648                        76.5
3     C1.E2.M1        15949.003                        37.3
4     C1.E2.M2        18570.973                        43.4
5     C1.E3.M1         1667.503                         3.9
6     C1.E3.M2         1667.503                         3.9
7     C2.E1.M1        42011.684                        98.3
8     C2.E1.M2        46125.685                       107.9
9     C2.E2.M1        26137.639                        61.1
10    C2.E2.M2        29986.375                        70.1
11    C2.E3.M1         5901.115                        13.8
12    C2.E3.M2         7605.565                        17.8
13    C3.E1.M1        58643.016                       137.2
14    C3.E1.M2        63558.581                       148.7
15    C3.E2.M1        40483.340                        94.7
16    C3.E2.M2        45678.816                       106.8
17    C3.E3.M1        16569.747                        38.8
18    C3.E3.M2        20210.811                        47.3
The table clearly documents that the damage starts to collapse against stronger enemies. When all debuffs are applied, still less than 50% of the outgoing damage reach the target. Also, given the low values of physical resist reduction, Maul is of quite some importance here and more often than not it represents a relevant damage increase. However, the higher the physical resist reduction is compared to the physical resistance, the lower the impact of Maul is.
Self Found?
Only self-found equipment and self-found crafting materials were used while levelling. Also, no mandates were transferred, writs were bought as soon as possible. However, all necessary blueprints were already found with earlier characters. The character was started in 1.1.9.7 and was finished in 1.1.9.8. The transition to 1.1.9.8 happened shortly before finishing the main campaign in Ultimate.
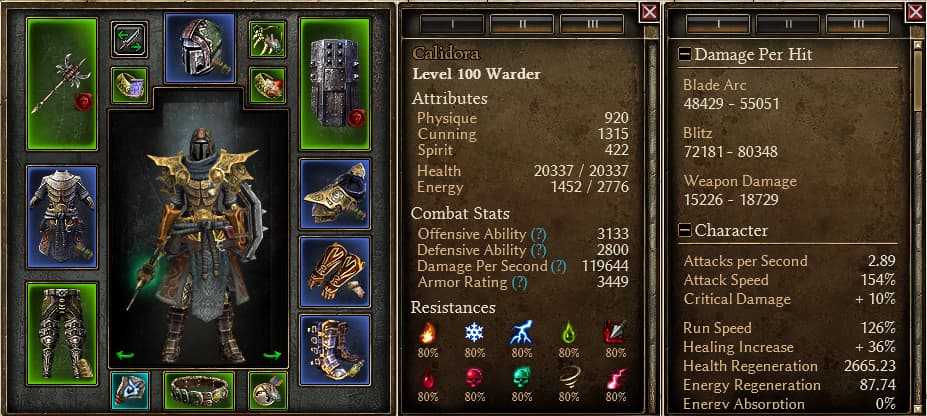
Current Character
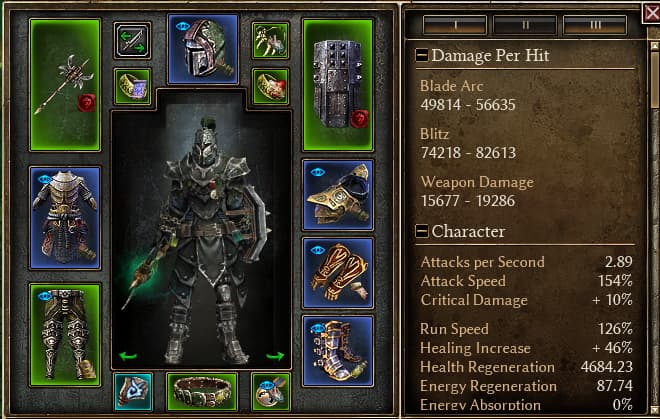
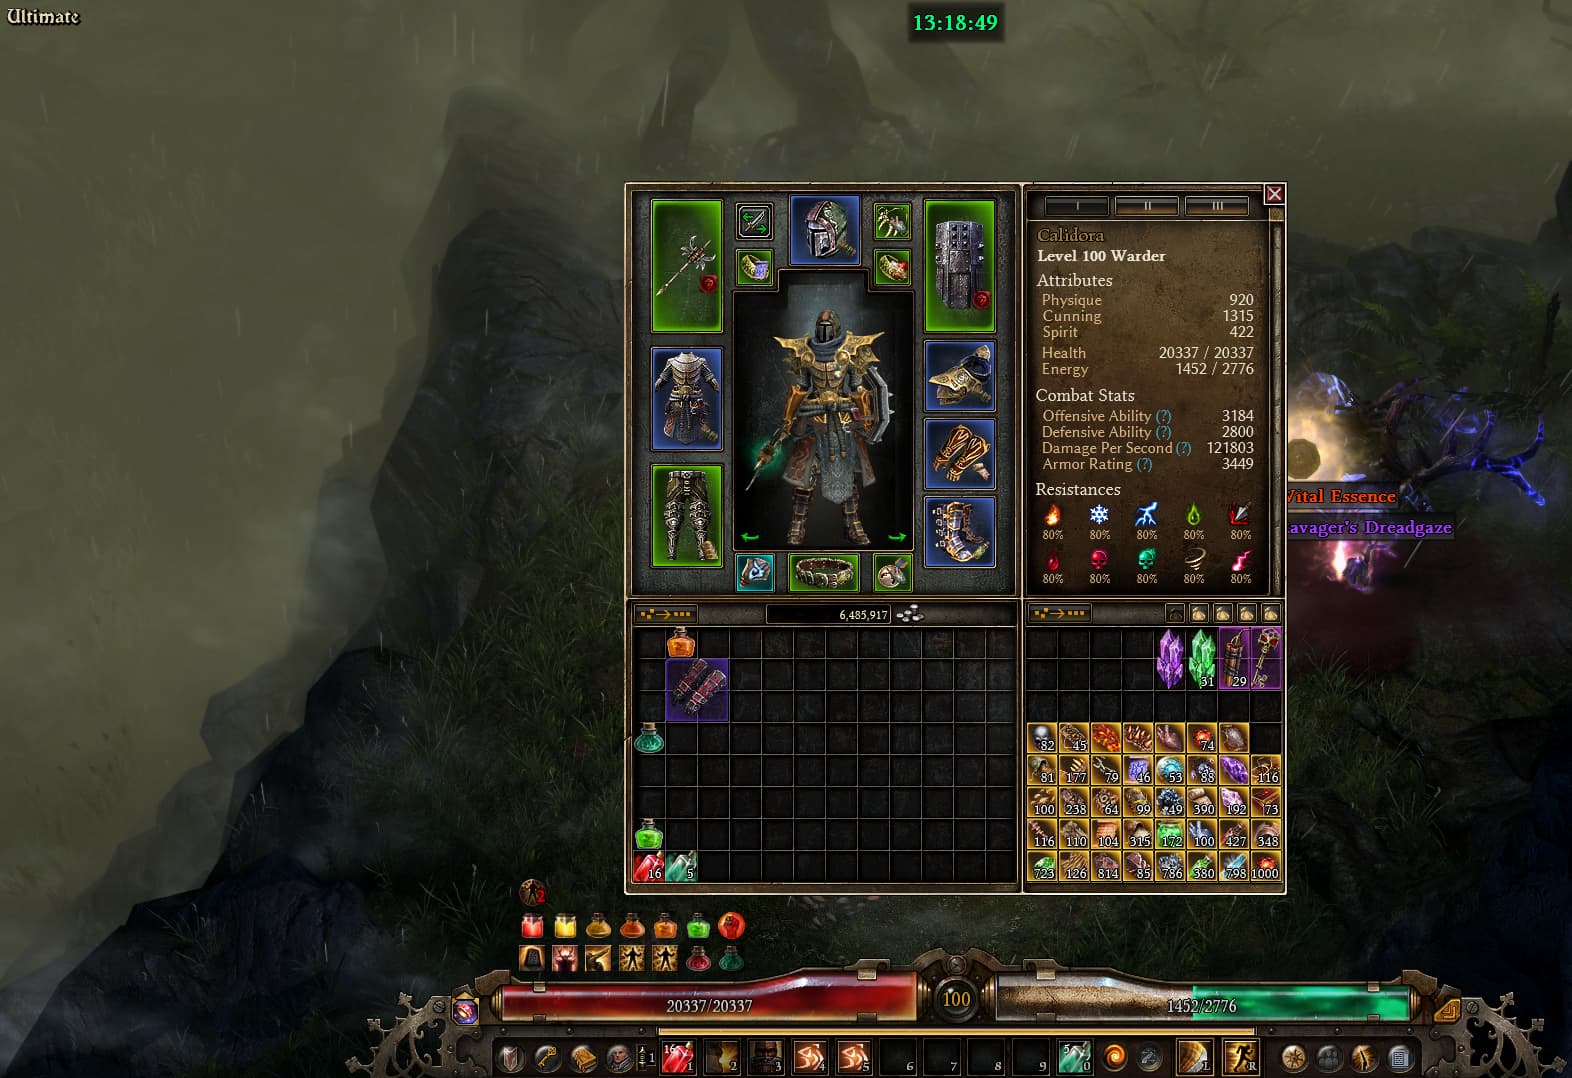
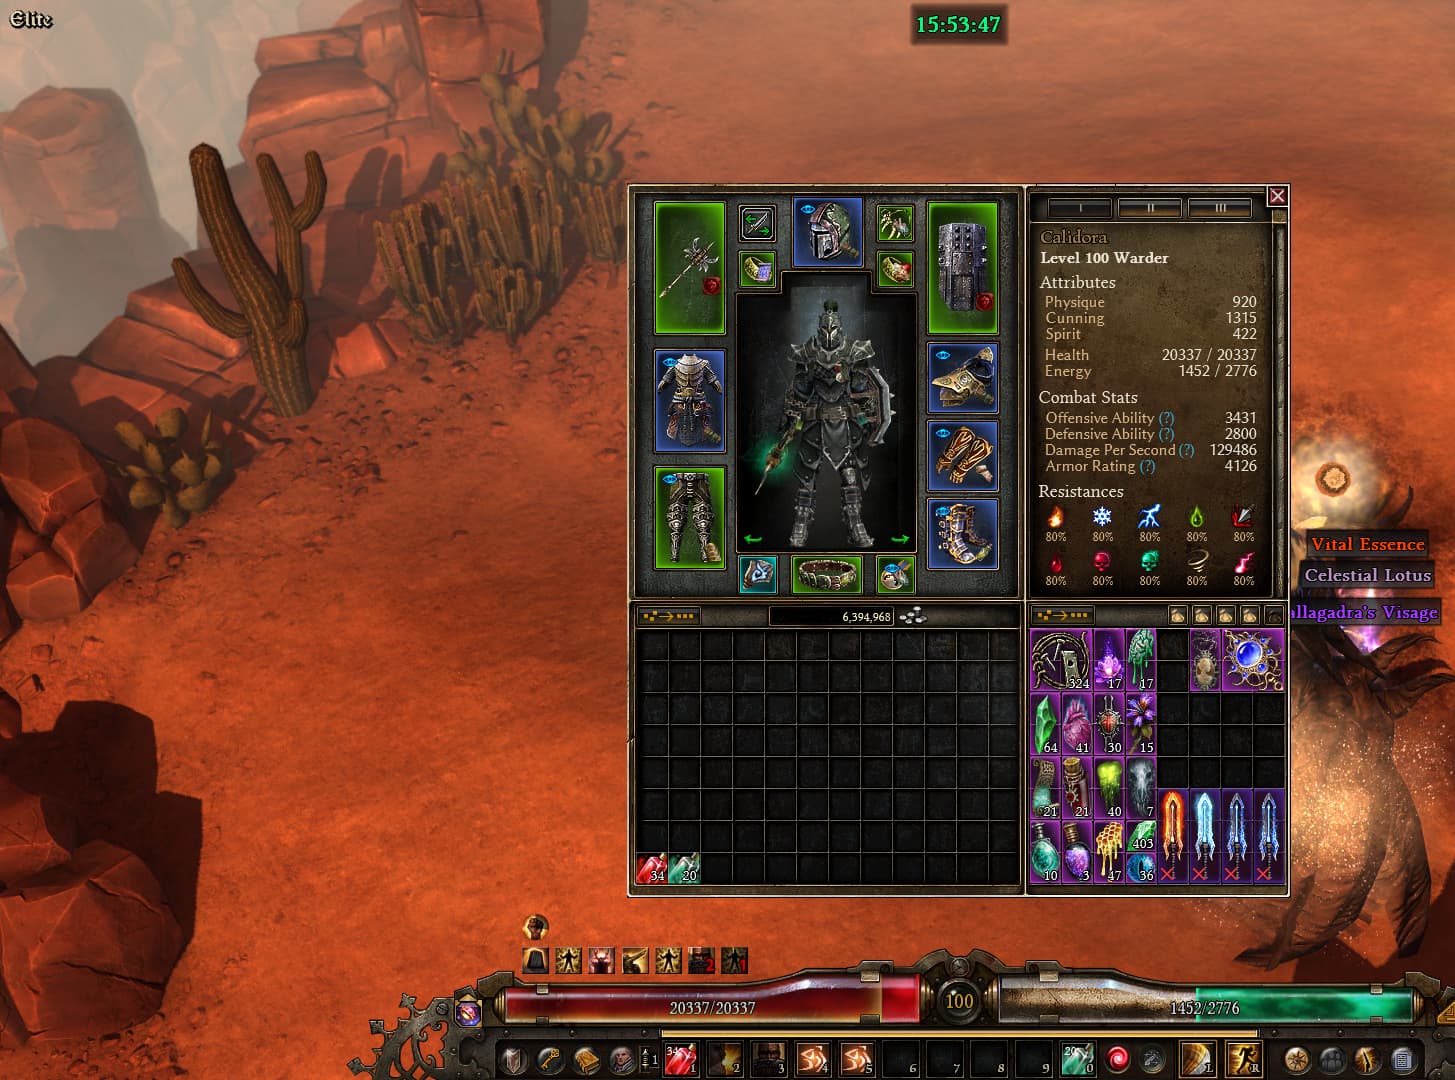
Grimtools of the current character.
[Blade Arc, all permanent buffs]
Using slightly different components and nacked gear, it is already possible to cap (80%+) all resistances skeleton character (= without affixes). However, some resistances only have a tiny overcap (value above 80% - needed to stay above 80% if debuffed). Affixes should help to close these holes. And as critical hits are necessary, a bit Offensive Ability (OA) is necessary. Remark: Getting resistances overcapped with gear would allow to use more Bysmiel’s Silversand augments which would provide quite some additional health regeneration. The health regeneration aspect of Antivenom Salve is the reason why it is here preferred over Ugdenbog Leather in the final build.
Performance
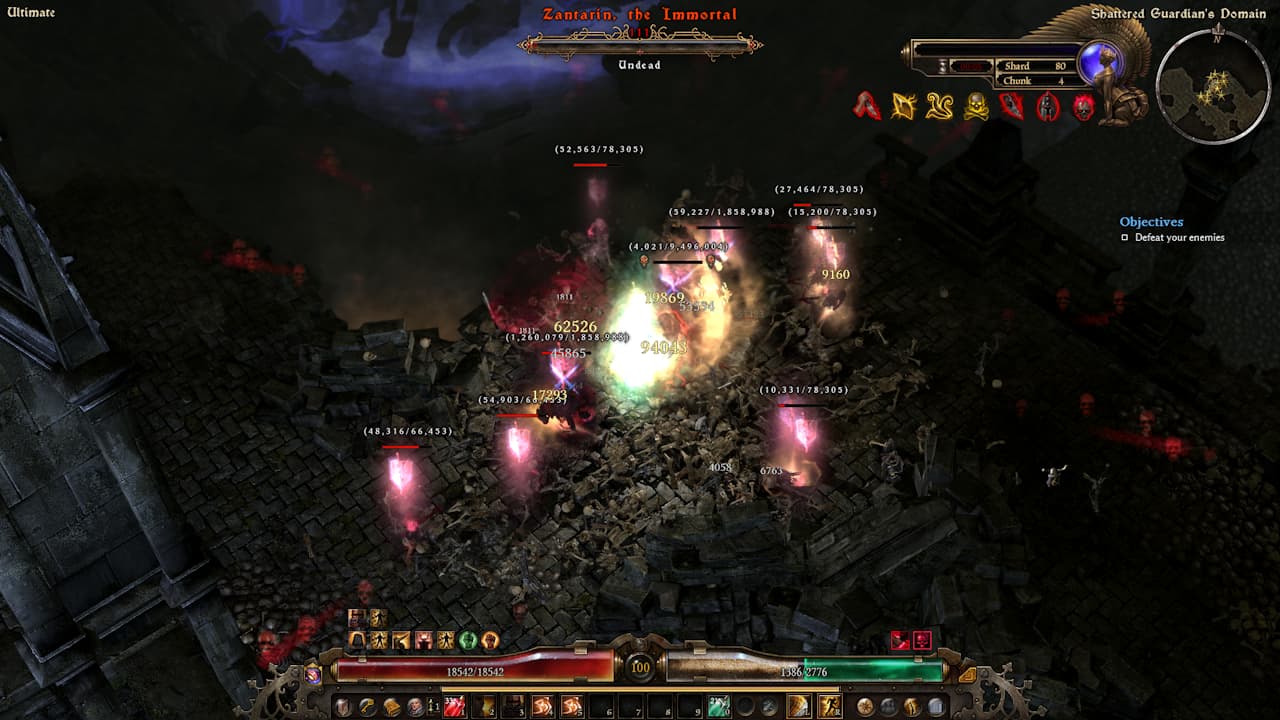
The full campaign (softcore) with both expansions was finished in all three difficulties (Veteran, Elite, Ultimate). Monster totems were activated on sight - after cleaning the surrounding area. Deaths were rare and happened mostly while stress testing the build. For quite some time (level 60 - 100) no attribute points were invested. The character is relatively safe to play and should be - using a more conservative method to play - hardcore suitable. However, damage - especially against superbosses - is rather low, trash mob clearing can be done relatively fast. Btw, four of the currently ten deaths happened in SR80 vs Theodin (four times in a row) as instant one hit deaths (one of these hits inflicted 27k damage).All challenge dungeons were finished in Ultimate painless with the final build. Shard 65/66 was completed in the Shattered Realm in Ultimate for the additional skill points (one death, getting nulled by Grava’Thul while trying to kill other stuff). For the Shattered Realm tests a waystone was used as shortcut. The following nemesis were slain in Ultimate: Moosilauke (the lack of freeze resist makes it a bit slow, but does not really hurt), Kubacabra (for facetanking, the damage can become critical low, but it still worked here), Valdaran, Benn’Jahr, Grava’Thul (not eating his null strike is recommended - testing it once caused one death) and Kaisan.
As the build has a rather strong sustain given the health regeneration value, even some other challenges were tested. SR 80/81 can be finished (four deaths in SR80 vs Theodin), a second SR80 run was within timer and deathless. Clones and Lokarr are relatively easy to kill. Ravager of Minds could be defeated in Ultimate (my first own budget Ravager kill), in the first half no pharma was required, in the second half health regeneration and resistance pharma was used. While there was rarely a critical situation, around 15 minutes were necessary for the kill. Because of the long Ravager kill time, Callagadra was only tested in Elite. Callagadra could be killed without pharma (first half: facetanking, second half: hit until fumbling starts, move (and use health regeneration to get to 100% health), repeat). So while slow, still a rather strong budget build.
Levelling / Skills
The character starts as Soldier. As Blade Arc is only suitable at higher levels (the base skill requires the Soldier mastery bar at level 10, however, the in the early levelling phase more important node Laceration with its flat damage needs the Soldier mastery bar at level 32), another skill has to be used for the first levels. The decision here was made to use cooldown Forcewave with white attacks in a S&B setup. For the first nine levels, one points is invested into Forcewave, and two in the Soldier mastery bar. The quest skill point is invested into Forcewave. With level 10, the Shaman mastery is started and two points are invested into the Shaman mastery, the third points goes into Shield Training. Afterwards, the Shaman mastery is brought to 5/50, followed by maxing Mogdrogen's Pact for the flat damage and health regeneration.As soon as possible, farm a Milton’s Casque (the point invested in Shield Training, you remember?). Only after you have farmed one, the damage becomes acceptable (as the initial investment in Forcewave is rather low), before it is a bit painful. Later farm Shambler’s Heart and Mutant Bludgeon. With all three items, cooldown S&B Forcewave starts to work and becomes fun. After Mogdrogen’s Pact is maxed, return to two points into the Soldier mastery bar and one point into Forcewave. However, the moment you have a Mutant Bludgeon, invest one point in Rending Force (instead of Soldier mastery bar). After the Soldier mastery has has reached 25/50, change the point distribution to one point into Forcewave and two points into Internal Trauma until both area maxed. Internal Trauma instead of Rending Force is maxed here because so Forcewave also does damage in its cooldown phase. After both skills are maxed, raise the Soldier mastery bar to 32/50. Then, invest one point in Field Command, one in Squad Tactics and one in the Soldier mastery bar with each level up.
After you have defeated Krieg, go to the Forgotten Gods area and get a movement rune and farm a reasonable Sandclaw Slicer. If you have one and the Soldier mastery bar has reached level 32, it is time to switch to Blade Arc. The intention here is to use Blade Arc as soon as sensible (means: the moment Forcewave starts to make fun). In my case, all conditions were meet at level 27. For the transition, remove all points from Forcewave and its nodes and max Blade Arc and Laceration with these points. Farm a reasonable Balthazar’s Crest after reaching the area. The side effect of farming this medal is that you typically will have enough dynamite. Continue with one point in Field Command, one in Squad Tactics and one in the Soldier mastery bar. Repeat, until all three are maxed. Put one point in Menhir’s Bulwark. If you should use Cronley’s Signet? I would say, if you get a good one, use it, but do not farm for a good one, we go for a different ring.
However, farm Dreeg-Sect Legguards, used here for the health regeneration bonus, a Fleshwarped Bulwark and Mogara’s Fangs after reaching the respective area. Also craft a Devil’s Cord. All should be possible shortly before level 40 is reached. The moment you have +2 to all skills in the Soldier mastery (amulet and belt), invest one point into Military Conditioning, Veterancy, Decorated Soldier, Scars of Battles, Menhir’s Will and Fighting Spirit each. This will cost you two level ups. Now, the first longer farming run will happen, farm two (!) good Gollus’ Ring. Both rings farmed were used until Ultimate, therefore resistance bonuses were preferred. Keep in mind that in this phase it becomes important to have always all resistance (almost) capped, select your gear accordingly. Now max Menhir’s Bulwark, followed by Decorated Soldier (damage and resistances).
Craft a Juggernaut relic. If you don’t have the blueprint, you can buy the blueprint from the vendor (Grim Dawn World Map) in the challenge dungeon near Homestead (who also sells Fleshwarped Bulwarks and Fleshwarped Pauldrons, which is a good levelling shoulder armor). Crafting a Juggernaut relic however will require 12 Seals of Binding. After Decorated Soldier is maxed, bring the Shaman mastery bar to 25/50. On the way to 25, invest on point into Heart of the Wild. After reaching 25/50 in the Shaman mastery bar, invest one point in Oak Skin and one in the Shaman mastery bar. After Oak Skin is maxed, invest one point into War Cry (so: 1/12) and then with each following level up one point into Break Moral and one in the Shaman mastery bar (all free skill points from quests go into the mastery bar). War Cry with Break Moral is used here for the flat resist reduction. The build otherwise really lacks resist reduction and even without 100% uptime, the effect of Break Moral is clearly noticeable. To limit the gear farming while levelling, the Coven physical damage chest and shoulder armor was used from the moment it became available (first the level 65 versions, later replaced by the elite level 90 versions)
After Break moral is maxed, invest in Veterancy (health regeneration). After Veterancy and the Shaman mastery bar is maxed, bring Fighting form to 8/12 without gear. Get your Elite Fettan Mask. Now the skills are slowly brought to the final setup, bring Heart of Wild to 2/10 without gear, invest one point into Blitz and Blindside (after having Blitz, you might shift to another movement rune), bring War Cry to 8/12 without gear and bring Scars of Battle to either 2 or 3/8 (so that your Stun resistance is almost maxed). Farm the final gear (amulet, medal, rings, shield and pants - later after reaching the respective areas: belt, weapon and Ultimate Fettan Mask), and shift to the two pieces of the Mythical Baldir set. Keep in mind that you can transmute parts of the set into other parts (so keep each part you find) and can even transmute parts of other sets and equal level to this set (so, as long as you don’t have two pieces, keep on part of another level 84 epic set). After your shift to the Baldir set, check you skill point distribution, you quite likely will have an overinvestment in Laceration and can remove some points there.
Invest now on point in Overguard. Overguard is here mainly used for the health regeneration bonus and works as another health potions, so it is only used if the health sinks too fast for the normal health regeneration to cover. The remaing skill points are more or less free - I have invested them in Blindside for the increased enemy Defensive Ability reduction.
Factionwise, the character sided with Kymon’s Chosen and used the faction augment in the levelling phase. Barrowholm was kept friendly to be able to fight Ravager. The decision regarding the cults is not the most important here, as in the end, all three should have reached maximal reputation. However, as the build used Bysmiel’s and Dreeg’s Cult augments earlier, both were taken in lower difficulties, to have their reputation earlier maxed. Solael was taken in Ultimate for their quest movement rune.
Character Snapshots
level 10: Soldier, Level 10 (GD 1.1.9.8) - Grim Dawn Build Calculator
level 20: Warder, Level 20 (GD 1.1.9.8) - Grim Dawn Build Calculator
level 30: Warder, Level 30 (GD 1.1.9.8) - Grim Dawn Build Calculator
level 40: Warder, Level 40 (GD 1.1.9.8) - Grim Dawn Build Calculator
level 50: Warder, Level 50 (GD 1.1.9.8) - Grim Dawn Build Calculator
level 60: Warder, Level 60 (GD 1.1.9.8) - Grim Dawn Build Calculator
level 70: Warder, Level 70 (GD 1.1.9.8) - Grim Dawn Build Calculator
level 80: Warder, Level 80 (GD 1.1.9.8) - Grim Dawn Build Calculator
level 90: Warder, Level 90 (GD 1.1.9.8) - Grim Dawn Build Calculator
level 100: Warder, Level 100 (GD 1.1.9.8) - Grim Dawn Build Calculator (reaching level 100 - used for farming final gear)
level 100: Warder, Level 100 (GD 1.1.9.8) - Grim Dawn Build Calculator (update to initial final setup, with farmed base campaign Monster Infrequents)
level 100: Warder, Level 100 (GD 1.1.9.8) - Grim Dawn Build Calculator (current status)
- savegame folder: _Calidora.zip (1.2 MB)
Devotions
- Crossroads yellow
- Tortoise
- remove Crossroads yellow
- Lizard
- Crossroads purple
- Toad
- remove Crossroads purple
- Assassin’s Blade
- Harvestman’s Scythe
- Dire Bear
- Stag
- Hammer
- Azrakaa, the Eternal Sands (without proc)
- Solemn Watcher
- Crossroads blue
- Vire, the Stone Matron
- first two nodes of Light of Empyrion
While the build leans gear wise rather strong towards health regeneration, the devotion setup is relatively standard and damage orientated and neither Tree of Life nor Behemoth is taken. The first devotion is Tortoise for its damage absorption proc. Rarely used, but if, it is a good warning sign to disengage or be more careful. Lizard is used for the health regeneration bonuses, and Toad is taken relatively early for the attack damage converted to health, so that the build has a second method of sustain. Assassin’s Blade is rather important, together with War Cry, it is our only source of reliable resist reduction. Harvestman’s Scythe is a rather good defensive devotions and helps here with energy and health regeneration. Dire Bear is our second - lets increase our damage - devotion. Its proc is a bit weaker than Assassin’s Blade, but because of the low resist reduction in general, of quite some importance for the build. Hammer is used to reach the requirement of Azrakaa. Azrakaa increases the damage, while Solemn Watcher strengthens the Defensive Ability. Vire is our second damage orientated T3 devotion with a nice proc, the two nodes of Light of Empyrion also increase slightly the damage.
see Grimtools
Gear
This build relies on quite some specific Monster Infrequent items (MI) to work. They are necessary to either improve Blade Arc (and make Blade Arc as levelling skill possible) or the health regeneration aspect of the build. The drop chance is acceptable, but nevertheless, quite some farming runs are necessary to find good gear. Always keep multiple version in your stash to find the best possible setup in the end. It is however not necessary to upgrade them always, if you have found acceptable versions, you can use them from Veteran to Ultimate and only farm the final ones in Ultimate again. The build also used epic items, the two parts of the Baldir set can either be dropped, transmuted from another part of the set or transmuted from another epic set of equal level. The gloves and boots can be replaced by faction items if they don't drop. The relic is relatively cheap, so if the first one is not optimal, try later - after you have the material - again.Monster Infrequents:
Final Build
weapon: Sandclaw Slicer - Blade Arc bonuses, can be farmed in Korvan Plateau and Sunbane Oasis, also sold by Yurrith
shield: Fleshwarped Bulwark - bonuses to Mogdrogen’s Pact, also sold by Agarrad
amulett: Mogara’s Fangs - +1 to all skills in Soldier, Blade Arc and Mogdrogen’s Pact bonuses, can be farmed from Mogara, the Prime Matriarch
medal: Balthazar’s Crest - bonuses to Blade Arc, can be farmed from Nicholas Balthazar
rings: Gollus’ Ring - health regeneration, +3 Mogdrogen’s Pact and Menhir’s Bulwark, can be farmed from Gollus, the Deepdweller
pants: Dreeg-Sect Legguards - health regeneration, resistances, Offensive Ability, can be farmed from Guardian of Dreeg
girdle: Ugdenbog Girdle - +1 to all skills in Soldier, also sold by Vinelton
Levelling
shoulder: Fleshwarped Pauldrons - physical damage Monster Infrequent
Faction Gear:
Levelling
chest: Coven Combatant’s Chestguard - easy to get physical damage faction gear
shoulder: Coven Combatant’s Spaulders - easy to get physical damage faction gear
Epic / Legendary items
Final Build
head: Fettan Mask - +1 to all skills, guaranteed drop from Urn Cluster
chest: Mythical Baldir’s Armor - attack damage converted to health, +2 Laceration
shoulder: Mythical Baldir’s Mantle - +2 Blade Arc, set bonus
gloves: Mythical Turin’s Grips - +2 to Break Moral, alternative faction gear item Elite Rhowari Grips
boots: Mythical Dreadnought Footpads - +2 to Blitz and Blindside, alternative faction gear item Elite Legion Greaves
Relic:
Juggernaut - +1 to all skills in Soldier, health regeneration skill
What Else / What Now
Go Farming: The character is able to farm totems, challenge dungeons and nemesis as well in the Shattered Realm in Ultimate relatively safe. With enough patience even superbosses are be possible.
While there is no direct S&B upgrade path, there are relatively recent potential target builds (physical two handed melee): [1.1.9.7] 2H Melee Physical Primal Strike Warder - SR 85 / Ravager of Minds, or with a stronger health regeneration focus [1.1.9.1] [HC] Avenger Warder, Facetank all superbosses, SR90+, 8k average HP regen, physical 2h Savagery.
Other endgame Warders can be found in the Build Compendium X (Forgotten Gods) - #34 by Stupid_Dragon