(burning for physical damage)
Introduction
After levelling already a Battlemage ([1.1.9.0] Budget S&B Physical Battlemage), a Warlord ([1.1.9.0 - 1.1.9.1] Budget Physical Cadence S&B Warlord) and a Witchblade ([1.1.9.1] Budget Physical Cadence-Blitz S&B Witchblade) S&B character - it was time to level a S&B Shieldbreaker (Oathkeeper, Demolitionist).
There is already a guide for a S&B Shieldbreaker ([1.1.9.4] Beginner's Fire Sword & Board Shieldbreaker - First char suitable, SR viable (up to 50)), therefore a further guide is in itself redundant, even if there is a minor difference in the damage type (fire vs physical damage). But after having theorycrafted the build, the potential damage looked too nice to not try the build and levelling process out.
For endgame Shieldbreakers see Build Compendium X (Forgotten Gods) - #7 by Stupid_Dragon, for other budget / beginners builds check Beginner build guides Compendium (for AoM + FG expansions). A potential target build (physical S&B Shieldbreaker) can be found here [1.1.9.3] Phys Shieldbreaker with a sheild that breaks EVERYTHING+++ (now actually).
A Shielded Life - Part 4
Since the build does not include the Soldier mastery, the levelling process is quite different from the previous three S&B characters. This character is more damage-oriented and relatively weak on the defensive side, which is not a problem as long as enough damage is dealt. Like @idontwannaknow0’s character, Righteous Fervor and the two Shield WPS of the Oathkeeper mastery are used as main damage dealer, in this case additionally boosted by Bargoll’s Root and Okaloth’s Visage in the final build. In addition, Safeguard, Rebuke and Temper bring quite a lot of natural flat damage.
The character also uses relatively little (= none) faction gear at the end this time, it mainly utilizes Monster Infrequent items and Epic gear. This means that the final character cannot be standardised very well and the strength at the end depends on the RNG god or the own farming endurance. In my eyes, however, the effort is worth it and at least the damage is more than sufficient for a budget build. The kill time of the training dummy can be found in the performance section - and it imho rather impressive for a budget build.
One advantage (or disadvantage) of the character is that it is relatively easy to play. For most of the time only 3 keys/buttons are needed: Righteous Fervor, Movement Rune and the occasional healing potion. It is only at the end that Vire’s Might is added as a second movement skill. The gameplay also remains the same for most of the time. In the levelling phase the progression was relatively steady and there were almost no real performance holes. One exception was the initial level 100 character, which was used unchanged (although better items were available) rather long. The damage was good, the normal map was no problem, but against stronger enemies the character started to collapsed. However, Okaloth could already be defeated with this character in Ultimate. A regular update of the items in Ultimate makes therefore sense. The change to the final weapon setup then brings another significant boost in damage.
Self Found?
Only self-found equipment and self-found crafting materials were used while levelling. Also, no mandates were transferred, writs were bought as soon as possible. However, all necessary blueprints were already found with earlier characters. The character was played solely in 1.1.9.7.
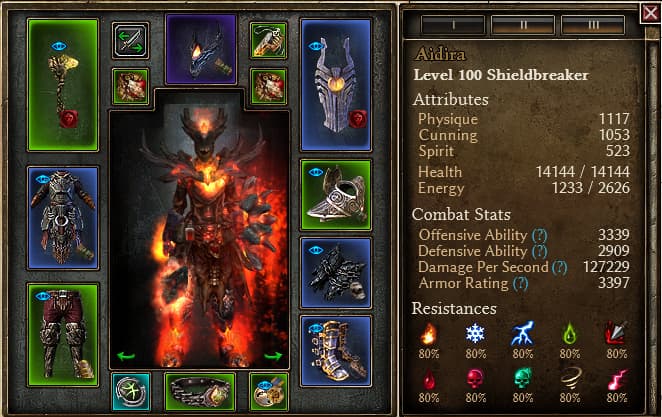
Current Character
Grimtools of the current character.
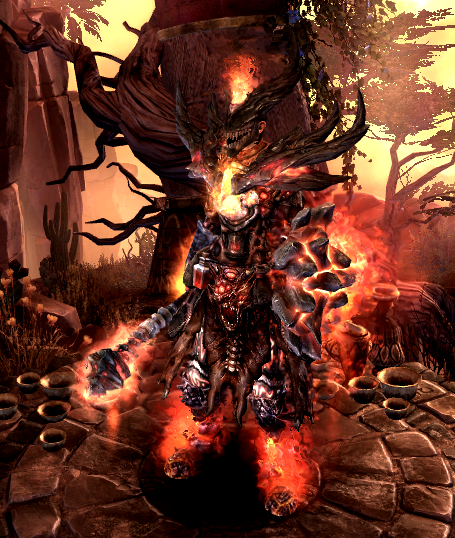
[Righteous Fervor, all permanent buffs and Righteous Fervor charge]
Using different(!) components and nacked gear, it is already possible to cap all resistances skeleton character (= without affixes). However, some resistances only have a tiny overcap, also CC resistance (Stun, Slow) are no capped at all. So affixes clearly should help to close the holes. As critical hits are necessary, a bit Offensive Ability (OA) would not harm either. As the build uses two random drops (Epic gloves and boots), here an alternative cheaper version using faction gear replacements faction skeleton character (= without affixes).
Performance
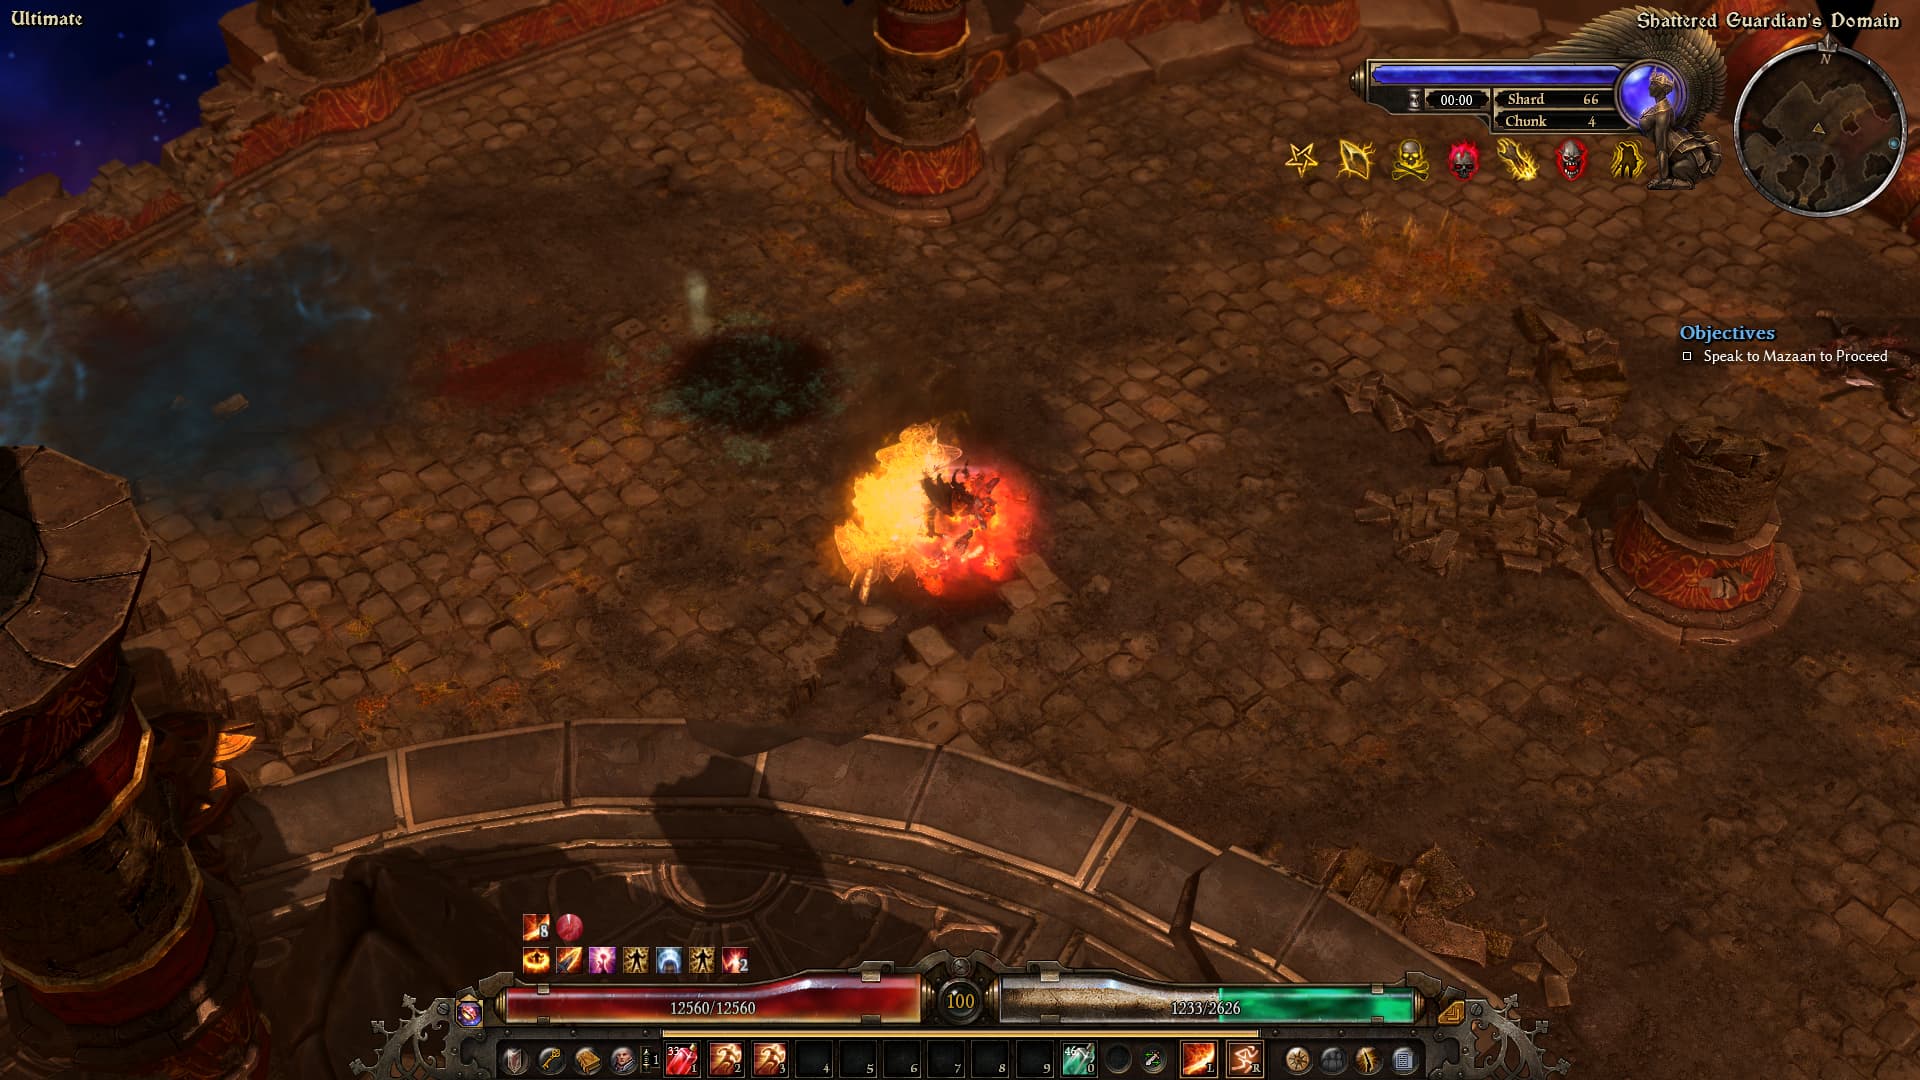
The full campaign (softcore) with both expansions was finished in all three difficulties (Veteran, Elite, Ultimate). Monster totems were activated on sight - after cleaning the surrounding area. Deaths happened from time to time. Quite some deaths happened however with the intial level 100 build (not the final setup). The build really started to collapse in front of stronger enemies (e.g. challenge dungeons endbosses) - Kymon even proved unkillable with this version. However, playing was nevertheless not frustrating - as the damage was already acceptable and the normal map could be cleaned rather easy. I am still not completely sure why the build collapsed that hard, on paper, it still looks not that bad. One death happend with the initial final setup - tested if the build can eat Korvaak's meteors - was not the case. Two deaths with the final build so far, one in a test against Ravager in Ultimate and one in the first Gladiator Crucible run at level 165.All challenge dungeons were finished in Ultimate relatively painless with the final build. Shard 50/51 was completed in the Shattered Realm in Ultimate for the additional skill points. Shard 65/66 was completed twice. All runs were deathless within time. For the Shattered Realm tests a waystone was used as shortcut. The following nemesis were slain in Ultimate: Moosilauke, Kubacabra, Valdaran, Benn’Jahr, Grava’Thul and Kaisan. Additionally, the ability to kill other bosses was tested with the final build. Clones and Lokarr are relatively easy to kill in Ultimate.
And @tqFan was able to kill the Ravager (of Minds) with the build - see the second post in the thread for the video. ![]()
And the reason for levelling the build: The final character has the so far fasted kill time of the training dummy of my budget builds: 20 - 21 seconds (~25 seconds with the initial final setup)
Levelling / Skills
The character starts as Oathkeeper. The first level-ups are invested in the Oathkeeper mastery bar, Safeguard and Righteous Fervor (one skill point in each skill) until all three have reached level five. After that, the distribution changes to two points in Safeguard and one point in Smite. The skill point of the quest is however invested in Righteous Fervor. After Safeguard is maximised, Smite is also maximised. Safeguard brings a good damage and armor bonus at the beginning, the latter ensures that the equipment must not be changed so quickly. Smite is a good damage boost and brings some area of effect damage.Then the Demolitionist mastery bar is started and brought up to 20/50. One point goes in Flame Touched and Vindicative Flame while raising the mastery bar. Flame Touched could already be maximised now, which would increase damage (and mixed damage is not a problem at this stage) - but this has been omitted here. Flame Touched is mainly taken already now, so that a level 18 Shambler’s Heart can be used sensibly (note: the level 8 version does not have the Flame Touched bonuses). This may take some time as most drops will be level 8 versions, i.e. you should be happy with what you have and not expect a perfect level 18 amulet here. After the mastery bar reaches 20/50, Temper is maximised for the extra damage.
It goes back to the Oathkeeper mastery, which is brought to 25/50. Once this is done, invest a point in Presence of Virtue and maximise Rebuke. Then maximise Shattering Smash and then Righteous Fervor. Rebuke, like Safeguard and Temper, brings flat damage and Reflected Damage Reduction, Shattering Smash brings another weapon and shield multi-target WPS and resist reduction. During this time you should also farm a good Balthazar’s Crest. The advantage of these farming runs is that you have some dynamite in stock. A movement rune from the Forgotten Gods area should also be standard equipment from now on, I prefer Charge.
After Righteous Fervor was maximised, one point each was invested in Presence of Virtue, Flame Touched and the Oahtkeeper mastery bar. From character level 50, both skills were maximised and the mastery bar paused. The aim is to increase the Offensive Ability (OA), as critical hits for Assassin’s Mark will slowly become necessary from now on. Then invest one point each in the Oahtkeeper mastery bar and the Demolitionist mastery bar. The goal is to maximise the Oahtkeeper mastery bar and bring the Demolitionist mastery bar to 40/50. In this phase it makes sense to farm good Fleshwarped Pauldrons (for the Righteous Fervor bonus), a Sandclaw Slicer (for the Presence of Virtue damage bonus), a Kalis’Ka’s Harvest (physical damage Monster Infrequent shield), and Solael-Sect Legguard.
After the two masteries have reached their target values, one point is invested in Guardian of Empyrion, then Celestial Presence and Divine Mandate are maximised (one point in each with each level up). Celestial Presence brings resist reduction, Divine Mandate increases damage and critical damage modifier - increasing the OA beforehand also helps to benefit from this. At this stage you should be farming a Gargoyle Girdle and slowly be able to craft the Endurance relic. If you have both, one point should go into Consecration and Haven. Consecration is maximised relatively late, although increasing the attack speed would have definitely increased the damage before, but the skill wasn’t really lacking until that point either. After both skills got the one skill point (for now), maximise Celestial Presence and Divine Mandate again.
With the transition to Elite, relevant gear positions should be farmed again, the Elite Fettan Mask is also helpful in the phase. Next target to maximise is Consecration, then one point goes into Resilence and Vindicative Flame is maximised. The remaining points are relatively free, here two points went into Vire’s Might (1 Vire’s Might, 1 Tectonic Shift) and Blast Shield, two more points were also invested in Haven and Resilence. The shift to the final gear setup happened in Ultimate - as the farming of the level 94 Okaloth’s Visage is more reliable. Bargoll’s Root is best bought from Vinelton. Two Gargabol’s Ring (Veteran and Elite) should already be available. If they are not abysmal bad use them - both rings used for the initial transition to the final setup were the Veteran and Elite ring. Farm as much as you prefer to improve the build with better gear, but acceptable gear should already allow the build to safely finish the campaigns and farm mid level normal Shattered Realm for blueprints.
Factionwise, the character sided with Kymon’s Chosen and used the faction augment in the levelling phase and also in the final build. Barrowholm was kept friendly to be able to fight Ravager. Cult of Dreeg was selected in all three difficulties for the additional farming possibilities - but this decision is not really important in itself.
Post release comments:
Vire’s Cascade (Honor relic) was not used as damage skill in the build levelled, but this was quite likely an error. Using the skill increases the damage slightly and it also provides a good alternative to proc Maul.
Character Snapshots
level 10: Oathkeeper, Level 10 (GD 1.1.9.7) - Grim Dawn Build Calculator
level 20: Shieldbreaker, Level 20 (GD 1.1.9.7) - Grim Dawn Build Calculator
level 30: Shieldbreaker, Level 30 (GD 1.1.9.7) - Grim Dawn Build Calculator
level 40: Shieldbreaker, Level 40 (GD 1.1.9.7) - Grim Dawn Build Calculator
level 50: Shieldbreaker, Level 50 (GD 1.1.9.7) - Grim Dawn Build Calculator
level 60: Shieldbreaker, Level 60 (GD 1.1.9.7) - Grim Dawn Build Calculator
level 70: Shieldbreaker, Level 70 (GD 1.1.9.7) - Grim Dawn Build Calculator
level 80: Shieldbreaker, Level 80 (GD 1.1.9.7) - Grim Dawn Build Calculator
level 90: Shieldbreaker, Level 90 (GD 1.1.9.7) - Grim Dawn Build Calculator
level 100: Shieldbreaker, Level 100 (GD 1.1.9.7) - Grim Dawn Build Calculator (reaching level 100 - used for finishing the main campaign in Ultimate, and to reach farming grounds)
level 100: Shieldbreaker, Level 100 (GD 1.1.9.7) - Grim Dawn Build Calculator (update to final setup - initial gear - used for farming final gear)
level 100: Shieldbreaker, Level 100 (GD 1.1.9.7) - Grim Dawn Build Calculator (current status)
- savegame folder: _Aidira.zip (1.2 MB)
Devotions
- Crossroad purple
- Toad
- remove Crossroad purple
- Fox
- Crossroad blue
- Sailor’s Guide
- remove Crossroad blue
- Crossroad yellow
- Panther
- remove Crossroad yellow
- Assassin’s Blade
- Dire Bear
- Empty Throne
- Crossroad blue
- Solemn Watcher
- remove crossroad blue
- Azrakaa, the Eternal Sands (without Proc)
- Owl
- Hammer
- Oleron - without head
The devotion setup targets two physical damage devotions (Azrakaa, Oleron). The first devotions are Toad amd Fox to have a tiny bit of Attack damage converted to health, followed by Sailor’s Guide and Panther for it stats. Assassin’s Blade is taken only afterwards - but will be levelled up either way fast enough. Dire Bear provides additional %physical damage and a nice proc (Maul). Empty Throne brings some resistance (including crowd control resistances) as well as the needed purple affinity. Solemn Watcher boost the defense and also provides the needed affinity to take Azrakaa. Owl and Hammer bring some boni as well the needed affinity for Oleron. I prefer to bind the proc of Oleron (Blind Fury) to Guardian of Empyrion, Maul is bound to Smite to not forget to proc it (alternative would be e.g. a movement skill).
An alternative with an emergy proc at the cost of a bit of damage would be the replacement of Panther with Tortoise - the needed additional point can be taken from the head of Azrakaa.
see Grimtools
Gear
This build relies on quite some specific Monster Infrequent items (MI). Important items of the final build are (1) Bargoll's Root, (2) Gargabol's Ring (2x), (3) Shambler's Heart, (4) Balthazar's Crest, (5) Solael-Sect Legguards, (6) Gargoyle Girdle and (7) Korvan Spaulders. While levelling, Sandclaw Slicer, Kalis'Ka's Harvest and Fleshwarped Pauldrons were used. The final build uses also two parts of the Stonefather Set - Armor and Shield. Keep in mind that items within a set can be transmuted to another part of the set (also an expensive way to get other rolls for the same item) and even other Mythical Epic Set items of equal level can be transmuted to the Stonefather Set (the target set is random, but it is only a question of time and money). I had found one part of the set at the time the shift to the final setup should happen, so the second part was transmuted from another set. Another core item needed for the final build is (8) Okaloth's Visage - a legendary item which can be target farmed, however, the probability to drop is around 5%, so at average 20 runs are necessary (I needed 18). The final build also uses two random drop Epic items: (9) Mythical Obsidian Grasp (gloves) and (10) Mythical Dreadnought Footpads (boots). Lower level version of these items can be used, but if one of them does not drop - faction items are an alternative. Another alternative for Mythical Obsidian Grasp are Turin's Grisp. In my case, the mythical version of the boots dropped after finishing the SR 65/66 test - I used the Empowered version rather long.While levelling, accept good MI’s - especially early one - and a sensible focus is often resistances. For hard to farm items - i.p. Gargabols’ Ring - I used the item dropped. However, be prepared to invest some time to get good gear at the end (if wanted). In total, there were 20 - 25 Gargabol runs for the rings, and around 30 - 40 runs for medal, amulett and pants each. Both Bargoll’s Root were bought from Vinelton (30 minutes of power shopping for the final weapon). Girdle and spaulders farming only needed around 10 runs each to get the finally used item. The build also works with non ideal gear (see e.g. the non final build used for farming), however, 10% - 20% more damage can be gained with good gear.
Monster Infrequents:
Final Build
weapon: Bargoll’s Root - + 3 Shattering Smash, + bonus to Shattering Smash, can be farmed from Bargoll, the Mouldering Mound, also sold by Vinelton
shoulder: Korvan Spaulders - +3 to Rebuke, elemental damage converted to physical damage, best farmed in Cairan Docks and Dungeons
amulett: Shambler’s Heart - bonus to Flame Touched, can be farmed from Ancient Shambler
medal: Balthazar’s Crest - bonus to Flame Touched, can be farmed from Nicholas Balthazar
rings: Gargabol’s Ring - +3 Righteous Fervor, can be farmed from Gargabol, Heart of the Wild
pants: Solael-Sect Legguard - Adcth, resistances, can be farmed from Guardian of Solael
girdle: Gargoyle Girdle - +1 to all skills in Oathkeeper, best farmed in Astral Fields
Levelling
weapon: Sandclaw Slicer - +3 to Rebuke, boni to Presence of Virtue, can be farmed in Korvan Plateau and Sunbane Oasis
shield: Kalis’Ka’s Harvest - +3 to Presence of Virtue, can be farmed from Kalis Ka, the Bonehunter
shoulder: Fleshwarped Pauldrons - +3 to Righteous Fervor
Faction Gear:
Levelling
chest: Coven Combatant’s Chestguard - easy to get physical damage faction gear
shoulder: Coven Combatant’s Spaulders - +3 to Righteous Fervor
ring: Bysmiel Vile Seal - faction physical damage ring, +3 to Smite and Shattering Smash
Epic / Legendary items
Final Build
head: Okaloth’s Visage - +1 to all skills in Oathkeeper, bonus to Smite, can be farmed from Okaloth ~ “The Messenger”
chest: Stonefather Armor - +2 to Safeguard, Set Bonus
shield: Stonefather Bulwark - high physical damage, Set Bonus
gloves: Mythical Obsidian Grasp - physical resistance, +2 to Flame Touched and Temper, alternative Epic Mythical Turin’s Grips or faction gear item Elite Rhowari Grips
boots: Mythical Dreadnought Footpads - +2 to Rebuke, alternative faction gear item Elite Legion Greaves
Levelling
head: Fettan Mask - +1 to all skills, guaranteed drop from Urn Cluster
Relic:
Endurance - +1 to all skills in Oathkeeper, physical resistance, needed to craft Honor, sold by Forgotten Gods faction vendors
Honor - +1 to all skills in Oathkeeper, damage and attack speed bonus, racial damage
How to craft a Honor relic
required materials
11 Tainted Brain Matter, 11 Blood of Ch’thon, 2 Ancient Heart
22 Scrap, 31 Aether Crystal, 12 Chthonic Seal of Binding
11 Polished Emerald, 19 Scavanged Plating, 18 Chilled Steel, 4 Battered Shell, 2 Chipped Claw, 4 Cracked Loadstone, 3 Mutagenic Ichor,
2 Roiling Blood, 9 Serrated Spike, 4 Searing Ember, 5 Bristly Fur, 13 Ectoplasm, 3 Corpse Dust, 2 Frozen Heart
1 Ancient Armor Plate, 1 Attuned Loadstone
crafting order (1 → 2 → 3 → … → 6) - number in brackets = number of required materials / relics (e.g. 2 Fervor relics are needed)
1 Purified Salt (3) - 3 Aether Crystal, Corpse Dust, Polished Emerald
1 Resilient Plating (4) - 3 Scrap, 3 Scavanged Plating
1 Vengeful Wraith (4) - 3 Aether Crystal, 3 Ectoplasm, 3 Chilled Steel
2 Imbued Silver - 3 Aether Crystal, Scavanged Plating, Polished Emerald
2 Spined Carapace - 3 Aether Crystal, 3 Serrated Spike, Battered Shell
2 Antivenom Salve - 3 Scrap, Mutagenic Ichor, Roiling Blood, Scavanged Plating
2 Serrated Shell - 4 Aether Crystal, 4 Serrated Spike, Battered Shell
2 Deathchill Bolts - 4 Scrap, 4 Chilled Steel
2 Molten Skin - 3 Scrap, Scavanged Plating, Searing Ember, Bristly Fur (can be skipped if available)
2 Haunted Steel - 12 Chthonic Seal of Binding, 4 Vengeful Wraith, 4 Polished Emerald
3 Bladesworn Talisman - Tainted Brain Matter, Resilient Plating, Chipped Claw, Polished Emerald
3 Fervor (2) - Blood of Ch’thon, Cracked Loadstone, Scavanged Plating, Bristly Fur
3 Equilibrium - Tainted Brain Matter, Searing Ember, Cracked Loadstone, Chilled Steel
3 Fortitude (2) - Tainted Brain Matter, Frozen Heart, Bristly Fur, Resilient Plating
3 Gunslinger Talisman - Tainted Brain Matter, Serrated Spike, Polished Emerald, Resilient Plating
3 Calamity - Tainted Brain Matter, Searing Ember, Chipped Claw, Polished Emerald
3 Gluttony - Ancient Heart, Serrated Spike, Mutagenic Ichor, Roiling Blood
3 Hysteria - Blood of Ch’thon, Battered Shell, Scavanged Plating, Ectoplasm
3 Corruption - Blood of Ch’thon, Mutagenic Ichor, Scavanged Plating, Molten Skin
4 Sanctuary - Ancient Heart, Searing Ember, Chilled Steel, Battered Shell, Cracked Loadstone
4 Vendetta - 2 Blood of Ch’thon, Attuned Loadstone, Deathchill Bolts, Purified Salt, Gunslinger Talisman, Calamity, Fortitude
4 Endurance - 2 Blood of Ch’thon, Ancient Armor Plate, Purified Salt, Serrated Shell, Equilibrium, Fervor, Fortitude
5 Meditation - 3 Tainted Brain Matter, Spined Carapace, Antivenom Salve, Sanctuary, Vendetta, Endurance
5 Mortality - 2 Tainted Brain Matter, Imbued Silver, Purified Salt, Haunted Steel, Gluttony, Hysteria, Corruption
6 Honor - 3 Blood of Ch’thon, Bladesworn Talisman, Fervor, Meditation, Mortality
What Else / What Now
Go Farming: The character is able to farm totems, challenge dungeons and nemesis and in the Shattered Realm in Ultimate relatively safe.
A potential endgame build is [1.1.9.3] Phys Shieldbreaker with a sheild that breaks EVERYTHING+++ (now actually). If a shift to fire damage is acceptable, there is also >1.1.9.7< S&B Melee Fire RF Shieldbreaker. SR 90 / Ravager of Minds (but in this case - why use this guide and not the fire S&B levelling guide linked above)
Other endgame Shieldbreakers can be found in the Build Compendium X (Forgotten Gods) - #7 by Stupid_Dragon
