Hello GD Modders!
We’ve been seeing some requests on the forums for more information on how to use the 3D Studio Max plugins that are included in the Steam Build of GD. As a result, I’ve decided to throw together this basic guide, which should hopefully resolve most or who knows, maybe even ALL of your questions regarding!
Tools Now support 3ds Max 2019 x64 version! (see attachment at end of post)
Tools Now support 3ds Max 2023 x64 version! (see attachment at end of post)
1: INSTALLATION
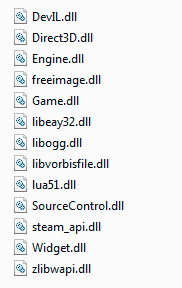
Copy over the following .dll files located in the grim dawn folder (\Steam\SteamApps\common\Grim Dawn) to your 3ds max installation folder (\3DS Max 2012 (x86)\3ds Max 2012):
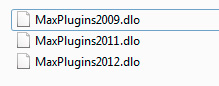
Next, place the .dlo file relevant to your 3ds max installation into the \Plugins folder of your 3ds max directory (\3DS Max 2012 (x86)\3ds Max 2012\Plugins):
Once all files are in place, you should be able to access the exporter objects and the IL Shaders we use for GD.
2: SETTING MAX TO DISPLAY IL SHADERS:
By default, Max 2012 enables the “Nitrous” viewport, which is not compatible with Grim Dawn’s IL Shaders. To fix this, Max needs to be set to “Direct 3D” in the renderer settings. Under Customize > Preferences, click on the Viewport tab. Next, click on the “Choose Driver. . .” button and select the “Revert From Direct 3D. . .” button in the popup window. Finally, select “Direct3D” and press ok. You will need to restart Max for the changes to take effect. Once max is restarted, Open up the viewport tab in the preferences window again to confirm the settings took effect. If not, repeat the process again.
Note for Nitrous Viewport and 2019/2023:
If you are running the newer version of max, reverting to direct 3d is not recommended. Not only will Max become substantially more unstable (crashes after loading new files) you will also experience substantial performance loss. Using the default Nitrous viewport will result in the IL shaders appearing as black, but the improved performance/stability is strong trade-off.
Once Direct3D is properly set, the ambient light needs to be changed from the default Black to a mid-tone gray. To do this, open up the Environments & Effects window (Default hotkey 8). Select the Ambient color and change it to gray.
Note for 2023:
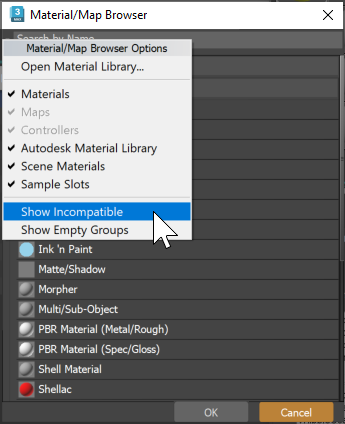
You will need to check the “Show incompatible” toggle to on in your shader browser to be able to select the IL shaders from the list:
Finally, the build directory of your Mod needs to be added to the Asset Manager in order for your textures to show up in the resource browser in Max. To do this, switch over to the AM and navigate to Tools > Options… In the “Additional Browse Directories” field, enter the path to the root folder of your Mod’s build location (not source) and be sure to leave the "" at the end of the path: "\Grim Dawn\Data\AMBuild\mods\YOURMOD"
3: ADDING AN EXPORT OBJECT & HITBOXES TO YOUR SCENE:
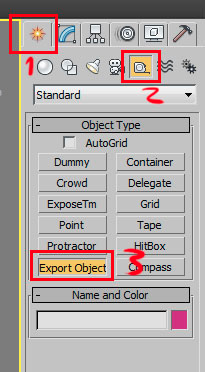
With the plugins installed, launch 3ds Max, click on the “Create” panel (1), then click on the “Helpers” button (2), you should see the “Export Object” button (3) visible:
With the Export Object button selected, click anywhere in the scene to add the object (location does not matter, though we usually place it at 0,0,0 or negative Z at some amount so it doesn’t overlap the game mesh):
Hitboxes are used in GD for calculating simple collision/transparency on static meshes, selection highlights on items and targeting on Mobs. In short, every object in the game should have a Hitbox. Generally speaking, Hitboxes should encompass the object in question, but the size can vary depending on the usage. For collision purposes, multiple Hitboxes can be used on a single asset.
Hitboxes can be accessed in the same tab as the Exporter Object. Simply click the Hitbox button and click-drag in your scene to create Hitbox around your object. Once the Hitbox is created, you are free to rotate/scale the Hitbox using Max’s transform tools. Please note that if you rotate the Hitbox and then wish to scale, you must switch from “view” coordinates to “local” coordinates otherwise you will distort the Hitbox which can cause bad things to happen. Hitbox names can typically be left as default, though I usually recommend naming them in some logical fashion for organizational purposes (hitbox_OBJNAME_##). There are several special-case Hitboxes that require specific, case-sensitive names and serve a unique purpose:
BlockLOS - This is used on dungeon walls and any other large wall assets that should prevent players from targeting monsters on the other side of said asset. Any Hitbox named this way (duplicate names accepted) will prevent any targeting of any vector from the player to a mob that intersects the volume of the Hitbox.
Transparency - Used for objects that need to fade out, but shouldn’t block projectiles (skyshard) or generate pathing. Typically useful on trees and building roofs.
There is another more advanced form of collision - physics meshes, but I won’t go into them in this guide. I will probably break this section off and talk more in-depth about collision and hitboxes in a new guide a some point. Images will also be included, but unfortunately, I’m currently at the 10 image limit for this post.
4: CREATING .MSH & .TEX FILES FROM YOUR SOURCE FILES:
Once the export object is placed, the scene is ready to become engine-ready. Save the scene and switch over to the Asset Manager. Navigate to the folder where the Max file is saved, right click and select “Add Files.” Add the Max file and any other associated files (Diffuse, Normal, Glow textures, etc). With the Files now added to the AM, right-click first on the Max file and choose “Auto-Create Asset”. Choose “Mesh” for the main character model file or if the scene is not animated:

Now, repeat the process for any textures associated with the Max file, choosing “Texture”.
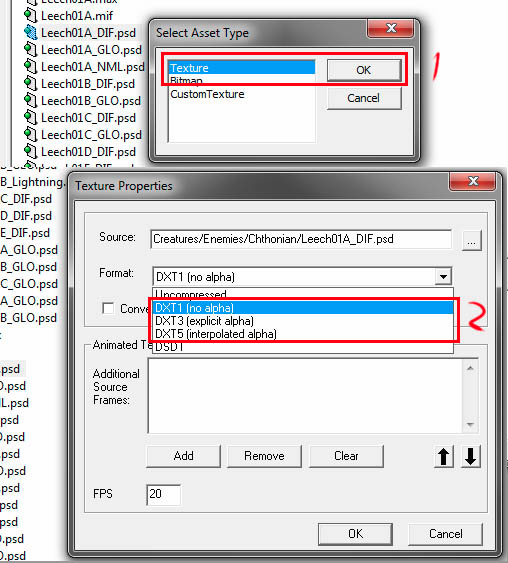
Next, you must select a format appropriate for your texture. Most Diffuse textures will be DXT1 unless they have an alpha. If they have an alpha, then DXT3 or DXT5 is used. Normal maps always use DXT5 for the spec map in their alpha channel.
Once all files are added to the AM, you can generate .msh and .tex files for your models and textures, respectively. To do this, select Action > Build from the menu in the AM.
5: ASSIGNING MATERIALS TO YOUR GAME MESH:
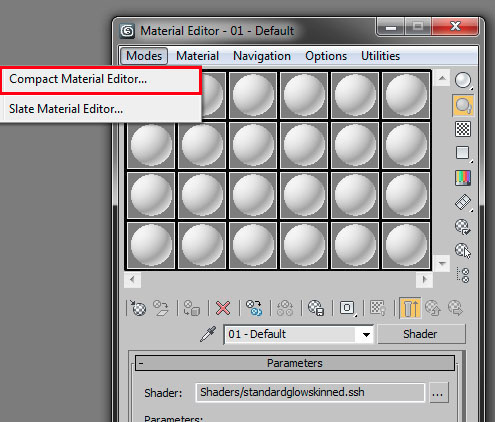
For texturing models in GD, we use special shaders that should now be present if your plugins were installed correctly. To access these shaders in Max, open up your material editor default hotkey “M” and make sure you are using the compact material editor:
Next, select an empty shader (1), click on the “Standard” button (2), select the “ILShader” (3) from the list located within the “Standard” tab and press ok:

You should now see your shader show up as a solid colored sphere in the slot you selected. Make sure the shader is selected, then click on the “. . .” button (1) next to the “Shader” field. Here you should see a list of shaders within the popup dialog (Resources\Shaders). Although the list is rather large, we primarily use two main shaders: “StandardSkinned” and “StandardStatic” (2):
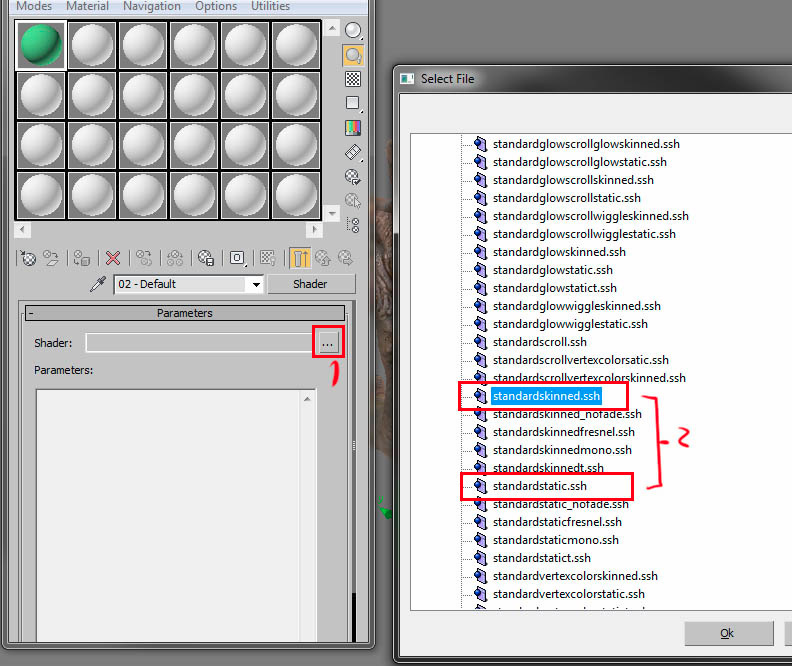
StandardSkinned is used for all animated models and StandardStatic is used for everything that is not animated. Again, there are many variants of these shaders, such as ones that allow glows and scrolling, but those are not covered in the scope of this guide. Once you have selected your shader, you can assign your textures. With the shader still selected, click the “Base Texture” field, followed by the “. . .” button (1) that will show up. Navigate to the location of your Diffuse/Albedo texture (2) and press ok to apply it:
NOTE: textures that haven’t been added/built in the Asset manager will not show up in the texture list in Max! If a texture was added/built while the Max file was open, Max may need to be closed/reopened for the textures to show up.

Repeat the process for any normal/glow files (note that specular is saved as an alpha channel in the normal map). As a result, the spec field should be ignored for the standard shader. WARNING, shaders without an assigned normal map tend to crash when loaded in the editor, same with glow shaders with no glow map assigned!
If you followed all these steps correctly, theoretically you should be able to add your .msh and .tex files in a dbr file and load them up in the engine!
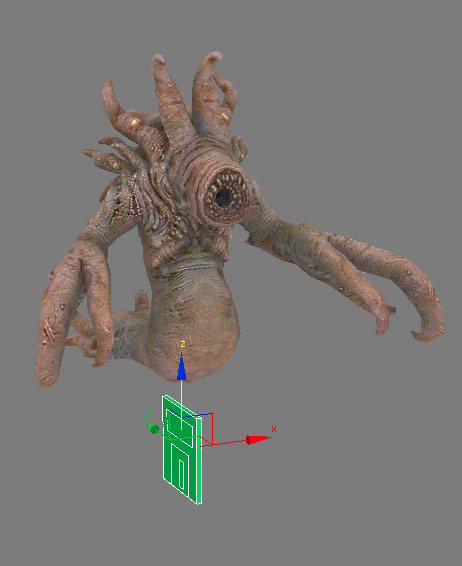
Template versions of the Male/Female PCs and sword for scale referenence/armor fitting:
www.grimdawn.com/guide/settings/GD_ModelTemplates01.zip
EDIT - Adding 2019 plugin files:
3dsmax_2019_64_073018.zip (2.6 MB)
EDIT - Adding 2023 plugin files:
3dsmax_2023_64_051925.zip (2.7 MB)


 !
!