Tired of planting seeds in Path of Farmville? Love smashing your face into enemies to kill them? Taking a gander at Grim Dawn and looking for build guides for new players? Look no further!
Do note that this is only a build guide. While I will be detailing how and where to farm particular enemies that drop particular things for this build, I will not be going into specific mechanics of the game here as a comprehensive new-player guide would. This guide assumes you know how to navigate the game’s user interface, work with Devotion (possibly a generous assumption), and have a basic understanding of the game’s terminology. (e.g., what Components, Passives, Procs, Monster Infrequents (abbr. MIs) are, etc.)
TL;DR Links for those that don’t want to read:
Level 50 setup: Warlord, Level 50 (GD 1.1.7.1) - Grim Dawn Build Calculator
Level 100 setup: Warlord, Level 100 (GD 1.1.7.0) - Grim Dawn Build Calculator
Note that attribute investment is different between these two links. Thankfully, an attribute-reset potion is easily acquirable once/difficulty. Note, also, that the Level 100 setup’s MIs are devoid of any affixes! The build was theorycrafted so that any affix combinations at all, of which MIs will always have both a prefix and a suffix past the early levels of the game, will cover the build’s offensive and defensive requirements. This means the build can work out of the gate as soon as you get any roll of any piece, and can only get better than it looks in the grimtools link!
Picture of the character + inventory at level 50:
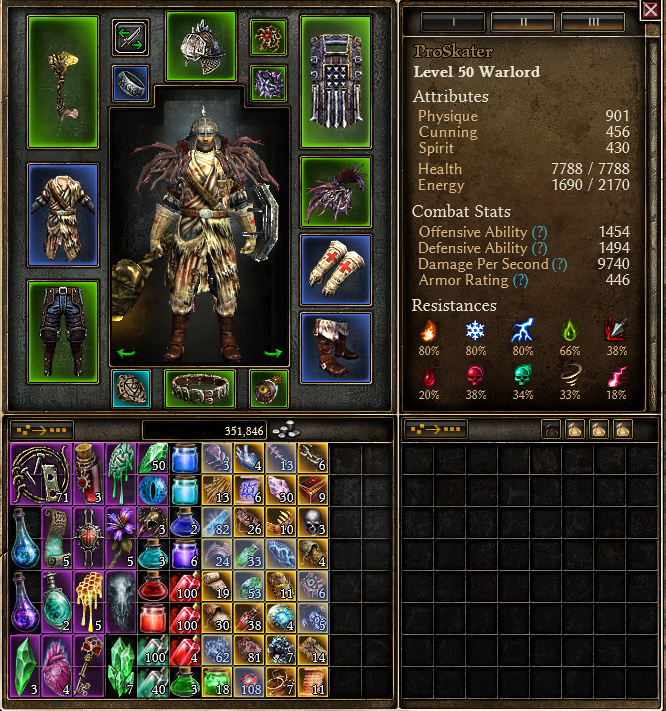
While I was lucky enough to get some Explorer’s Footpads, which greatly expedite the leveling process, they are not required. Everything seen was found and equipped straight off the ground - no shared stash involved!
Version 1.1.7.0 of Grim Dawn adjusted many Monster Infrequents and made them much easier to drop with preferable affixes. One of the most significant parts of the former adjustments involved numerous Monster Infrequents receiving Blitz bonuses, or having those bonuses buffed. Blitz, in addition to being a fantastic one-pointer for mobility, was already capable of being a great leveling skill. That it can now get additional and significant bonuses via target-farming specific gear pieces makes it a prime skill choice for new players to focus on.
Let’s take a look at exactly what we can work with:
Monster Infrequent Gearing
Very early into the game, one can kill Milton Hart and seek to acquire his helmet which will likely be a 30-50% dps increase for low-level Blitzing. Further on into Act 1, upon killing the Act Boss of Warden Krieg you can hope to acquire a Warden’s Fortress to further reduce the cooldown of Blitz by a total of a second when in conjunction with the Milton Hart helmet, and will likewise grant Blitz even more damage. With these two items combined, you can look to one-shot most Hero enemies and three-shot most bosses up until Act 4. Sadly, the Warden’s Fortress is only a 50% drop, so you may need to kill him a few times if you’re unlucky.
In Act 2, there aren’t really any main gear pieces to acquire, however you can get a free relic from the Rovers in the “The Lost Elder” quest. At the end of it, keep the relic for yourself. You’ll lose out on a bit of reputation and experience, but you’ll gain a fantastic relic that will help with your likely energy problems and grant you a temporary damage buff in the same granted skill.
You will, however, have some gear pieces to farm come Acts 3 and 5. On the road to Homestead, one can dip into Pine Barrens - a semi-hidden side area with a good selection of quests - and farm Ol’ Bloodbriar for a Bloodbriar’s Thorn drop. I actually got quite unlucky in my farming, needing 7 runs, but theoretically it’s only a 50% drop. This amulet will grant Blitz a nice sum of Crit Damage while you’re leveling - a stat that is usually only found on endgame gear and Devotion constellations!
In both Acts 3 and 4, you can attempt to drop Fleshwarped Pauldrons from Fleshwarped Commander enemies (and their hero variants). These aren’t overly essential while leveling, though you will want them for your endgame setup. Comes down to it, I actually didn’t wind up dropping them at all until I already had something better in the Loghorrean’s Corruption shoulders from the final boss of the base game, the Loghorrean, the Voice of Ch’thon.
When the Loghorrean is slain, Elite difficulty is unlocked, and players have a choice to continue into Act 5 (Ashes of Malmouth content) or move into Elite, starting the campaign over. My recommendation is to briefly dip into Elite and farm up another Milton Hart helmet, as Normal’s Milton Hart does not scale in level enough to drop you a helmet with midgame armor values. When you have a replacement helmet, dip back to Normal difficulty and continue on with Act 5.
Come Act 5, there are a number of gear pieces you’ll be wanting. The Ugdenbog Girdle can drop from any of the non-ghostly Crab enemies in Gloomwald and the Ugdenbog. You’ll probably see several such drops without even trying to farm for it. While this belt isn’t used in the endgame setup on grimtools, it is a viable stop-gap over - and with good rolls potentially beats out - the chosen Legendary belt of the Reforged Chains of Oleron, which is otherwise a random drop. The Wendigo Glare medal can drop from any Champion (Yellow)-tier Wendigo, or their hero variants, though your best bet will probably be Wendigo Ancients; other Wendigo Champions/heroes can also drop two other Medal MIs that Ancients cannot, thus competing with the Glare’s drop rate. Ancients can only drop the Glare. Finally, you’ll want to acquire a Bargoll’s Root - not a Bargoll’s Heart or Bargoll’s Core - which only drops from Bargoll, the Mouldering Mound, who spawns in one of six random locations in the Ugdenbog. He’s a bit of a pain to farm and each of his drops compete with one another, but the performance increase of getting a good Bargoll’s Root will blow most other 1H weapons in the game out of the water.
While I wouldn’t recommend pursuing this in Normal difficulty, in Elite or Ultimate - when you’re finalizing your character - you will also want to pick up a pair of Gargabol Rings which only drop from the end-boss of a fairly difficult Roguelike Dungeon - the Ancient Grove - in Act 5.
And that about sums up the extent of Monster Infrequent gear to chase after, exception being the Kubacabra Legguards , which you won’t be finding until you hit Nemesis with the Beast faction. Kuba can be one of the more challenging Nemeses in the game to kill upfront, but this build is very capable of kiting Kuba around safely and is generally resilient enough to exchange a few blows with the beast before needing to back off. Killing and farming him, once Nemesis-tier is unlocked, is very feasible.
Skill Point Distribution
At the very start of the game, pump up the Soldier mastery, taking Blitz as soon as possible and getting between 5-10 points in the skill - if you feel you can sustain the Energy requirements, go closer to 10. If not, keep it lower and pump the mastery higher until you can pick up one point in Blindside, Blitz’s modifier. Once you have the point in Blindside, work on maxing out Field Command, the permanent, togglable-aura at the 20-skillpoint-tier of Soldier. By the point you’re maxing it out, you’re probably either about to enter Act 2 or have already begun to make some decent headway into the much-harder stage of the game thereof. So, pick up a value point in Menhir’s Will, Military Conditioning, and Shield Training. You can also take a point in Decorated Soldier and Scars of Battle now, but it shouldn’t be too necessary. The resists will help with some enemies of Act 2, but are not necessary before higher difficulties.
When you’ve sorted out the above and are comfortable with the way of things, take your first few points in the Oathkeeper mastery. As soon as you can access Presence of Virtue, Oathkeeper’s toggleable-aura, max it. Doing so will give you a tremendous amount of Energy Regeneration that, in conjunction with the aforementioned Relic picked up in Act 2, will allow you to sustain almost any amount of Blitzing indefinitely. Once you’ve maxed PoV, you can then easily max out Blitz, pushing it well beyond the base 16/16 cap thanks to the MI’s you’re accruing.
I then recommend pushing the Oathkeeper mastery further until you can access PoV’s second modifier, Rebuke, and maxing that as well. While you’ll want the first modifier - Haven - eventually, you can hold off on it for now. Instead, you’ve got a pretty boring amount of investment before you: pumping the Oathkeeper mastery until it’s fully invested at 50/50 points, with one exception being that of a single point spent into the Guardian’s of Empyrion skill. Up until GoE, you’ll have been needing a skill to reliably trigger the Assassin’s Mark devotion skill, which will - for the time being - be your main source of Resistance Reduction. There aren’t great options for this…until GoE, which is one of the best options in the entire game for cooldown-based builds. And once you have GoE and have maxed out Oathkeeper, pick up their modifier - Celestial Presence. By the time CP is maxed out, you will likely have finished AoM content and will have amassed a good amount of gear with which to Blitz foes down for all eternity.
Now for the rest!
You see, this isn’t just a Blitz build - it’s also an autoattacking build! At this point, max out Shattering Smash. For the time being, you’ll be relying on regular autoattacks during Blitz’s brief cooldown, so you’ll want those to be as powerful as possible. Shattering Smash, with the gear pieces you’ve already assembled for Blitz (namely, Wendigo Glare and Bargoll’s Root), will be greatly empowered. When you’ve got Shattering Smash maxed out, it’s time to take your autoattacks even further with Righteous Fervor. Max RF, and then max its first modifier, Consecration. We don’t have much in the way of Retaliation to justify taking Retribution, so don’t bother. When you’ve done this and are thereby autoattacking away, rebind Assassin’s Mark onto RF, from GoE.
In transitioning into autoattacking between Blitz, you’ll probably be sustaining significant damage whilst in melee range. For this reason, you’ll then want to pick up and max Soldier’s Overguard skill, using it more or less off cooldown, and then to max out the Soldier mastery to pick up and max Soldier’s Menhir’s Bulwark exclusive skill. By the time you’ve done so, you’ll likely be nearing the true end of the game, with but a few levels left to invest points into. I recommend taking some more points in Shield Training, as well as picking up a few extra one-pointers, but by this point you’ve probably got a good enough feel for the build and the game that you no longer need me to tell you what to do. The Level 100 grimtools link is not more than a baseline recommendation, and with some decent gear rolls you can branch out from it and improve upon it as you see fit!
Devotions
When it comes to Devotion, there isn’t really a “right answer.”
My chosen path, in leveling, was to take Yellow (Order) Crossroads, max Panther, and then max Assassin’s Mark.
From there, I took Red (Chaos) Crossroads and maxed Jackal.
I then went with Blue (Primordial) Crossroads, maxed Eel, maxed Shieldmaiden, and then maxed Solemn Watcher. This setup will get you through all content on the first difficulty without issue.
The next step would be to max Lizard and then max the Tier 3 Light of Empyrion constellation. You’ll want the Damage Reduction LoE offers to help you ease into the higher difficulties.
After that, we’ll take a defensive Purple (Ascendant) route, respeccing out of the three Crossroads we had taken into the Purple one instead, and then maxing (in any order) Owl, Empty Throne, and Wolverine. With that done, your final five points can be used to route through the Oleron Constellation to its Celestial Power, Blind Fury, which is best bound to Guardian’s of Empyrion.
Other Gear Pieces
Without relying on specific gear affixes, we instead need to rely on specific faction choices and Component selections. The affixless build must side with Kymon’s Chosen and Barrowholm to round out its resistances in Ultimate difficulty. Further, it does require an Oleron’s Blood , two Ugdenbog Leather , a Seal of Blades , a Living Armor , and a Seal of Annihilation . These components do not drop and you will not encounter them at all while leveling. They must be crafted, their blueprints being random drops in higher Elite or Ultimate difficulties.
Also random drops are the Colossal Grasp , Golemborn Greaves , Zolhan’s Battle Plate , and the Reforged Chains of Oleron , as mentioned earlier. In my experience these don’t drop too rarely, but there is no specific source to them as there has been for your MIs.
The end-tier relic of choice is Mogdrogen Ardor , and without question it will be the hardest single item to obtain for the build, requiring a user to first find its Blueprint, as well as the blueprints for Citadel - which also requires the Ancestor, Fortress, and Sanctuary relics - , Savage - which requires the Mistborn Talisman, Rampage, and Inferno relics - Fortitude, and Hysteria.
Fortunately, each of these are great - if imperfect - stop-gaps to use while working toward Mog’s Ardor, if one wishes to stop using the Bone/Ivory/Sacred talismans from the Rover quest in each difficulty. Furthermore, each of these relics can either have their blueprint purchased from a Faction vendor or purchased from one of the three relevant non-faction vendors, except for Mog’s Ardor and Citadel. Check each one’s grimtools link, above, for a list of their sources!
And that about sums up the build! If you have any questions, ask away in the comments below. I hope this guide is somewhat helpful for those of you trying out Grim Dawn for the first time, or otherwise looking to set out on a fresh playthrough.
