1.2.3 Setting Up Asset Manager
Finally it’s time for some practical steps: Setting up your Asset Manager! Why Asset Manager first? Simply because it is an easy way to get the main directories to work that you will need for modding: Your working, tools and build directory. Alright, let’s start:
First, you’ll have to open your windows file explorer and navigate to your Grim Dawn Installation folder which lies by default in
C:\Program Files (x86)\Steam\steamapps\common\Grim Dawn
You should see a folder that contains a bunch of directories and files that looks like this:
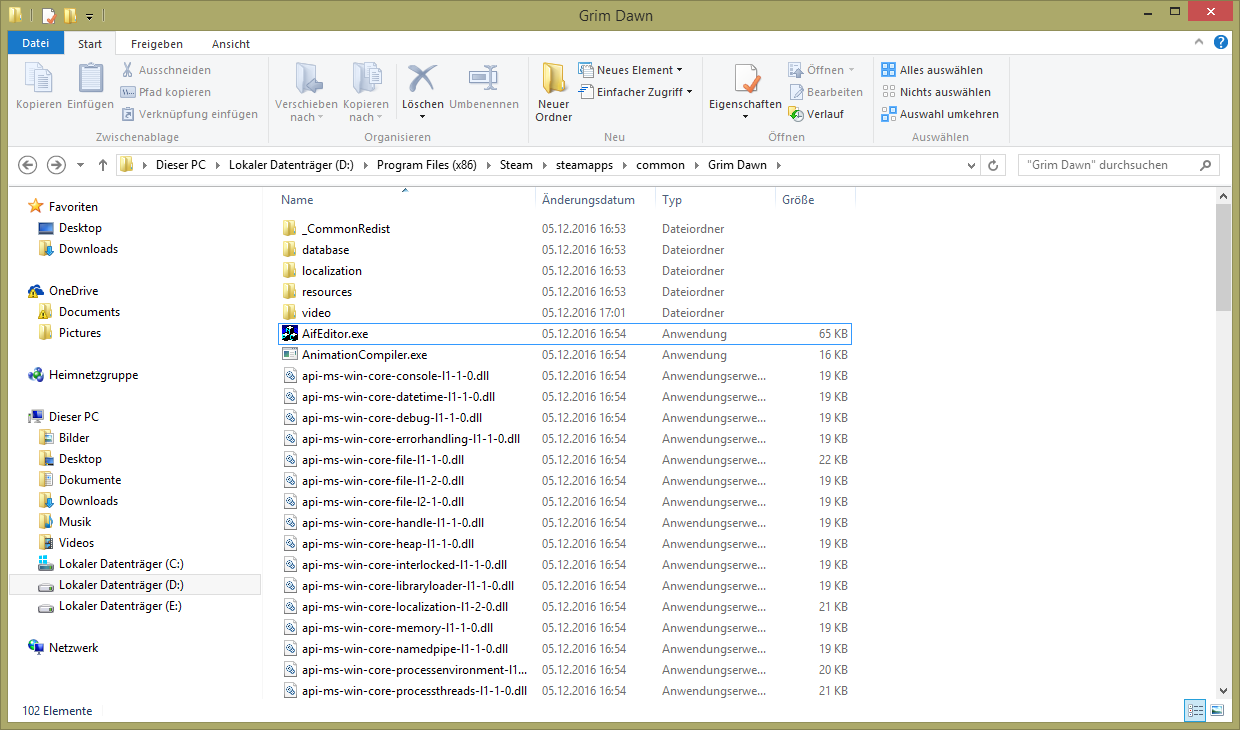
(For me it’s in D, just ignore that, it’s by system design)
Now if you search this folder, you’ll find a file called AssetManager.exe. Start it (note: may require administrative rights as it otherwise couldn’t do required file operations).
You should get rewarded with the following login screen now:
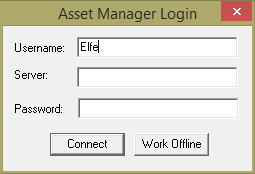
For now, all we want to do is a simple setup and one person projects so we’re going to work offline. Click “Work Offline”. This window will get interesting when you decide to work together with other modders but dealing with that would be kind of an overkill right now.
Now there should a bigger window open that looks like this:
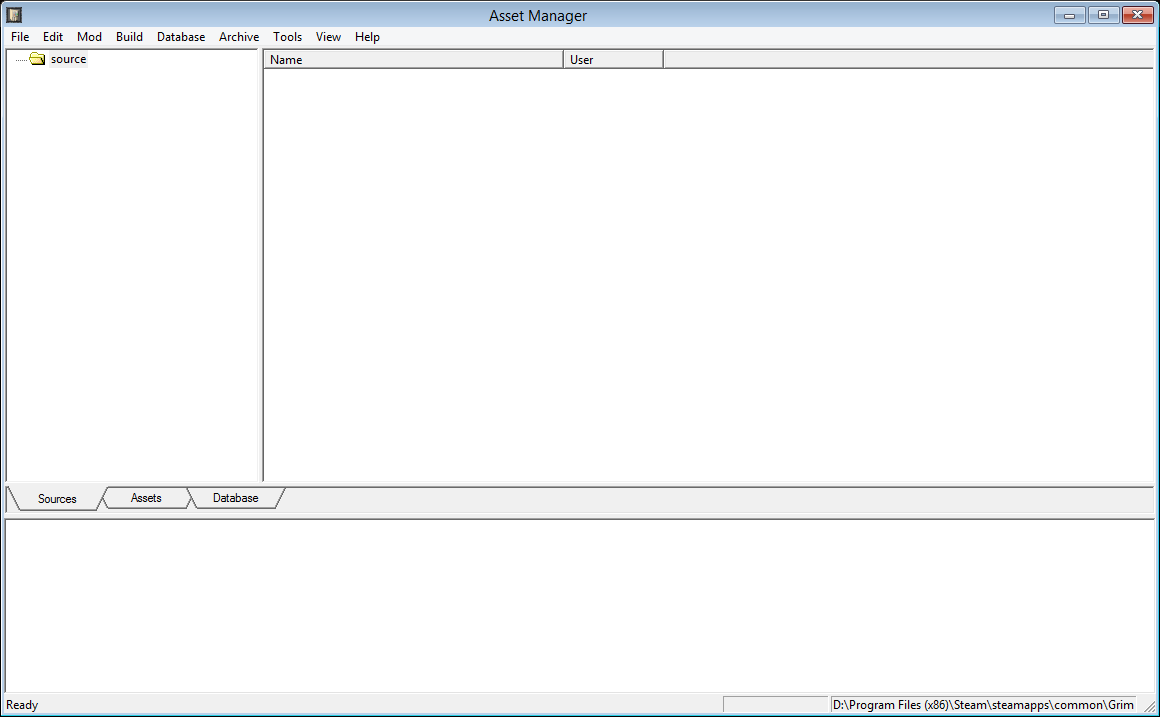
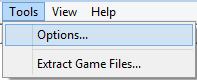
As we want to set up or directories, we now need to click Tools → Options in the menu:
This window should open:
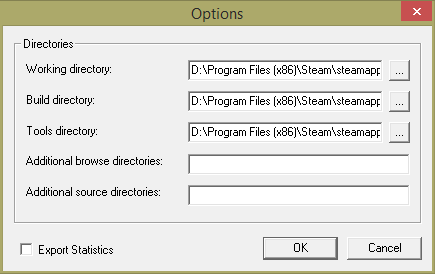
Now there are 5 fields in which we can put directories. For now only the top 3 will be interesting to us as the other two ones are for more advanced modding and when it comes to merging mods / working with expansions. The Working directory is where all the source files for your mods will go, the build directory is where your “compiled” output will get to once you build your mod and the tools directory is where your modding tools are, which is by default the game’s main installation directory.
Note for Gog Users: Your paths will be different though the base is the same, the only difference is where your installation directory lies.
These three path might be set for you already, but we’re going to change one of them. The build directory should point to your game installation directory as the Asset Manager will use this path to create a new folder “mods” inside the installation folder from which the game later will read mods to enable you to play your mod:
C:\Program Files (x86)\Steam\steamapps\common\Grim Dawn\
Whereas the Tool directory should be the instalation directory:
C:\Program Files (x86)\Steam\steamapps\common\Grim Dawn\
Now by default the working directory will point to the same directory as the build directory which is also recommended by the official modding guide.
This is bad practise as it will result in a mix of output files and source files and might confuse you and potential other modders later if they want to merge your mod with other mods so we’re going to seperate them and make “clean mods”. Also there are several more clean mod guidelines and best practises but more on that later.
We’re going to create a new folder inside Grim Dawn’s installation folder called “Working”:
C:\Program Files (x86)\Steam\steamapps\common\Grim Dawn\Working
and put it as working directory. You can navigate to it by clicking the […] button in the Options window in the Asset Manager:
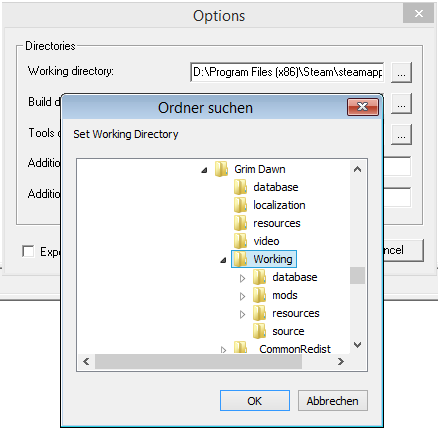
Note: Keep this in mind as the […] button is the idea of a file browser button in the Asset Manager. You’ll find these buttons very often while modding. They usually indicate that you can choose a database record file or a resource file as reference for that certain entry.
Ashes of Malmouth Integration
If you have the Ashes of Malmouth expansion you will have to do a few additional steps in order to be able to work with the expansion files. As mentioned before, there are two more fields “Additional Browse Directories” and “Additional Source Directories”. The additional browse directories field enables the Asset Manager to read additional database record files from a seperate .arz file while the additional source directory provides the Asset Manager with additional resource files for the resources browser window.
To make these functional with the xpack, we’ll set those to the following paths:
Additional Browse Directories:
The additional browse directory needs to be set to the location where the game stores the xpack data as .arz file inside a folder called “database”. By default it should be in the game’s install directory in a subfolder called “gdx1”, so the path by default looks like this:
C:\Program Files (x86)\Steam\steamapps\common\Grim Dawn\gdx1\
Additional Source Directories:
The additional source directories path must point to a subfolder of your working directory as this is where the gdx1 resources will be extracted to in the next step. By default it’s in a subfolder inside the working folder in "mods\gdx1", which would be the following path (assuming you use the above recommended working folder structure):
C:\Program Files (x86)\Steam\steamapps\common\Grim Dawn\Working\mods\gdx1\
If you consider to rather use the default variant, your path should look like this:
C:\Program Files (x86)\Steam\steamapps\common\Grim Dawn\mods\gdx1\
These changes will make the game read both from the main game and the expansion files and merge them into one file structure for both the DBR and the resource import dialogs, so you won’t see any extra “gdx1” folders but instead find the corresponding files in their equivalent folder strucure alongside the normal game files.
Forgotten Gods & Future Expansions
If you have the Forgotten Gods (or any possibly following Expansion), you’ll have to take another additional step in order to be able to use the files from the corresponding expansion.
Just as with the AoM expansion before, you need to set additional Browse Directories and Additional Source Directories for each expansion you want to add to your Asset Manager. All you need to do is add the paths to the expansion files as before with the AoM paths by concatenating the paths with a semicolon (;). The paths need to be in reverse order to their xpack number. This means that if there were 3 xpacks, the order would be PathToXpack3;PathToXpack2;PathToXpack1.
For example if you wanted to add Forgotten Gods files, the default additional browse path to these is the following (assuming you use the working directory variant described earlier):
C:\Program Files (x86)\Steam\steamapps\common\Grim Dawn\gdx2\
If you now want to add the path to your Additional Browse Directories, assuming you already added a path for the AoM files, your path should look like this afterwards:
C:\Program Files (x86)\Steam\steamapps\common\Grim Dawn\gdx2\;C:\Program Files (x86)\Steam\steamapps\common\Grim Dawn\gdx1\;
Also the same goes for the Additional Source Directories, assuming the path to your Forgotten Gods files are at the following location:
C:\Program Files (x86)\Steam\steamapps\common\Grim Dawn\Working\mods\gdx2\
The result would again be a semicolon concatenated path:
C:\Program Files (x86)\Steam\steamapps\common\Grim Dawn\Working\mods\gdx2\;C:\Program Files (x86)\Steam\steamapps\common\Grim Dawn\Working\mods\gdx1\;
Another side note regarding expansions:
The Asset Manager will extract all files from all expansions by default, not matter if the Additional Browse / Source Directories are set or not but it will only display the files correctly in the Import Records window (and also in the World Editor) if the paths are setup correctly.
Now that we set up our directories, there is only one thing left to do: Extract the game files so we can start modding!
To do this, choose Tools -> Extract Game Files in the menu:
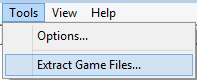
And then locate your Grim Dawn installation folder and select it:

Now press “ok”. You’ll get a warning that you’re about to write the files into your working directory but that’s perfectly fine for our purposes, so you’re going to press “yes”. Now the Asset Manager will be kinda busy for a while as it extracts the entire database and all resource files so you can work easily with it.
Once you did this you’re done setting up your Asset Manager and therefore the most important directories setup! Congrats ![]()
You may wonder now why I only go through the setup of the Asset Manager with you. This is simply because it will suffice for most of the modding tools except for special ones like the PSEditor and I don’t want to confuse you even more than I already do. This will be enough to start out with basic modding and there are more advanced tutorials for these special cases already so there is no need to do it again.