GrimTools
GT after beating MC
(old Spellward Powder)
About stats
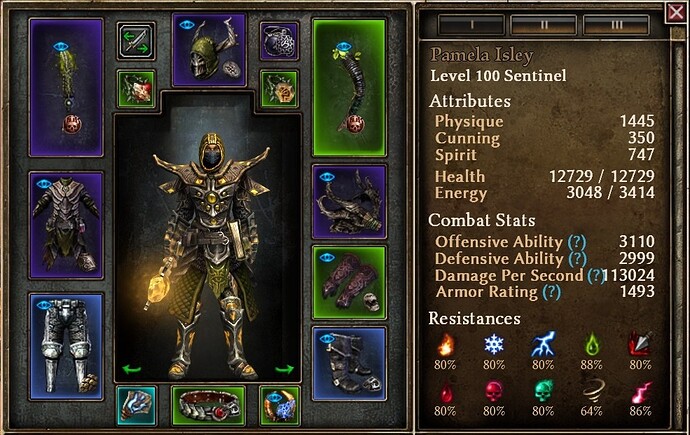
In my first iteration GrimTools I tried to get as much Phys Res as possible to attempt Ravager but it was too tough. I then changed rings, components and augments a bit in the title variant to get some more damage for SR. 12% Phys res loss which was still fine for non-Ravager content though.
I like having high OA to proc the Secrets of the Guardian (was 400% in 1.1.9.1 when I was building instead of current nerfed 200%) and Annihilation on the hardest enemies. It doesn’t go to waste as I have ~140% Crit damage on DEE.
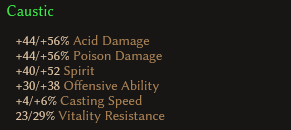
High DA not to be critted. Both Physique and Spirit dump are viable and which you go for depends on the details of your gear. I had a setup with nearly maxed out Casting Speed at some point too - GrimTools (you can see it on one of the rings and on the off-hand). I guess I found it a bit less balanced.
Basic gear info
Note to beginner players
- feel free to use better random not target-farmable items you find along the way, such as build-defining Legendaries,
since you don’t have to limit yourself for the purpose of making a generic guide
-
don’t necessarily try to make an exact copy of my setup / get gear with the same affixes as me
but rather get MIs that benefit you the most, have two useful affixes, are above average-
for or example MIs with Resistances that I have on my augments such as Aether and Elemental (i.e. from Thunderstruck prefix) are useful because you could then use DA / DA+Health armor augments instead.
-
components are flexible to some degree as well and I’m not claiming my setup is the best.
-
I found both Spirit and Physique dump to be viable to balance the stats
-
-
gather / buy / craft multiple
- rings
- off-hands
- gloves
- medals
- belts
and try to make the best setup out of them
Getting gear from Vinelton
- tl;dr - from Vinelton, the vendor from Ancient Grove dungeon. See Unique Merchants of Cairn
The trick is that you can enter this dungeon once. You should have a few millions of Iron Bits beforehand from selling Greens while leveling. Then you reset-farm him efficiently using 2 Movement skills for let’s say an hour. The video below shows how it’s done. I am using a useful macro for rotating the camera by 180 degrees every time I change direction. Btw I had so-called streamer’s luck - after starting recording I immediately got the off-hand with Sandstorm prefix.
Don’t spend so much time looking at the items - I was tired, not in the groove. Also it’s not worth checking out Living Rings imo.
What are we looking for / checking out:
-
Blueprint: Hood of Dreeg from which we later craft the whole Shroud of Dreeg set (see the next paragraph),
Blueprint: Prismatic Diamond just in case and the following potion blueprints:Don’t buy other blueprints to save Iron Bits just in case unless you really have something else in mind.
After getting all the blueprints stop checking them out to reduce the accumulation of mental fatigue and eye strain. -
the following items during every visit
- Leafmane Horn off-hand
- Vine Ring and Creeping Ring
- Basilisk Fang medal
I don’t recommend looking at other items in the process.
Gear details
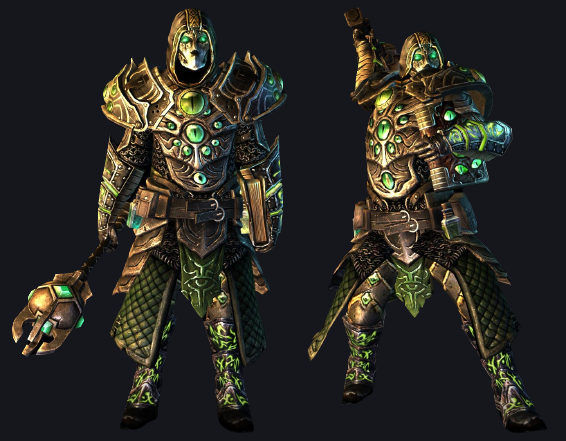
Shroud of Dreeg set

Shroud of Dreeg set - I chose it because it provides
- a lot of skill points to DEE skill line and +2 to other Occultist skills
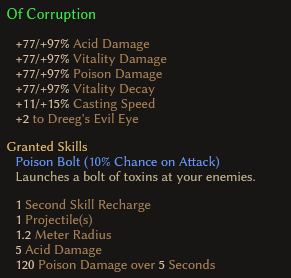
- 50% global Vit → Acid conversion
- in 1.1.9.2 the off-hand got 100% Vit → Acid to DEE but it doesn’t work work on Vile Eruption anyway
(see Secondary Skill Modifiers) so full global conversion is natural and also benefits Sigil and Twin Fangs I use
- in 1.1.9.2 the off-hand got 100% Vit → Acid to DEE but it doesn’t work work on Vile Eruption anyway
- casting speed
- 3 different procs
and spares the time and effort of farming and coming up with non-set items for these slots.
To make the set, you first need to craft Blueprint: Hood of Dreeg 5 times. The cost is not big and doesn’t require additional farming. When the time came for this crafting, I had twice as many rare mats as needed. Just remember that
- you can transmute them into each other, see
 Blacksmiths’ Crafting Materials Exchange Table
- it’s good to kill every Ch’thon Cultist along the way for a good chance of Blood of Ch’thon
- giving 3 of those mats to Anasteria on every difficulty is not needed
Blueprint: Relic - Corruption is required as well but is target-farmed from Hyram (see Unique Merchants of Cairn) together with Blueprint: Relic - Blight which is the relic used in the build.
I believe that I crafted at Angrim for a good chance of somewhat useful crafting bonus on the best hood.
The last step is transmuting the remaining 4 hoods into other pieces of the set.
The cost-efficient procedure is simply to always transmute duplicates with worse stats till you have 5 items for 5 different slots.
You have
- 80% chance to get the 2nd slot / not get a hood
- 60% chance to get the 3rd slot after getting the 2nd slot
- 40% chance to get the 4th slot after getting the 3rd slot
- 20% chance to get the 5th slot after getting the 4th slot
which means that the average number of transmutation needed is 1/80% + 1/60% + 1/40% + 1/20% ~ 10.4
which is also the average cost in Eldritch Essences that you can get from Forgotten Gods DLC, (SR) Quests, Totems etc. I spent possibly too many of them for crafting Movement augments during Main Campaign but still don’t remember this cost to be a big deal.
However I do recommend conserving them because I remember spending less then average.
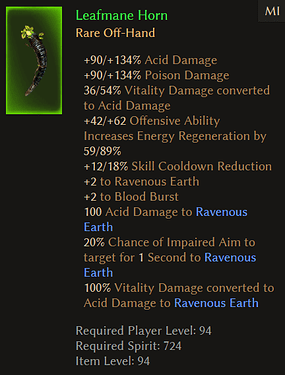
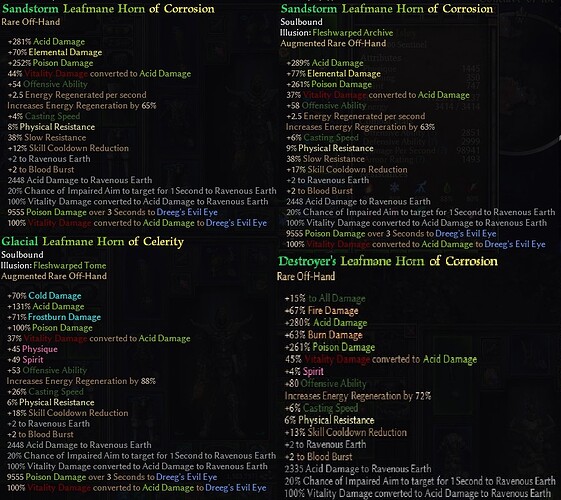
Leafmane Horn off-hand
Update after Sandstorm prefix nerf: Link to post.
Leafmane Horn off-hand
-
gets skill modifiers for DEE in 1.1.9.2
- full Vit → Acid conversion (doesn’t work on Vile Eruption though)
- Poison damage
-
I chose it to reach (close to) full global Vit → Acid conversion with the rest of the gear
-
I decided on Physical Resistance prefix and bought / could buy 4 of those in about 3 hours of Vinelton test-farming
(to get a better feel if it’s a valid method of farming them):
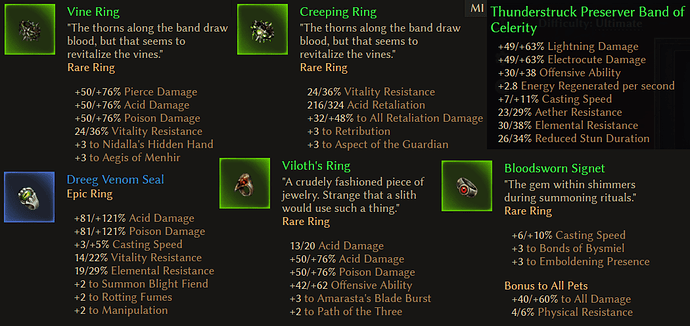
Rings
-
Vine Ring (base w/o affixes)
- from Vinelton
- I used 2 of those (~45 min of farming) to bump up my %Acid damage and other stats in my 2nd and final setup
-
Creeping Ring (base w/o affixes)
- from Vinelton
- a more defensive ring than the one above - 2 of those provide 4% Physical Res and some %Acid damage through +6 to Aspect of the Guardian. 1 provides only 1% Physical Res so I’d say use either 2 or none.
-
Thunderstruck … of Celerity
- an example of a good random drop you may have
-
Dreeg Venom Seal
- a solid ring from the Cult of Dreeg faction
-
Viloth’s Ring (base w/o affixes)
- dropped by a monster called Viloth but farming it is far less efficient than Vinelton and also doesn’t have any native res
-
Bloodsworn Signet (base w/o affixes)
- from Karros Adal, the vendor from Bastion of Chaos dungeon, see Unique Merchants of Cairn
- although the ring can be reset-farmed efficiently, we don’t need anything else from the vendor
When resetting Vinelton I recommend checking both Vine Ring and Creeping Ring because you may miss some crazy affixes. The Vine Rings from my GrimTools I only farmed for about 45 minutes despite testing the vendor for much longer in total because initially I only considered Creeping Rings to maximize Physical Resistance for Ravager but that turned out to be too difficult in the end and I also needed to retweak my whole setup a bit for more %damage to feel better in SR.
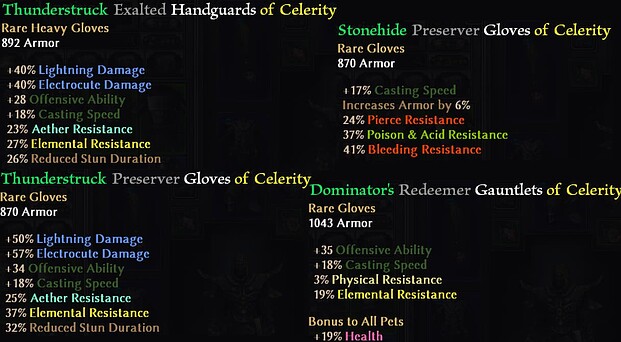
Gloves
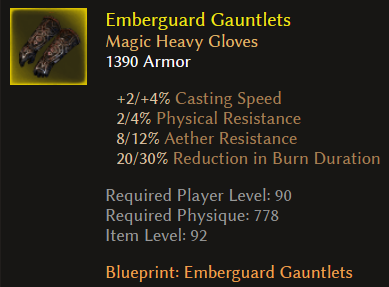
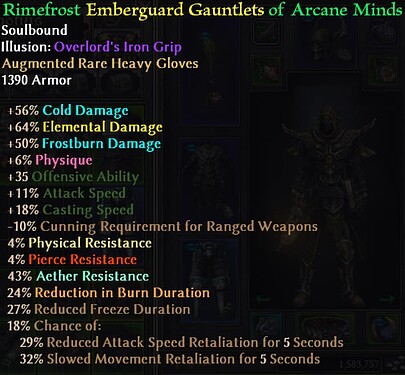
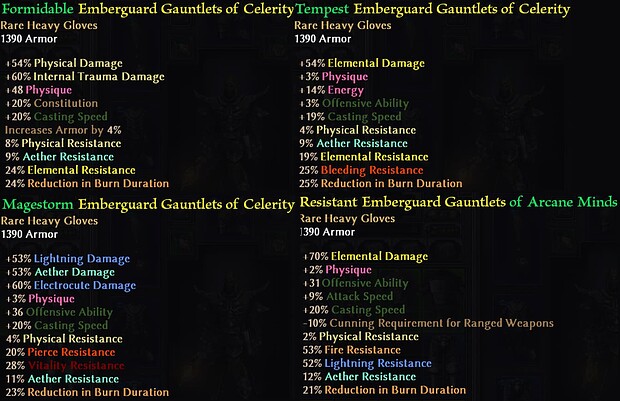
I chose the Emberguard Gauntlets crafting base for Physical Res you can easily max and to spend millions of Iron Bits
I got from selling Greens in Main Campaign. Crafted by Angrim. The following stats are needed:
- around 20% Casting Speed
- 4% Physical res
- other useful stats
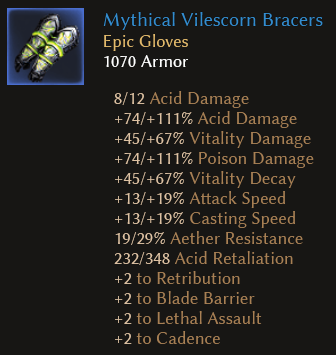
Here are the ones I decided on:
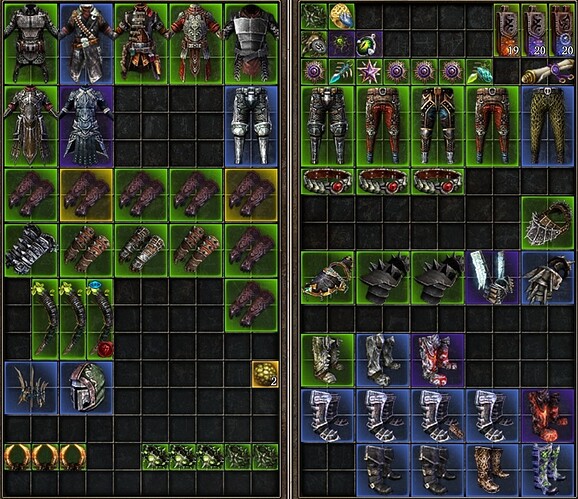
Here are some others I crafted:
And here are some gloves I found in the Main Campaign:
I also found these but 1 pair only so they’re not guaranteed I guess:
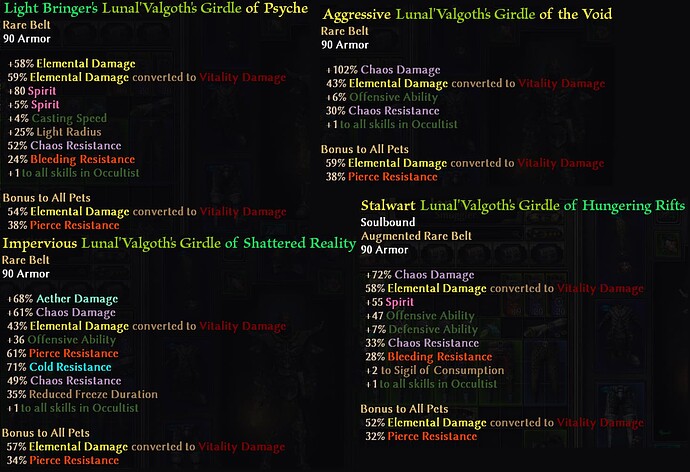
Belt
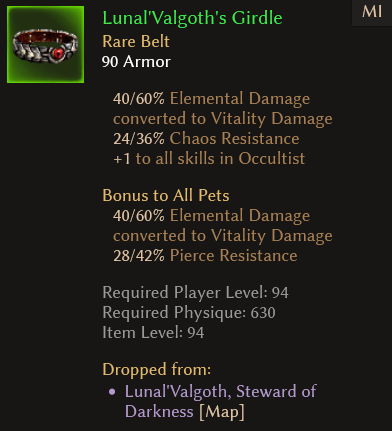
Lunal’Valgoth’s Girdle for +1 to Occultist. There are crafted belts with this property (I used one while leveling) but other than that I don’t like spending time / currency on ultimately gimped belts with only 1 affix and rather farm a MI for a chance of some crazy double rare that might be best in slot for this or other Occultist build.
Also farming the belt is funny because you can sometimes fight Grava on the way.
The following video shows an optimal route (might not be what you expect):
If you still need some blueprints, items (i.e. Valor Pants), iron bits, materials then feel free to search for Treasure Troves, clear Totems, kill Grava along the way. Otherwise you might want to skip all this additional farming because it can make the belt hunt more frustrating, tiring and less rewarding.
I farmed 4 of those in total and I decided on the last one:
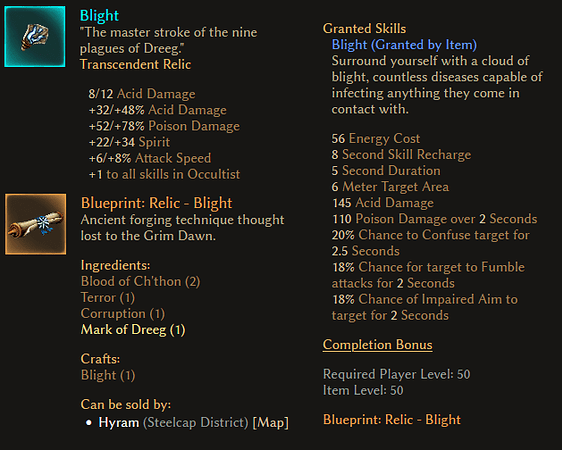
Relic
Blight relic for +1 to Occultist crafted using its Blueprint which can be acquired by reset-farming Hyram.
How to do it efficiently can be seen in the video below. More info about the vendor in Unique Merchants of Cairn.
To make the relic you also need other blueprints. I recommend to make a list beforehand
so that you don’t farm the ones you already have:
- Blueprint: Relic - Corruption (Hyram)
- Blueprint: Relic - Terror (Hyram)
- Blueprint: Relic - Glacier (Hyram)
- Blueprint: Bloody Whetstone (Homested at Respected so no bounties needed)
- Blueprint: Blessed Whetstone (Kymon’s or Order of Death’s Vigil)
- Blueprint: Relic - Mistborn Talisman (Voldrak from Smuggler’s Pass)
- Troll Bonecrusher (Voldrak from Smuggler’s Pass or Benevald)
The Deathstalker relic is not easily target-farmable from what I read.
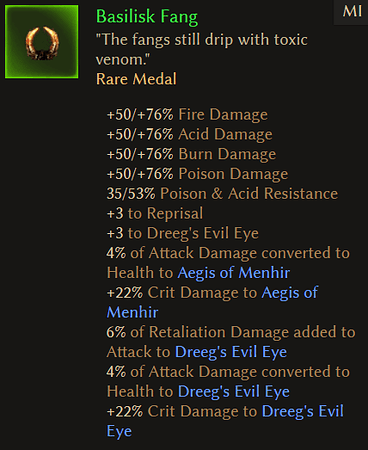
Medal
Basilisk Fang for ADCTH to DEE. Try to get Reduced Stun on either prefix or sufix. Of the Cabal is the most probable.
And use one of the 2.5s charge Movement skills augments for the zoom zoom.
Pants
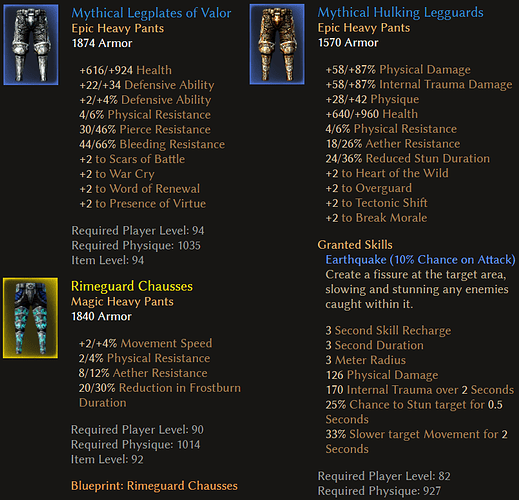
Mythical Legplates of Valor provide a lot of defense and +2 to Presence of Virtue. I’d say it’s debatable whether they are good for SSF since they seem to be quite rare. I found 2 of them but within a short time frame which might have been some RNG quirk.
Other defensive options I thought of:
- Mythical Hulking Legguards
- Rimeguard Chausses (crafted)
Boots
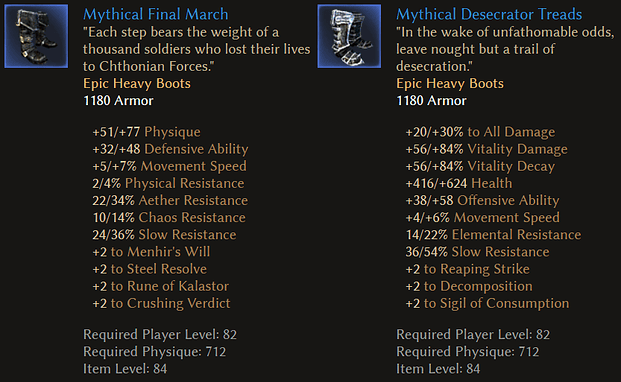
I chose Mythical Final March for Slow Res and other resistances. Mythical Desecrator Treads are not bad either.
Attributes
Warning! In 1.1.9.2 DEE (especially low level) needs less Energy because iirc:
- the base node costs less
- Blood Burst no longer costs Energy; the cost is redistributed to two last nodes
but I leveled it in 1.1.9.1.
For leveling, I eventually needed around 1000 Spirit. In endgame I didn’t need that much, both Spirit and Physique dumps are viable depending the details of your gear (I had two different variants). It’s worth to have more Energy for bosses that have phases, Theodin is the worst in this regard. I didn’t feel Arcane Spark much probably due to Energy Leech scaling with DEE’s low Weapon damage.
In the endgame version of the build you can have more Weapon Damage on DEE thanks to Groble Toxic Effigy (although it’s nerfed in 1.1.9.2) which makes Arcane Spark and Mythical Girdle of Stolen Dreams more efficient in Energy leeching.
Skills order
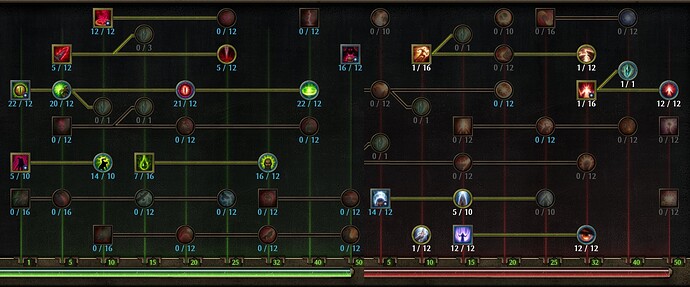
To be honest, the order is not that important. I prioritized damage but feel free to grab Possesion or Ascension earlier if needed.
Step 1 / Level 2
- put 2 points into Dreeg’s Evil Eye
- max out Blood Burst before the main node because it has AoE
- and no Energy cost in 1.1.9.2 which was shifted to the following nodes
- max out Dreeg’s Evil Eye
- put 5 - 6 points into Curse of Frailty and max out Vulnerability
- put points into Oathkeeper mastery and max out Presence of Virtue for Energy Regen and Offensive Ability
- leave it for later if you don’t need Energy Regen, due to 1.1.9.2 changes for example
- put more points into Oathkeeper mastery to grab 1 point in Vire’s Might for mobility
- and 1 point in Resilience but I forgot about it in-game and in the links
- put more points into Occultist and max out Terrifing Gaze
- you can choose to put even more points into Occultist to reach Aspect of the Guardian for Acid Res if needed
- max out Vile Erruption
- I finally have 1 point in Resilience I forgot about before
- and also put 1/1 into Blood of Dreeg line for some Acid Res
- put more points into Oathkeeper mastery to reach Guardians for devotion proccing
- I pulled some points from Terrifying Gaze because I needed Guardians earlier
- max out Aspect of the Guardian and put 1 point into Tectonic Shift to increase Vire’s Might’s range
- I had +4 to Occultist at that point and decided to reach Possession and put 1 point into it
- I also pulled all but 1 point from Terrifing Gaze
- get 12/12 in Sigil of Consumption to proc devotions and leech health
- the off-hand with Vit → Acid global conversion is even more important in 1.1.9.2 due to added modifiers, see Gear details
- take Scion of Dreeg transmuter and max out Celestial Presence
- perhaps it should be taken earlier - before Possession - but I didn’t need damage and was too lazy to move points around
- max out Possession for damage absorption
- max out Ascension and put some points into Haven
- max out Terryfing Gaze and put more points into Haven
-
Clarity of Purpose left for the end but feel free to invest in it earlier for CC resistances
- put 1/1 ponts in Solael’s Witchfire and Second Rite for Vitality res if needed
Devotion
Path optimized for procs access / exp
- Green Crossroad
-
Bat
- bind to Dreeg’s Evil Eye
- –Green Crossroad
-
Ghoul
- bind to Presence of Virtue
- Hawk
-
Manticore
- bind to Dreeg’s Evil Eye
- bind Bat to Curse of Frailty
- Blue Crossroad
- Sailor
-
Murmur
- bind to Guardians (I have it swapped with
Manticore though, see Devotion Bindings)
- bind to Guardians (I have it swapped with
- –Hawk
- Spider
- Raven
- Red Crossroad
- Green Crossroad
-
Tainted Eruption (part of Abomination)
- bind to Curse of Frailty
- bind Bat to Sigil of Consumption
- Hawk
- –Green Crossroad
-
Yugol
- bind to Possession
- Ulzuin’s Torch’s 2 nodes
-
Abomination’s 1 more node
- so that you have all but Abominable Might
Path optimized for length / less respecing
- Green Crossroad
-
Bat
- bind to Dreeg’s Evil Eye
-
Ghoul
- bind to Presence of Virtue
- Raven
-
Manticore
- bind to Dreeg’s Evil Eye
- bind Bat to Curse of Frailty
- Blue Crossroad
- Sailor
-
Murmur
- bind to Guardians (I have it swapped with
Manticore though, see Devotion Bindings)
- bind to Guardians (I have it swapped with
- Spider
- Red Crossroad
-
Tainted Eruption (part of Abomination)
- bind to Curse of Frailty
- bind Bat to Sigil of Consumption
- Hawk
- –Green Crossroad
-
Yugol
- bind to Possession
- Ulzuin’s Torch’s 2 nodes
-
Abomination’s 1 more node
- so that you have all but Abominable Might
Devotion procs bindings
I like having Rumor (Murmur) on Dreeg’s Evil Eye because it last 1s shorter than Acid Spay (Manticore) and has OA debuff.
Guardians often need more time to get into action or lose aggro. Still they are 2nd best and get Acid Spray as a result.
However it’s possible for Guardians to focus on a secondary target in which case you can do one of the following:
-
focus on that target too to kill it quicker / attack targets chosen by Guardians themselves
-
use Pet Attack to make Guardians attack a target of your choice
-
swap Rumor and Acid Spray bindings so that even if Guardians attack a secondary target and proc Rumor on it
it still debuffs the main target since it spreads amongst enemies
Twin Fangs (Bat) is bound to Sigil instead of Curse of Frailty because
-
you can have 2 Sigils at the same time each having a separate chance to proc it
-
Tainted Erruption is great on Curse of Frailty as it’s the first skill you cast after charging into a group of monsters. It explodes immediately and makes monsters disperse which is great for defensive purposes - to not be burst down at the start of the fight.
A very fun binding to have is Tainted Erruption on Guardians because it’s then centered around them and not the player.
Beginner tips
Loot, mats & bits
- Clear all totems along your way to get a lot of stuff and Iron Bits from selling greens, it’s going to be useful later.
- Keep multiple item pieces for every slot with various resistances so that you have a lot of options while making adjustments.
- 2 Vitriolic Gallstones can boost your damage significantly early on.
-
Horrus from Gates of Necropolis can transmute materials into each other, see
 Blacksmiths’ Crafting Materials Exchange.
- Always kill Ch’thon Cultists along the way for a good chance of Blood of Ch’thon.
- Read blueprints that drop from a totem before farming the next one. I’m not sure of this but I read once that the game checks which blueprints the player has already read.
-
I followed the Ugdenbloom route below but not the whole one - I restarted after clearing Undergrowth:
Campaign progression
- In Veteran / Normal progress till you unlock Hyram in Malmouth for a +1 to Occultist relic.
- Skip Forgotten Gods in Veteran / Normal after choosing a faction.
- Skip Ashes of Malmouth and Forgotten Gods in Elite.
Factions & reputation
- Betray Dreeg and side with Solael just after killing Krieg in Veteran / Normal for an early Charge skill to combine with Vire’s Might.
- Side with Kymon’s Chosen in Normal and Elite to get access to and buy a reserve of their Armor Augments.
- Consecrated Silver is useful too for Chaos enemies ahead.
- In Ultimate switch to Death’s Vigil.
-
It can be postponed / not done immediately if you’d like to farm Kymon’s Chosen rep naturally in Ultimate Campaign or while farming Lunal’Valgoth’s Girdle.
-
I filled up the whole Death’s Vigil Honored bar to Revered in an hour. The best (and only) bounties I recommend are the ones in Warden’s Lab due to the amount of Aetherial Heroes and trash mobs there and the ones in Fort Haron.
-
- Side with Anasteria but do NOT give her 3 rare crafting mats on any difficulty - it’s a scam. You’ll max out Outcast’s Secret’s reputation easily anyway.
- Don’t farm bounties on lower difficulties if you can progress smoothly anyway. The higher the difficulty, the more reputation you get.
Gameplay
- Shoot the same targets as your Guardians or use Pet Attack to not waste their RR aura and devotion RR procs.
- Wait till Blight and Ascension skills are off cooldown before activating a totem.
Other
-
You don’t need to grind SR[1-25] on Ultimate to get 3 Skill Points for doing the following quests:
You can reach high SR on Normal and do just SR35 on Ultimate instead.
Leveling gear
Here is a list of useful target-farmable items that can aid you while leveling with their minimal level requirements.
I don’t mention random uniques that might be better.
You can farm Vinelton a bit for low level versions of items before finishing the campaign if needed although I personally didn’t.
More about his items in Basic gear info and Gear Details.
- (1) Pusquill’s Tail
- (5) Rift Scourge Slicer - easy to get with additional casting speed
- (9) Viloth’s Ring
- (12) Groble Toxic Effigy
- (18) Ronaprax’s Sting
- (20) Chosen Raiment - has Vit → Acid conversion but is only available late in Ultimate FG if you skip it on lower difficulties
- (20) Crimson’s Vile Scepter
- (20) Leafmane Horn - from Ugdenbog
- (30) Dreeg-Sect Legguards
- (32) Putrid Necklace - +1 to Occultist is only available on 32+ variants and only in Elite+
- (35 / 50 / 70) Belts froms Rovers faction
- (35 / 70) Chests from Rovers faction
- (40) Wendigo Barb - gets Vit → Acid conversion in 1.1.9.2
- (40 / 70) Harvest Footpads
- (40) Lunal’Valgoth’s Girdle
- (50) Blight
- (75 / 94) Fettan Mask
Leveling journey
Warning! Leveling of this build was done in 1.1.9.1 before various
1.1.9.2 buffs to DEE
-
main nod’s damage increase:
- Acid from 252 to 300 (at 22)
- Poison from 690 to 765 (at 22)
-
fixing Blood Burst not working reliably on main target (?)
-
making DEE proc devotions on multiple targets not only the main one
-
redistribution (and small decrease) of Blood Burst’s energy cost to Terrifying Gaze and Vile Eruption
-
buffs to leveling items:
-
Leafmane Horn off-hand new mods to DEE:
- full Vit → Acid conversion (not working on Vile Eruption)
- Poison damage
-
- Vit → Acid conversion
-
The journey:
Level 24 - vs Krieg
I went to Conclave of the Three for Charge movement skill from Cult of Solael to combine it with Vire’s Might.
Sentinel, Level 24 vs Krieg:
Level 27 - vs Cronley
I bought the following blueprints from Rovers:
-
Restless Remains (crafted and used immediately)
-
Runestone and Rhowari Cord (both for future needs)
Sentinel, Level 27 vs Cronley:
Level 30
-
I started investing in Terrifing Gaze.
-
By using Aether Soul and Runestone I got more Aether Res
and swapped Purified Salt for another Vitriolic Gallstone for more damage.
Level 34 - vs Ravna & Karroz
Sentinel, Level 34 vs Ravna:
-
After that, at level 35, I wore Rhowari Cord, Ronaprax’s Sting and fixed my Chaos resistance.
-
I was planning to use Arcane Spark but I didn’t need Energy that badly so I decided to not spend time on bounties.
-
Thankfully I was able to keep 2 Vitriolic Gallstones: Sentinel, Level 35.
-
I joined Kymon’s Chosen for 2 difficulties.
Sentinel, Level 37 vs Karroz:
Level 46 - vs Loghorrean
-
I bought Harvest Footpads and used Chains of Oleron component.
-
I put 2 skills points in Blood of Dreeg line for more Acid res.
-
I farmed Black Legion to test out Arcane Spark but it didn’t turn out to be that great / mandatory.
Sentinel, Level 46 vs Loghorrean:
Level 53 - Elite preparation
My character after adjusting it for Elite: Sentinel, Level 53
-
Didn’t feel like going to Ancient Grove for MIs.
-
I progressed in Malmouth just to the point where I could buy +1 Occ relic from Hyram
(detailed instruction in Gear Details). -
I moved some points from Terryfing Gaze to Blood of Dreeg for more Acid res.
-
I used Kymon’s Chosen jewellery augments for Chaos res. I didn’t have to farm rep.
-
I got a second 3s charge so mobility became amazing.
Level 55 - Elite Krieg fail & Cronley
Just after starting Elite I got another +2 to Occultist:
- one from Putrid Necklace (in Normal you cannot get that)
- one from some lucky Epic crown
I decided to reach Possession having +4 to Occultist and put 1 point into it.
Krieg was giving me problems because of my 0% Slow res with this 50% Slow debuff.
I was too slow to heal myself through his shotguns even with Ghoul proc.
Ultimate Krieg was a piece of cake though.
Also I got no healing skills / ADCtH to DEE yet. I could have bought good items
from Vinelton at that point but I didn’t want to spend my time / resources on him just yet.
Krieg fail:
No CC res was unplayable so I needed to boost Freeze / Slow resists:
- respecced from Eel to Sailor and equipped some boots with Slow res
- used two Frozen Hearts and Mark of the Traveler
Here’s the result Sentinel, Level 60.
To craft medal augment I needed 1 Eldritch Essence. I got it from 5 levels of SR in Normal. Also 1 Devotion point and a waystone.
Here’s the fight with Elite Cronley:
Level 71 - Ultimate preperation
-
Armor augments from Homestead.
-
I played SR a bit to get 1 Eldritch Essence for crafting movement skill augment.
Level 75 - vs Ultimate Krieg
I found useful Epic helm (with +1 to Occultist) and chest (with Aether res for better overcap) pieces.
If it weren’t for that I could go for Fettan Mask.
Sentinel, Level 75 vs Ultimate Krieg:
Level 83 - vs Ultimate Loghorrean
I had some Energy problems.
Sentinel, Level 83 vs Ultimate Loghorrean:
Level 86
Sentinel, Level 86
I improved my stats by wearing better gear:
- 700 armor (when multiplied by absorption)
- 300 OA
- 200 DA
- 2000 Health
- maxed out Casting Speed
Level 97 - vs Korvaak
Sentinel, Level 97
No video because it was not pretty, needed focus and took me a few tries.
Perhaps I should have improved my setup to final beginner gear before the fight.
Or maybe I’m just not experienced with Korvaak. I kited him very carefully.
Post-leveling
Here’s how I made the final setup:
-
I farmed Lunal’Valgoth’s Girdle - more info (i.e. optimal route) in Gear details.
- I had bad luck initially - a few +1 Necro belts in a row.
- I farmed 4 belts in total I believe.
- I needed to go back to get Skeleton Key blueprint from Kalderos quest line in Old Arcovia.
- I farmed Vinelton - more info (i.e. how to reset him) in Basic gear info.
- It’s quite satisfying since you have access to so many instances of various gear pieces.
-
I crafted the Shroud of Dreeg set - more info (i.e. calculation of the average number of transmutations needed) in Gear details.
-
I wanted to maximize Elemental Res and Casting Speed on the helmet as it needs to be crafted 5 times.
For that reason I chose Angrim to be my blacksmith as all 3 of his crafting bonuses are somewhat useful. -
I exchanged 13 Ancient Hearts for Bloods of Ch’thon (35 for crafting 5 Helmets).
-
Horrus from Gates of Necropolis can transmute materials into each other,
see Blacksmiths’ Crafting Materials Exchange.
-
Horrus from Gates of Necropolis can transmute materials into each other,
-
The chest had low 23% conversion from Vit → Acid but fortunately one helm transmuted into a better one.
-
I think I was lucky - I needed 7 transmutations which is below average. Stats were decent too.
-
- I crafted Emberguard Gauntlets - more info in Gear details.
-
I noticed that I still didn’t have Seal of Annihilation so I decided to farm totems for it. But which totems to farm?
-
I decided to combine totem farming with Ugdenbloom farming (~150 needed). See Beginner Tips for a good route.
-
After farming 147 Blooms I still didn’t have Seal of Annihilation so I decided to farm FG totems to farm reputation by killing their monsters. I farmed the totem near Korvan City Rift and killed everything there (also entering the Tomb of Nephos because there’s a treasure trove there and a chance for an additional totem). Then I teleported to Infernal Waste and went through Tomb of Sethan and back again to overground. After that I restarted. In retrospect I don’t think I needed this rep and FG totems are the more difficult ones. I found the seal blueprint quite quickly, before getting into the grove of totem farming.
- I farmed some Royal Jelly.
- I crafted even more Emberguard Gauntlets since I got another 2 mils from all this farming and green selling.
I needed to dismantle some low level uniques for Scrap.
- I started to put on my gear but I then realized I got no Aether Crystals so I farmed them (250) with scuffed unfinished gear setup.
Btw it’s better to farm them from Coven’s Refugy because you then don’t have to scroll the map to Warden’s Laboratory Rift.
- Then I realized I got no Living Armor blueprint yet so I went back to totem farming.
-
It turned out I didn’t even need FG rep but I should have farmed Death’s Vigil rep instead while doing Totems.
-
However farming rep from bounties on Ultimate seems to be pretty fast, I filled up full Honored Bar to Revered for Death’s Vigil in an hour. I think the best place for it are bounties in Warden’s Lab due to the number of Aetherial Heroes there and trash mobs. Fort Haron is 2nd best.
-
Next I did SR Shards 1 - 15 on Normal in an hour. 20 - 35 also in an hour.
-
After doing 35th Shard on Ultimate I could have tried some bosses but I wanted to get some 2.5s recharge charge augment.
-
The game crashed for the first time in my career at 72 SR Normal, fortunately I could go back to 70.
-
I farmed 75/76 for a better movement skill and got Violent Delight.
- I changed my setup a bit to be more damaging. Also
 buffed DEE in the meantime.
I needed to farm Witch God reps for different augments.
- I grinded all levels of Crucible, got to 170 a couple times but two Reapers were not comfortable to fight with.
- I farmed some potion blueprints at Port Valbury.
- I got the last skill and attribute points.
Video proofs
Warning! Tested before the nerf of Physical Resistance on some off-hand prefixes.
Non-ssf bonus
Warning! Tested before the following nerfs
- Physical Resistance on the off-hand prefix
- weapon damage to DEE on the off-hand
GrimTools
Since my SSF build couldn’t beat Ravager I thought I’ll try non-SSF tankier DEE built in a similar style. The goal was to facetank him but I only managed to do that in the 1st phase. Perhaps it could be easier on Witch Hunter because it can get more Phys Res due to items and skills. Or with Scales of Ulcama constellation.
Sigil appearance was modded here to look cooler, Acid-like.
Mods and tools
I’m a tool enthusiast and this is what I use:
-
https://www.grimtools.com/
-
Calculator (Planner) to test item / augment changes while leveling
-
World Map displayed on my TV not to miss any secrets
-
Checklist - didn’t use it but I should have to check if I did all important quests
-
Item Database to find best items
-
Monster Database to prepare for bosses
-
- [Tool] Grim Dawn Item Assistant because I detest limited stash and quit games because of that
-
[Tool] Grim Internals for
-
being able to make cool screenshots such as those at the edges of this guide
-
debuff icons on enemies
-
auto-pick up of greens which normally takes a lot of time after conquering totems
-
visual and sound notifications about being nullified which I otherwise often missed
-
display of health / energy potions cooldowns
-
fixing time of the day
-
removal of fog which makes the game look better
-
- [Tool] Rainbow Filter (Item Highlighting) for making item stats more readable
-
mods:
-
Sigil appearance was modded to look cooler, Acid-like, but only in non-ssf video
because the game was constantly being updated and this change overwritten -
removal of Blood of Dreeg sound - I don’t like it
-
- camera hack - for improving Rotate Left / Right Camera rotation because it’s otherwise very slow
- YoloMouse for having bigger and more visible cursor
-
[Tool] GDAutocaster - play 🎹 builds with ease, autocasting of skills, combos, faster / automatic camera, autohiding of items, centered Inquisitor Seal and more for all games! to reduce number of buttons I need to press
-
The non-software alternative is shown below. You can put Sigil, Ascension, Blood of Dreeg, Blight, Pet Attack under an ice stick as all these abilities don’t interrupt each other and mash the ice stick while holding DEE button, RMB for example.

-
![]()
credit to RektbyProtoss, Ulvar, Nery and Stupid Dragon for general info on the game
Crate for buffs to the skill, grey_maybe for tests and feedback on various DEE builds
Let me know if you are using this guide and having some problems along the way.







 :
: